
Popular categories
Looking for a yarn?


Comments / Questions (89)
![]() Eva wrote:
Eva wrote:
De har no retta vidda under armane i str 9/10 år til 41 cm og til 46 cm i str 11/12 år. Kan det stemme, at det er så stor forskjell mellom akkurat desse to størrelsane?
20.10.2020 - 22:50DROPS Design answered:
Hej Eva, næststørste størrelse havde en trykfejl, nu er det rettet. God fornøjelse!
22.10.2020 - 11:54
![]() Eva wrote:
Eva wrote:
Eg lurar på det same som Kari skriv i spm av 12.10.2020
19.10.2020 - 19:41DROPS Design answered:
Hej Eva, jo det stemmer, vi skal se på det :)
20.10.2020 - 08:32
![]() Kari wrote:
Kari wrote:
I alle størrelser skal man felle til sammen 20 masker, når man strikker bolen. Da kan umulig tegningen vise rette mål. Der står det at det er kun 1 cm forskjell i vidde under armene i forhold til vrangborden nederst. Hva er rette mål (vidde) under armene?
12.10.2020 - 17:37DROPS Design answered:
Hej Kari, jo det stemmer, vi skal se på målene i måleskitsen :)
20.10.2020 - 08:33
![]() Pip wrote:
Pip wrote:
Hi there, I'm having a problem after I've knitted the elevation in back of neck. I've worked the 64 stitches and turned, however when I work 1 round - where I turned I knit the stitch where I've turned it makes quite a hole in the row below. I have re- knitted this many times and about ready to give up so would really appreciate your help. Many thanks Pip
16.09.2020 - 11:04DROPS Design answered:
Hi Pip, Have you tried knitting in the back of the stitch? This will twist the stitch and prevent you leaving a hole. It is also important to tighten the strand at the end of each short row before turning. Hope this helps and happy knitting!
16.09.2020 - 11:19
![]() Solange wrote:
Solange wrote:
Bonjour Si je fait ce modele en cote perlée est que la quantité de laine change? Merci
29.04.2020 - 17:36DROPS Design answered:
Bonjour Solange, fort probablement, en fonction du point employé, la quantité peut varier. Vous pouvez tricoter un échantillon dans les 2 points et les peser ou bien mesurer la longueur de fil utilisée dans les 2 pour recalculer la quantité nécessaire. Votre magasin saura vous apporter toute l'assistance nécessaire, même par mail ou téléphone. Bon tricot!
30.04.2020 - 09:50
![]() Anna wrote:
Anna wrote:
è possibile fare questo modello con i ferri dritti ? Non so usare i ferri circolari e ho 3 nipotine alle quali vorrei fare questo maglioncino che trovo molto bello. perchè non proponete anche modelli da lavorare con ferri dritti ? grazie
03.04.2020 - 20:40DROPS Design answered:
Buongiorno Anna. Purtroppo in questa sede non riusciamo a rielaborare le spiegazioni per trasformare questo modello in un modello per ferri tradizionali. In base alla sua esperienza può provare a individuare il numero delle maglie per le singole parti e poi unirle. Il suo rivenditore Drops può aiutarla. Buon lavoro!
04.04.2020 - 08:27
![]() Bjørg Haarseth wrote:
Bjørg Haarseth wrote:
Hei Mønsteret, Paulina, jeg fikk i butikken stemmer heller ikke med mønsteret her. Jeg går ut fra min oppdkrift:Ermer 14 m + økn = 52m. Forst. og rygg: 30 m + øk = 68m. Tilsm 52+52+68+68= 240 m. Det stemmer med oppskriften, men de 8 m i raglanfellingen er ikke med. Så når jeg har tatt ermene over på tråd og lagt til 16 m har jeg 160 m , ikke 152 som i min oppskrift . Skal jeg bare fortsette med 8m for mye. Vennlig hilsen Bjørg
11.02.2020 - 20:31
![]() REINE MARIE wrote:
REINE MARIE wrote:
BONJOUR TOUT D ABORD JOYEUX NOEL.COMMENT ET A PARTIR D OU MESURE T ON LA MANCHE ?ES CE QUE C EST A PARTIR DES EPAULES OU ALORS AU 8MAILLES MONTEES A L EMMANCHURE MERCI A L AVANCE JE SUIS PERDUE LA
24.12.2019 - 11:55DROPS Design answered:
Bonjour Mme Reine Marie! Il faut mesurer la manche a partir de 8 mailles montees (au milieu sous la manche). Bon tricot!
30.12.2019 - 11:41
![]() REINE MARIE wrote:
REINE MARIE wrote:
BONJOUR VOILA J AI COMPRIS HIER LORSQUE J AI TOUT REDEFAIT CAR JE VOULAIS VRAIMENT PARFAIT ET J AI REFAIT ET CA FAIT BIEN .JE VOUS REMERCIE DE LA RAPIDITE DE VOTRE REPONSE IL ME RESTE LE BAS DU PULL ET LES MANCHES MAIS IL EST MAGNIFIQUE AVEC CE POINT FANTAISIE BLE.MERCI EN VOUS SOUHAITANT D EXCELLENTES FETES NOEL ET BOUT D AN
16.12.2019 - 15:21
![]() REINE MARIE wrote:
REINE MARIE wrote:
JE FAIS LES MAILLES A L ENDROIT TORSE MAIS IL PARAIT UN JOUR DANS LES PREMIERES AUGMENTATIONS QUE D UN COTE SEULEMENT .MERCI DE VOTRE REPONSE
14.12.2019 - 22:09DROPS Design answered:
Bonjour Reine Marie, comme suggéré auparavant, essayez de ne pas faire des jetés trop lâches pour éviter qu'ils ne soient trop visibles. Votre magasin aura probablement d'autres astuces pour vous, n'hésitez pas à le contacter, même par mail ou téléphone. Bon tricot!
16.12.2019 - 08:16
|
|||||||
Paulina#paulinasweater |
|||||||
|
|
|||||||
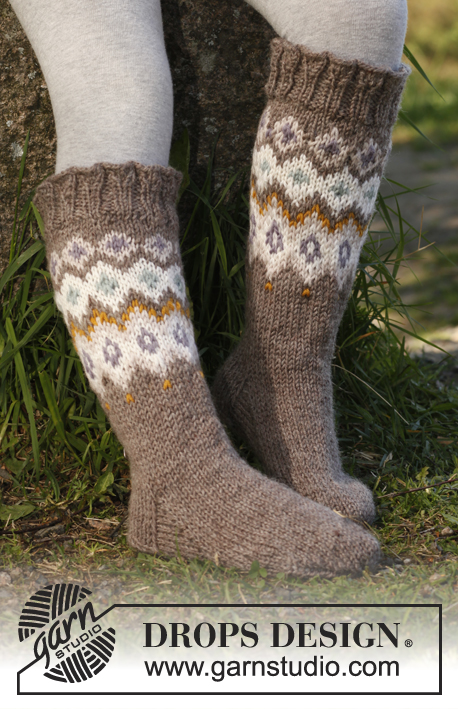
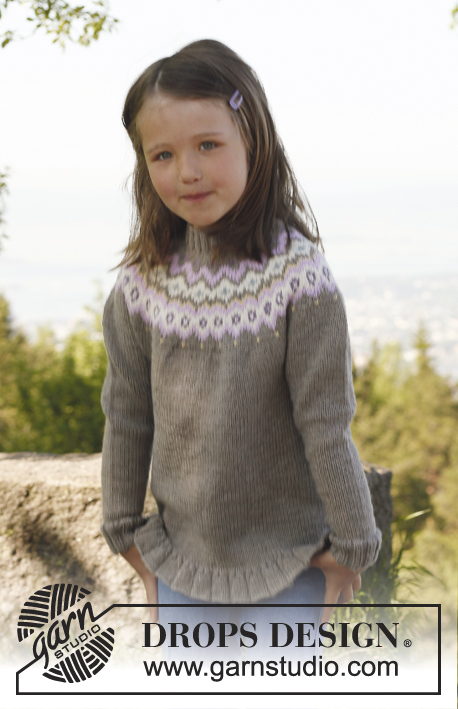
Knitted jumper with raglan, worked top down in DROPS Merino Extra Fine. Size children 3 to 12 years.
DROPS Children 23-7 |
|||||||
|
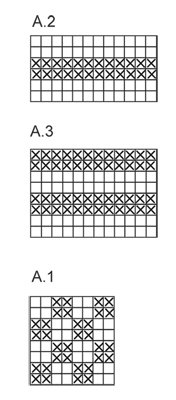
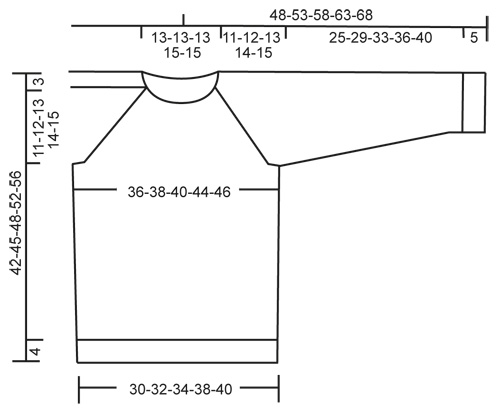
INCREASE TIP (applies to raglan): Work until 1 st remain before marker: Make 1 YO, K 2 sts (marker is in the middle of these sts), make 1 YO. On next round K YOs twisted (i.e. work in back loop of st instead of front) to avoid holes. Work the inc sts in the pattern. PATTERN: See diagrams A.1, A.2 and A.3. Diagrams show pattern from RS. DECREASE TIP (applies to body and sleeves): Work until 2 sts remain before marker, K 2 tog, marker, and K 2 twisted tog (i.e. work in back loop of st instead of front). -------------------------------------------------------- JUMPER: Worked in the round, top down. YOKE: Cast on 84-84-84-92-92 sts on a short circular needle size 3 mm with Merino Extra Fine. Insert a marker at beg of round (= mid back). K 1 round. Then work rib = K 2/P 2 for 3 cm. Then work an elevation in back of neck as follows (continue in rib): Work 8 sts past marker, turn, tighten thread and work 16 sts back, turn, tighten thread and work 24 sts, turn, continue by working 8 sts more on every turn until a total of 64 sts have been worked, turn and work 1 round until marker mid back again. READ ALL OF THE FOLLOWING SECTION BEFORE CONTINUING! Switch to circular needle size 4 mm and work 1 round in stocking st while at the same time inc 4 sts evenly = 88-88-88-96-96 sts. Now insert 4 new markers (for raglan) as follows: Work 15-15-15-17-17 sts from marker mid back, insert 1st marker here (at the same time remove marker mid back), work 14 sts more (= sleeve), insert 2nd marker, work 30-30-30-34-34 sts (= front piece) and insert 3rd marker, work 14 sts (= sleeve), insert 4th marker and work until 1st marker again (there are 30-30-30-34-34 sts between markers on back piece). Work A-1, AT THE SAME TIME on 1st round, inc 1 st on each side of the 4 markers for raglan (= 8 inc) - SEE INCREASE TIP! Repeat inc every round 7-7-9-10-11 more times and then every other round 11-13-13-14-15 times = 240-256-272-296-312 sts on needle. AT THE SAME TIME when piece measures 8-8-8-9-9 cm from mid front, work A.2 1 time vertically, then work A.1 again. After all inc, work next round as follows: Work until 1st marker. Slip the 52-56-60-64-68 sts between 1st and 2nd marker on a stitch holder, cast on 8 new sts over stitch holder, work until 3rd marker, slip the 52-56-60-64-68 sts between 3rd and 4th marker on a stitch holder, cast on 8 new sts over stitch holder, work until 1st marker again = 152-160-168-184-192 sts on needle. BODY: Continue in A.1 – AT THE SAME TIME insert a marker in the middle of the 8 new sts in each side. When piece measures 3 cm from where sleeve sts were put on a stitch holder, work A-3 1 time vertically, then continue in stocking st. AT THE SAME TIME when 4 cm have been worked from where sleeve sts were slipped on a stitch holder, dec 1 st on each side of the markers in the sides – SEE DECREASE TIP! Repeat dec every 3-4-4-5-5 cm 4 more times = 132-140-148-164-172 sts. Continue to work until piece measures 38-41-44-48-52 cm from shoulder. Work 1 round while AT THE SAME TIME inc 4 sts evenly = 136-144-152-168-176 sts. Switch to circular needle size 3 mm and work rib = K 2/P 2 for 4 cm. LOOSELY cast off with K over K and P over P. Piece measures approx. 42-45-48-52-56 cm from shoulder. SLEEVE: Slip sts from one stitch holder on double pointed needles size 4 mm and in addition cast on 8 new sts under sleeve = 60-64-68-72-76 sts. Insert a marker mid under sleeve (i.e. in the middle of the 8 new sts). NOW MEASURE PIECE FROM HERE! Continue with A.1 until piece measures 3 cm from marker, now work A.3 1 time vertically, then work in stocking st. AT THE SAME TIME when 1 cm of A.3 has been worked, dec 1 st on each side of marker – SEE DECREASE TIP! Repeat dec every 4-3-4-4-3½ cm 5-7-7-7-9 more times = 48-48-52-56-56 sts. Continue to work until sleeve measures 25-29-33-36-40 cm. Switch to double pointed needles size 3 mm and work rib = K 2/P 2 for 5 cm. Then LOOSELY cast off with K over K and P over P. Work the other sleeve the same way. ASSEMBLY: Sew the openings under the sleeves. |
|||||||
Diagram explanations |
|||||||
|
|||||||
 |
|||||||
 |
|||||||
Have you finished this pattern?Tag your pictures with #dropspattern #paulinasweater or submit them to the #dropsfan gallery. Do you need help with this pattern?You'll find 12 tutorial videos, a Comments/Questions area and more by visiting the pattern on garnstudio.com. © 1982-2026 DROPS Design A/S. We reserve all rights. This document, including all its sub-sections, has copyrights. Read more about what you can do with our patterns at the bottom of each pattern on our site. |
|||||||


With over 40 years in knitting and crochet design, DROPS Design offers one of the most extensive collections of free patterns on the internet - translated to 17 languages. As of today we count 324 catalogues and 12290 patterns translated into English (UK/cm).
We work hard to bring you the best knitting and crochet have to offer, inspiration and advice as well as great quality yarns at incredible prices! Would you like to use our patterns for other than personal use? You can read what you are allowed to do in the Copyright text at the bottom of all our patterns. Happy crafting!
Post a comment to pattern DROPS Children 23-7
We would love to hear what you have to say about this pattern!
If you want to leave a question, please make sure you select the correct category in the form below, to speed up the answering process. Required fields are marked *.