
Popular categories
Looking for a yarn?


Comments / Questions (22)
![]() Riedel wrote:
Riedel wrote:
I'm knitting the sleeves. It says: When piece measures 7 cm, inc 1 st on each side of marker mid under sleeve. Does this includes the first 6 cm, or 7 cm in stocking stitch? Thank you.
23.10.2025 - 10:03DROPS Design answered:
Dear Riedel, it is measured from the cast on (otherwise it would mention the point you should measure it from. I hope this helps. Happy Knitting!
23.10.2025 - 10:58
![]() Riedel wrote:
Riedel wrote:
Ik heb een vraag over de hoogte voor de eerste meerdering bij de mouwen. Deze meerdering wordt gedaan bij 7 cm. Is dit inclusief het boord van 6 cm of alleen 7 cm tricotsteek? Alvast bedankt!
22.10.2025 - 23:08DROPS Design answered:
Dag Riedel,
Dit is 7 cm hoogte in totaal, dus vanaf het opzetten.
23.10.2025 - 17:48
![]() Ingegerd Tornegård wrote:
Ingegerd Tornegård wrote:
Vill sticka denna i enfärgat M. Hur mycket garn behövs då?
21.10.2024 - 15:46DROPS Design answered:
Hej Ingegerd, du sparer nok 1 nøgle hvis du strikker den ensfarvet :)
22.10.2024 - 15:46
![]() Paola Pedroni Kaune wrote:
Paola Pedroni Kaune wrote:
He desarmado 2 veces las mangas, el rebaje de las mangas no coincide con el rebaje del cuerpo, me faltan como 10 centimetros en el contorno de la manga para poder coserlo al cuerpo. No sé si pueden aconsejarme algo, por el momento me iré probando y añadiendo filas a la labor, hasta que coincidan ambas partes. Muy lindo modelo, lamentablemente me encontré con este problema, Saludos
02.06.2022 - 00:13DROPS Design answered:
Hola Paola, debido al patrón de jacquard, es posible que esta parte quede más tensa y que el ancho sea menor de lo recomendado por el patrón. En este caso, lo recomendable es aumentar cada menor número de filas (es decir, trabajar más aumentos) para tener más puntos/ más cm al llegar al largo final de la manga y que se pueda coser al cuerpo.
04.06.2022 - 19:03
![]() Carlin wrote:
Carlin wrote:
Patroon graag in Nederlands
29.12.2021 - 11:34
![]() Rosy wrote:
Rosy wrote:
Buonasera. Grazie per aver risposto ma non capisco...il ferro 5in blu lo lascio al diritto e il rovescio lo faccio in grigio. Come posso poi ripartire con il blu al diritto se l ho lasciato al rovescio? E cosi anche per aktri ferri. Come il 12 con il 14 ad esempio....confido in aiuto
24.10.2021 - 20:37DROPS Design answered:
Buongiorno Rosy, ha due possibilità: o si porta il filo blu sul rovescio del lavoro, intrecciandolo ogni 2 o 3 maglie, mentre lavora con il grigio, ma rischia di vedersi sul diritto del lavoro, oppure lavora con tanti gomitolini di filato che può lasciare ai lati del lavoro. Buon lavoro!
20.11.2021 - 12:07
![]() Rosy wrote:
Rosy wrote:
Come devo fare al giro 4, 5, 6, con il bordo in blu? Devo avere due gomitoli per i bordi e uno per lo schema? Grazie
22.10.2021 - 21:17DROPS Design answered:
Buonasera Rosy, o continua a portarsi il colore blu lungo il lavoro oppure si, deve utilizzare 2 gomitoli di blu. Buon lavoro!
24.10.2021 - 20:07
![]() Kerstin wrote:
Kerstin wrote:
Hallo, ich benötige dringend Hilfe.....Ich habe den Ärmel gestrickt, habe Ai fast beendet und habe die benötigte Maschenzahl erreicht. Ich habe aber große Bedenken, das der Ärmel viel zu eng ist, wenn ich ihn nach Anleitung stricke. Das vorgegebene Armloch ist viel zu groß für den engen Ärmel. Kann man den Ärmel bei diesem Modell auch direkt anstricken? Wie müsste ich dann abnehmen? Hoffentlich kann mir jemand helfen🙏
30.01.2021 - 20:14DROPS Design answered:
Liebe Kerstin, sollte Ihre Maschenprobe stimmen, dann sollte die Ärmel auch so passen. -siehe auch Maßen in der Maßskizze. Leider können wir nicht jede Anleitung nach jeder individuellen Anfrage anpassen aber sicher kann Ihnen Ihr DROPS Laden damit helfen - auch telefonisch oder per E-Mail. Viel Spaß beim stricken!
01.02.2021 - 09:08
![]() Sawnuy wrote:
Sawnuy wrote:
Sehrgeehrte Damen und Herren, Ich habe diese Anleitung schön 3 Jacke gestrickt. 2 Jacke mit Alaska und eine Jacke mit Nepal. Sie sind sehr sehr schön.. Und jetzt stricken ich die 4. Jacke. Aber ich habe wieder vergessen.. Was bedeutet das?: ( , A-1 bis noch 15 M. zu stricken sind, 1. M. in A-1 (damit das Muster vorne überein stimmt), ) Vielen Dank für ihre Hilfe... Mit freundlichen Grüßen Sawnuy
05.06.2019 - 20:11DROPS Design answered:
Liebe Sawnuy, damit das Muster symetrisch wird, muss man am Ende der Hinreihe der ersten Masche in M.1 noch stricken, dann die 14 Blendemaschen - bein den Rückreihen stricken Sie die erste Masche in M.1 dann lesen Sie M.1 links nach rechts. Viel Spaß beim stricken!
06.06.2019 - 09:50
![]() Sawnuy wrote:
Sawnuy wrote:
Hallo,kann ich diese Jacke mit Drops Nepal auch stricken? Ich habe schon 2 Jacke mit Alaska gestrickt..Sie sind sehr schön.... und ich möchte nochmal diese Jacke stricken aber mit anderen Drops . Mit freundlichen Grüßen
13.10.2018 - 16:52DROPS Design answered:
Liebe Sawnuy, DROPS Nepal und Alaska gehören beide der Garngruppe C, so können Sie Nepal auch hier benutzen - Hier lesen Sie mehr über die Wahl der Garne, hier lesen Sie mehr über Garnalternativen - den Garnumrechner können Sie gerne benutzen. Viel Spaß beim stricken!
15.10.2018 - 08:55
|
||||||||||
Blue Mountain#bluemountainjacket |
||||||||||
|
|
||||||||||
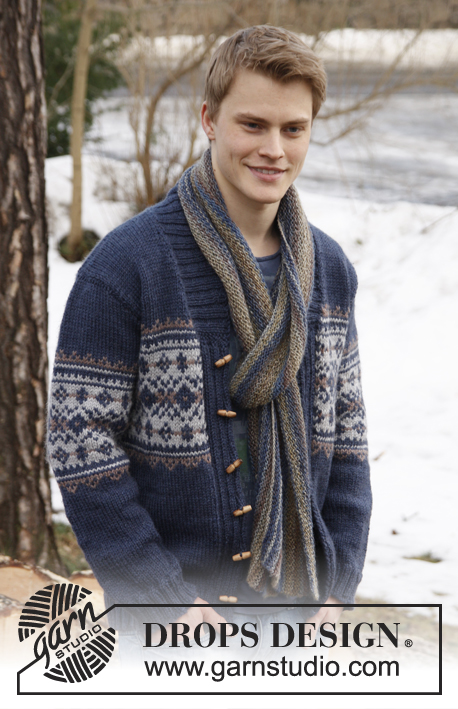
Knitted DROPS jacket with pattern and shawl collar in ”Alaska”. Size: S - XXXL.
DROPS Extra 0-817 |
||||||||||
|
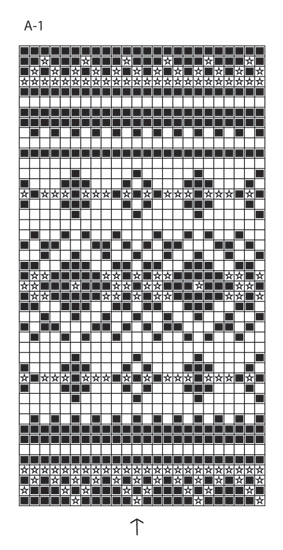
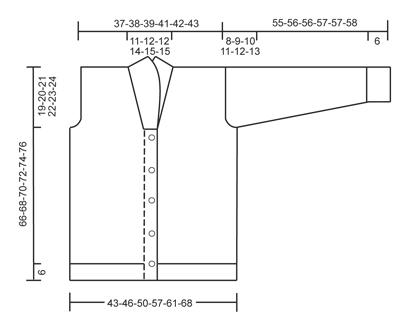
GARTER ST (back and forth on needle): K all rows. BUTTON HOLES: Cast off for 6 button holes on right band, all cast offs are done from RS. 1 button hole = P tog 5th and 6th st from mid front and make 1 YO. On next row K the YO. Cast off for button holes when piece measures: SIZE S: 6, 14, 22, 30, 38 and 46 cm. SIZE M: 6, 15, 23, 31, 39 and 47 cm. SIZE L: 6, 15, 24, 32, 40 and 48 cm. SIZE XL: 6, 15, 24, 33, 41 and 49 cm. SIZE XXL: 6, 15, 24, 33, 42 and 50 cm. SIZE XXXL: 6, 15, 24, 33, 42 and 51 cm. PATTERN: See diagram A-1 – the diagram shows 2 repetitions in breadth. Work entire pattern in stocking st. DECREASE TIP (applies to neckline at the front): Dec inside 1 edge st in garter st. All dec are done from RS. Dec after 1 edge st as follows: Slip 1 st as if to K, K 1, psso. Dec before 1 edge st as follows: K 2 tog. -------------------------------------------------------- BODY: Worked back and forth on circular needle from mid front. Cast on 210-226-242-270-286-314 sts on circular needle size 4 mm with dark blue Alaska. P 1 row from WS. Then work next row as follows from RS: 2 edge sts in GARTER ST - see explanation above - * K 2/P 2 *, repeat from *-* until 4 sts remain and finish with K 2 and 2 edge sts in GARTER ST. Continue rib like this until piece measures 6 cm. AT THE SAME TIME when piece measures 6 cm, beg to cast off for BUTTON HOLES on right band – see explanation above! After rib, switch to circular needle size 5 mm and work next row from RS as follows: 2 sts in garter st, K 2, P 2, K 2, P 2, K 2, P 2 (= 14 band sts), work in stocking st until 14 sts remain while AT THE SAME TIME dec 49-53-57-61-65-69 sts evenly (do not dec over bands), finish with P 2, K 2, P 2, K 2, P 2, K 2 and 2 sts in garter st = 161-173-185-209-221-245 sts. Insert a marker 44-47-50-56-59-65 sts in from each side (= 73-79-85-97-103-115 sts between markers on back piece). Move the markers upwards when working. Then work in stocking st with 14 band sts in each side towards mid front as before. REMEMBER THE KNITTING TENSION! When piece measures 30-31-32-33-34-35 cm, work A-1 as follows: Work 14 band sts as before with dark blue, work A-1 until 15 sts remain, work 1st st in A-1 (so that pattern beg and ends the same way on each side of band) and finish with 14 band sts in dark blue as before. When piece measures 47-48-49-50-51-52 cm, work next row from RS as follows: Cast off the first 13 sts, insert a marker (this marks where to beg the knit up for collar), work the rest of row. Turn and cast off the first 13 sts, insert a marker (this marks where to end the knit up for collar), work the rest of row = 135-147-159-183-195-219 sts. Now divide the piece at the markers in the sides and finish each part separately. BACK PIECE: = 73-79-85-97-103-115 sts. Continue A-1 (when A-1 has been worked 1 time vertically, continue with dark blue until finished measurements) – AT THE SAME TIME cast off for armholes at beg of every row in each side: 3 sts 0-1-2-2-3-4 times, 2 sts 1-1-1-3-3-4 times and 1 st 3-2-1-2-1-1 times = 63-65-67-69-71-73 sts remain on needle. When piece measures 64-66-68-70-72-74 cm, cast off the middle 17-19-19-21-23-23 sts for neck. Now finish each shoulder separately. Continue to cast off 1 st on next row from neck = 22-22-23-23-23-24 sts remain on the shoulder. Cast off when piece measures 66-68-70-72-74-76 cm. RIGHT FRONT PIECE: = 31-34-37-43-46-52 sts. Continue A-1 as on back piece with 1 edge st in garter st towards mid front - AT THE SAME TIME cast off for armhole in the side as on back piece. AT THE SAME TIME when piece measures 48-49-50-51-52-53 cm, dec 1 st towards the neck - SEE DECREASE TIP! Repeat dec on every 4th row a total of 2-2-3-3-4-4 times, and on every 8th row a total of 2-3-2-3-3-3 times. After all cast offs and dec are done, 22-22-23-23-23-24 sts remain on shoulder. Cast off when piece measures 66-68-70-72-74-76 cm. LEFT FRONT PIECE: Work as right front piece but reversed. SLEEVE: Worked in the round on double pointed needles, switch to circular needle when needed. Cast on 48-48-52-52-56-56 sts on double pointed needles size 4 mm with dark blue. K 1 round, then work rib = K 2/P 2. When piece measures 6 cm, switch to double pointed needles size 5 mm. K 1 round while AT THE SAME TIME dec 9-7-9-7-9-9 sts evenly = 39-41-43-45-47-47 sts. Insert a marker at beg of round (= mid under sleeve). Then work in stocking st. When piece measures 7 cm, inc 1 st on each side of marker mid under sleeve. Repeat inc every 4½-4-3½-3-3-2½ cm a total of 9-10-11-12-13-15 times = 57-61-65-69-73-77 sts. AT THE SAME TIME when piece measures 20 cm, insert a marker in the middle st on round (= mid on top of sleeve). Work A-1. NOTE: St marked with arrow in diagram should be the st with marker mid on top of sleeve. When A-1 has been worked 1 time vertically, continue with dark blue until finished measurements. AT THE SAME TIME when piece measures 47-47-46-46-45-45 cm (shorter measurements in the larger sizes because of longer sleeve cap), cast off 4-6-6-6-6-6 sts mid under sleeve. Then work back and forth on needle until finished measurements. AT THE SAME TIME cast off for sleeve cap at beg of every row in each side: 2 sts 0-2-3-3-3-4 times and 1 st 3-3-4-4-5-6 times. Then cast off 2 sts in each side until piece measures 54-55-55-56-56-57 cm, then cast off 3 sts 1 time in each side. Cast off the remaining sts, piece measures approx. 55-56-56-57-57-58 cm. ASSEMBLY: Sew shoulder seams and sew in sleeves. SHAWL COLLAR: Worked back and forth on circular needle size 4 mm with dark blue. Knit up from RS inside 1 edge st along the neck as follows: Start mid front at the marker on right front piece, knit up up to shoulder, then along the neck and down along left front piece until marker = approx. 90 to 110 sts. K 1 row from WS while AT THE SAME TIME inc no of sts to 118-122-126-130-138-146. Then work rib as follows (seen from RS): 2 sts in garter st, * K 2, P 2 *, repeat from *-* and finish with K 2 and 2 sts in garter st. Continue like this until collar measures approx. 5 cm. Now inc 1 st in each of the middle 12 P-sections, seen from RS (= back of neck) = 130-134-138-142-150-158 sts. Then work K over K and P over P until collar measures approx. 7 cm. Now work as follows: Work 1 row on all sts as before and then slip the first 10 sts worked on a stitch holder, turn piece, work next row and then slip the first 10 sts worked at the beg of row on another stitch holder. Turn piece, work the next row and slip the first 10 sts worked at the beg of row on the first stitch holder, turn piece, work the next row and slip the first 10 sts worked at the beg of row on the other stitch holder. Continue like this until there are a total of 40 sts on the stitch holders in each side. Then slip sts from stitch holders back on needle and work 1 row as before over all 130-134-138-142-150-158 sts. NOTE: To avoid holes in every transition where sts where put on holder, slip loop before next st twisted on to left needle and work tog with first st on needle. Cast off with K over K and P over P. Neatly fasten collar with stitches in each side towards band – sew edge to edge to avoid a chunky seam. Sew on buttons. |
||||||||||
Diagram explanations |
||||||||||
|
||||||||||
 |
||||||||||
 |
||||||||||
Have you finished this pattern?Tag your pictures with #dropspattern #bluemountainjacket or submit them to the #dropsfan gallery. Do you need help with this pattern?You'll find 19 tutorial videos, a Comments/Questions area and more by visiting the pattern on garnstudio.com. © 1982-2026 DROPS Design A/S. We reserve all rights. This document, including all its sub-sections, has copyrights. Read more about what you can do with our patterns at the bottom of each pattern on our site. |
||||||||||


With over 40 years in knitting and crochet design, DROPS Design offers one of the most extensive collections of free patterns on the internet - translated to 17 languages. As of today we count 324 catalogues and 12290 patterns translated into English (UK/cm).
We work hard to bring you the best knitting and crochet have to offer, inspiration and advice as well as great quality yarns at incredible prices! Would you like to use our patterns for other than personal use? You can read what you are allowed to do in the Copyright text at the bottom of all our patterns. Happy crafting!
Post a comment to pattern DROPS Extra 0-817
We would love to hear what you have to say about this pattern!
If you want to leave a question, please make sure you select the correct category in the form below, to speed up the answering process. Required fields are marked *.