
Popular categories
Looking for a yarn?


Comments / Questions (110)
![]() Philippe Evelyne wrote:
Philippe Evelyne wrote:
Magnifique haut, c'est mon 1er Travail en tricot hyper contente du résultat. Merci, je sais pas comment vous envoyer mon ouvrage.
16.05.2026 - 16:47DROPS Design answered:
Bonjour Mme Philippe , découvrez ici comment vous pouvez partager vos photos avec nous. À bientôt!
18.05.2026 - 09:38
![]() Evelyne Philippe wrote:
Evelyne Philippe wrote:
Bonjour, c'est une amie qui me a acheter ma laine. Donc bretelles largeur de 6 cm et hauteur bretelles 22 cm. Encolure entre les deux 22 cm. Haut bus 58, nombril et le basc60 cm. Hauteur total du top 60 à 62. Pouvez vous m expliquer , nombre de maille début, combien d augmentation et le nombre de fois à faire et combien je rabat de chaque côté après il grand merci
20.04.2026 - 13:02DROPS Design answered:
Bonjour Mme Philippe, nous vous remercions de votre compréhension quant à notre impossibilité d'adapter chacun de nos modèle à chaque situation. Vous pouvez toujours contacter le magasin où votre amie a acheté la laine ou bien demander conseil à d'autres tricoteuses via un forum de tricot ou dans notre DROPS Workshop. Merci encore. Bon tricot!
20.04.2026 - 16:16
![]() Evelyne PHILIPPE wrote:
Evelyne PHILIPPE wrote:
Bonjour, je suis débutante. Comment faire pour avoir des bretelles plus longue, car j'ai un grand buste. Mille merci.
19.04.2026 - 17:46DROPS Design answered:
Bonjour Mme Philippe, vous pouvez recalculer en vous basant sur le schéma du bas de page, le nombre de mailles montées ici et la longueur des bretelles souhaitées, le nombre de mailles qu'il vous faudra en plus avant le 1er marqueur et après le 2ème marqueur (entre les 2 marqueurs = encolure). N'hésitez pas à demander assistance à votre magasin, même par mail ou téléphone. Bon tricot!
20.04.2026 - 10:44
![]() Bettina wrote:
Bettina wrote:
Ich vermisse in der Anleitung die Beschreibung wie die Träger gestrickt werden? Viele Grüße Bettina
07.02.2026 - 11:36DROPS Design answered:
Liebe Bettina, die Träger ergeben sich durch die Zunahmen am Anfang. Sie schlagen also die genannte Maschenzahl an und stricken dann quasi zwei "Knicke", die durch die Zunahmen an den Markierern entstehen, sodass sich hier eine rechtwinklige Form ergibt, später ketten Sie dann an beiden Seiten Maschen ab, dadurch entstehen die Träger. Viel Spaß beim Stricken!
08.02.2026 - 08:53
![]() Sofia wrote:
Sofia wrote:
Hur stickar jag axelbanden? Hur långt (antal cm?) ska jag öka/minska någonstans?
05.09.2025 - 11:37
![]() Céline wrote:
Céline wrote:
Je nais pas d’aiguilles circulaires n2,5 , comment faire pour terminer le modèle avec des aiguilles normales ? Merci de votre réponse
22.08.2025 - 16:30DROPS Design answered:
Bonjour Céline, si c'est juste pour terminer la bordure point mousse du bas du top, divisez les mailles en 2 (devant et dos) et tricotez les 2 cm point mousse sur vos aiguilles 2,5 droites et terminez le dos et le devant séparément, puis faites la couture de cette bordure sur les côtés à la fin. Bon tricot!
25.08.2025 - 09:13
![]() Céline wrote:
Céline wrote:
Comment terminer le pull en aller retour avec les aiguilles n2,5? Merci de votre réponse
22.08.2025 - 16:28
![]() Céline wrote:
Céline wrote:
Comment terminer le pull en aller retour avec les aiguilles n2,5? Merci de votre réponse
22.08.2025 - 15:28DROPS Design answered:
Bonjour Céline, cette leçon vous donnera quelques astuces pour adapter un modèle sur aiguilles droites, notez bien qu'ici le bas du top se tricote avec des aiguilles 3 (pour avoir les bonne mesures), avec le point ajouré M.1 de chaque côté. On changera pour les aiguilles 2,5 pour la bordure point mousse en bas du top. Bon tricot!
25.08.2025 - 09:12
![]() CAROLE wrote:
CAROLE wrote:
Bjr peut on le tricoter entièrement en circulaire ?
26.06.2025 - 07:50DROPS Design answered:
Bonjour Carole, pas vraiment car la 1ère partie du devant et du dos permet de créer les bretelles en même temps, il faudra donc commencer chaque partie séparément puis quand les bretelles sont terminées et que vous avez monté les mailles des emmanchures (pour chaque partie), vous pourrez tricoter la fin en rond. Bon tricot!
26.06.2025 - 08:45
![]() Francesca Toti wrote:
Francesca Toti wrote:
Scusate,ma dove trovo le spiegazioni per le spalline?
31.03.2025 - 11:27DROPS Design answered:
Buonasera Francesca, le spalline vengono lavorate all'inizio del lavoro. Buon lavoro!
01.04.2025 - 22:10
|
||||||||||||||||
Simply Summer#simplysummertop |
||||||||||||||||
 |
 |
|||||||||||||||
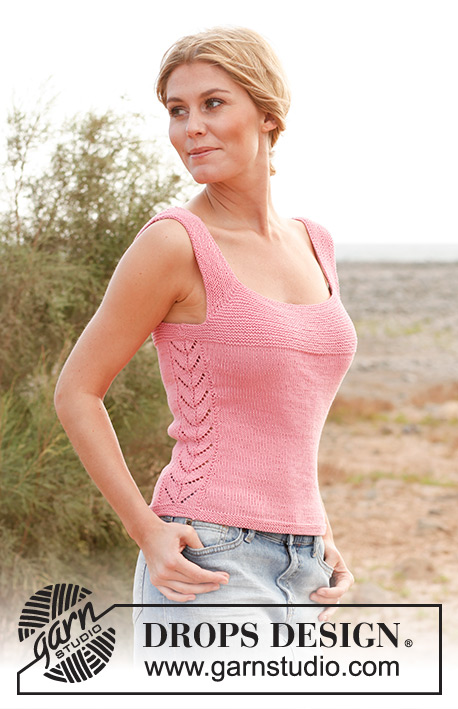
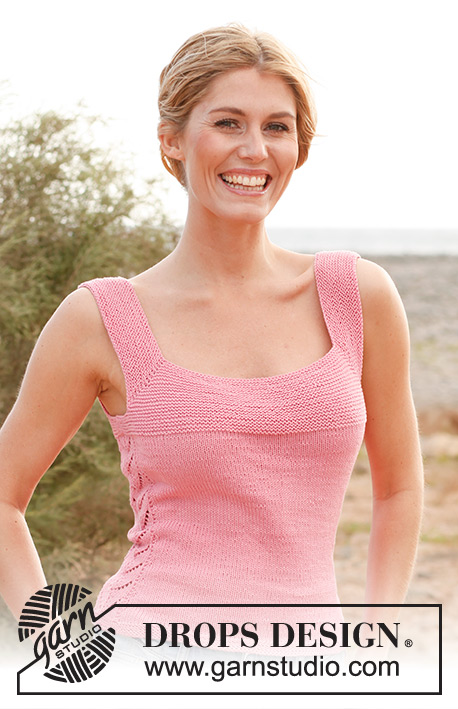
Knitted DROPS top in garter st and with lace pattern, worked top down in ”Safran”. Size: S - XXXL
DROPS 137-2 |
||||||||||||||||
|
GARTER ST (back and forth on needle): K all rows. 1 ridge = K 2 rows. GARTER ST (in the round on circular needle): * K 1 round and P 1 round *, repeat from *-*. PATTERN: See diagram M.1 – the diagram shows 1 repetition of the pattern. DECREASE TIP (applies to side dec): Dec as follows when 2 sts remain BEFORE diagram M.1: K 2 tog. Dec as follows AFTER diagram M.1: Slip 1 st as if to K, K 1, psso. INCREASE TIP (applies to side inc): Work until 1 st in stocking st remains before diagram M.1, make 1 YO, 1 st in stocking st, work diagram M.1 and 1 st in stocking st, make 1 YO. On next round K YOs twisted (i.e. work in back loop of st instead of front) to avoid holes. -------------------------------------------------------- TOP: Worked top down. Front and back piece are worked separately, then put tog and worked in the round. FRONT PIECE: Worked back and forth on circular needle. Cast on 100-100-108-108-115-121 sts on circular needle size 3 mm with Safran. Switch to circular needle size 2.5 mm. Insert a marker in the 27th-27th-30th-30th-32nd-35th st in from each side (= 46-46-48-48-51-51 sts between sts with markers). K 1 row from WS. Continue with K on all rows (= garter st). AT THE SAME TIME on next row, inc 1 st on each side of the 2 sts with markers – inc by making 1 YO, on next row K YOs twisted (i.e. work in back loop of st instead of front) to avoid holes. Repeat inc every other row a total of 14-17-17-19-19-22 times = 156-168-176-184-191-209 sts. K 1 row from WS after last inc. REMEMBER THE KNITTING TENSION! Now piece measures approx. 6-7-7-8-8-9 cm. Work next row as follows (from RS): Loosely cast off the first 40-43-46-48-50-56 sts (= strap), K the next 76-82-84-88-91-97 sts (the first of these sts is already on right needle), and loosely cast off the last 40-43-46-48-50-56 sts (= strap), cut the thread. Work next row from WS as follows: Cast on 7-9-13-16-20-24 new sts at beg of row, work the 76-82-84-88-91-97 sts from needle and cast on 7-9-13-16-20-24 new sts at the end of row = 90-100-110-120-131-145 sts. Work in garter st back and forth for 3-3-3-4-4-4 cm – AT THE SAME TIME after 2-2-2-3-3-3 cm, dec 1 st in each side by K tog the 2 second outermost sts from RS = 88-98-108-118-129-143 sts. Put piece aside. BACK PIECE: Cast on and work as front piece. BODY: Slip front and back piece on to same circular needle size 3 mm = 176-196-216-236-258-286 sts. NOW MEASURE PIECE FROM HERE! Then work diagram M.1 over 16 sts in each side (i.e. 8 sts from back piece and 8 sts from front piece = mid under sleeve). Work the other sts in stocking st. AT THE SAME TIME when piece measures 2 cm, dec 1 st on each side of diagram M.1 in each side - SEE DECREASE TIP! Repeat dec every 2½ cm a total of 6-6-6-6-5-5 times = 152-172-192-212-238-266 sts. When piece measures 18 cm, inc 1 st on each side of diagram M.1 - SEE INCREASE TIP! Repeat inc every 2 cm a total of 6 times = 176-196-216-236-262-290 sts. When piece measures approx. 30-31-32-32-33-33 cm (50-52-54-56-58-60 cm in total) - adjust after 1 whole repetition of diagram M.1, switch to circular needle size 2.5 mm. Work in GARTER ST in the round over all sts for 2 cm - see explanation above! Then loosely cast off with K – use circular needle size 3 mm when casting off (it is very important that the cast off edge is not too tight). The top measures approx. 52-54-56-58-60-62 cm vertically. ASSEMBLY: Sew shoulder seams and side seams edge to edge in front loop of outermost st to avoid chunky and visible seams. |
||||||||||||||||
Diagram explanations |
||||||||||||||||
|
||||||||||||||||
 |
||||||||||||||||
 |
||||||||||||||||
Have you finished this pattern?Tag your pictures with #dropspattern #simplysummertop or submit them to the #dropsfan gallery. Do you need help with this pattern?You'll find 7 tutorial videos, a Comments/Questions area and more by visiting the pattern on garnstudio.com. © 1982-2026 DROPS Design A/S. We reserve all rights. This document, including all its sub-sections, has copyrights. Read more about what you can do with our patterns at the bottom of each pattern on our site. |
||||||||||||||||


With over 40 years in knitting and crochet design, DROPS Design offers one of the most extensive collections of free patterns on the internet - translated to 17 languages. As of today we count 325 catalogues and 12298 patterns translated into English (UK/cm).
We work hard to bring you the best knitting and crochet have to offer, inspiration and advice as well as great quality yarns at incredible prices! Would you like to use our patterns for other than personal use? You can read what you are allowed to do in the Copyright text at the bottom of all our patterns. Happy crafting!
Post a comment to pattern DROPS 137-2
We would love to hear what you have to say about this pattern!
If you want to leave a question, please make sure you select the correct category in the form below, to speed up the answering process. Required fields are marked *.