
Popular categories
Looking for a yarn?


Comments / Questions (16)
![]() Alexandra Gallo wrote:
Alexandra Gallo wrote:
Verstehe das mit den zunahmen nicht gibt es darüber auch ein video
23.02.2016 - 21:16DROPS Design answered:
Was genau verstehen Sie nicht, an welcher Stelle kommen Sie mit den Zunahmen nicht klar?
24.02.2016 - 18:55
![]() Monika wrote:
Monika wrote:
Upletla jsem pro dceru z příze Drops Cotton Merino v tmavě růžové a model je to luxusní. Moc děkuju za perfektní návod :-)
25.02.2014 - 11:42DROPS Design answered:
I my děkujeme a už pro vás chystáme další kousky, tak se těšte ;-)!
28.02.2014 - 22:40J.v.Schijndel wrote:
I do not understand how to reach the number of sts.right in the beginning.When I want to begin with the pattern I still have 76 sts.Please,can you help me?
20.12.2013 - 22:04DROPS Design answered:
Dear Mrrs Schijndel, inc in diagrams are done with a YO at the beg/the end of each repeat of diagram. On next round, work YO into back of loop to avoid holes. Happy knitting!
27.12.2013 - 14:19
![]() Milena wrote:
Milena wrote:
Es fehlt die Angabe, an welcher Stelle man beim Übergang vom 1. Muster zum Vorder- und Rückteil die 2 Markierer anbringen soll. Im englischen habe ich es dann gefunden: In der Mitte der Aufnahme der 6 neuen Maschen. Vielleicht kann man das im deutschen noch ergänzen.
27.04.2013 - 21:39DROPS Design answered:
Liebe Milena, vielen Dank für den Hinweis. Wit werden das gleich ergänzen.
29.04.2013 - 07:57
![]() Margrietje wrote:
Margrietje wrote:
Bij het breien van het lijf moet je meerderen aan iedere kant van beide markeerders. Ik heb alleen een markeerder midden achter. Moet ik dan 2 steken tussen de gemeerderde steken breien? Of moet je meerderen onder de mouwen, zodat je het meerderen minder ziet? Ik mis ook de uitleg over de manier van meerderen, zoals in andere patronen altijd aangegeven is.
31.01.2013 - 10:41DROPS Design answered:
Er miste een zin in de vertaling. Dat hebben we nu aangepast.Er is er in het begin eentje voor het breien van de ronding van de pas, middenachter. Dit is tevens het begin van de nld. Dan zijn er twee aan de zijkanten, aan elk kant in het midden van de 6 st aan de zijkant. Dus drie in totaal.
04.02.2013 - 14:40
![]() Mona Oen Frethurst wrote:
Mona Oen Frethurst wrote:
Hei. Finner ikke ut av denne oppskriften: Reduser til 90 masker (str. 7-8). OK Strikk mønster 1 etter diagram til valgt str. Dette tilsvarer 4 økninger med mønster x 7.5?? Dette kan umulig stemme? Maskeantallet etter mønster 1 skal være 240? Hvordan får man det til å gå opp??
13.09.2012 - 21:46DROPS Design answered:
Når du starter å strikke M.1 har du 90 m på p. Det er 6 m i M.1 = 90/6 = 15. M.1 strikkes 15 ganger pr pinne. Det økes 10 m i løpet av M.1. Så da blir det 15 (m.1) x 10 (økninger) = 150 m + 90 m = 240 m på p.
27.09.2012 - 09:23
|
||||||||||||||||
Selina#selinadress |
||||||||||||||||
 |
 |
|||||||||||||||
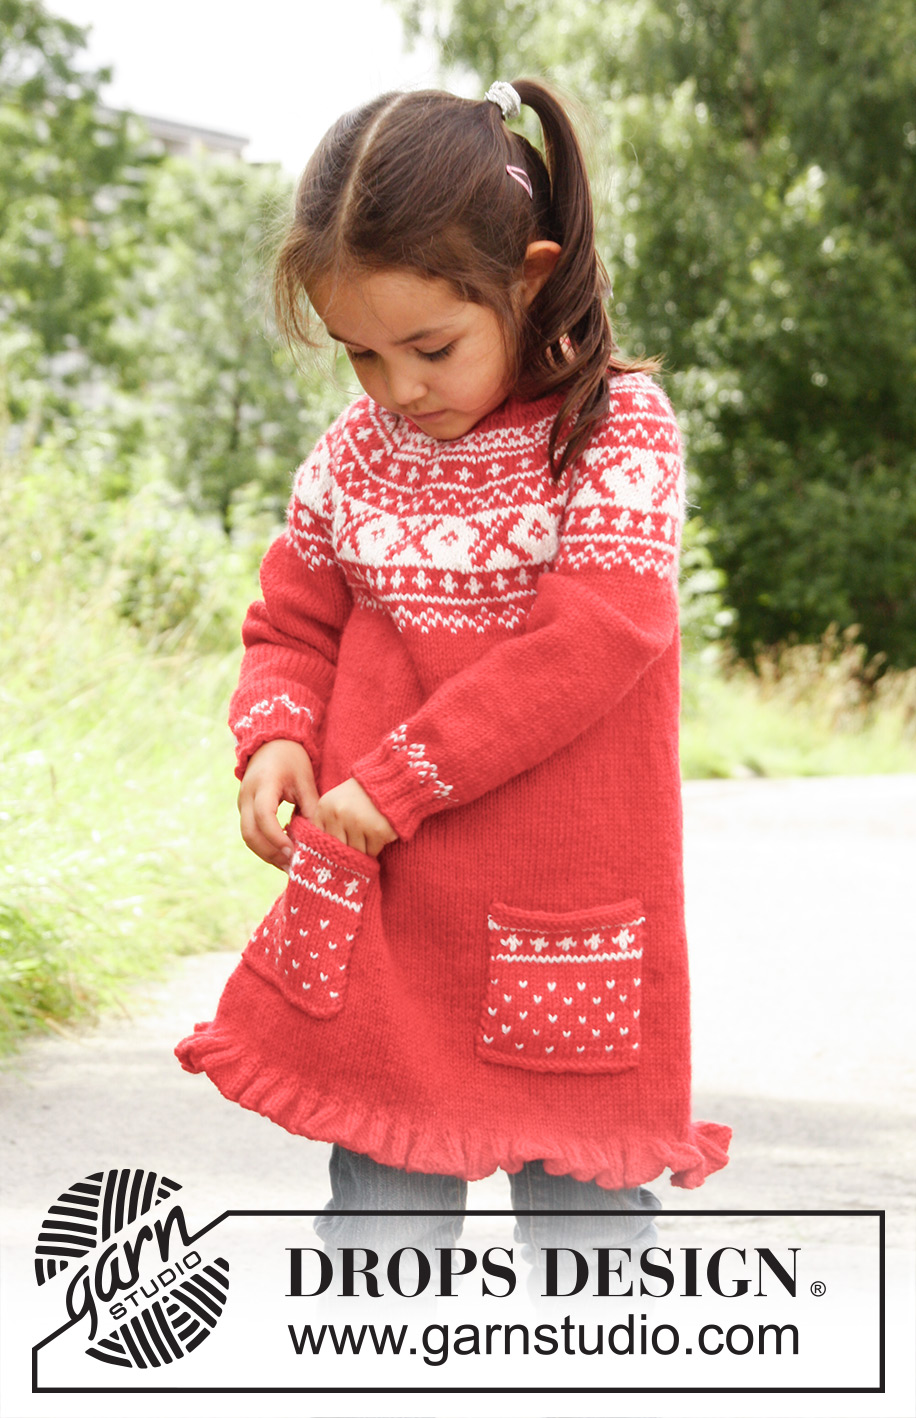
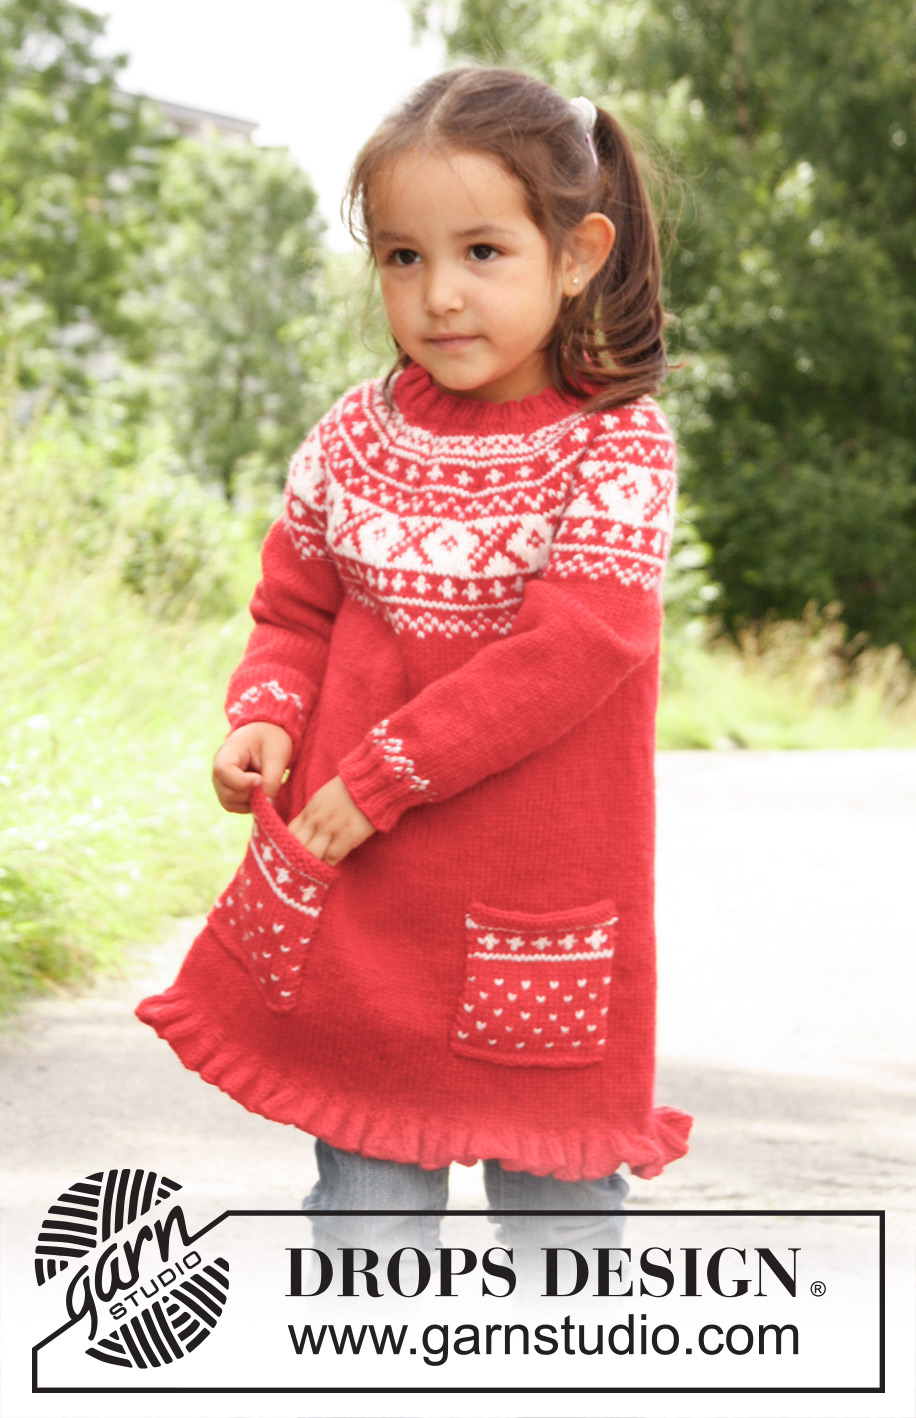
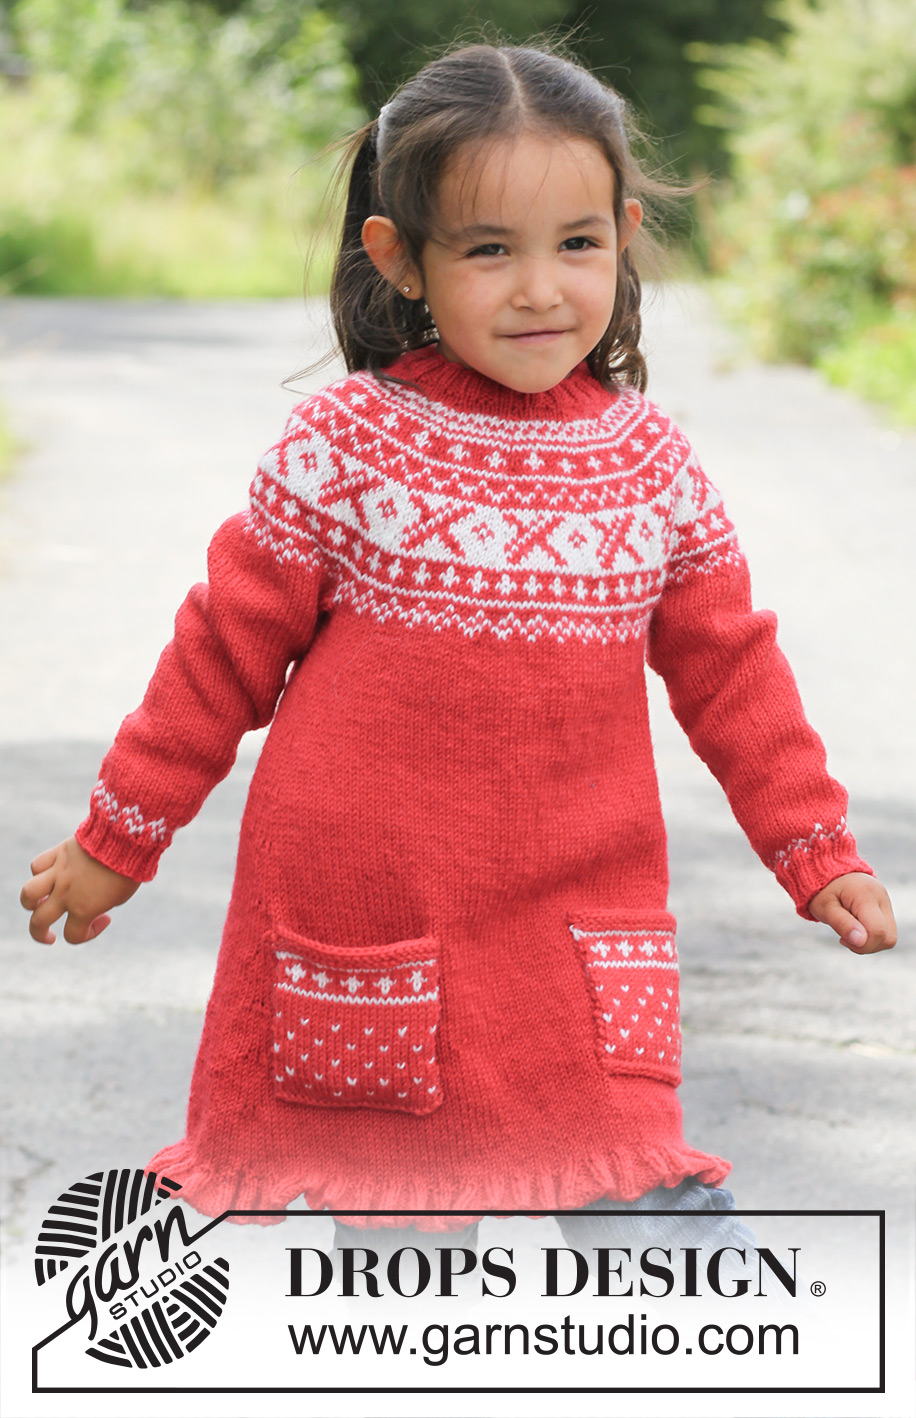
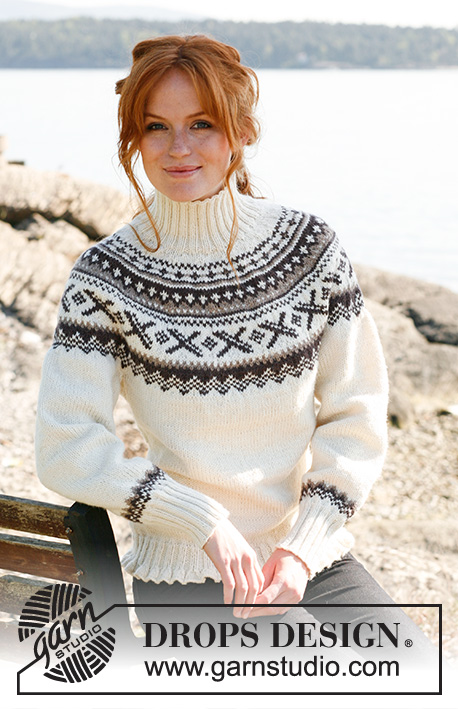
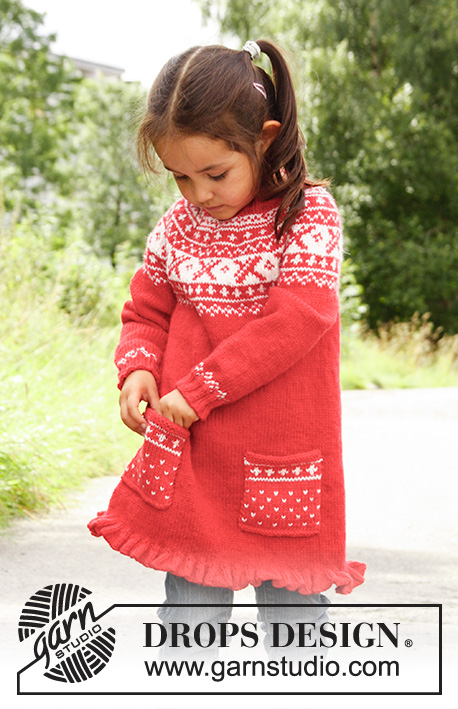
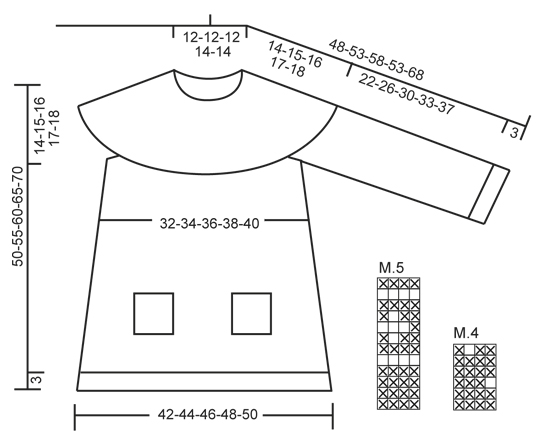
Knitted DROPS tunic worked top down in ”Karisma” with round yoke and Norwegian pattern. Size 3 - 12 years.
DROPS Children 22-20 |
||||||||||||||||
|
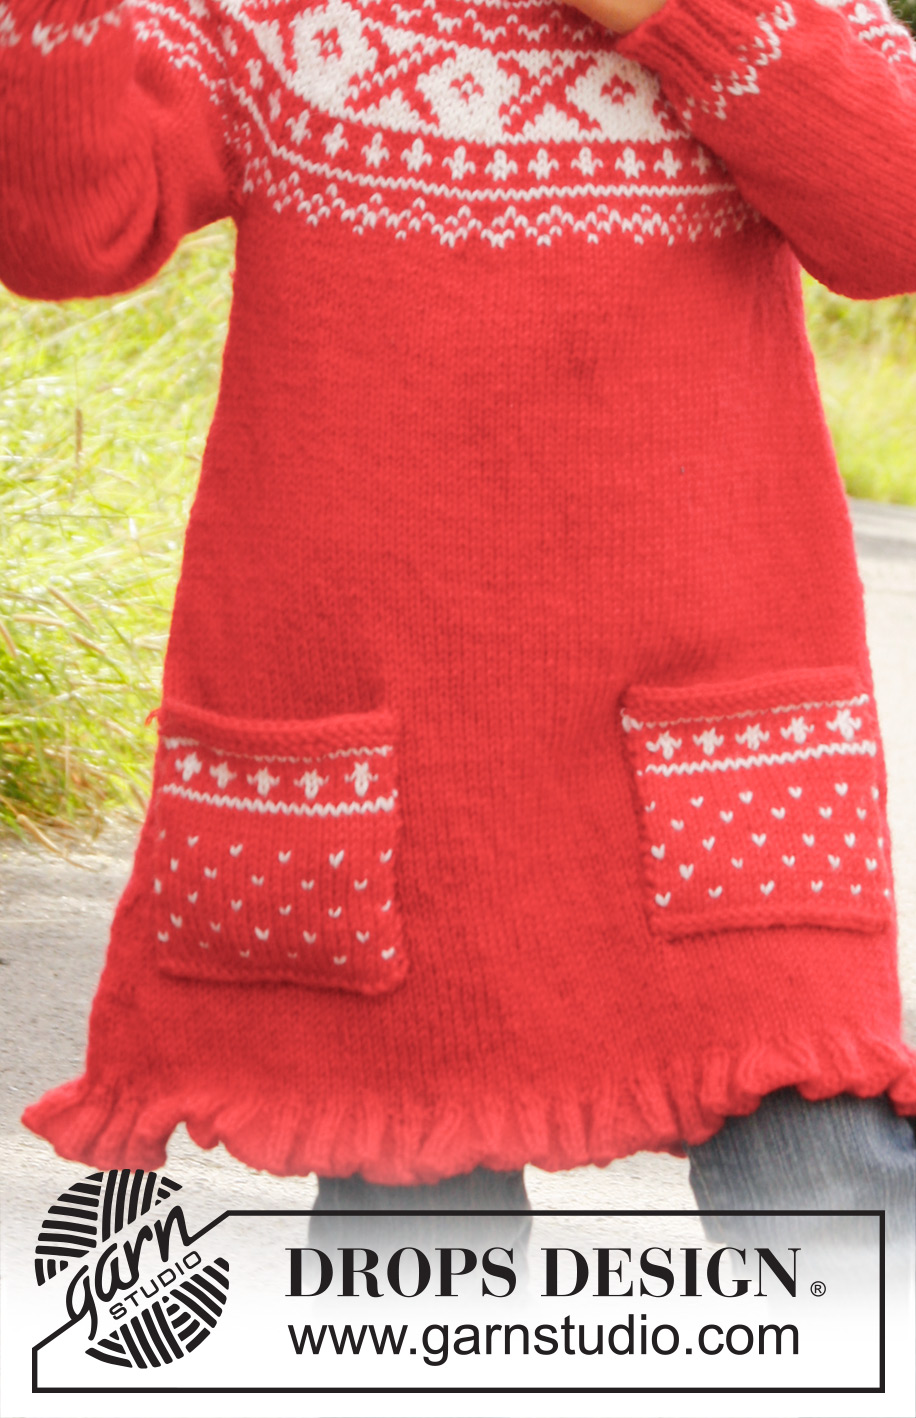
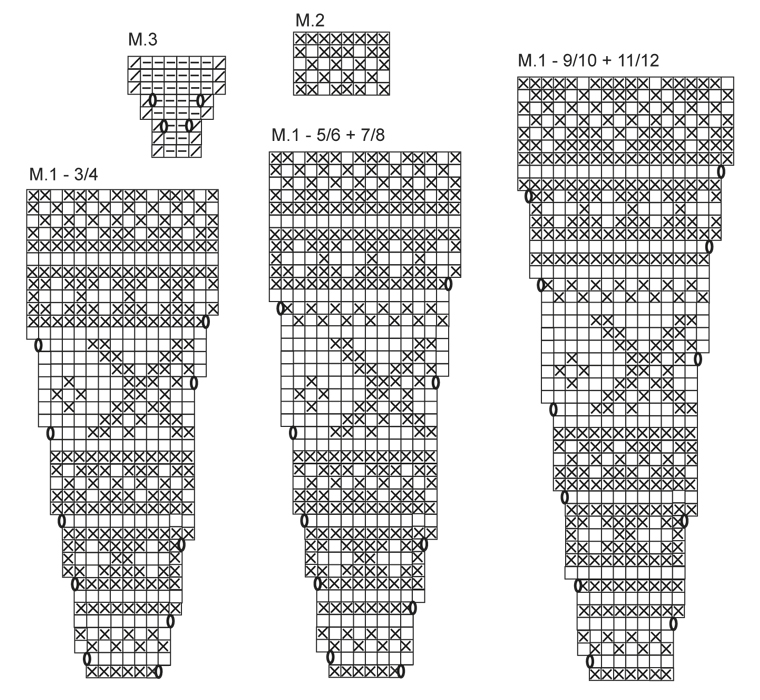
PATTERN: See diagram M.1 to M.5. Diagrams M.1, M.2, M.4 and M.5 are all worked in stocking st. -------------------------------------------------------- TUNIC: Worked in the round, top down. YOKE: Cast on 84-88-92-96-100 sts on a short circular needle size 3 mm with red, insert a marker at beg of round (= mid back). Work rib = K 2/P 2 for 2-2-3-3-3 cm (= neck). Switch to a short circular needle size 4 mm. K 1 round while at the same time adjusting no of sts to 78-84-90-98-105. Then work an elevation at the back as follows in stocking st: K 8 sts past marker, turn, tighten thread and P 16 sts on return, turn, tighten thread and K 24 sts, turn, continue by working 8 sts more on every turn until a total of 48-48-64-64-80 sts have been worked, turn and K 1 round until marker mid back again. Then work diagram M.1 – see diagram for correct size! Switch to a longer circular needle when there are enough sts. When diagram M.1 has been worked, there are 208-224-240-252-270 sts on needle, work 0-0-1-0-1 cm more with red. Piece now measures approx. 14-15-16-17-18 cm mid front (measured without rib in the neck). Work with red and in stocking st until finished measurements. First work 1 round while at the same time inc 4-4-4-12-10 sts evenly = 212-228-244-264-280 sts. Work next round as follows: Work 31-33-35-37-39 sts, slip the next 44-48-52-58-62 sts on a stitch holder for sleeve (without working them first), cast on 6 new sts (insert a marker in the middle of these sts = the side), work 62-66-70-74-78 sts (= front piece), slip the next 44-48-52-58-62 sts on a stitch holder for sleeve (without working them first), cast on 6 new sts (insert a marker in the middle of these sts = the side), work 31-33-35-37-39 sts. BODY: = 136-144-152-160-168 sts. NOW MEASURE PIECE FROM HERE! Continue in the round in stocking st. When piece measures 4 cm, inc 1 st on each side of both markers. Repeat inc every 3-3-3½-4-4 cm a total of 10 times = 176-184-192-200-208 sts. When piece measures 33-37-41-45-49 cm (from where sts were slipped on stitch holders for sleeve), switch to circular needle size 3 mm. Work 1 round while at the same time inc 36-36-36-40-40 sts evenly = 212-220-228-240-248 sts. Then work diagram M.3. When diagram M.3 has been worked, there are 424-440-456-480-496 sts on needle. Cast off with K over K and P over P. SLEEVE: Slip sts from one stitch holder on double pointed needles size 4 mm, cast in addition on 6 sts mid under sleeve (insert a marker in the middle of these sts) = 50-54-58-64-68 sts. NOW MEASURE PIECE FROM HERE! Work in stocking st in the round with red. When sleeve measures 2 cm, dec 1 st on each side of marker. Repeat dec every 4½-3½-4-3-3½ cm a total of 5-7-7-10-10 times = 40-40-44-44-48 sts. When sleeve measures 20-24-28-31-35 cm, work diagram M.2, then switch to double pointed needles size 3 mm. Work rib = K 2/P 2 for 3 cm, then cast off with K over K and P over P. Work the same way over the sts on the other stitch holder. POCKET: Worked back and forth on circular needle. Cast on 23-23-23-27-27 sts on needle size 4 mm with red. K 1 row from WS. Continue as follows: 1 st in garter st, diagram M.4 over the next 21-21-21-25-25 sts (work the last st as the first st in diagram) and 1 st in garter st. Work diagram M.4 until there are 5-5-6-6-6 lines of dots, then work diagram M.5 one time vertically over diagram M.4. Then K 4 rows (= 2 ridges) with red, then cast off. Knit another pocket. ASSEMBLY: Sew the openings under the sleeves. Place the pockets on front piece, approx. 8-8-9-9-10 cm from bottom edge and approx. 10-11-12-14-15 cm apart (cast off edge = up). Fasten pockets with neat little stitches in sts in garter st. |
||||||||||||||||
Diagram explanations |
||||||||||||||||
|
||||||||||||||||
 |
||||||||||||||||
 |
||||||||||||||||
Have you finished this pattern?Tag your pictures with #dropspattern #selinadress or submit them to the #dropsfan gallery. Do you need help with this pattern?You'll find 15 tutorial videos, a Comments/Questions area and more by visiting the pattern on garnstudio.com. © 1982-2026 DROPS Design A/S. We reserve all rights. This document, including all its sub-sections, has copyrights. Read more about what you can do with our patterns at the bottom of each pattern on our site. |
||||||||||||||||


With over 40 years in knitting and crochet design, DROPS Design offers one of the most extensive collections of free patterns on the internet - translated to 17 languages. As of today we count 324 catalogues and 12285 patterns translated into English (UK/cm).
We work hard to bring you the best knitting and crochet have to offer, inspiration and advice as well as great quality yarns at incredible prices! Would you like to use our patterns for other than personal use? You can read what you are allowed to do in the Copyright text at the bottom of all our patterns. Happy crafting!
Post a comment to pattern DROPS Children 22-20
We would love to hear what you have to say about this pattern!
If you want to leave a question, please make sure you select the correct category in the form below, to speed up the answering process. Required fields are marked *.