
Popular categories
Looking for a yarn?


Comments / Questions (38)
![]() Mireille Isaac wrote:
Mireille Isaac wrote:
Bonjour et merci pour votre réponse. Je vais tout de même y réfléchir puis decider si je fais un raglan sur quelques mailles à distance . Afin que l'encolure soit plus ouverte.
25.02.2021 - 11:52
![]() Mireille Isaac wrote:
Mireille Isaac wrote:
Bonjour, j'arrive à l'encolure et je ne vois aucune diminution dans les explications. Or, pour accueillir l'encolure, et selon la photo du modèle, il devrait y en avoir, me semble-t'il. Où les trouver, s'il vous plaît ?
24.02.2021 - 21:43DROPS Design answered:
Bonjour Mme Isaac, il n'y a pas de diminutions pour l'encolure, elle sera suffisamment large pour accueillir le col comme prévu par les explications. Bon tricot!
25.02.2021 - 07:27
![]() M - Claire wrote:
M - Claire wrote:
Bonjour je vous remercie pour la réponse .Et si j ai bien compris je fais les augmentation dans le cou? .Passez une bonne journée ,si vous n êtes pas un robot .J écrit Ca car on me demande si je suis un robot ,lol
07.02.2020 - 09:27DROPS Design answered:
Bonjour M-Claire, oui vous allez augmenter dans les 23-33 (cf taille) sections de 2 m env des côtes au milieu du col (vous augmenterez ensuite dans les 19-23 sections 3 m env au milieu du col, les côtes du col seront donc avec 2 m end et 2 m env, 3 m env , 4 m env, 3 m env, 2 m env en fonction de leur emplacement. Bon tricot!
07.02.2020 - 09:30
![]() M -Claire wrote:
M -Claire wrote:
Rebonjour merci pour la réponse .Et là je suis à nouveau dans l incompréhension pour le col j ai tricoté 4cmpuis je dois augmenter 1 m dans les sections .Si j ai compris je prend les mailles que j ai rabattue au centre Mais je les tricotes ,les côtes 2/2 seront de travers ,hors sur la photo on ne voit pas ces augmentations .Merci d avance pour la réponse
06.02.2020 - 16:37DROPS Design answered:
Bonjour M. Claire, vous n'augmentez que dans les sections en mailles envers, vu sur l'endroit (raison pour laquelle ces augmentations ne se voient pas, car en plus elles se font au niveau du dos). Vous aurez donc - sur l'endroit: 5 fois (2 m end, 2 m env) au début du col, puis des côtes 2 m end/3 m env et de nouveau 5 fois des côtes 2 m end/2 m env pour terminer. Bon tricot!
07.02.2020 - 07:43
![]() M-Claire wrote:
M-Claire wrote:
Bonjour .Faut il tricoter les torsades jusqu en haut dans le dos ?
21.01.2020 - 16:10DROPS Design answered:
Bonjour M-Claire, tout à fait, vous tricotez au point de blé en suivant M.B puis vous tricoterez M.C au-dessus de M.B, juste avant de rabattre les mailles de l'encolure dos, dans M.C on diminue des mailles pour éviter que l'encolure ne soit trop large (on a besoin de plus de mailles en torsades pour la même largeur). Bon tricot!
22.01.2020 - 07:48
![]() Mj wrote:
Mj wrote:
En résumé, il me semble qu'il doit y avoir environ 10 cm entre l'encolure devant et le début des emmanchures ? Il est dommage que cette information ne figure pas sur le croquis.
22.08.2019 - 15:30DROPS Design answered:
Bonjour MJ, 10 cm avant les emmanchures du devant, on tricote les diagrammes M.C puis on va rabattre les mailles de l'encolure au rang suivant après MC et terminer chaque devant séparément. Bon tricot!
23.08.2019 - 08:30
![]() Marieke wrote:
Marieke wrote:
Als ik de mouwen langer wil maken, kan ik dan het beste later beginnen met minderen, of na het minderen gewoon langer doorbreien?
30.01.2018 - 16:18DROPS Design answered:
Hallo Marieke, Als je van te voren al weet hoeveel langer je de mouw wilt hebben, kun je de minderingen over de hele lengte van de mouw verdelen door de extra lengte in cm te delen door het aantal minderingen en deze op te tellen bij om de hoeveel cm je de minderingen wilt maken. Overigens worden de mouwen van onder naar boven gebreid, dus maak je meerderingen i.p.v. minderingen.
31.01.2018 - 16:24
![]() Britt wrote:
Britt wrote:
Hoi, ik ben bij het voorpand net klaar met patroon MC in maat m. Er staat nu dat ik de middelste 18 steken moet afkanten voor de hals. Dit begrijp ik, maar ik kom helemaal niet aan 33 steken per schouder... Ik heb er nl. 29 per kant in gerstekorrel, dan 5 averechts en dan nog 3 rechte. Dat komt dan toch op 37? Of heb ik ergens iets over het hoofd gezien? Alvast bedankt!
13.10.2017 - 16:43DROPS Design answered:
Hallo Brit, Ik heb het helemaal nagerekend (als het goed is brei je maat M) en op het moment dat je de middelste steken voor de hals afkant heb je 84 steken op de naald. (Je hebt op dat punt nog niet afgekant voor de armsgaten). 84 - 18 steken gedeeld door 2 is 33 steken voor elke schouder. Zou je nog eens willen kijken of je ergens iets over het hoofd hebt gezien. Het zou namelijk wel moeten kloppen.
18.10.2017 - 11:37
![]() Marie Andersson wrote:
Marie Andersson wrote:
Hej! Höger framstycke, storlek L: 33 m + en kantmaska=34 m ska bli 24 m efter avmaskning för ärmhål på samma sätt som bakstycket. Det blir 27 maskor kvar. Har jag missat något? Tacksam för svar😀 Mvh Marie
30.07.2016 - 17:28DROPS Design answered:
Hej. Du minskar först 3 m 1 gång. Sedan minskar du i början på varje v i varje sida 2 m 3 ggr och sedan 1 m 1 ggr (strl M). 34-3-(2x3)-(1x1)= 24 m. Lycka till!
11.08.2016 - 11:40
![]() Sandra wrote:
Sandra wrote:
Hej! Avmaskning för ärmhålet på framstycket i strl L. 33m +1 kantm ska bli 24m efter minskning likadant som på bakstycket. Minskar jag likadant som på bakstycket så blir det 27m kvar. Vad missar jag?! Tacksam för svar/Sandra
28.07.2016 - 14:28DROPS Design answered:
Hej. Du minskar först 3 m 1 gång. Sedan minskar du i början på varje v i varje sida 2 m 3 ggr och sedan 1 m 1 ggr (strl M). 34-3-(2x3)-(1x1)= 24 m. Lycka till!
11.08.2016 - 11:40
|
|||||||||||||||||||
Fishtail |
|||||||||||||||||||
 |
 |
||||||||||||||||||
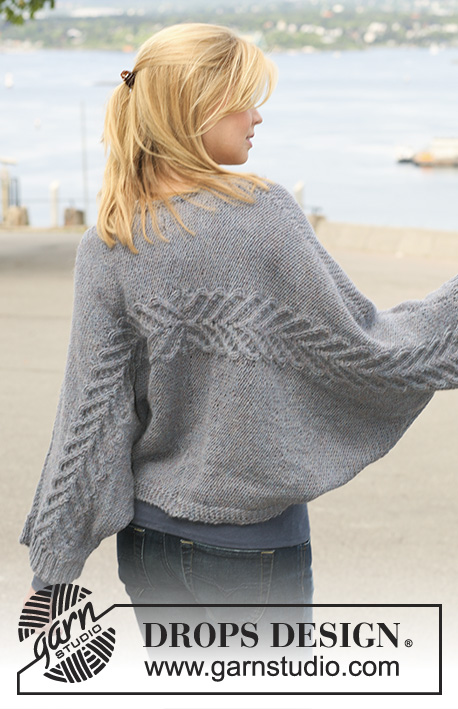
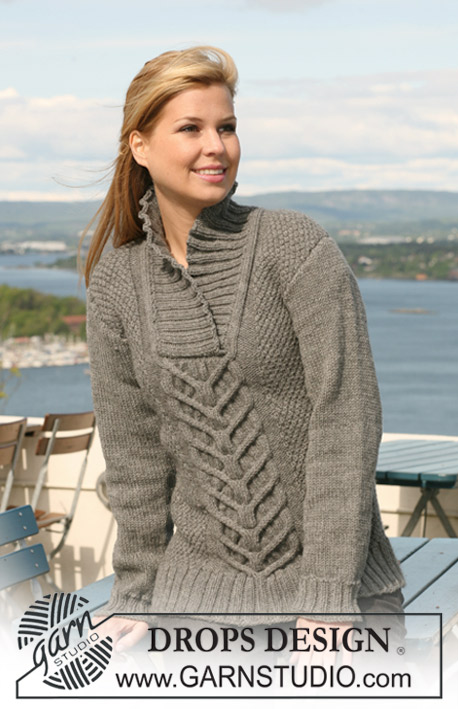
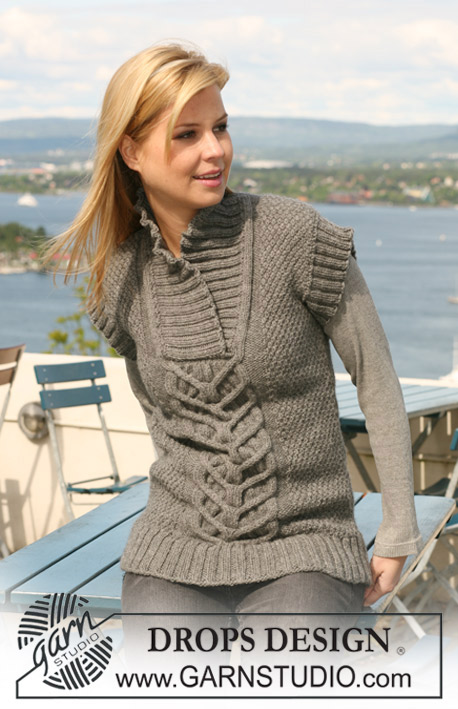
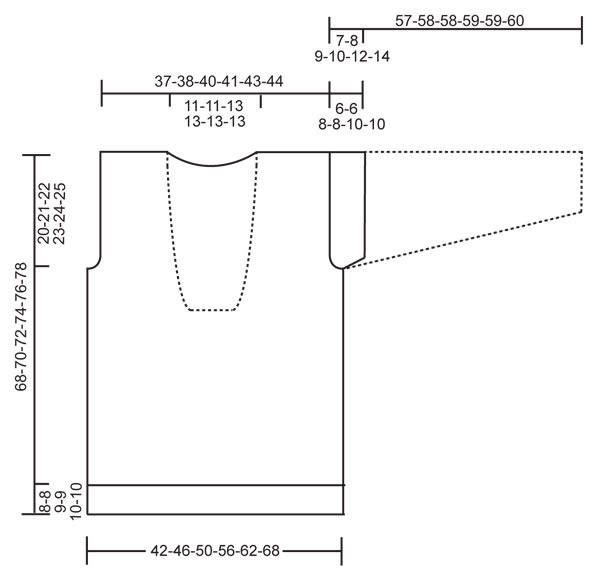
Knitted DROPS jumper with short or long sleeves with cables and moss st in ”Nepal”. Size S - XXXL.
DROPS 125-24 |
|||||||||||||||||||
|
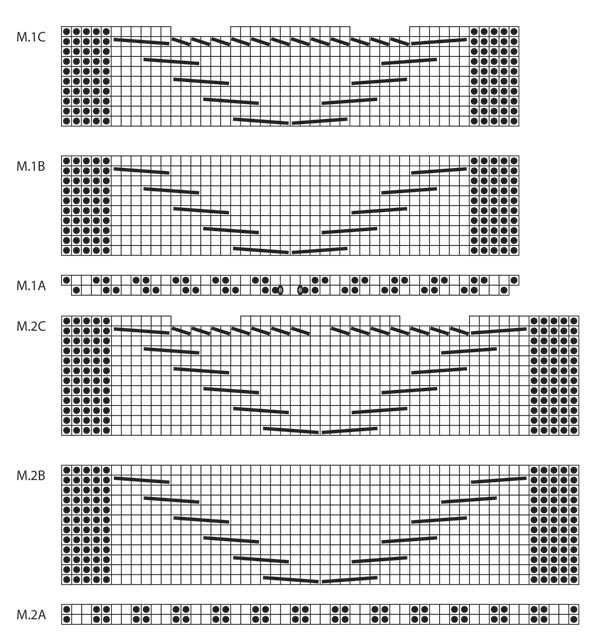
PATTERN: See diagram M.1 and M.2. See diagram for your size. Diagram shows the pattern from RS. Size S + M: M.1A, M.1B and M.1C. Size L + XL + XXL + XXXL: M.2A, M.2B and M.2C. GARTER ST (back and forth on needle): K all rows. INCREASING TIP: Inc 1 st by making 1 YO. Inc alternately before and after P-section. On next row K YO into back of loop to avoid a hole. MOSS ST (double): Row 1: * K1, P1 *, repeat from *-*. Row 2: K over K and P over P. Row 3: P over K and K over P. Repeat row 2 and 3. -------------------------------------------------------- BACK PIECE: Cast on 94-102-110-118-126-142 sts (includes 1 edge st each side) on needle size 4.5 mm with Nepal. P 1 row from WS and continue in rib as follows (from RS): 1 edge st, P1, * K2, P2 *, repeat from *-* and finish with K2, P1 and 1 edge st. When rib measures 8-8-9-9-10-10 cm work next row as follows (from RS): 1 edge st, 24-28-28-32-36-44 sts in rib as before, M.A (work diagram for your size - see above), 24-28-28-32-36-44 sts in rib as before and 1 edge st. After 1 vertical repeat of M.A there are 96-104-110-118-126-142 sts on needle. Change to needle size 5 mm and work next row as follows: 1 edge st, 24-28-28-32-36-44 MOSS STS - see above - AT THE SAME TIME dec 4-4-4-3-2-5 sts evenly, M.B (work diagram for your size), 24-28-28-32-36-44 moss sts AT THE SAME TIME dec 4-4-4-3-2-5 sts evenly and work 1 edge st. There are now 88-96-102-112-122-132 sts on needle. Continue in moss st and M.B. When piece measures 48-49-50-51-52-53 cm cast off 3 sts each side for armhole and cast off to shape the armhole at the beg of every row each side: 2 sts 1-2-3-5-6-8 times and 1 st 0-1-1-1-2-2 times = 78-80-82-84-88-90 sts. Continue as before until piece measures approx 61-63-65-67-69-71 cm (adjust to a full repeat). Now worked M.C over M.B. After 1 vertical repeat of M.C there are 66-68-68-70-74-76 sts on needle. On next row from RS cast off the middle 18-18-22-22-22-22 sts for neck= 24-25-23-24-26-27 sts left on each shoulder. Continue in moss st and P5 + K3 towards neck. AT THE SAME TIME on first row cast on 1 new st towards neck (= edge st) = 25-26-24-25-27-28 sts on shoulder. Continue until piece measures approx 68-70-72-74-76-78 cm, cast off. FRONT PIECE: Cast on and work like back piece until piece measures approx 38-39-40-41-42-43 cm (adjust to a full repeat). Now worked M.C over M.B. After 1 vertical repeat of M.C there are 76-84-88-98-108-118 sts on needle. On next row cast off the middle 18-18-22-22-22-22 sts for neck and complete each side separately. RIGHT FRONT PIECE: = 29-33-33-38-43-48 sts. Continue in moss st and P5 + K3 towards neck. AT THE SAME TIME on first row cast on 1 new st towards neck (= edge st). AT THE SAME TIME when piece measures 48-49-50-51-52-53 cm cast off for armhole at the side as described for back piece = 25-26-24-25-27-28 sts. Continue in moss st and P5 + K3 + 1 edge st towards neck until piece measures approx 68-70-72-74-76-78 cm (adjust to back piece). Cast off. LEFT FRONT PIECE: Like right front piece, but mirrored. ASSEMBLY: Sew shoulder seams. Sew side seams inside 1 edge st. SHORT SLEEVE: Pick up 80 to 120 sts on circular needle size 4.5 mm with Nepal round armhole. P 1 round, AT THE SAME TIME adjust no of sts to 88-92-100-108-112-116. K 1 round and continue in rib, K2/P2. When rib measures approx 6-6-8-8-10-10 cm cast off loosely with K over K and P over P. LONG SLEEVE: Worked back and forth on needle. Cast on 46-46-50-50-50-54 sts (includes 1 edge st each side) on needle size 4.5 mm with Nepal. P 1 row from WS and continue in rib K2/P2 with 1 edge st each side. When rib measures approx 6 cm K 1 row from RS, AT THE SAME TIME dec 5-3-5-4-4-6 sts evenly = 41-43-45-46-46-48 sts. P 1 row from WS. Change to needle size 5 mm and continue in stocking st with 1 edge st each side. When piece measures 7-8-8-8-8-8 cm inc 1 st each side and repeat the inc on every 4-3.5-3-2.5-2-2 cm a total of 11-12-13-15-16-18 times = 63-67-71-76-78-84 sts. Continue until piece measures 50-50-49-49-47-46 cm (NOTE! less for the larger sizes because of longer sleeve cap and wider shoulder). Now cast off 4 sts each side and cast off to shape the sleeve cap at the beg of every row each side: 2 sts 3-3-4-4-4-4 times and 1 st 0-0-0-1-3-5 times, then 2 sts at the beg of every row until piece measures approx 56-57-57-58-58-59 cm. Now cast off 4 sts 1 time each side and cast off remaining sts. Piece measures approx 57-58-58-59-59-60 cm. Sew sleeve seams inside 1 edge st and set in sleeves. NECK: Beg at bottom of neck on right front piece. Pick up 130 to 180 sts inside edge st on circular needle size 4.5 mm with Nepal up along neckline on right front piece, along back piece, and down along neckline on left front piece. NOTE! Do not pick up on the 18-18-22-22-22-22 sts cast off on front piece. K 1 row from WS, AT THE SAME TIME adjust no of sts to 138-142-154-162-170-178. K 1 row from RS and work next row from WS as follows: 2 GARTER STS - see above - P2, * K2, P2 *, repeat from *-* and finish with 2 garter sts. Continue in rib like this for approx 4 cm. On next row from RS inc 1 st in each of the 23-24-27-29-31-33- P-sections along back piece (i.e. do not inc in the first and last 5 P-sections) - See INCREASING TIP = 161-166-181-191-201-211 sts. Continue with K over K and P over P. When piece measures approx 7 cm inc 1 st in each of the 19-20-23-25-27-29 P-sections along back piece (i.e. do not inc in the first and last 7 P-sections) = 180-186-204-216-228-240 sts. Continue with K over K and P over P. When piece measures approx 9 cm inc 1 st in each of the 15-16-19-21-23-25 P-sections along back piece (i.e. do not inc in the first and last 9 P-sections) = 195-202-223-237-251-265 sts. Continue with K over K and P over P until piece measures approx 11-11-13-13-13-13 cm. Now cast off loosely with K over K and P over P. ASSEMBLY: Place the right rib over the left at bottom of front piece and fasten through both layers. |
|||||||||||||||||||
Diagram explanations |
|||||||||||||||||||
|
|||||||||||||||||||
 |
|||||||||||||||||||
 |
|||||||||||||||||||
Have you finished this pattern?Tag your pictures with #dropspattern or submit them to the #dropsfan gallery. Do you need help with this pattern?You'll find 20 tutorial videos, a Comments/Questions area and more by visiting the pattern on garnstudio.com. © 1982-2026 DROPS Design A/S. We reserve all rights. This document, including all its sub-sections, has copyrights. Read more about what you can do with our patterns at the bottom of each pattern on our site. |
|||||||||||||||||||


With over 40 years in knitting and crochet design, DROPS Design offers one of the most extensive collections of free patterns on the internet - translated to 17 languages. As of today we count 324 catalogues and 12285 patterns translated into English (UK/cm).
We work hard to bring you the best knitting and crochet have to offer, inspiration and advice as well as great quality yarns at incredible prices! Would you like to use our patterns for other than personal use? You can read what you are allowed to do in the Copyright text at the bottom of all our patterns. Happy crafting!
Post a comment to pattern DROPS 125-24
We would love to hear what you have to say about this pattern!
If you want to leave a question, please make sure you select the correct category in the form below, to speed up the answering process. Required fields are marked *.