
Popular categories
Looking for a yarn?


Comments / Questions (32)
![]() Dinah wrote:
Dinah wrote:
Merci pour ce modèle et ses explications qui sont claires. Bien amicalement.
06.01.2019 - 14:50
![]() Asma wrote:
Asma wrote:
Bonjour, j'en suis à la bordure et l'augmentation avec jeté fait un petit trou que je ne trouve pas joli, y a t-il une autre manière de faire l'augmentation sans trou? merci.
23.03.2018 - 12:28DROPS Design answered:
Bonjour Asma! Essayez la technique suivante: ICI. Bon travail!
23.03.2018 - 15:01
![]() Anna wrote:
Anna wrote:
Hej, jeg er ikke sikkert med knaphull, skal de strikkes på højre forkant? tak
12.03.2018 - 11:44DROPS Design answered:
Hej Anna, Ja du strikker knaphullerne på højre forkant. Se instruktion for knaphul øverst i opskriften. God fornøjelse!
14.03.2018 - 16:15
![]() Asma wrote:
Asma wrote:
Bonjour, si j'ai bien compris les boutonnières se font sur la bordure de droite?
12.03.2018 - 11:25DROPS Design answered:
Bonjour Asma, tout à fait, et les boutons seront cousus sur la bordure devant gauche. Bon tricot!
12.03.2018 - 13:15
![]() Asma wrote:
Asma wrote:
Bonjour, je ne comprends pas pour les boutonnières, au début des explications vous dites á 18, 27, et 36 cm de hauteur totale, et plus loin sur la bordure droite á 3 cm de hauteur totale lui á 11cm, pouvez m'expliquer, merci.
12.03.2018 - 07:32DROPS Design answered:
Bonjour Asma, les boutonnières se situent à 18, 27 et 36 cm de hauteur totale, en mesurant à partir du bas de la veste, et elles vont être faites à 3 et à 11 cm de hauteur de la bordure en côtes. Bon tricot!
12.03.2018 - 10:56Emma wrote:
Hola. En el patrón mencionan que después de armar 7 cm del punto resorte 2 der x 2 rev es necesario hacer disminuciones al mismo tiempo en una vuelta de derecho; estoy tejiendo el saco en talla XL y se indica que de 220 puntos se deberán disminuir equitativamente 42 puntos hasta llegar a 178 puntos. mi pregunta es ¿cada cuantos puntos es conveniente hacer la disminución simple para que quede lo mas distribuido posible?. La verdad no se como calcular eso. Gracias
20.02.2018 - 07:42DROPS Design answered:
Hola Emma, para averiguar cómo disminuir de forma proporcional, tomar el número total de puntos en la aguja ( 220 puntos) y dividirlo entre el número de disminuciones a trabajar ( 42) = 5,2. En este caso, disminuir trabajando cada 5º y 6º puntos juntos de derecho.
24.02.2018 - 19:32Manuela Vianello wrote:
Capito, grazie mille siete fantastici
22.11.2017 - 23:49Manuela Vianello wrote:
Ma quello che non capisco sono proprio le 12 sezioni che cosa si intende appunto per queste 12 sezioni scusate e grazie mille del vostro aiuto
17.11.2017 - 18:31DROPS Design answered:
Buonasera Manuela. Per sezioni si intendono i gruppi di 2 m dir delle coste 2 m dir/ 2 m rov. Deve aumentare 1 m nei 12 gruppi di 2 m dir all'altezza della nuca (non sul fondo della giacca). Ci riscriva se è ancora in difficoltà. Buon lavoro!
17.11.2017 - 20:35Manuela Vianello wrote:
Non riesco a capire cosa devo fare con i bordi frontali in particolare dove si dice ...Now inc 1 st in each of the top 10-10-11-11-12-12 K-sections...che cosa sono queste k-sections dove devo aumentare le mie 12 maglie? la mia taglia è la xxl....grazie mille
14.11.2017 - 21:12DROPS Design answered:
Buonasera Manuela, nel menù a tendina può selezionare la lingua italiana per il modello. In ogni caso deve aumentare 1 maglia in ognuna delle 12 sezioni a diritto in alto. Buon lavoro!
14.11.2017 - 23:46
![]() Heike Von Au wrote:
Heike Von Au wrote:
Hallo zusammen! Ist es richtig, dass die Schultern in Größe M hinten mit 22 Maschen enden und vorne mit 23 Maschen? Ich werden lieber auch vorne mit 22 Maschen enden, damit ich besser zusammennähen kann...
15.10.2017 - 18:16DROPS Design answered:
Liebe Frau Von Au, es stimmt ja so, die zusätzliche Masche bein den beiden Vorderteilen ist die Randmasche. Die Maschen für die Blende/Halskante werden dann innherhalb diese Randmasche (Vorderteil) aufgenommen. Viel Spaß beim stricken!
16.10.2017 - 10:03
|
|
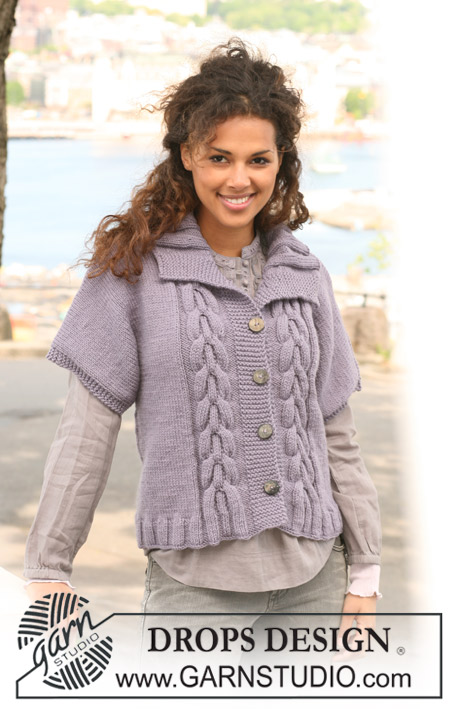
Trip to Town#triptotowncardigan |
|
|
|
|
DROPS jacket in stocking st with front bands in rib in 2 strands ”Alpaca” or 1 strand ”Nepal”.
DROPS 126-15 |
|
|
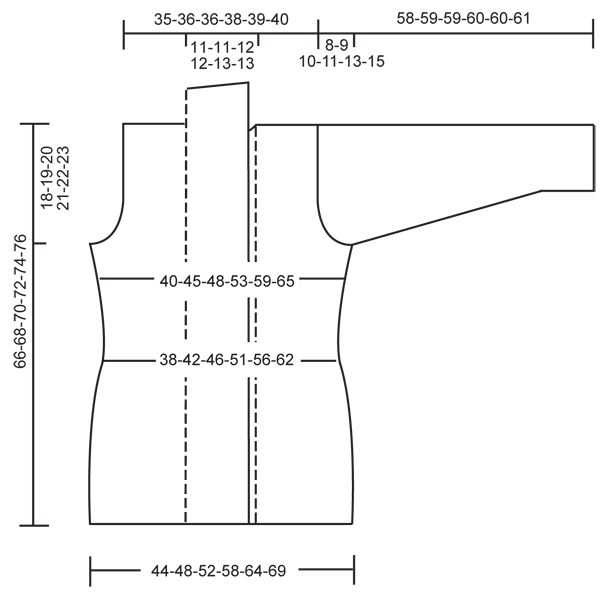
GARTER ST (back and forth on needle): K all rows. INCREASING TIP: Inc 1 st by making 1 YO. On next row work YO into back of loop to avoid a hole. BUTTONHOLES: Make buttonholes on right front band. 1 buttonhole = cast off 1 st and cast on 1 new st on next row. Make buttonholes when piece measures 18 cm, 27 cm and 36 cm, measured from bottom edge of jacket. -------------------------------------------------------- JACKET: Worked back and forth on circular needle. Cast on 164-184-196-220-244-268 sts on circular needle size 4.5 mm with 2 strands Alpaca or 1 strand Nepal (includes 1 edge st towards front edge each side). Work 1 edge st, rib K2 / P2 until 3 sts remain, finish with K2 and 1 edge st. Continue in rib like this until piece measures 7 cm. Now K 1 row from RS AT THE SAME TIME dec 32-36-38-42-48-52 sts evenly = 132-148-158-178-196-216 sts. Change to circular needle size 5 mm. Continue in stocking st. Insert 2 markers in piece, 29-33-35-40-44-49 sts in from each side (back piece = 74-82-88-98-108-118 sts). When piece measures 10 cm dec 1 st each side of both markers and repeat the dec on every 4.5-4.5-4.5-3.5-3.5-3.5 cm a total of 5-5-5-6-6-6 times = 112-128-138-154-172-192 sts. When piece measures 34 cm inc 1 st each side of both markers. Repeat the inc when piece measures 39-40-41-42-43-44 cm = 120-136-146-162-180-200 sts. When piece measures 48-49-50-51-52-53 cm cast off 6 sts for armhole each side (= 3 sts each side of marker) and complete each piece separately. BACK PIECE: = 62-70-76-84-94-104 sts. Cast off for armhole at beg of row each side as follows: 2 sts 0-1-2-3-5-7 times and 1 st 1-2-3-4-4-4 times = 60-62-62-64-66-68 sts. When piece measures 64-66-68-70-72-74 cm cast off the middle 16-16-18-18-20-20 sts for neck and complete each shoulder separately. Cast off 1 st on neckline on next row = 21-22-21-22-22-23 sts left on shoulder. Cast off when piece measures 66-68-70-72-74-76 cm. LEFT FRONT PIECE: = 23-27-29-33-37-42 sts. Cast off for armhole at the side as described for back piece = 22-23-22-23-23-24 sts left on shoulder (includes 1 edge st towards front edge). Cast off when piece measures 66-68-70-72-74-76 cm. RIGHT FRONT PIECE: Like left front piece, but mirrored. SLEEVE: Worked in the round. Cast on 52-52-56-60-60-60 sts on double pointed needles size 4.5 mm with 2 strands Alpaca or 1 strand Nepal. Work rib K2 / P2 until piece measures 5 cm. K 1 round AT THE SAME TIME dec 12-10-12-14-12-10 sts evenly = 40-42-44-46-48-50 sts. Change to double pointed needles size 5 mm. Insert a marker at beg of round. Continue in stocking st. When piece measures 8 cm inc 1 st each side of marker and repeat the inc on every 7.5-6.5-5-4-3.5-3 cm a total of 6-7-8-10-11-12 times = 52-56-60-66-70-74 sts. When piece measures 50-50-49-49-47-46 cm (less for the larger sizes because of longer sleeve cap and wider shoulder) cast off 6 sts mid under sleeve (= 3 sts each side of marker). Cast off for sleeve cap at beg of row each side as follows: 2 sts 2 times, 1 st 3-4-5-6-8-10 times, then 2 sts each side until piece measures 57-58-58-59-59-60 cm. Cast off 3 sts 1 time each side and cast off remaining sts. ASSEMBLY: Sew shoulder seams. Set in sleeves. LEFT FRONT BAND/NECKLINE: Pick up 164-168-172-180-184-188 sts (approx 22 sts/10 cm) with start mid back on circular needle size 4.5 mm with 2 strands Alpaca or 1 strand Nepal (pick up inside cast off row on back piece and inside 1 edge st along the side of jacket). K 1 row from WS and continue in rib as follows from RS: 1 edge st, K1, * P2, K2 *, repeat from *-* and finish with 2 garter sts – see above. Continue like this until rib measures 5-5-6-6-7-7 cm. Now inc 1 st in each of the top 10-10-11-11-12-12 K-sections (not in K1 at beg of row) – See INCREASING TIP! = 174-178-183-191-196-200 sts. Continue until rib measures 9-9-10-10-11-11 cm. Now inc 1 st in each of the top 8-8-9-9-10-10 K-sections (not in K1 at beg of row) = 182-186-192-200-206-210 sts. Continue until rib measures 13-13-14-14-15-15 cm. Cast off with K over K and P over P. RIGHT FRONT BAND/NECKLINE: Like left side, but beg from bottom edge. AT THE SAME TIME when piece measures 3 cm make BUTTONHOLES – see above – and repeat when piece measures 11-11-12-12-13-13 cm. Cast off with K over K and P over P when rib measures 13-13-14-14-15-15 cm. FURTHER ASSEMBLY: Sew front bands tog mid back inside 1 edge st. Sew buttons on left front band. |
|
 |
|
Have you finished this pattern?Tag your pictures with #dropspattern #triptotowncardigan or submit them to the #dropsfan gallery. Do you need help with this pattern?You'll find 21 tutorial videos, a Comments/Questions area and more by visiting the pattern on garnstudio.com. © 1982-2026 DROPS Design A/S. We reserve all rights. This document, including all its sub-sections, has copyrights. Read more about what you can do with our patterns at the bottom of each pattern on our site. |


With over 40 years in knitting and crochet design, DROPS Design offers one of the most extensive collections of free patterns on the internet - translated to 17 languages. As of today we count 324 catalogues and 12290 patterns translated into English (UK/cm).
We work hard to bring you the best knitting and crochet have to offer, inspiration and advice as well as great quality yarns at incredible prices! Would you like to use our patterns for other than personal use? You can read what you are allowed to do in the Copyright text at the bottom of all our patterns. Happy crafting!
Post a comment to pattern DROPS 126-15
We would love to hear what you have to say about this pattern!
If you want to leave a question, please make sure you select the correct category in the form below, to speed up the answering process. Required fields are marked *.