
Popular categories
Looking for a yarn?


Comments / Questions (32)
![]() Lucie wrote:
Lucie wrote:
Bonjour Au debut il est ecris "a 10 cm de hauteur totale,diminuer 1m ..." Doit on inclure les 7 cm de cotes ?
23.01.2025 - 13:31DROPS Design answered:
Bonjour Lucie, tout à fait, soit 3 cm après les côtes. Bon tricot!
24.01.2025 - 07:36
![]() Marianne wrote:
Marianne wrote:
Hello! When the pattern transfers from "Jacket" to "Back Piece" (or another piece it begins with = and then a number of stitches. Does this mean that for the "Back Piece" those are the amount of stitches I need to cast on? Or do I just continue on from Jacket to Back Piece? If so, what does that mean I do for the front pieces? Thank you!
31.01.2023 - 01:26DROPS Design answered:
Hi Marianne, This is the number of stitches left on the back piece after the division (which you then work onwards) and the same applies to the front pieces. Happy knitting!
31.01.2023 - 06:46
![]() Nin wrote:
Nin wrote:
Is het mogelijk om de mouwen in het patroon te breien, dus vest te breien tot aan splitsen van patroondelen, dan de mouwen rondbreien tot aan afkanten tot aan mouwkop en daar vest en mouwen samenvoegen?
21.12.2020 - 22:24DROPS Design answered:
Dag Nin,
Dan zou je denk ik het afkanten van de mouwen moeten verwerken in de vorm van minderingen in de aansluitlijn tussen de panden en de mouwen. Je krijgt dan nog steeds een visuele lijn tussen de mouwen en de panden.
10.01.2021 - 11:36
![]() Sandrine Brzezinski wrote:
Sandrine Brzezinski wrote:
Bonjour, je suis au niveau de la bordure du col et je ne comprend pas ce que veut dire une section, quand vous dites : augmenter 1m dans chacune des 10 sections endroit du haut, je vous remercie par avance, car je sui bloquer.
08.11.2020 - 16:04DROPS Design answered:
Bonjour Mme Brzezinski, quand on tricote en côtes 2 m env, 2 m end, une section endroit correspond aux parties des côtes tricotées en mailles endroit, par ex, on va augmenter 1 m aille dans les 10 sections endroit des côtes = on aura ici 10 fois (2 m env/3 m end) en haut du col- et toujours des côtes 2 m end/2 m env sur les autres mailles. Vous aurez ensuite 8 fois (2 m env/4 m end), 2 fois (2 m env/3 m end) et le reste en côtes 2 m end/2 m env. Bon tricot!
09.11.2020 - 11:12
![]() Bep Mudde wrote:
Bep Mudde wrote:
Ik vind het patroon heel erg leuk, maar mijn vraag is, kan ik het patroon ook in delen breien, bv de voorpanden achterpanden los ik ben namelijk geen ster in rondbreien; maar wel een heel leuk patroon dank je wel, ik hoop iets van jullie te horen groetjes
01.10.2020 - 12:38
![]() Suzie wrote:
Suzie wrote:
Bonjour, puisque je désire tricoter le chandail en utilisant une laine différente. Serait-il possible d'avoir les dimensions précise de chaque pièce grandeur médium ? Merci beaucoup pour votre aide.
01.04.2020 - 16:17DROPS Design answered:
Bonjour Suzie, vous trouverez toutes les mesures disponibles pour ce vêtement en bas de page, nous n'en avons pas d'autres à vous proposer. Vous pouvez éventuellement recalculer celles qui vous manquent à partir de l'échantillon et des explications. Merci pour votre compréhension, bon tricot!
01.04.2020 - 16:30
![]() Juliette Michielsen wrote:
Juliette Michielsen wrote:
Als je voor de mouwkop afkant in maat M ...hoeveel steken heb je dan uiteindelijk nog op de naald staan?
25.12.2019 - 10:54DROPS Design answered:
Dag Juliette,
Dat zou je uit kunnen rekenen door alle minderingen (dus de minderingen voor de mouwkop en de minderingen na de boordsteek) af te trekken van het aantal opgezette steken en alle meerderingen (in de zijkanten) erbij op te tellen.
26.12.2019 - 16:03
![]() Carine wrote:
Carine wrote:
Bonjour, je suis au niveau des bordures pour l augmentation des cotes 2/2. Si je comprends bien a partir de 7 cm je passe en cotes 3/2 sur les 12 premières sections et à compter de 11 cm je passe en cotes 4/2. Est ce que j ai bien compris? Merci de votre aide, bonne journée.
19.08.2019 - 15:10DROPS Design answered:
Bonjour Carine, vous passez effectivement en côtes 3 m end/2 m env à 7 cm et 4 m end/2 m env à 11 cm mais bien uniquement dans les 12 sections endroit côté col, on continue en côtes 2 m end/2 m env pour la bordure devant. Bon tricot!
19.08.2019 - 15:51
![]() Victorina Rickman wrote:
Victorina Rickman wrote:
Where are the increases in the band supposed to end? Are they supposed to end at the corner for the front piece or somewhere on the neckline? The second is how did you pick up the stitches on the front side? My row gauge was correct, but I couldn’t come close to getting the row gauge when I picked up the stitches on the slipped stitch edge. I wanted to know if you were using a different technique than I am used to or if I missed understood something. Thank you for any help you can give.
25.07.2019 - 10:25DROPS Design answered:
Dear Mrs Rickman, if you don't get the correct number of stitches when picking up for front band, just adjust to the correct number of stitches on first row from WS (= when you K frim WS). The increases in rib are worked in the 10-11-12 K-sections of the rib on the top of neck (at the beg of row from RS on left front band / at the end of row from RS on right front band). Happy knitting!
06.08.2019 - 10:12
![]() Liesbeth wrote:
Liesbeth wrote:
Bij de bies moet er gemeerderd worden in de rechte delen : aan de goede kant dus? en hoe wordt er dan verder gebreid? Wordt de verhouding dan van de boordsteek 3 recht 2 averecht??
15.02.2019 - 08:55DROPS Design answered:
Dag Liesbeth
Dat klopt inderdaad, je breit de boordsteek dan met 3 recht/ 2 averecht.
28.02.2019 - 11:27
|
|
Trip to Town#triptotowncardigan |
|
|
|
|
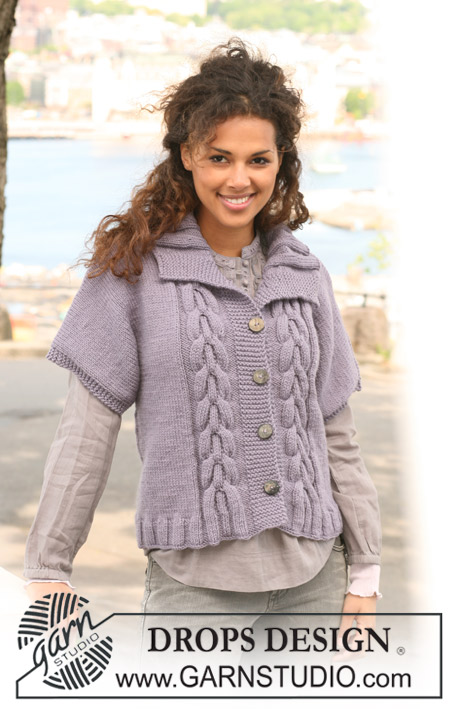
DROPS jacket in stocking st with front bands in rib in 2 strands ”Alpaca” or 1 strand ”Nepal”.
DROPS 126-15 |
|
|
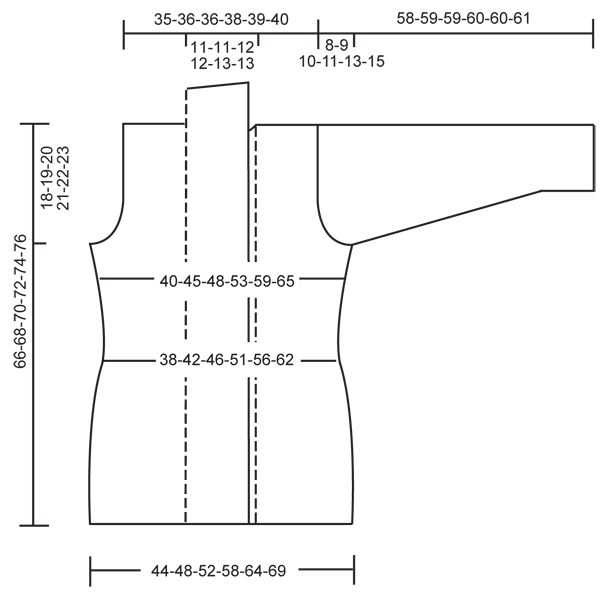
GARTER ST (back and forth on needle): K all rows. INCREASING TIP: Inc 1 st by making 1 YO. On next row work YO into back of loop to avoid a hole. BUTTONHOLES: Make buttonholes on right front band. 1 buttonhole = cast off 1 st and cast on 1 new st on next row. Make buttonholes when piece measures 18 cm, 27 cm and 36 cm, measured from bottom edge of jacket. -------------------------------------------------------- JACKET: Worked back and forth on circular needle. Cast on 164-184-196-220-244-268 sts on circular needle size 4.5 mm with 2 strands Alpaca or 1 strand Nepal (includes 1 edge st towards front edge each side). Work 1 edge st, rib K2 / P2 until 3 sts remain, finish with K2 and 1 edge st. Continue in rib like this until piece measures 7 cm. Now K 1 row from RS AT THE SAME TIME dec 32-36-38-42-48-52 sts evenly = 132-148-158-178-196-216 sts. Change to circular needle size 5 mm. Continue in stocking st. Insert 2 markers in piece, 29-33-35-40-44-49 sts in from each side (back piece = 74-82-88-98-108-118 sts). When piece measures 10 cm dec 1 st each side of both markers and repeat the dec on every 4.5-4.5-4.5-3.5-3.5-3.5 cm a total of 5-5-5-6-6-6 times = 112-128-138-154-172-192 sts. When piece measures 34 cm inc 1 st each side of both markers. Repeat the inc when piece measures 39-40-41-42-43-44 cm = 120-136-146-162-180-200 sts. When piece measures 48-49-50-51-52-53 cm cast off 6 sts for armhole each side (= 3 sts each side of marker) and complete each piece separately. BACK PIECE: = 62-70-76-84-94-104 sts. Cast off for armhole at beg of row each side as follows: 2 sts 0-1-2-3-5-7 times and 1 st 1-2-3-4-4-4 times = 60-62-62-64-66-68 sts. When piece measures 64-66-68-70-72-74 cm cast off the middle 16-16-18-18-20-20 sts for neck and complete each shoulder separately. Cast off 1 st on neckline on next row = 21-22-21-22-22-23 sts left on shoulder. Cast off when piece measures 66-68-70-72-74-76 cm. LEFT FRONT PIECE: = 23-27-29-33-37-42 sts. Cast off for armhole at the side as described for back piece = 22-23-22-23-23-24 sts left on shoulder (includes 1 edge st towards front edge). Cast off when piece measures 66-68-70-72-74-76 cm. RIGHT FRONT PIECE: Like left front piece, but mirrored. SLEEVE: Worked in the round. Cast on 52-52-56-60-60-60 sts on double pointed needles size 4.5 mm with 2 strands Alpaca or 1 strand Nepal. Work rib K2 / P2 until piece measures 5 cm. K 1 round AT THE SAME TIME dec 12-10-12-14-12-10 sts evenly = 40-42-44-46-48-50 sts. Change to double pointed needles size 5 mm. Insert a marker at beg of round. Continue in stocking st. When piece measures 8 cm inc 1 st each side of marker and repeat the inc on every 7.5-6.5-5-4-3.5-3 cm a total of 6-7-8-10-11-12 times = 52-56-60-66-70-74 sts. When piece measures 50-50-49-49-47-46 cm (less for the larger sizes because of longer sleeve cap and wider shoulder) cast off 6 sts mid under sleeve (= 3 sts each side of marker). Cast off for sleeve cap at beg of row each side as follows: 2 sts 2 times, 1 st 3-4-5-6-8-10 times, then 2 sts each side until piece measures 57-58-58-59-59-60 cm. Cast off 3 sts 1 time each side and cast off remaining sts. ASSEMBLY: Sew shoulder seams. Set in sleeves. LEFT FRONT BAND/NECKLINE: Pick up 164-168-172-180-184-188 sts (approx 22 sts/10 cm) with start mid back on circular needle size 4.5 mm with 2 strands Alpaca or 1 strand Nepal (pick up inside cast off row on back piece and inside 1 edge st along the side of jacket). K 1 row from WS and continue in rib as follows from RS: 1 edge st, K1, * P2, K2 *, repeat from *-* and finish with 2 garter sts – see above. Continue like this until rib measures 5-5-6-6-7-7 cm. Now inc 1 st in each of the top 10-10-11-11-12-12 K-sections (not in K1 at beg of row) – See INCREASING TIP! = 174-178-183-191-196-200 sts. Continue until rib measures 9-9-10-10-11-11 cm. Now inc 1 st in each of the top 8-8-9-9-10-10 K-sections (not in K1 at beg of row) = 182-186-192-200-206-210 sts. Continue until rib measures 13-13-14-14-15-15 cm. Cast off with K over K and P over P. RIGHT FRONT BAND/NECKLINE: Like left side, but beg from bottom edge. AT THE SAME TIME when piece measures 3 cm make BUTTONHOLES – see above – and repeat when piece measures 11-11-12-12-13-13 cm. Cast off with K over K and P over P when rib measures 13-13-14-14-15-15 cm. FURTHER ASSEMBLY: Sew front bands tog mid back inside 1 edge st. Sew buttons on left front band. |
|
 |
|
Have you finished this pattern?Tag your pictures with #dropspattern #triptotowncardigan or submit them to the #dropsfan gallery. Do you need help with this pattern?You'll find 21 tutorial videos, a Comments/Questions area and more by visiting the pattern on garnstudio.com. © 1982-2026 DROPS Design A/S. We reserve all rights. This document, including all its sub-sections, has copyrights. Read more about what you can do with our patterns at the bottom of each pattern on our site. |


With over 40 years in knitting and crochet design, DROPS Design offers one of the most extensive collections of free patterns on the internet - translated to 17 languages. As of today we count 324 catalogues and 12290 patterns translated into English (UK/cm).
We work hard to bring you the best knitting and crochet have to offer, inspiration and advice as well as great quality yarns at incredible prices! Would you like to use our patterns for other than personal use? You can read what you are allowed to do in the Copyright text at the bottom of all our patterns. Happy crafting!
Post a comment to pattern DROPS 126-15
We would love to hear what you have to say about this pattern!
If you want to leave a question, please make sure you select the correct category in the form below, to speed up the answering process. Required fields are marked *.