
Popular categories
Looking for a yarn?


Comments / Questions (43)
![]() MajLis Olofsson wrote:
MajLis Olofsson wrote:
Hej! Stickar modell 119 -23 i Alpacka stl M - med lång ärm. Ärmkullens längd stämmer inte överens med ärmhålets längd på bak - och framstycke. Man ska ju sticka ihop 3 och 3 maskor på näst sista varvet på ärmen - går det att säga ungefär hur många maskor som är kvar att sticka ihop? Mvh MajLis O
11.10.2024 - 16:17DROPS Design answered:
Hej MajLis, når du begynder at tage ind har du ca 10 cm tilbage, du strikker 32 pinde på 10 cm, og tager ind i hver side 4+4+2+2 = 28 pinde tilbage. dvs 108m - 12 - 28 = ca 68 masker tilbage når du skal strikke maskerne sammen :)
16.10.2024 - 13:32
![]() Nathalie Margat wrote:
Nathalie Margat wrote:
Bonjour, comment faire pour la bande fantaisie en rangs raccourcis. Je ne sais pas comment commencer. Merci
18.02.2021 - 21:26DROPS Design answered:
Bonjour Mme Margat, tricotez comme indiqué sous RANGS RACCOURCIS: tricotez 4 rangs sur toutes les mailles du devant = toutes celles sur l'aiguille (= comme avant, bordure comprise), puis tricotez 2 rangs de M.1 seulement (= les autres mailles restent sur l'aiguille sans être tricotées), puis tricotez 6 rangs sur toutes les mailles , et tricotez 2 rangs de M.1 - répétez ces 14 rangs = vous avez tricotez 14 rangs sur les mailles de M.1 mais seulement 10 rangs sur toutes les mailles du devant. Commencez ces rangs sur l'envers pour le devant gauche et sur l'endroit pour le devant droit. N'oubliez pas de diminuer pour l'encolure et l'emmanchure en même temps. Bon tricot!
19.02.2021 - 07:51
![]() Nathalie Margat wrote:
Nathalie Margat wrote:
Bonjour,pouvez vous m'expliquer comment faire pour les devant gauche et droite du modele 119-23 pour les rangs raccourcis faut il tricoter sur la bande point mousse, et pour l'echancrure..sur la grille m1a que représente les cadre noir et les barrées. Les jetés ce font il un après l autre. Merci
16.02.2021 - 10:28
![]() Nathalie Margat wrote:
Nathalie Margat wrote:
Que veut dire tricoter 6 rangs sur toute les mailles modele 119-23.merci
14.02.2021 - 08:29DROPS Design answered:
Bonjour Mme Margat, ceci signifie qu'aux 6 rangs suivants, vous tricotez toutes les mailles sur l'aiguille (= celles de M.1 et les autres). Bon tricot!
15.02.2021 - 08:55
![]() NATHALIE MARGAT wrote:
NATHALIE MARGAT wrote:
Bonjour je ne comprend pas les symboles sur la grille M1a du modèle 119-23. Merci
14.02.2021 - 08:11DROPS Design answered:
Bonjour Mme Margat, aux rangs 1, 3, 5, 7, 13, 15, 17, 19, vous devez faire des double-jetés (et ne tricoter qu'un seul des 2 au rang suivant), aux rangs 9 et 21, vous devez faire des jetés - les symboles vont être différenciés dans la légende. Retrouvez les autres symboles dans la légende(M.1 se tricote au point mousse: à l'endroit sur l'endroit et à l'endroit sur l'envers). Bon tricot!
15.02.2021 - 08:54
![]() Irene Kjærsgaard wrote:
Irene Kjærsgaard wrote:
Hej! Hvornår skal jeg tage ind i blondekanten? I kanten af de 9 m.? eller mellem kant og trøje? M.v.h. Irene
29.06.2020 - 16:59DROPS Design answered:
Hej Irene, Du tager ind indenfor M.1 ifølge INDTAGNINGSTIPS som står øverst i opskriften. God fornøjelse!
30.06.2020 - 13:33
![]() KS Lowery wrote:
KS Lowery wrote:
I'm a bit confused as to where the short rows start and end. Do you do an entire M1a or M1b before returning to the front or do you just work until the bind off and go back to the whole piece? It's clear that you start with the whole piece and start the first collar row on the WS but that is where I got lost. Thank you!
28.02.2018 - 15:58DROPS Design answered:
Dear Mrs Lowery, you will work M.1 at the end of row (left front piece) when working all sts, and at the same time, work some extra rows in M.1 only, see also SHORTENED ROWS at the beg of the pattern. Happy knitting!
28.02.2018 - 17:38
![]() Claire Daoust wrote:
Claire Daoust wrote:
L'ouverture sur le coté pour le lien est du coté droit sur la photo mais faite sur le devant gauche. Je ne comprends pas du tout ou les liens vont. Lequel passe par l'ouverture ?
26.01.2018 - 19:41DROPS Design answered:
Bonjour Mme Daoust, c'est le lien du devant gauche qui va passer dans l'ouverture du coté droit puis dans le dos et on va le nouer avec le lien du devant droit, sur le côté gauche. Bon tricot!
29.01.2018 - 08:38
![]() Claire Daoust wrote:
Claire Daoust wrote:
Pour le lien, je relève les mailles dans la partie droite du point mousse juste avant les volants
26.01.2018 - 18:19DROPS Design answered:
Bonjour Mme Daoust, tout à fait, les mailles du lien sont relevées juste avant M.1. Bon tricot!
29.01.2018 - 08:35Claire Daoust wrote:
Rabattre pour l'arrondi de la manche en début de rang de chaque côté tous les rangs : 1 fois 4 m, 1 fois 2 m puis 1 m de chaque côté jusqu'à ce que la manche mesure 18 cm. J'aimerais savoir si je rabats une maille de chaque coté 1 fois seulement ou plusieurs fois jusqu'à 18 cm
15.11.2017 - 18:10DROPS Design answered:
Bonjour Mme Daoust, vous rabattez 1 maille de chaque côté jusqu'à ce que la manche mesure 18 cm, le nombre de fois dépendra de votre tension en hauteur. Bon tricot!
16.11.2017 - 08:48
|
|||||||||||||||||||
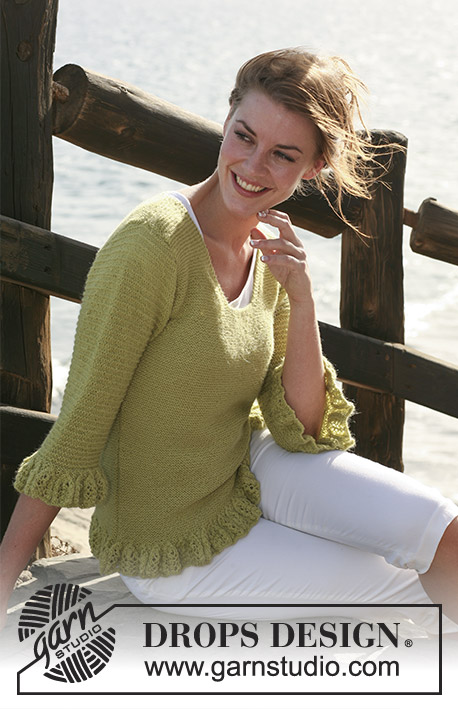
Queen of Ruffles#queenofrufflescardigan |
|||||||||||||||||||
 |
 |
||||||||||||||||||
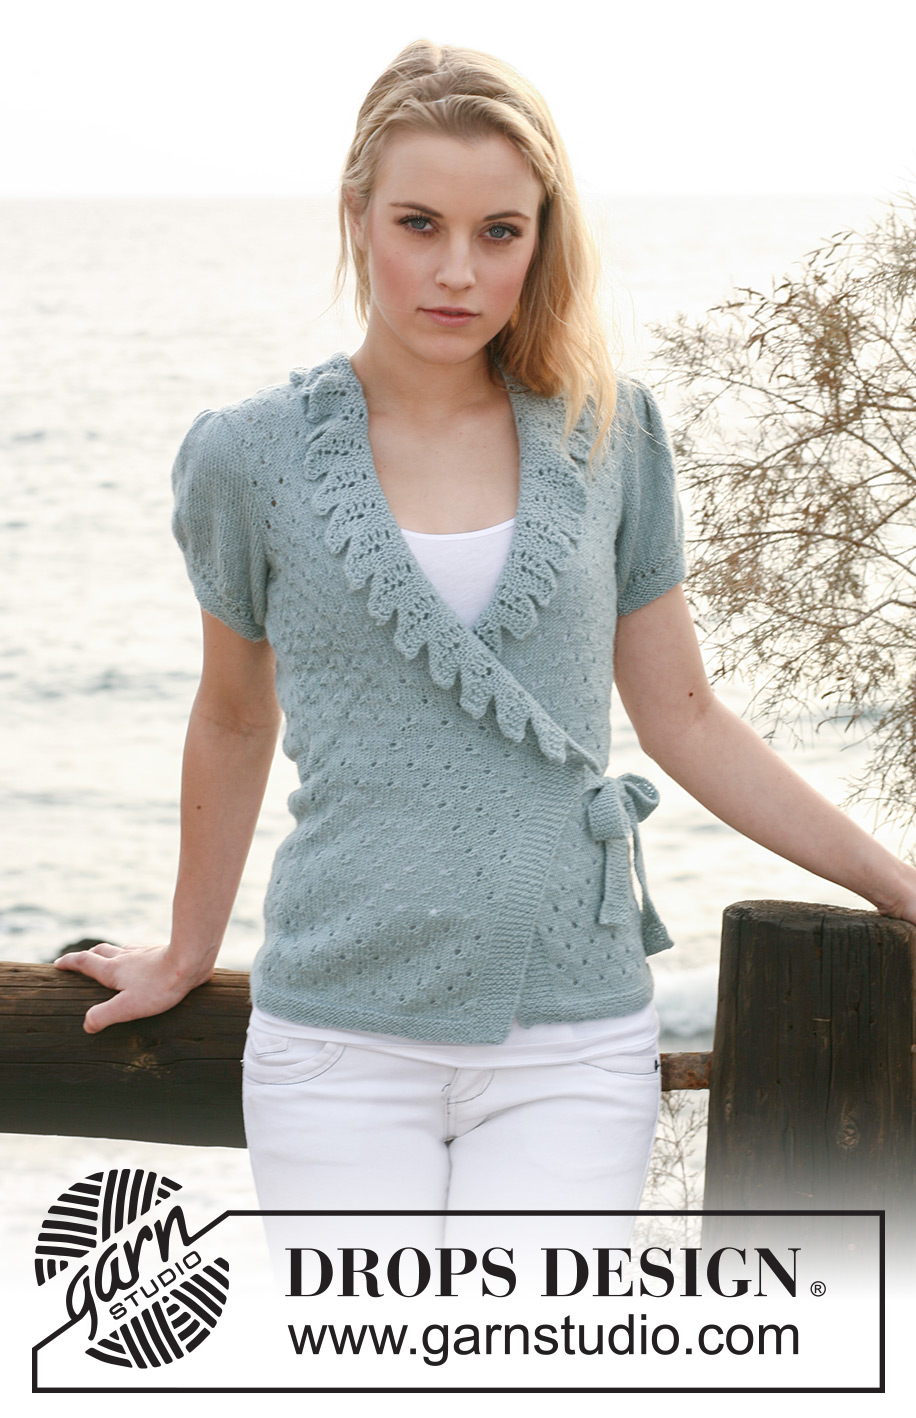
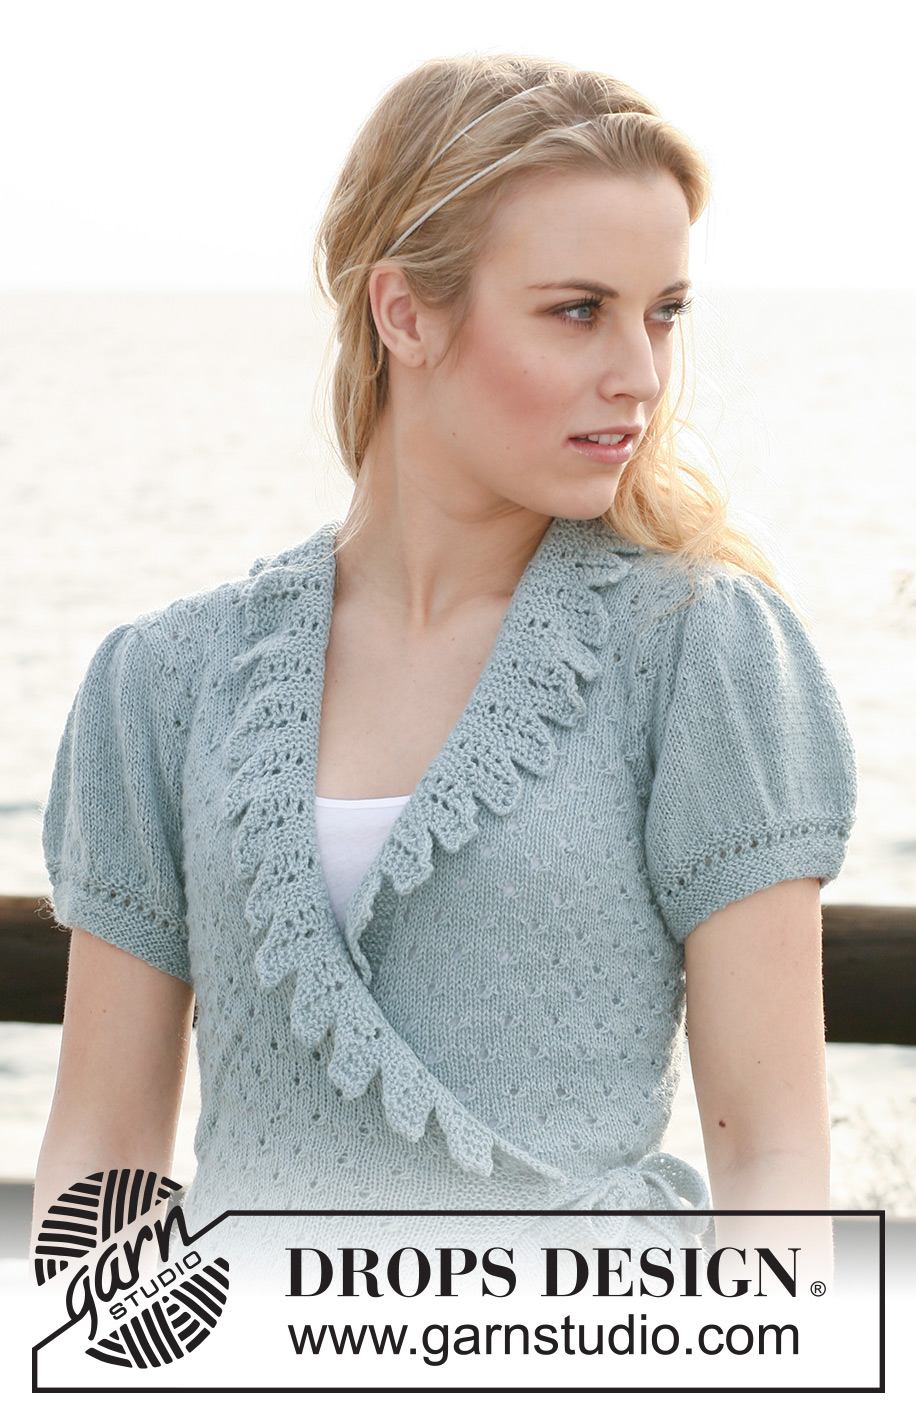
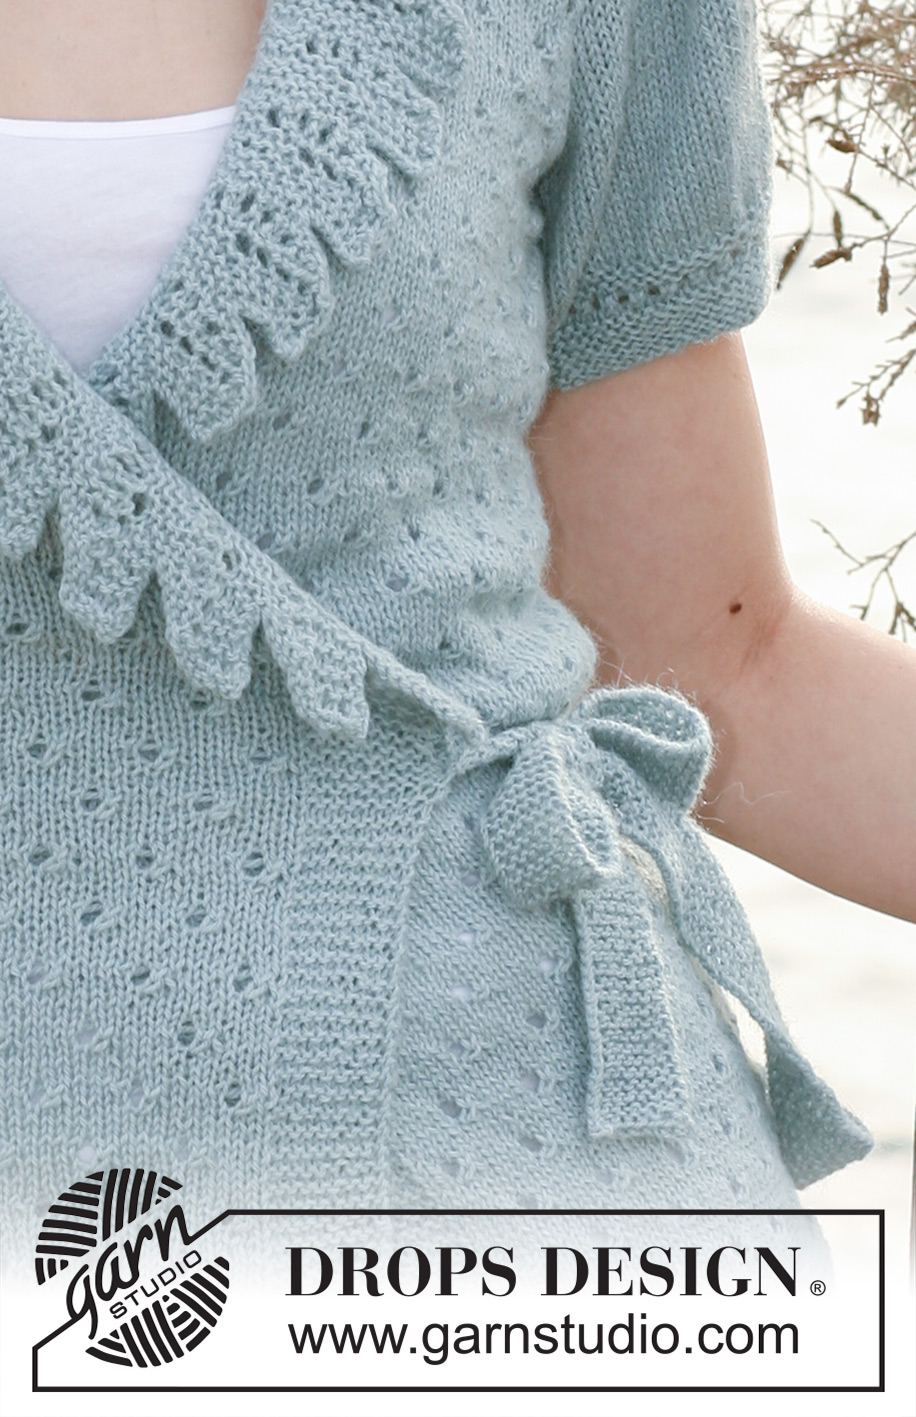
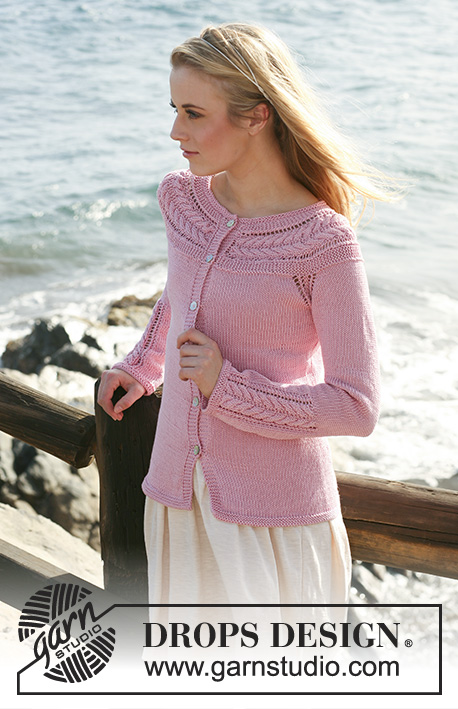
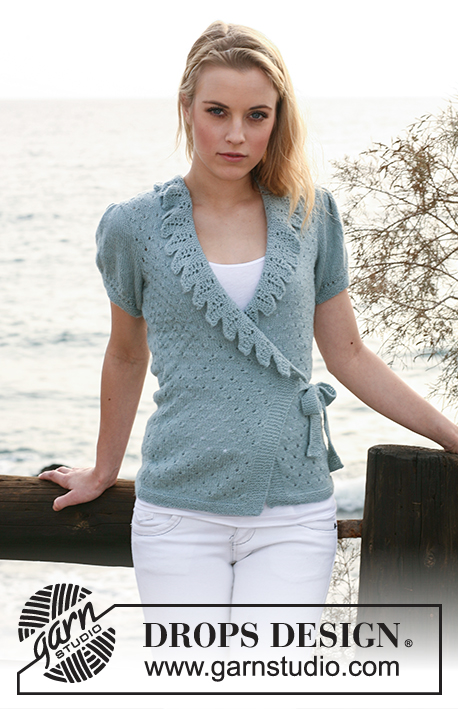
DROPS wrap-round jacket in ”Alpaca” with flounces along front pieces and short puff sleeves. Size: S to XXXL
DROPS 119-23 |
|||||||||||||||||||
|
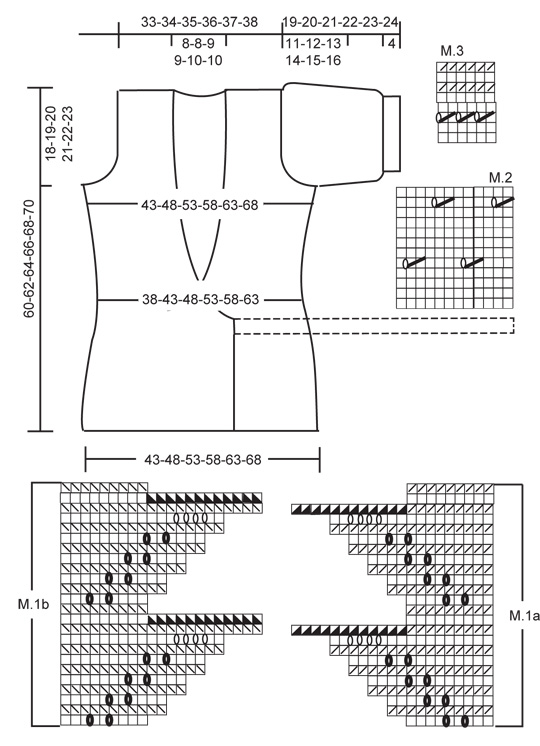
GARTER ST (back and forth on needle): K all rows. PATTERN: See diagrams M.1 to M.3 - Diagrams show the pattern from RS! DECREASING TIP (applies to the wrap-round): Make all dec from RS inside M.1 on a row worked on all sts. Dec as follows BEFORE M.1: K2 tog. Dec as follows AFTER M.1: slip 1 st as if to K, K1, psso. SHORTENED ROWS: Work extra rows on the flounce along the wrap-round edge on front piece in order to make it sit nicely. Do this as follows: * Work 4 rows on all sts on front piece, work 2 rows only on M.1, work 6 rows on all sts, work 2 rows only on M.1 *, repeat from *-*. -------------------------------------------------------- -------------------------------------------------------- BACK PIECE: Worked back and forth on needle. LOOSELY cast on 104-116-128-140-152-164 sts (includes 1 edge st each side) on needle size 2.5 mm with Alpaca. Work 8 rows GARTER ST – see above! Change to needle size 3 mm. Continue in M.2 with 1 edge st each side in garter st (first row = RS). When piece measures 4-5-6-7-8-9 cm dec 1 st each side, and repeat the dec on every 2.5 cm a total of 6 times (work sts not fitting into M.2 in stocking st) = 92-104-116-128-140-152 sts. When piece measures 21-22-23-24-25-26 cm inc 1 st each side, and repeat the inc on every 3 cm a total of 6 times (incorporate inc sts in M.2 as you go along) = 104-116-128-140-152-164 sts. When piece measures 42-43-44-45-46-47 cm cast off for armhole each side at the beg of every row: 4 sts 1-1-1-1-2-2 times, 3 sts 0-1-2-3-3-4 times, 2 sts 2-3-4-5-5-6 times and 1 st 4-4-4-4-5-5 times = 80-82-84-86-88-90 sts left on needle. Continue in M.2 – work sts not fitting into M.2 in stocking st. When piece measures 58-60-62-64-66-68 cm work 2 rows garter st on the middle 22-22-24-24-26-26 sts (work remaining sts as before), and then cast off the middle 20-20-22-22-24-24 sts for neck and complete each shoulder (= 30-31-31-32-32-33 sts) separately. Continue in M.2 with 1 garter st towards neck until piece measures 60-62-64-66-68-70 cm, cast off. LEFT FRONT PIECE: Worked back and forth on needle. LOOSELY cast on 64-70-76-82-88-94 sts (includes 1 edge st at the side) on needle size 2.5 mm with Alpaca. Work 8 rows garter st. Change to needle size 3 mm and continue as follows from the side (first row = RS): 1 edge st in garter st, M.2 on 54-60-66-72-78-84 sts and 9 garter sts towards mid front. READ ALL OF THE FOLLOWING SECTION BEFORE CONTINUING! DEC AT THE SIDE: When piece measures 4-5-6-7-8-9 cm dec 1 st 6 times at the side as described for back piece. PATTERN: When piece measures 20-21-22-23-24-25 cm continue as follows (from RS): 1 edge st in garter st, M.2 until 9 sts remain, work M.1a on these 9 sts – at the same time on row 2 beg working SHORTENED ROWS – see above! DEC ON WRAP ROUND: At the same time as beg M.1a on the 9 sts towards mid front dec 1 st on next row from RS – SEE DECREASING TIP, and repeat the dec on every other row a total of 4-4-4-4-5-5 times, then on every 4th row 4-4-5-5-5-5 times and then on every 6th row 5-5-5-5-5-5 times. INC AT THE SIDE: When piece measures 21-22-23-24-25-26 cm inc at the side as described for back piece. ARMHOLE: When piece measures 42-43-44-45-46-47 cm cast off for armhole at the side as described for back piece. When all dec and inc are complete there are 1 edge st + 29-30-30-31-31-32 sts of M.2 + M.1a (varies from 9-21 sts) left on needle. When piece measures 60-62-64-66-68-70 cm cast off 30-31-31-32-32-33 sts for shoulder = sts in M.1a left on needle for collar. To make collar sit nicely on neckline on back piece continue in M.1a on these sts as follows (first row = RS): 1 row on all sts, * 2 rows on all sts except the 3 first sts (i.e. towards shoulder), 2 rows on all sts *, repeat from *-* until collar measures approx 5-5-5.5-5.5-6-6 cm along the shorter side (adjust to a full repeat), slip sts on a stitch holder. TIE STRING: Pick up 8 sts on needle size 2.5 mm along garter sts on front piece just before the dec on wrap round beg. Work garter st for approx 75-80-85-90-95-100 cm, cast off. RIGHT FRONT PIECE: Like left front piece, but mirrored, i.e. when piece measures 20-21-22-23-24-25 cm continue as follows (from RS): M.1b on the first 9 sts, M.2 on 54-60-66-72-78-84 sts and 1 edge st in garter st. NOTE: Beg working shortened rows on the same row as beg M.1b. First row on collar = WS. Work garter st on tie string for approx 35-40-40-45-50-50 cm. SLEEVE: Worked back and forth on needle. LOOSELY cast on 68-72-76-80-84-88 sts (includes 1 edge st each side) on needle size 2.5 mm with Alpaca. Work 12 rows garter st, and then M.3 (first row = RS). After M.3 change to needle size 3 mm and work next row as follows (from RS): K1, 1 YO, * K2, 1 YO *, repeat from *-*, finish with K1 = 102-108-114-120-126-132 sts. P 1 row from WS, P YO into back of loop to avoid a hole. Continue in stocking st. When piece measures 8 cm (for all sizes) cast off for sleeve cap each side at the beg of every row: 4 sts 1 time and 2 sts 1 time, then 1 st each side until piece measures 18-19-20-21-22-23 cm. On next row from RS K3 tog across the row and cast off in P sts from WS. ASSEMBLY: Sew shoulder seams. Sew collar tog mid back, edge to edge and sew collar to neckline on back piece – sew edge to edge to avoid a chunky seam. Set in sleeves and sew sleeve and side seams inside 1 edge st – leave an opening in seam on the right side approx 18-19-20-21-22-23 cm from bottom edge and 2 cm from the top and use this hole for tie string |
|||||||||||||||||||
Diagram explanations |
|||||||||||||||||||
|
|||||||||||||||||||
 |
|||||||||||||||||||
Have you finished this pattern?Tag your pictures with #dropspattern #queenofrufflescardigan or submit them to the #dropsfan gallery. Do you need help with this pattern?You'll find 19 tutorial videos, a Comments/Questions area and more by visiting the pattern on garnstudio.com. © 1982-2026 DROPS Design A/S. We reserve all rights. This document, including all its sub-sections, has copyrights. Read more about what you can do with our patterns at the bottom of each pattern on our site. |
|||||||||||||||||||


With over 40 years in knitting and crochet design, DROPS Design offers one of the most extensive collections of free patterns on the internet - translated to 17 languages. As of today we count 325 catalogues and 12298 patterns translated into English (UK/cm).
We work hard to bring you the best knitting and crochet have to offer, inspiration and advice as well as great quality yarns at incredible prices! Would you like to use our patterns for other than personal use? You can read what you are allowed to do in the Copyright text at the bottom of all our patterns. Happy crafting!
Post a comment to pattern DROPS 119-23
We would love to hear what you have to say about this pattern!
If you want to leave a question, please make sure you select the correct category in the form below, to speed up the answering process. Required fields are marked *.