
Popular categories
Looking for a yarn?


Comments / Questions (25)
![]() Dangle wrote:
Dangle wrote:
J’ai bien lu votre réponse cependant pour le modèle 117-41 il est spécifié de diminuer à 69 cm et de rabattre à 70 cm le restant des mailles Hors l’exemple montré diminué et rabat en même temps
03.01.2020 - 15:20DROPS Design answered:
Bonjour Mme Dangle, la vidéo était juste pour vous montrer le principe de la technique, suivez bien les indications du modèle comme elles sont indiquées: diminuez à 69 cm et rabattez à 70 cm. Bon tricot!
03.01.2020 - 16:05
![]() Dangle wrote:
Dangle wrote:
Je ne comprends pas le fait de diminuer 3 mailles au dessus de M1 Cela veut il dire que c’est 3 mailles doivent être diminuer au centre de la torsade
03.01.2020 - 09:42DROPS Design answered:
Bonjour Mme Dangle, tout à fait, il faut plus de mailles en torsades qu'en jersey pour la même largeur, ainsi, en diminuant, on va bien conserver la bonne largeur d'épaules. Vous trouverez ici un exemple en vidéo. Bon tricot!
03.01.2020 - 10:22
![]() Luisa wrote:
Luisa wrote:
Muchas gracias por el patron me gustaria que aclararan el significado de M1 gracias
04.08.2019 - 13:15DROPS Design answered:
Hola Luisa. El diagrama M.1 es para trabajar la trenza. Las abreviaturas del diagrama están explicadas encima del diagrama. https://www.garnstudio.com/lesson.php?id=68&cid=23 - aquí tienes un enlace para ver cómo se trabaja el diagrama.
08.09.2019 - 13:58
![]() Karmen wrote:
Karmen wrote:
Estoy siguiendo este patrón para hacerme una chaqueta, hay una abreviatura que no entiendo es rem ¿ que quiere decir? Gracias , hace poco he descubierto esta página y es genial!
05.02.2015 - 15:27DROPS Design answered:
Hola Karmen. Rem = rematar (es decir, cerrar los pts al final de la labor y asegurar los hilos)
08.02.2015 - 12:28
![]() Peggie wrote:
Peggie wrote:
The pattern states needle 11 or 11stsx15rows=4x4no matter what size needle with 11sts I can't get 4in could this be wrong? I have tried different needle sizes Thank you
28.05.2014 - 01:26DROPS Design answered:
Dear Peggie, to get the correct tension, you may have to go up/down a needle size to obtain the correct knitting tension. Work sts a different way (continental or US/UK method) may also help you to get the correct tension. Happy knitting!
28.05.2014 - 09:12
![]() Lena wrote:
Lena wrote:
Hallo ich verstehe den wortlaut beim halsabnehmen nicht. vor bzw nach den 17M. bedeutet das beim rechten vorderteil nach dem zopf, beim linken vor dem zopf? oder bei beiden vorderteilen je einmal vor und nach dem zopf? wenn ja, werden da die blendenmaschen immer weniger. kann mir jemand helfen bitte? danke
11.05.2013 - 20:23Yary Yañez wrote:
Hola, estoy haciendo este modelo pero no entiendo como hacer la sisa,me explicas por vueltas
18.08.2012 - 19:10DROPS Design answered:
Yary, En la pieza de la espalda, cuando la pieza mida 41-42-43-44-45-46 cm, rematas para la sisa, en cada lado de la pieza, al inicio de cada vta (es decir, al inicio de la vta por el LD y al inicio de la vta por el LR): 3 pts 1 vez, 2 pts 1-2-2-3-4-5 veces (según la talla que estés tejiendo) y 1 pt 1-1-2-3-3-5 veces (según la talla)= 38-38-40-40-42-42 pts restantes. Para las piezas de los frentes se trabaja igual, pero solo de un lado.
19.08.2012 - 04:12
![]() Julie wrote:
Julie wrote:
J'ai tricoté ce modèle pour ma maman et elle ne l'a pas quitté de tout l'hiver!J'ai adoré le tricoter car la laine est super douce, facile à torsader et avec des aiguilles 8 il s'est réalisé très vite.
01.11.2010 - 10:03
![]() Thoma wrote:
Thoma wrote:
Hallo, hilfreich wäre es, im Diagramm die Reihen mit Hilfe von Zahlen an der Seite durch zu nummerieren, das erleichtert das Arbeiten und die Übersicht enorm. Tschüß Thoma
09.06.2010 - 03:18
![]() Kirsten Buhl wrote:
Kirsten Buhl wrote:
Virkelig flot, kunne også være god med lange ærmer
27.10.2009 - 04:31
|
||||||||||
Winter Transitions#wintertransitionscardigan |
||||||||||
|
|
||||||||||
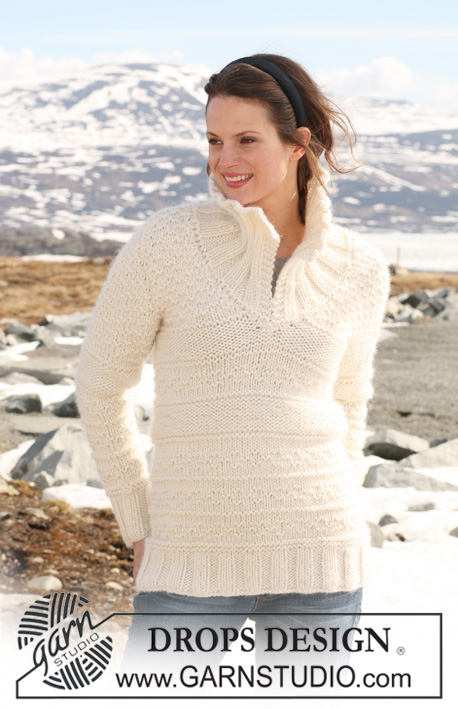
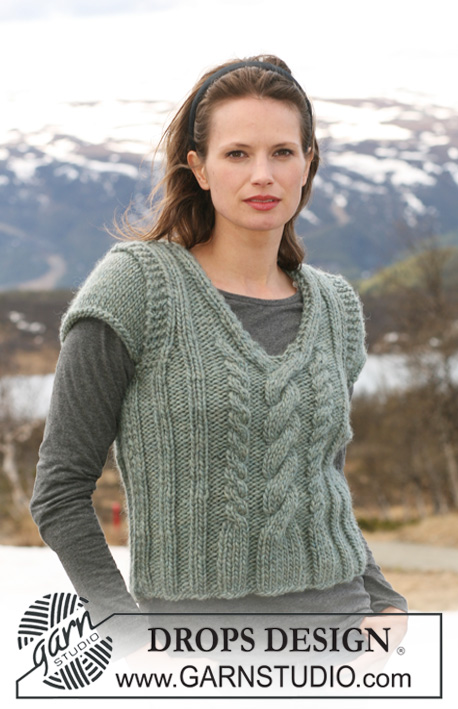
Knitted DROPS jacket with moss st, short sleeves and cables in ”Snow”. Size S to XXXL.
DROPS 117-41 |
||||||||||
|
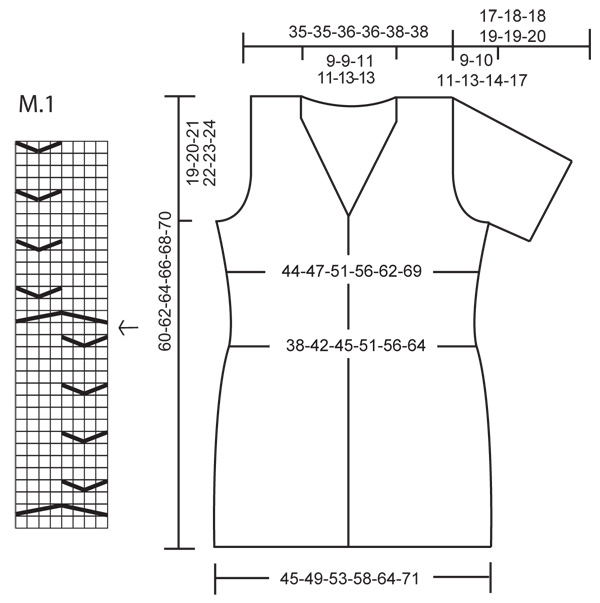
GARTER ST (back and forth on needle): K all rows. MOSS ST: Row 1: * K1, P1 *, repeat from *-*. Row 2: K over P and P over K. Repeat row 2. PATTERN: See diagram M.1. Diagram is seen from RS, first row = WS. The arrow shows where to beg on left front piece. BUTTONHOLES: Make buttonholes on right front band. 1 BUTTONHOLE: Cast off 3rd st from mid front and cast on 1 new st on return row. Make buttonholes when piece measures: SIZE S: 5, 12, 19, 26 and 34 cm SIZE M: 5, 12, 19, 27 and 35 cm SIZE L: 5, 12, 20, 28 and 36 cm SIZE XL: 5, 13, 21, 29 and 37 cm SIZE XXL: 5, 11, 17, 24, 31 and 38 cm SIZE XXXL: 5, 11, 18, 25, 32 and 39 cm DECREASING TIP: Dec for neck inside 17 sts (front band + P2, M.1, P1). Dec by P tog 1 st with first st in moss st. ---------------------------------------------------------- ---------------------------------------------------------- BACK PIECE: Worked back and forth on circular needle. Cast on 52-56-60-66-72-80 sts (includes 1 edge st each side) on circular needle size 8 mm with Snow. Work 8 rows GARTER ST – see above, and then continue in MOSS ST – see above, with 1 edge st each side (K on every row). REMEMBER THE KNITTING TENSION! When piece measures 8 cm dec 1 st each side, and repeat the dec on every 4 cm a total of 4 times = 44-48-52-58-64-72 sts. When piece measures 26 cm inc 1 st each side, and repeat the inc on every 6-6-7-7-8-8 cm a total of 3 times = 50-54-58-64-70-78 sts. When piece measures 41-42-43-44-45-46 cm cast off for armhole each side at the beg of every row: 3 sts 1 time, 2 sts 1-2-2-3-4-5 times and 1 st 1-1-2-3-3-5 times = 38-38-40-40-42-42 sts. When piece measures 56-58-60-62-64-66 cm work garter st on the middle 22-22-24-24-26-26 sts with remaining sts as before. When piece measures 58-60-62-64-66-68 cm cast off the middle 8-8-10-10-12-12 sts for neck, and complete each shoulder separately. Cast off 1 st on neckline on next row = 14 sts left on shoulder. Continue with 6 garter sts towards neckline. Cast off when piece measures 60-62-64-66-68-70 cm. RIGHT FRONT PIECE: Cast on 32-34-36-39-42-46 sts (includes 1 edge st at the side and 6 front band sts towards mid front) on needle size 8 mm with Snow. Work 8 rows garter st and then continue as follows from mid front and RS: 6 moss sts (= front band), P2, K2, 1 YO, K1, 1 YO, K1, 1 YO, K1, P2, and finish with 16-18-20-23-26-30 moss sts and 1 edge st = 35-37-39-42-45-49 sts. Work next row as follows from WS: 1 edge st, 16-18-20-23-26-30 moss sts, K2, M.1 (= 8 P sts), K2, 6 moss sts (work YO into back of loop to avoid a hole). Remember BUTTONHOLES – see above! Continue in pattern like this. When piece measures 8 cm dec at the side as described for back piece = 31-33-35-38-41-45 sts. When piece measures 26 cm inc at the side as described for back piece. AT THE SAME TIME when piece measures 35-36-37-38-39-40 cm dec 1 st for neck towards mid front – see DECREASING TIP – and repeat the dec on every 2 cm a total of 11-11-12-12-13-13 times. AT THE SAME TIME when piece measures 41-42-43-44-45-46 cm cast off for armhole at the side as described for back piece. When all dec and inc are complete there are 17 sts left on needle. When piece measures 59-61-63-65-67-69 cm dec 3 sts on M.1 = 14 sts left on shoulder. Work 1 row and cast off, piece measures approx 60-62-64-66-68-70 cm. LEFT FRONT PIECE: Like right front piece, but mirrored and without buttonholes. Work first pattern row as follows, from the side and RS: 1 edge st, 16-18-20-23-26-30 moss sts, P2, K1, 1 YO, K1, 1 YO, K1, 1 YO, K2, P2, 6 moss sts (= front band). NOTE! On left front piece beg M.1 in the middle of diagram, see arrow for start. SLEEVE: Worked back and forth on needle. Cast on 42-42-44-48-50-54 sts on needle size 8 mm (includes 1 edge st each side). K 1 row from WS and continue in moss st. When piece measures 8-8-7-6-5-3 cm (less for the larger sizes because of longer sleeve cap and wider shoulder) cast off for sleeve cap each side at the beg of every row: 3 sts 1 time, 2 sts 1 time, 1 sts 3-4-4-6-7-9 times, then 2 sts each side until piece measures 16-17-17-18-18-19 cm, now cast off 3 sts 1 time each side, and cast off remaining sts. Piece measures approx 17-18-18-19-19-20 cm. ASSEMBLY: Sew shoulder seams. Set in sleeves. Sew side and sleeve seams inside 1 edge st. Sew on buttons to fit buttonholes. |
||||||||||
Diagram explanations |
||||||||||
|
||||||||||
 |
||||||||||
Have you finished this pattern?Tag your pictures with #dropspattern #wintertransitionscardigan or submit them to the #dropsfan gallery. Do you need help with this pattern?You'll find 21 tutorial videos, a Comments/Questions area and more by visiting the pattern on garnstudio.com. © 1982-2026 DROPS Design A/S. We reserve all rights. This document, including all its sub-sections, has copyrights. Read more about what you can do with our patterns at the bottom of each pattern on our site. |
||||||||||


With over 40 years in knitting and crochet design, DROPS Design offers one of the most extensive collections of free patterns on the internet - translated to 17 languages. As of today we count 324 catalogues and 12290 patterns translated into English (UK/cm).
We work hard to bring you the best knitting and crochet have to offer, inspiration and advice as well as great quality yarns at incredible prices! Would you like to use our patterns for other than personal use? You can read what you are allowed to do in the Copyright text at the bottom of all our patterns. Happy crafting!
Post a comment to pattern DROPS 117-41
We would love to hear what you have to say about this pattern!
If you want to leave a question, please make sure you select the correct category in the form below, to speed up the answering process. Required fields are marked *.