
Popular categories
Looking for a yarn?


Comments / Questions (75)
![]() Jeanne Quigley wrote:
Jeanne Quigley wrote:
Do I wrap and turn on the short rows or just turn?
30.01.2025 - 18:25DROPS Design answered:
Dear Mrs Quicgley, we just turned here but you can use your favorite technique for short rows. Happy knitting!
31.01.2025 - 08:13
![]() Murielle wrote:
Murielle wrote:
Taglia m, per arrivare al segnapunti 3 (dopo 78 m, rimangono 42), faccio 2 m e giro, 4 ma e giro, 6 m e giro…aggiungo 2 m fino alla 78 m, sono quindi in totale 39 volte gli aumenti di 2?non sono troppi? Inoltre, va bene se faccio il wrap and turn quando giro? grazie mille
13.03.2018 - 13:15DROPS Design answered:
Buongiorno Murielle. Quando inserisce i segnapunti parte dalla vita verso il basso. Dopo il terzo segnapunti rimangono 42 maglie. I ferri accorciati si lavorano dal basso verso l'alto. Quindi quando deve lavorare fino al segnapunti 3, deve lavorare sulle 42 maglie nella parte in basso della gonna. In tutto 21 aumenti di 2 m. Il wrap and turn va benissimo. Buon lavoro!
13.03.2018 - 13:57
![]() Paul wrote:
Paul wrote:
Immer nach 2 M. mehr abdrehen Was ist damit gemeint, umdrehen?
19.04.2016 - 21:47DROPS Design answered:
Liebe Bianca, ja es ist gemeint, dass Sie an dieser Stelle wenden. Diese ältere Anleitung ist noch etwas holprig übersetzt, wir entschuldigen uns dafür.
20.04.2016 - 08:02
![]() Venetia Caine wrote:
Venetia Caine wrote:
I'm really loving knitting this pattern. I seems to me that there might be an error towards the end, where it says one should knit until there is a certain length between markers 2 and 3. Given that the markers travel with the knitting, the distance between the two of them is always going to be the same from beginning to end, surely? Or perhaps I have not understood something. Thank you for your help.
30.12.2014 - 16:30DROPS Design answered:
Dear Mrs Caine, you will measure in knitting direction from cast on edge but place your tape measure between markers 2 and 3 (place the skirt flat). Happy knitting!
31.12.2014 - 12:40
![]() Ulli wrote:
Ulli wrote:
Der Rock ist oben (Taille) zu weit geworden, wie kann ich abhilfe schaffen, ohne alles wieder autrennen zu müssen?
13.09.2014 - 19:36DROPS Design answered:
Eine Idee wäre, oben noch einen Beleg anzustricken, den Sie nach innen umklappen, und dort ein Gummiband einzuziehen. Dafür fassen Sie aus dem Rand aus jeder 2. R (also aus jedem "Knötchen", d.h. aus jeder Krausrippe) 1 M auf, stricken 1 Rd li und dann wenige cm glatt re. Den Beleg nähen Sie innen am Rock mit einer Öffnung für das Gummiband fest. Oder Sie stricken oben ein Rippenmuster an, dafür müssten Sie eine Maschenprobe machen und ausrechnen, wie viele M Sie für Ihre Taille benötigen.
15.09.2014 - 15:28
![]() J.Freynhagen wrote:
J.Freynhagen wrote:
Hallo, wahrscheinlich habe ich einfach einen Denkfehler habe ich komme über einen gewissen Punkt bei dieser Anleitung einfach nicht hinweg. Ersten ist im Anfangsteil der Anleitung von einem 4 Makierungsfaden die Rede und dieser taucht später nie wieder auf. Und ich verstehe nicht, wie der Rock im oberen Bereich wieder schmaler wird. laut Bild und Maßangaben müsste dem doch so sein, oder etwa nicht?Über Hilfe wäre ich wirklich dankbar. lg
16.01.2014 - 09:36DROPS Design answered:
Liebe Frau Freynhagen, Sie haben völlig Recht und keinen Denkfehler! Unserer damaligen Übersetzerin ist wohl ein Fehler passiert, es gibt keinen 4. Markierungsfaden. Wir haben die Anleitung nun korrigiert und entschuldigen uns für die Umstände.
17.01.2014 - 15:22
![]() Katka wrote:
Katka wrote:
Beautiful!!!Fabel is super. Moc pěkné, těším se až ji upletu.
22.07.2013 - 15:31
![]() Kristi wrote:
Kristi wrote:
Tere kui olen voldi kudund kas siis tuleb jälle 14 terved rida või nagu alustasin 2 poolikud ja ei sa aru mis mõeldud sm iga teisel real edasi tõsta
07.02.2013 - 07:56DROPS Design answered:
Jah, jälle * alates: *koo kõigi silmustega 10-12-12-14-14-16 rida edasi-tagasi jne.
29.08.2013 - 16:16
![]() Kristi wrote:
Kristi wrote:
Tere ma ei sa hästi aru kuidas seda kududa ,ei sa paarist reast edasi kas saaks kuidagi nii et märkida 1,2,3,4 ja nii edasi kuidas peaks kuduma neid ridasi tänan ette
06.02.2013 - 19:53DROPS Design answered:
Seelik kootakse ristipidi, tehes lühendatud ridu allääres, et tekiks volangid(voldid).
29.08.2013 - 16:14
![]() Tanja Mikner wrote:
Tanja Mikner wrote:
Ich habe eine traumhafte Variante entworfen und würde sie gerne zur Verfügung stellen. Außerdem gibt es einen Fehler in der Anleitung. Wenn Sie mir eine mail schicken, damit ich mehr Platz zum Antworten habe, schicke ich auch gern ein Foto. Herzliche Grüße
24.04.2012 - 20:55DROPS Design answered:
Schicken sie ihre Mail bitte an: deutsch(at)garnstudio.com
25.04.2012 - 10:49
|
|
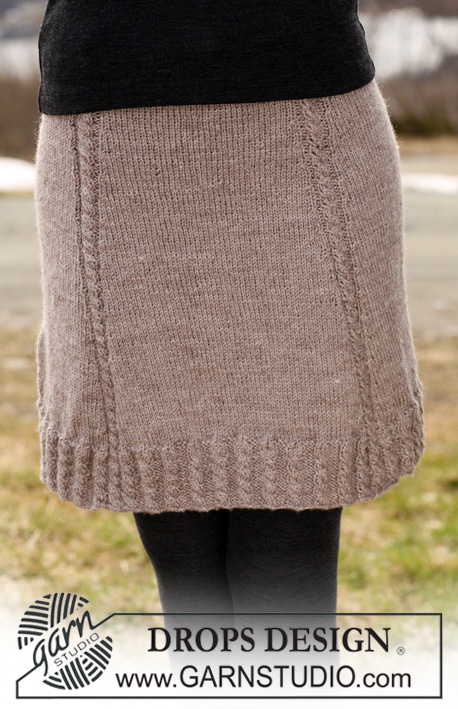
Shitake Flare |
|
|
|
|
DROPS Skirt in ”Fabel” knitted from side to side with shortened rows. Size S - XXXL
DROPS 115-41 |
|
|
SKIRT: Worked back and forth on circular needle from side to side, with shortened rows to make skirt wider towards bottom edge. The skirt is worked in garter st, i.e. K all rows. If you want the skirt 10 cm longer cast on an extra 24 sts, and add these to sts between MARKER-2 and MARKER-3, i.e. work 72-77-82-87-92-97 sts before MARKER-3. Loosely cast on 115-120-125-130-135-140 sts on circular needle size 3 mm with Fabel. Work first row as follows (from waist towards bottom edge): 10 sts, insert MARKER-1, work 15 sts, insert MARKER-2, work 48-53-58-63-68-73 sts, insert MARKER-3, work remaining 42 sts. Let the markers follow the piece as you go along. Now work shortened rows as follows (when turning piece mid row, tighten thread before working return row): * Work 10-12-12-14-14-16 rows back and forth on all sts (first row = WS), work next row to marker-1 (10 sts remain), turn and work return row, work row to marker-2 (25 sts remain), turn and work return row. Now work 1 pleat as follows: Work 2 sts, turn, work return row, work 4 sts, turn, work return row, work 6 sts, turn, work return row. Continue like this with 2 more sts before each turn until you reach marker-3 (i.e. on 42 sts), turn and work return row *, repeat from *-* until piece measures approx 90-96-104-114-124-136 cm between marker 2 and 3 (measured when lying flat) – adjust to after a whole pleat. Try the skirt on to see if it fits. Work 2 rows on all sts, then cast off VERY LOOSELY from bottom edge towards the waist, but finish 25 sts before the end of row. Work 10 rows back and forth on these sts for button band, and then cast off. ASSEMBLY: Sew skirt tog, edge to edge, up to buttonhole band. Crochet 5 buttonhole loops along the side without band on crochet hook size 3 mm as follows – beg at the top: 1 dc in first st, * 3 ch, skip 2 sts, 1 dc in each of the next 3 sts *, repeat from *-* a total of 5 times, turn and work 1 dc in each dc and 2 dc in each ch-loop on return row. Sew buttons to button band to fit buttonhole loops. |
|
 |
|
Have you finished this pattern?Tag your pictures with #dropspattern or submit them to the #dropsfan gallery. Do you need help with this pattern?You'll find 11 tutorial videos, a Comments/Questions area and more by visiting the pattern on garnstudio.com. © 1982-2026 DROPS Design A/S. We reserve all rights. This document, including all its sub-sections, has copyrights. Read more about what you can do with our patterns at the bottom of each pattern on our site. |


With over 40 years in knitting and crochet design, DROPS Design offers one of the most extensive collections of free patterns on the internet - translated to 17 languages. As of today we count 325 catalogues and 12298 patterns translated into English (UK/cm).
We work hard to bring you the best knitting and crochet have to offer, inspiration and advice as well as great quality yarns at incredible prices! Would you like to use our patterns for other than personal use? You can read what you are allowed to do in the Copyright text at the bottom of all our patterns. Happy crafting!
Post a comment to pattern DROPS 115-41
We would love to hear what you have to say about this pattern!
If you want to leave a question, please make sure you select the correct category in the form below, to speed up the answering process. Required fields are marked *.