
Popular categories
Looking for a yarn?


Comments / Questions (114)
![]() Rema wrote:
Rema wrote:
Once the main part of the skirt is completed (before joining the granny squares), which is the right side of the skirt?
01.11.2024 - 13:32DROPS Design answered:
Dear Rema, skirt will be quite reversible at this point, so you can just choose which side you like to be the right side and which one the wrong side. Happy crocheting!
01.11.2024 - 16:46
![]() Miriam wrote:
Miriam wrote:
Buenas noches, no sé si al principio del patrón 5filas no me sale la última en p.b. O es que una fila corresponde a las 2 filas del patrón?. Y hasta que medida?? La de la cadera?? Es para una XL. Gracias
19.02.2023 - 23:18
![]() MARIA JOSE GONZALEZ DE LA ALEJA SANCHEZ wrote:
MARIA JOSE GONZALEZ DE LA ALEJA SANCHEZ wrote:
Hola!! Me podrias explicar como repartir los marcadores para los aumentos' No me cuadra poner 6 marcadores con los puntos que indica la explicacion. Estoy haciendo la talla pequeña y en teoria el primero se pone a los once puntos de empezar, luego a los diecinueve y luego a los diez. No me cuadra nada!! Me podeis explicar por favor cada cuatos puntos coloco los marcadores? Muchas gracias.
03.01.2023 - 23:26DROPS Design answered:
Hola Maria José, 11 pts, insertar el 1º marcapuntos, 19 pts, insertar el 2º marcapuntos, 19 pts, insertar el 3º marcapuntos, 19 pts, insertar el 4º marcapuntos, 19 pts, insertar el 5º marcapuntos, 19 pts, insertar el 6º marcapuntos, 10 pts. Los marcapuntos se insertan entre los pts, no en el pt. En total tienes que tener 116 pts y 6 marcapuntos insertados.
07.01.2023 - 19:05
![]() Caterina wrote:
Caterina wrote:
Ho tentato di lavorare questa bellissima gonna ma il lato aperto mi è uscito tutto storto posso lavorarla in tondo ? Grazie
08.02.2022 - 18:43DROPS Design answered:
Buonasera Caterina, se preferisce può lavorare la gonna in tondo. Buon lavoro!
08.02.2022 - 23:28
![]() Catia wrote:
Catia wrote:
Non riesco a capire il primo giro della gonna : 1 1 1 5 5 3 cat
02.01.2022 - 08:25DROPS Design answered:
Buongiorno Catia, il numero tra i trattini indica il numero di catenelle per le diverse taglie: deve seguire la taglia che ha scelto. Buon lavoro!
02.01.2022 - 14:37
![]() Catia wrote:
Catia wrote:
Non riesco a capire il primo giro della gonna 1 1155 3cat
02.01.2022 - 08:22DROPS Design answered:
Buongiorno Catia, il numero tra i trattini indica il numero di catenelle per le diverse taglie: deve seguire la taglia che ha scelto. Buon lavoro!
02.01.2022 - 14:38
![]() Miriam wrote:
Miriam wrote:
Buenas tardes, como coso los cuadros a la falda?? Gracias
17.09.2021 - 19:21DROPS Design answered:
Hola Miriam, este video puede resultarte útil para ver cómo se cosen los cuadrados: https://www.garnstudio.com/video.php?id=174&lang=es
19.09.2021 - 22:37
![]() Miriam wrote:
Miriam wrote:
Hola, lo primero gracias por vuestros patrones. Tengo una duda muy grande que quiere decir , 1 p.b. en cada uno de los sig 1-1-1-5-5-3- p.de cad.,. He 0robado a hacer de todo puntos juntos y de todo pero no hay forma no se qué quiere decir. Podéis explicármelo?? Muchas gracias.
22.01.2021 - 13:43DROPS Design answered:
Hola Miriam. Los patrones de DROPS están preparados para las tallas S-XXXL. Si hay varios números, significa que el primer número es para la talla S, el 2º para la talla M, etc. Si hay solo un número, entonces es igual para todas las tallas. En tu caso, dependiendo de la talla, hay que trabajar 1 p.b. en cada uno de los sig 1 p.b.( para las tallas XS, S, M), 5 p.b. ( para la tallas L, XL) . 3 p.b. (para la talla XXL).
23.01.2021 - 20:29
![]() Miriam Rodgers wrote:
Miriam Rodgers wrote:
Hello, so I am guessing that I just move the markers along as I do each row? and increase nine times after each single crochet row? Just a comment it would be nice to say how many stitches there are after each increase Thank you
30.07.2020 - 17:34DROPS Design answered:
Dear Mrs Rodgers, you increase 6 sts on every dc (US-English) row (= every other row), this means you will have 6 sts more after every increase row, and 6 sts x 9 times = 54 more sts when all decreases are done; Happy crocheting!
31.07.2020 - 07:48
![]() Marleen wrote:
Marleen wrote:
@Drops: ik heb het vest passend bij de rok eindelijk gevonden ;) het is model is DROPS 115-36
28.02.2020 - 16:46
|
|
Licorice Squares |
|
|
|
|
DROPS Crochet Skirt in ”Karisma” with patterned squares along bottom edge. Size XS-XXL.
DROPS 115-43 |
|
|
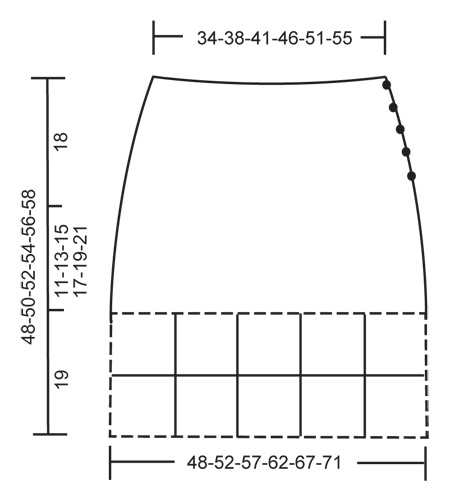
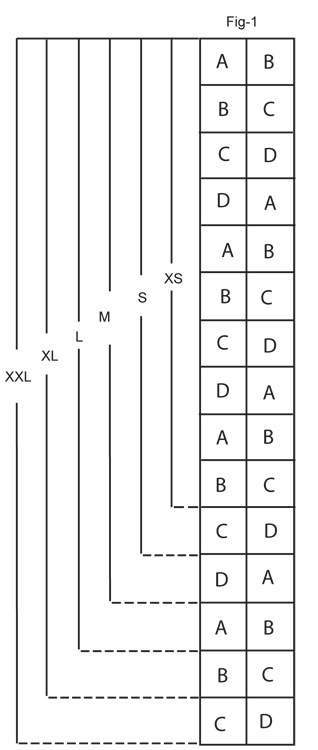
PATTERN: ROW 1: 1 tr in each dc, finish row with 1 ch to turn with. ROW 2: 1 dc in each tr, finish row with 3 ch to turn with. INCREASING TIP: Inc by working 2 tr in 1 dc. SKIRT: Worked back and forth from top down, and sewn tog at the side afterwards. Crochet 136-157-178-196-217-236 loose ch with charcoal grey with crochet hook size 4 mm. Crochet first row as follows: 1 dc in 2nd ch from hook, 1 dc in each of the next 1-1-1-5-5-3 ch, * skip 1 ch, 1 dc in each of the next 6 ch *, repeat from *-* = 116-134-152-168-186-202 dc. Continue in PATTERN – see above – until finished measurements. REMEMBER CROCHET TENSION! After 5 rows (last row is a row with dc) insert 6 markers in piece as follows: First marker after 11-12-14-14-16-19 sts, then 19-22-25-28-31-33 sts between each marker = 10-12-13-14-15-18 sts after the last marker. On next row inc 1 tr before all markers – SEE INCREASING TIP and repeat the inc on every other row (inc after and before marker alternately) a total of 9 times = 170-188-206-222-240-256 sts. Continue until piece measures 29-31-33-35-37-39 cm (or desired length), cut the thread. COLOURS OF SQUARES: SQUARE A: Beg + round 1 = charcoal grey, round 2 = light grey, round 3 = white, round 4 = black, round 5 = charcoal grey. SQUARE B: Beg + round 1 = black, round 2 = charcoal grey, round 3 = white, round 4 = light grey, round 5 = charcoal grey. SQUARE C: Beg + round 1 = white, round 2 = charcoal grey, round 3 = black, round 4 = light grey, round 5 = charcoal grey. SQUARE D: Beg + round 1 = white, round 2 = charcoal grey, round 3 = light grey, round 4 = black, round 5 = charcoal grey. CROCHET SQUARES: Crochet 6 ch with crochet hook size 4 mm and form a ring with 1 sl st in first ch. ROUND 1: 3 ch, 2 tr in ring, * 3 ch, 3 tr *, repeat from *-* a total of 3 times and finish with 3 ch and 1 sl st in 3rd ch from beg of round. Turn piece. ROUND 2: 3 ch, 2 tr in first ch-loop, 3 ch, 3 tr in the same ch-loop, * 1 ch, 3 tr in the next ch-loop, 3 ch, 3 tr in the same ch-loop *, repeat from *-* a total of 3 times, finish with 1 ch and 1 sl st in 3rd ch from beg of round. Turn piece. ROUND 3: 3 ch, 2 tr in the first ch-loop, 1 ch, * 3 tr in the next ch-loop, 3 ch, 3 tr in the same ch-loop, 1 ch, 3 tr in the next ch-loop, 1 ch *, repeat from *-* a total of 3 times, 3 tr in the next ch-loop, 3 ch, 3 tr in the same ch-loop, 1 ch, finish with 1 sl st in 3rd ch from beg of round. Turn piece. ROUND 4: 3 ch, 2 tr in the first ch-loop, 1 ch, * 3 tr in the next ch-loop, 3 ch, 3 tr in the same ch-loop, 1 ch, 3 tr in the next ch-loop, 1 ch, 3 tr in the next ch-loop, 1 ch *, repeat from *-* a total of 3 times, 3 tr in the next ch-loop, 3 ch, 3 tr in the same ch-loop, 1 ch, 3 tr in the next ch-loop, 1 ch, finish with 1 sl st in 3rd ch from beg of round. Turn piece. ROUND 5: Crochet 1 dc in each tr and 1 dc in each ch, finish with 1 sl st in first dc. 1 square = approx 9.5 x 9.5 cm. NUMBER OF SQUARES: Crochet 5-5-6-7-7-7 squares of A, 6-6-6-7-8-8 squares of B, 5-6-6-6-7-8 squares of C and 4-5-6-6-6-7 squares of D = a total of 20-22-24-26-28-30 squares. ASSEMBLY: Sew skirt tog at the side, edge to edge, but leave a 15 cm opening at the top. Sew squares tog, edge to edge, to a string as shown in fig-1, and then sew tog to form a ring. Now sew squares to bottom of skirt, edge to edge. BUTTONHOLE LOOPS: Crochet buttonhole loops on the side of opening towards front piece as follows (beg at bottom of opening): 1 dc in each of the first 2 sts, 3 ch, skip 1 cm, * crochet 1 dc in each st for 2 cm, 3 ch, skip 1 cm *, repeat from *-* a total of 4 times, and finish with 2 dc at the top. Turn and work return row as follows: 1 dc in each dc and 3 dc in each ch-loop, cut the thread. BUTTONHOLE BAND: Crochet 5 rows with dc along the side of opening towards back piece, cut the thread. Sew on buttons. |
|
|
|
|
|
Have you finished this pattern?Tag your pictures with #dropspattern or submit them to the #dropsfan gallery. Do you need help with this pattern?You'll find 8 tutorial videos, a Comments/Questions area and more by visiting the pattern on garnstudio.com. © 1982-2025 DROPS Design A/S. We reserve all rights. This document, including all its sub-sections, has copyrights. Read more about what you can do with our patterns at the bottom of each pattern on our site. |


With over 40 years in knitting and crochet design, DROPS Design offers one of the most extensive collections of free patterns on the internet - translated to 17 languages. As of today we count 314 catalogues and 11822 patterns translated into English (UK/cm).
We work hard to bring you the best knitting and crochet have to offer, inspiration and advice as well as great quality yarns at incredible prices! Would you like to use our patterns for other than personal use? You can read what you are allowed to do in the Copyright text at the bottom of all our patterns. Happy crafting!
Post a comment to pattern DROPS 115-43
We would love to hear what you have to say about this pattern!
If you want to leave a question, please make sure you select the correct category in the form below, to speed up the answering process. Required fields are marked *.