
Popular categories
Looking for a yarn?


Comments / Questions (33)
![]() Anna wrote:
Anna wrote:
Ich stricke gerade den Overall in Größe 86 und weiß bei den Zunahmen für die Ärmel nicht weiter.Ich habe beidseitig 3x 4 Maschen zugenommen und habe nun 74 maschen auf der Nadel.Wie geht es jetzt weiter? In der anleitung stehen diese zahlen: 10-11-10 (14-18) M. 1 Mal = 70-76-86 (98-110) M.) Damit kann ich nichts anfangen. Wieviel Maschen muss ich links und rechts desw Rückens zunehmen und wieviele Reihen muss ich stricken?LG Anna
15.12.2017 - 10:46DROPS Design answered:
Liebe Anna, beim Rückenteil müssen die Maschen für die Ärmel am Ende jeder Reihe angeschlagen werden, dh 3 x 4 M auf beiden Seiten (= insgesamt 12 M x 2 Seiten = 24 neue Maschen) + 1 x 14 M auf beiden Seiten (= insgesamt 14 M x 2 Seiten = 25 neue Maschen), dann haben Sie: 46 M + 24 M + 28 M = 98 M. Viel Spaß beim stricken!
15.12.2017 - 11:09
![]() Anna Bruch wrote:
Anna Bruch wrote:
Ich würde den Anzug gerne filzen und frage mich, in welcher Größe ich ihn dann stricken muss, damit er nach dem Filzen Größe 50/56 hat.
22.11.2017 - 12:03DROPS Design answered:
Liebe Frau Bruch, wir können leider jeder unserer Anleitung nach jeder Anfrage anpassen, der Anzug wird hier nicht gefilzt, Sie sollen Ihre Maschenprobe vor/nach Filzen stricken bzw messen und damit die Anleitung anpassen. Es wird aber schon dicker, nehmen Sie bitte Kontakt mit Ihrem DROPS Händler auf, gerne werden sie Ihnen weiterhelfen. Viel Spaß beim stricken!
22.11.2017 - 17:37
![]() Deborah Armstrong wrote:
Deborah Armstrong wrote:
When casting on new stitches on the left front piece I don't understand the directions. If I follow as per back piece than the total number of stitches don't add up. Example... There are 21 stitches on my needle to begin...if I add 4 to both ends that will be 16 which is a total of 37. Then I add on 11 sts one time on both ends which will be 22 for a total of 59. The pattern says I should have 40 stitches. Please clarify. And thank you very much for your lovely patterns.
12.09.2015 - 11:55DROPS Design answered:
Dear Mrs Armstrong, when working left front piece you will cast on sts for sleeve on one side only (towards back piece and no sts cast on towards mid front): 21 sts + (2 x 4 sts) + 11 sts= 40 sts. Happy knitting!
14.09.2015 - 09:03
![]() Nancy Knowles wrote:
Nancy Knowles wrote:
Ich habe eine Frage zum rechten Bein und zwar steht in der Beschreibung folgendes: Wie das linke Bein jedoch spiegelverkehrt, d.h. oben auf der rechten Seite des Markierungsfadens 2 M. abk. Was bedeutet "oben auf der rechten Seite des Markierungsfadens..."? Bedeutet es, das ich auf der rechte Seite des Markierungsfadens zwei Maschen abkette?
04.01.2015 - 11:06DROPS Design answered:
Beim linken Bein machen Sie das Abketten (2 M) bei einer Gesamtlänge von 20-23-27 (30-38) cm ja an der linken Seite des Markierers, also in Richtung Beinrückseite. Damit beim rechten Bein dieses Abketten auch in Richtung Beinrückseite erfolgt, müssen Sie die 2 M an der rechten Seite des Markierers abketten, Sie haben das also richtig verstanden.
06.03.2015 - 13:49
![]() Mina wrote:
Mina wrote:
Hei, har strikket meg ferdig med beina, og skal nå strikke de over på rundpinne. skal jeg strikke alle maskene på beinet over? har strikket lignende før, men da lot jeg noen masker være! :D
08.07.2014 - 01:18DROPS Design answered:
Hei Mina. Ja, du skal have alle maskerne for begge ben over på rundpinden.
15.07.2014 - 16:43Selam wrote:
And where are the increases supposed to be ?in the front? or back of the body? or at the beg and end of the round ?
29.09.2013 - 00:34DROPS Design answered:
Dear Selam, these additionnal sts will be in the mid front : first cast on 4 sts, work all pieces (right front, back, and left front piece) and cast on 4 new sts. Happy knitting!
08.10.2013 - 10:03Selam wrote:
Hi, can you please explain this"Cast on 4 sts (= towards mid front) on circular needle size 7 mm, work right leg in on circular needle, work left leg in on circular needle and then cast on 4 new sts at the end of round (= towards mid front) = 72-80-88 (96-104) sts. WILL THE INCREASES HAPPEN CONSEQUENTLY (NEXT TO EACH OTHER?
29.09.2013 - 00:01DROPS Design answered:
Dear Selam, you cast on 4 sts at the beg and end of row for the front band sts so that they will be next to each other. These sts will be then sewn at bottom of front pieces. Happy knitting!
30.09.2013 - 08:54
![]() Helena wrote:
Helena wrote:
Hej, Jag har just köpt garn och ska sticka denna mysiga overall. Undrar om ni tror att det går bra att bara lämna öppet i benen och sen sy i tryckknappar eller blir de för tajta då? Inser att det skulle underlätta för byten men är ingen hejare på att modifiera mönster. Tacksam för tips! Helena
07.08.2013 - 21:19DROPS Design answered:
Det går säkert bra, eller så lägger du till en m i byxbenen.
18.09.2013 - 15:36
![]() DROPS Deutsch wrote:
DROPS Deutsch wrote:
Die Maschen nach den abgeketteten Maschen dazustricken.
11.11.2010 - 09:05
![]() Jacqueline wrote:
Jacqueline wrote:
Wenn ich den Einteiler stricke und 4 M. angeschlagen habe, fange ich dann mit dem re.Bein, die M. li. nach den abgeketteten M. an? Dann würde ich zu den M. vor der Abkettung gelangen, schlage 4 M. an und stricke dann weiter beim li.Bein wieder mit den M. li. von der Abkettung? Ist das so richtig?
10.11.2010 - 21:20
|
|
Ready to Fly#readytoflyoverall |
|
|
|
|
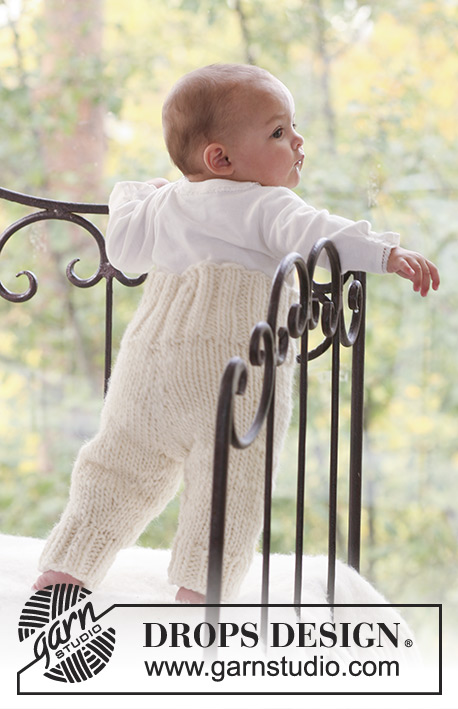
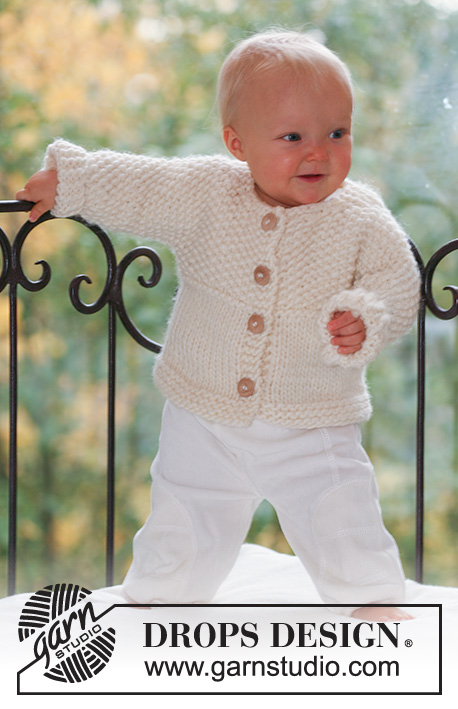
Knitted baby jumpsuit with seamless sleeves in DROPS Snow
DROPS Baby 16-15 |
|
|
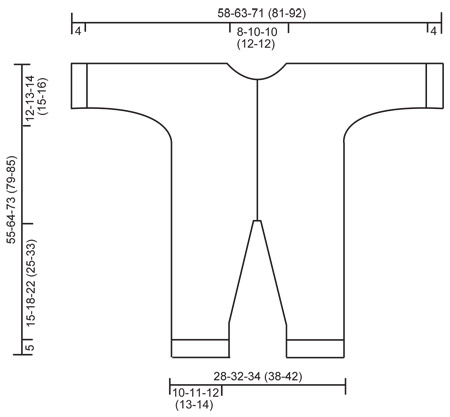
GARTER ST (in the round): K 1 round, P 1 round. GARTER ST (back and forth on needle): K all rows. INCRTEASING TIP: Inc 1 st by making 1 YO. Work YO into back of loop on return row to avoid a hole. BUTTONHOLES: Cast off for buttonholes on right front piece. 1 BUTTONHOLE = cast off 3rd st from mid front and cast on 1 new st on return row. Cast off for buttonholes when piece measures: SIZE 1/3 months: 22, 29, 36, 43 and 49 cm SIZE 6/9 months: 26, 34, 42, 50 and 58 cm SIZE 12/18 months: 30, 39, 48, 57 and 66 cm SIZE 2 year: 33, 41, 49, 57, 65 and 72 cm SIZE 3/4 year: 41, 48, 56, 63, 71 and 78 cm ---------------------------------------------------------- ---------------------------------------------------------- JUMPSUIT: Worked from bottom up on double pointed and circular needle. Beg at bottom of left leg! LEFT LEG: Worked in the round on double pointed needles. Cast on 26-28-30 (34-36) sts on needle size 7 mm with Snow. Work 5 cm garter st – SEE ABOVE. Continue in stocking st – insert a marker at beg of round (= inside of leg). REMEMBER THE KNITTING TENSION! When piece measures 10 cm inc 1 st on each side of marker - SEE INCREASING TIP. Repeat the inc on every 2-2-2½ (3-4) cm a total of 4-5-6 (6-7) times = 34-38-42 (46-50) sts. When piece measures 20-23-27 (30-38) cm cast off 2 sts to the left of marker (= towards back of leg) = 32-36-40 (44-48) sts. Slip sts on a stitch holder. RIGHT LEG: Cast on and work like left leg, but mirrored, i.e. cast off 2 sts to the right of marker at the top. JUMPSUIT: Cast on 4 sts (= towards mid front) on circular needle size 7 mm, work right leg in on circular needle, work left leg in on circular needle and then cast on 4 new sts at the end of round (= towards mid front) = 72-80-88 (96-104) sts. Insert 2 markers in piece, 19-21-23 (25-27) sts in from each side (to mark the sides). Continue in stocking st back and forth on circular needle from mid front with 6 garter sts each side towards mid front (= front bands). REMEMBER TO CAST OFF FOR BUTTONHOLES – SEE ABOVE. When piece measures 43-51-59 (64-69) cm divide the piece by markers and slip both front pieces on a stitch holder. BACK PIECE: = 34-38-42 (46-50) sts. Now cast on new sts each side for sleeves. Loosely cast on at the end of every row: 4 sts 2-2-3 (3-3) times and 10-11-10 (14-18) sts 1 time = 70-76-86 (98-110) sts. Continue in stocking st with 5 garter sts each side (= sleeve edges). When piece measures 53-62-71 (77-83) cm cast off the middle 8-10-10 (12-12) sts for neck and complete each side separately. Cast off 1 st on neckline on next row = 30-32-37 (42-48) sts left on shoulder/sleeve. Cast off all sts when piece measures 55-64-73 (79-85) cm. LEFT FRONT PIECE: = 19-21-23 (25-27) sts. Slip sts back on needle and cast on for sleeve at the side as described for back piece = 37-40-45 (51-57) sts. When piece measures 51-60-68 (74-80) cm cast off to shape the neckline towards mid front at the beg of every row: 6 sts 1 time and 1 st 1-2-2 (3-3) times = 30-32-37 (42-48) sts left on shoulder/sleeve. Cast off all sts when piece measures approx 55-64-73 (79-85) cm – adjust to back piece. RIGHT FRONT PIECE: Like left front piece, but mirrored – remember buttonholes! ASSEMBLY: Sew shoulder and upper arm seams, edge to edge. Sew under arm seams. Place right front band over left front band at bottom of front pieces and fasten. Sew opening between legs. COLLAR: Pick up approx 26-30-32 (34-38) sts round neckline on circular needle size 7 mm with Snow. NOTE: Do not pick up on front bands. Insert a marker on each shoulder. Work garter st back and forth on needle, AT THE SAME TIME inc 1 st on each side of both markers on every 4th row – SEE INCREASING TIP! Cast off when collar measures 5-5-6 (6-7) cm. Sew on buttons. Fold approx 5 cm towards RS at bottom of both legs. |
|
 |
|
Have you finished this pattern?Tag your pictures with #dropspattern #readytoflyoverall or submit them to the #dropsfan gallery. Do you need help with this pattern?You'll find 13 tutorial videos, a Comments/Questions area and more by visiting the pattern on garnstudio.com. © 1982-2026 DROPS Design A/S. We reserve all rights. This document, including all its sub-sections, has copyrights. Read more about what you can do with our patterns at the bottom of each pattern on our site. |


With over 40 years in knitting and crochet design, DROPS Design offers one of the most extensive collections of free patterns on the internet - translated to 17 languages. As of today we count 325 catalogues and 12298 patterns translated into English (UK/cm).
We work hard to bring you the best knitting and crochet have to offer, inspiration and advice as well as great quality yarns at incredible prices! Would you like to use our patterns for other than personal use? You can read what you are allowed to do in the Copyright text at the bottom of all our patterns. Happy crafting!
Post a comment to pattern DROPS Baby 16-15
We would love to hear what you have to say about this pattern!
If you want to leave a question, please make sure you select the correct category in the form below, to speed up the answering process. Required fields are marked *.