
Popular categories
Looking for a yarn?


Comments / Questions (19)
![]() Janneke wrote:
Janneke wrote:
Wanneer het telpatroon alle naalden laat zien dan ga je dus aan de teruggaande kant recht boven recht breien en krijg je een ribbel? Volgens mij zie ik op de afbeelding toch av boven r?
01.05.2016 - 10:38DROPS Design answered:
Hoi Janneke. Van de goede kant moeten je de witte hokjes recht en de stippeltjes av zijn. Dus de verkeerde kant zijn de witte hokjes av en de stippeltjes r.
02.05.2016 - 11:03LeeAnn wrote:
I am working on the pants I am at the point where I need to start the gusset where am I starting this ? Is it the center sts of the front and back please explain I don't feel the directions are clear for this
29.09.2015 - 23:59DROPS Design answered:
Dear LeeAnn, inc are done on mid back and mid front, each side of the middle st, you are working 79-94 sts in M4 and 7, work 1st st on round, inc 1 st, continue in M4 then inc 1 st, work 1 st (mid front), inc 1 st, continue in M5 to the end of round, inc 1 st = 4 sts inc either side of mid st on mid back and mid front. Happy knitting!
30.09.2015 - 09:40LeeAnn wrote:
I am working on this pattern and I do not understand the directions after casting off the center 5 sts under sleeve, pattern says to work back and forth on needle while dec each side the number if sts to dec for size I am making.. How am I working back and forth on DPN's and where am I doing the Decreases?
22.09.2015 - 14:41DROPS Design answered:
Dear LeeAnn, when the mid 5 sts under sleeve are cast off, continue in rows (= back and forth) on dpn or on a circular needle while casting off for sleeve cap sts at the beg on every row (both from RS and from WS). Happy knitting!
22.09.2015 - 15:57
![]() Nam wrote:
Nam wrote:
Please explain "cast off center 5 stitches on sleeve."..? Then 1 side every other row makes sense,but How to proceed with center stitches gone..have never seen sleeve this shape
04.03.2014 - 17:56DROPS Design answered:
Hi Nam, it's the 5 sts under arm i.e in armhole, that you cast off. From here on you work rem sleeve sts back and forth on needle. Hope it helps.
04.03.2014 - 19:14
![]() Nathalie wrote:
Nathalie wrote:
Zie je op de teltekening alleen de heengaande naald, of de heen gaande en teruggaande naald?
07.08.2012 - 18:44DROPS Design answered:
Je ziet beide nld. De eerste rij is de heengaande nld, tweede nld teruggaande enzo. Behalve bij breien in de rondte - dan komt elke nld op de goede kant.
20.08.2012 - 15:47
![]() Vibeke Birk Tiedemann wrote:
Vibeke Birk Tiedemann wrote:
Hejsa. Jeg sidder og ser lidt på denne skønne trøje, men det ser ud som om den er kort på både ærmer og krop. Min datter er meget spinkel men meget lang. Kan I hjælpe med at omskrive den, sådan at den i str 12-24 mdr bliver samme bredde på krop og ærmer, men 25% ekstra længde på både ærmer og krop? På forhånd tak! Vibeke
13.03.2012 - 19:20DROPS Design answered:
Du finder trøjens mål i måleskitsen lige under opskriften. Læg de cm til du behøver, inden du lukker af til ærmegab. Og det samme på ærmerne inden du lukker af til ærmekuppel. Du kan også altid få hjælp hos vore DROPS forhandlere hvis du køber garnet der.
15.03.2012 - 09:53
![]() DROPS Design wrote:
DROPS Design wrote:
Hej Anna, Nu ligger det rätt! Tack för hjälpen
26.05.2009 - 14:03
![]() Anna Rohman wrote:
Anna Rohman wrote:
Kom på en sak till! Man måste absolut inte har rundstickor för att få plats! Det hade inte jag och det gick bra ändå...
23.05.2009 - 15:38
![]() Anna Rohman wrote:
Anna Rohman wrote:
Hittade ett fel på beskrivningen! På luvan skall det nog inte vara mönster M3 utan M5 man skall sticka för att dett skall bli symmetriskt! Annars har det fungerat bra, och jag är bara amatör/nybörjare! Mysig tröja verkar det vara också, finns den i vuxenstorlek? ;)
23.05.2009 - 15:36
|
||||||||||
Cuddle Bug#cuddlebugoverall |
||||||||||
 |
 |
|||||||||
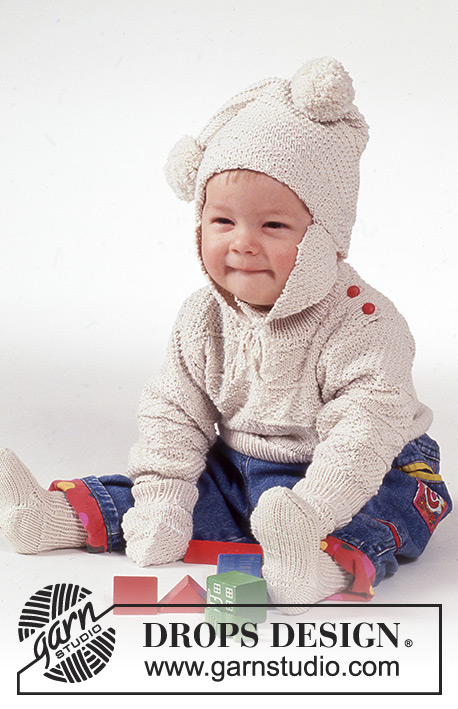
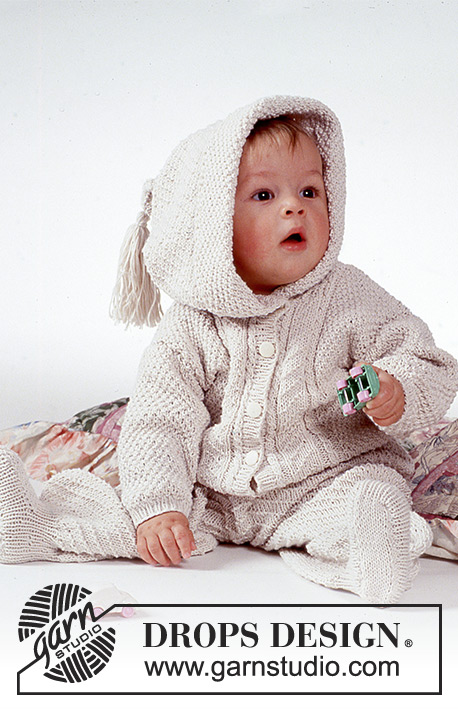
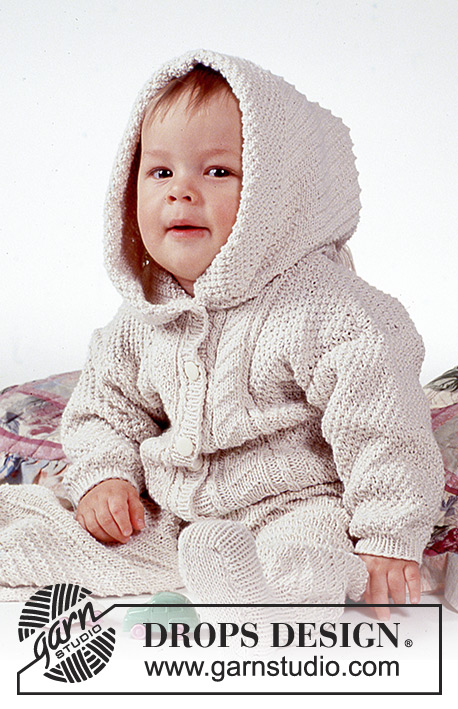
Drops Aran pattern Set (jacket with optional hood and pants) in Safran.
DROPS Baby 1-1 |
||||||||||
|
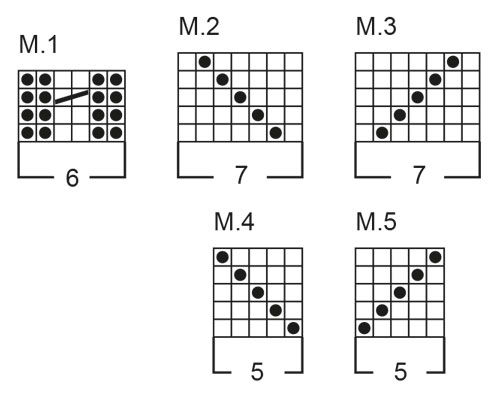
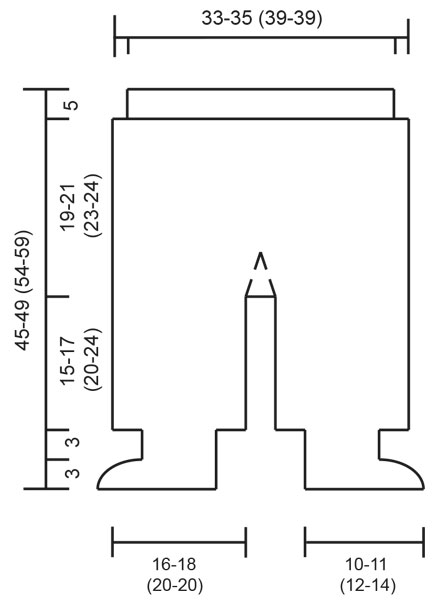
Knitting Tension: 24sts x 32 rows on needles size 3mm in stocking st = 10x10cm. Knitting Tension: 26sts x 35 rows on needles size 3mm in double moss st. = 10x10cm. Rib: *K1, P1*. Repeat from * - *. Cable: See diagram – worked over 2 sts. K 2nd st but leave on left needle, K 1st st, then lift both sts over onto right needle. Double moss st: *1st and 2nd row: K1, P1. 3rd and 4th row: K over P and P over k sts*. Repeat from * - *. Pattern: See diagram (1 diagram = 1 repeat). Pattern is seen from RS. Jacket with optional hood: Body: Jacket is worked back and forth on circ needle. Cast on 128-140(148-156) sts on circ needles size 2.5mm with cream. Work 2-2 (3-3) cm rib. Change to circ needle size 3mm and at the same time inc 11-16 (24-30) sts evenly on first row = 139-156 (172-186) sts. Work 1 st row as follows: M.1, M.2, M.1, 101-118 (134-148) sts in double moss st, M.1, M.3, M.1. Remember to check your tension. Continue until piece measures 14-16 (19-20) cm. Next row: work 35-40 (42-45) sts across front, cast off 4-4 (6-6) sts for arm, work 61-68 (76-84) sts across back, cast off 4-4 (6-6) sts for armhole, work 35-40 (42-45) sts across front. Finish fronts and back separately. Left front: = 35-40 (42-45) sts. Dec for armhole on every other row as follows: 1 st 2-2 (3-3) times = 33-38 (39-42) sts. Continue until piece measures 22-25 (29-31) cm. Dec for neck on every other row as follows: 12-14 (14-14) sts once, 3 sts once, 2 sts once, 1 st twice. Continue until piece measures 26-29 (33-35) cm. Cast off remaining 14-17 (18-21) sts for shoulder. Right front: Work as left front. Back: = 61-68 (76-84) sts. Dec for armhole each side on every other row as follows: 1 st 2-2 (3-3) times = 57-64 (70-78) sts. Continue until piece measures 24-27 (31-33) cm. Cast off centre 25-26 (30-32) sts for neck. Dec each side for neck on every other row as follows: 1 st twice. Continue until piece measures 26-29 (33-35) cm. Cast off remaining 14-17 (18-21) sts for each shoulder. Sleeves: Cast on 36-40 (44-44) sts on double pointed needles size 2.5mm with cream. Work 2-2(3-3) cm rib. Change to needles size 3mm, work double moss st and at the same time inc 4-6 (8-12) sts evenly on first round = 40-46 (52-56) sts. At the same time inc sts under sleeve each side of centre st as follows: 1 st 11-11 (10-11) times for 3months: every 4th round, for 6/9 months: every 5th round, for 12/18+24 months: every 6th round = 62-68 (72-78) sts. Continue until piece measures 16.5-20 (22-24) cm. Cast off centre 5 sts under sleeve and finish working back and forth on needle. Dec each side on every other row as follows: 5 sts 2-3 (3-3) times. Continue until piece measures 18-22 (24-26) cm. Cast off. Assembly: Left button band: Pick up 80-90 sts on needle size 2.5mm with cream along left front and work 2cm in rib. Cast off. Right button band: Work as left band but after 1 cm make 4 button holes evenly spaced – 1 button hole = cast off 2 sts – cast on 2 sts on next row over cast off sts. Sew shoulder seams. Pick up 90-100 sts around neck opening with needles size 2.5mm with cream. Work 1.5cm in double moss st and at the same time make button hole on 2nd round. Cast off at this point if hood is not wanted. Hood: Change to needle size 3mm and inc 11 sts at beginning and end of row and 113-127 (127-137) overall evenly across row. Work 1st row as follows: 16-18 (18-18) sts in double moss st, 41-46 (46-51) sts in M.4, 40-45 (45-50) sts in M.5, 16-18 (18-18) sts in double moss st. Work 23-24 (25-25) cm. Cast off. Sew hood together in centre from RS. Make a pompom and sew to hood. Fold the moss st edge in half and fix at neck edge with stitch. Sew sleeves to body in edge st to avoid seams being too bulky. Sew in buttons. ------------------------------------------------------- Pants: Size: 3 – 6/9 (12/18 -24) months Materials: Drops Safran from Garnstudio 100% Egyptian cotton 50 g= 160m 200-200 (250-300) g col 018, cream or use Camelia, 100% lambs wool, 50g =200m Drops circular needle: 2.5mm and 3mm. Drops buttons: 2 pcs. Knitting Tension: 24sts x 32 rows on needles size 3mm in stocking st = 10x10cm. Knitting Tension: 26sts x 35 rows on needles size 3mm in double moss st. = 10x10cm. Double moss st: *1st and 2nd row: K1, P1. 3rd and 4th row: K over P and P over k sts*. Repeat from * - *. Pants: Worked from waist down – optional sock. Cast on 140-150 (160-160) sts on circ needle size 2.5mm with cream. Work 5-5 (5-5) cm rib, but after 2 cm, make 2 buttonholes centre front with 24 sts between button holes – 1 button hole= cast off 2 sts, cast on 2sts on next row. Change to circ needle size 3mm and at the same time inc 17-17 (27-27) sts evenly on round= 157-167 (187-187) sts. Work 1st round as follows (start centre back): 79-84 (94-94) sts in M.4, 78-83 (93-93) sts in M.5. Remember to check your tension. Continue until piece measures 19-21 (23-24) cm. Inc centre front and centre back for gusset, between M.4 and M.5 each side of centre st on every other round as follows: 1 st 7 times = 185-195 (215-215) sts. Work now measures approx 24-26 (28-29) cm. Dec the 14 sts previously inc centre front and back = 157-167 (187-187) sts. Divide work for legs. Right leg = 79-84 (94-94) sts. Continue in pattern until piece measures 39-43 (48-53) cm. Dec evenly on round until 52-52 (60-60) sts. Work 3 cm rib (for version without sock, work 10 cm rib and then cast off). Put back 40-40 (44-44) sts on a thread. Work 5-6 (7-9) cm double moss st over the remaining 12-12 (16-16) sts centre front, dec 4-4 (6-6) sts evenly on last round = 8-8 (10-10) sts. Pick up the 40-40 (44-44) sts from thread, 14-16 (18-24) sts each side of the moss st and 8-8 (10-10) sts from front= 76-80 (90-102) sts. Work 3 cm rib. Cast off all sts except the front 10-10 (12-12) sts – continue to work 10-11 (12-14) cm stocking st across these for sole. Cast off. (work sole twice as long and make a double sole if wanted). Left leg: Work as left leg. Assembly: Braces: Make 2. Cast on 14 sts on needle size 2.5mm and work 40 cm in rib. Cast off. Sew braces to centre back with 7 cm space between. Sew gusset seam, sew the cast off stitches on mid front to the cast off stitches on mid back. Sew side seam on sole. |
||||||||||
Diagram explanations |
||||||||||
|
||||||||||
 |
||||||||||
 |
||||||||||
 |
||||||||||
Have you finished this pattern?Tag your pictures with #dropspattern #cuddlebugoverall or submit them to the #dropsfan gallery. Do you need help with this pattern?You'll find 23 tutorial videos, a Comments/Questions area and more by visiting the pattern on garnstudio.com. © 1982-2026 DROPS Design A/S. We reserve all rights. This document, including all its sub-sections, has copyrights. Read more about what you can do with our patterns at the bottom of each pattern on our site. |
||||||||||


With over 40 years in knitting and crochet design, DROPS Design offers one of the most extensive collections of free patterns on the internet - translated to 17 languages. As of today we count 324 catalogues and 12285 patterns translated into English (UK/cm).
We work hard to bring you the best knitting and crochet have to offer, inspiration and advice as well as great quality yarns at incredible prices! Would you like to use our patterns for other than personal use? You can read what you are allowed to do in the Copyright text at the bottom of all our patterns. Happy crafting!
Post a comment to pattern DROPS Baby 1-1
We would love to hear what you have to say about this pattern!
If you want to leave a question, please make sure you select the correct category in the form below, to speed up the answering process. Required fields are marked *.