
Popular categories
Looking for a yarn?


|
||||||||||
Cuddle Bug |
||||||||||
 |
 |
|||||||||
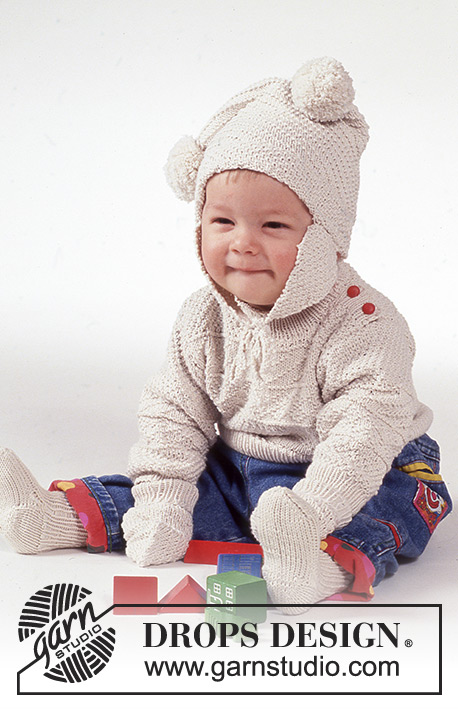
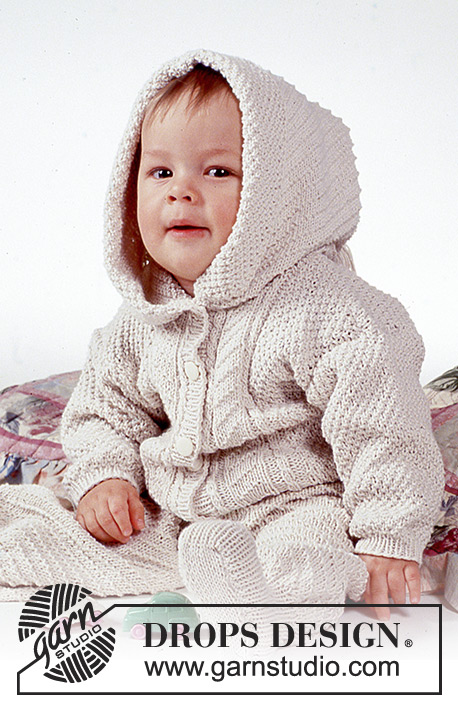
Drops Aran pattern Set (jacket with optional hood and pants) in Safran
DROPS Baby 1-1 |
||||||||||
|
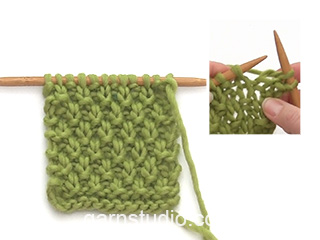
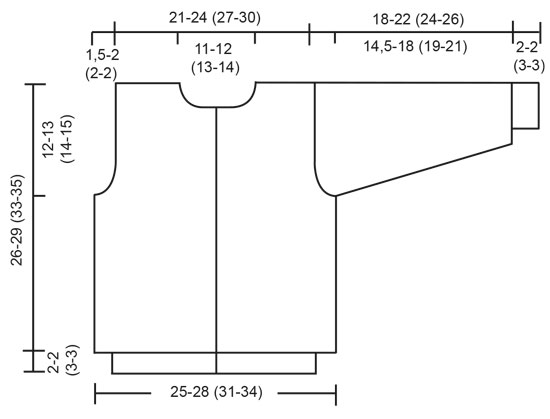
Knitting gauge: 24sts x 32 rows on needles size 3 mm / US 2.5 in stockinette st = 4" x 4" (10x10cm). 26sts x 35 rows on needles size 3 mm / US 2.5 in double seed st. = 4" x 4" (10x10cm). Rib: *K1, P1*. Repeat from * - *. Cable: See diagram – worked over 2 sts. K 2nd st but leave on left needle, K 1st st, then lift both sts over onto right needle. Double seed st: *1st and 2nd row: K1, P1. 3rd and 4th row: K over P and P over k sts*. Repeat from * - *. Pattern: See diagram (1 diagram = 1 repeat). Pattern is seen from RS. Jacket with optional hood: Body: Jacket is worked back and forth on circ needle. Cast on 128-140(148-156) sts on circ needles size 2.5 mm / US 1.5 with off white. Work 2-2 (3-3) cm rib. Change to circ needle size 3 mm / US 2.5 and at the same time inc 11-16 (24-30) sts evenly on first row = 139-156 (172-186) sts. Work 1 st row as follows: M.1, M.2, M.1, 101-118 (134-148) sts in double seed st, M.1, M.3, M.1. Remember to check your gauge. Continue until piece measures 14-16 (19-20) cm. Next row: work 35-40 (42-45) sts across front, bind off 4-4 (6-6) sts for arm, work 61-68 (76-84) sts across back, bind off 4-4 (6-6) sts for armhole, work 35-40 (42-45) sts across front. Finish fronts and back separately. Left front: = 35-40 (42-45) sts. Dec for armhole on every other row as follows: 1 st 2-2 (3-3) times = 33-38 (39-42) sts. Continue until piece measures 22-25 (29-31) cm. Dec for neck on every other row as follows: 12-14 (14-14) sts once, 3 sts once, 2 sts once, 1 st twice. Continue until piece measures 26-29 (33-35) cm. Bind off remaining 14-17 (18-21) sts for shoulder. Right front: Work as left front. Back: = 61-68 (76-84) sts. Dec for armhole each side on every other row as follows: 1 st 2-2 (3-3) times = 57-64 (70-78) sts. Continue until piece measures 24-27 (31-33) cm. Bind off centre 25-26 (30-32) sts for neck. Dec each side for neck on every other row as follows: 1 st twice. Continue until piece measures 26-29 (33-35) cm. Bind off remaining 14-17 (18-21) sts for each shoulder. Sleeves: Cast on 36-40 (44-44) sts on double pointed needles size 2.5 mm / US 1.5 with off white. Work 2-2(3-3) cm rib. Change to needles size 3 mm / US 2.5, work double seed st and at the same time inc 4-6 (8-12) sts evenly on first round = 40-46 (52-56) sts. At the same time inc sts under sleeve each side of centre st as follows: 1 st 11-11 (10-11) times for 3months: every 4th round, for 6/9 months: every 5th round, for 12/18+24 months: every 6th round = 62-68 (72-78) sts. Continue until piece measures 16.5-20 (22-24) cm. Bind off centre 5 sts under sleeve and finish working back and forth on needle. Dec each side on every other row as follows: 5 sts 2-3 (3-3) times. Continue until piece measures 18-22 (24-26) cm. Bind off. Assembly: Left button band: Pick up 80-90 sts on needle size 2.5 mm / US 1.5 with off white along left front and work 2cm in rib. Bind off. Right button band: Work as left band but after 1 cm / ⅜" make 4 button holes evenly spaced – 1 button hole = bind off 2 sts – cast on 2 sts on next row over bind off sts. Sew shoulder seams. Pick up 90-100 sts around neck opening with needles size 2.5 mm / US 1.5 with off white. Work 1.5cm in double seed st and at the same time make button hole on 2nd round. Bind off at this point if hood is not wanted. Hood: Change to needle size 3 mm / US 2.5 and inc 11 sts at beginning and end of row and 113-127 (127-137) overall evenly across row. Work 1st row as follows: 16-18 (18-18) sts in double seed st, 41-46 (46-51) sts in M.4, 40-45 (45-50) sts in M.5, 16-18 (18-18) sts in double seed st. Work 23-24 (25-25) cm. Bind off. Sew hood together in centre from RS. Make a pompom and sew to hood. Fold the seed st edge in half and fix at neck edge with stitch. Sew sleeves to body in edge st to avoid seams being too bulky. Sew in buttons. PANTS Size: 3 – 6/9 (12/18 -24) months Materials: Drops Safran from Garnstudio 100% Egyptian cotton 50 g= 160m 200-200 (250-300) g col 018, off white Drops circular needle: 2.5mm and 3mm / 1.5 and 2.5. Drops buttons: 2 pcs. Knitting gauge: 24sts x 32 rows on needles size 3 mm / US 2.5 in stockinette st = 4" x 4" (10x10cm). 26sts x 35 rows on needles size 3 mm / US 2.5 in double seed st. = 4" x 4" (10x10cm). Double seed st: *1st and 2nd row: K1, P1. 3rd and 4th row: K over P and P over k sts*. Repeat from * - *. Pants: Worked from waist down – optional sock. Cast on 140-150 (160-160) sts on circ needle size 2.5 mm / US 1.5 with off white. Work 5-5 (5-5) cm rib, but after 2 cm / ¾", make 2 buttonholes centre front with 24 sts between button holes – 1 button hole= bind off 2 sts, cast on 2sts on next row. Change to circ needle size 3 mm / US 2.5 and at the same time inc 17-17 (27-27) sts evenly on round= 157-167 (187-187) sts. Work 1st round as follows (start centre back): 79-84 (94-94) sts in M.4, 78-83 (93-93) sts in M.5. Remember to check your gauge. Continue until piece measures 19-21 (23-24) cm. Inc centre front and centre back for gusset, between M.4 and M.5 each side of centre st on every other round as follows: 1 st 7 times = 185-195 (215-215) sts. Work now measures approx 24-26 (28-29) cm. Dec the 14 sts previously inc centre front and back = 157-167 (187-187) sts. Divide work for legs. Right leg = 79-84 (94-94) sts. Continue in pattern until piece measures 39-43 (48-53) cm. Dec evenly on round until 52-52 (60-60) sts. Work 3 cm / 1" rib (for version without sock, work 10 cm / 4" rib and then bind off). Put back 40-40 (44-44) sts on a thread. Work 5-6 (7-9) cm double seed st over the remaining 12-12 (16-16) sts centre front, dec 4-4 (6-6) sts evenly on last round = 8-8 (10-10) sts. Pick up the 40-40 (44-44) sts from thread, 14-16 (18-24) sts each side of the seed st and 8-8 (10-10) sts from front= 76-80 (90-102) sts. Work 3 cm / 1" rib. Bind off all sts except the front 10-10 (12-12) sts – continue to work 10-11 (12-14) cm stockinette st across these for sole. Bind off. (work sole twice as long and make a double sole if wanted). Left leg: Work as left leg. Assembly: Braces: Make 2. Cast on 14 sts on needle size 2.5 mm / US 1.5 and work 40 cm in rib. Bind off. Sew braces to centre back with 7 cm / 2¾" space between. Sew gusset seam. Sew side seam on sole. |
||||||||||
Diagram explanations |
||||||||||
|
||||||||||

|
||||||||||
|
||||||||||

|
||||||||||
|
Have you made this or any other of our designs? Tag your pictures in social media with #dropsdesign so we can see them! Do you need help with this pattern?You'll find tutorial videos, a Comments/Questions area and more by visiting the pattern on garnstudio.com. © 1982-2024 DROPS Design A/S. We reserve all rights. This document, including all its sub-sections, has copyrights. Read more about what you can do with our patterns at the bottom of each pattern on our site. |
||||||||||


With over 40 years in knitting and crochet design, DROPS Design offers one of the most extensive collections of free patterns on the internet - translated to 17 languages. As of today we count 304 catalogs and 11422 patterns - 11417 of which are translated into English (US/in).
We work hard to bring you the best knitting and crochet have to offer, inspiration and advice as well as great quality yarns at incredible prices! Would you like to use our patterns for other than personal use? You can read what you are allowed to do in the Copyright text at the bottom of all our patterns. Happy crafting!
Comments / Questions (19)
Ich möchte von Cuddle Bug die Jacke mit Kapuze für ein ca. 8 Mte. Baby stricken. Die angegebene Wolle Safran Nadelstärke 2,5 + 3 habe ich mal mit 300 gr. angenommen und wollte sie tauschen mit der Belle Nadelstärke 4 und habe 250 gr. bestellt. Kann es sein, dass ich da falsch lag? Wieviel würde ich denn benötigen und kann ich die Anleitung genauso übernehmen, angefangen bei der Maschenprobe? Ich als Laie habe etwas Probleme die Anleitung zu verstehen. Vielen Dank für Ihre Hilfe
07.02.2022 - 19:35DROPS Design answered:
Liebe Frau Bartschat, diese Jacke wird mit Safran = Garngruppe A gestrickt, Belle gehört zur Garngruppe B und ist dafür keine Alternative. Benutzen Sie den Garnumrechner um die unterschiedlichen Möglichkeiten zu sehen. Viel Spaß beim stricken!
08.02.2022 - 08:47Was muss ich unter ärmelnadeln verstehen? Ein nadelspiel?
04.08.2021 - 19:21DROPS Design answered:
Liebe Frau Brandt, ja genau, Nadelspiel ist hier gemeint. Viel Spaß beim stricken!
05.08.2021 - 09:03Lorsque que vous faites pour les manche une augmentation de chaque côté de la maille central et que l’ont travail le point riz comment ont fait est ce qu’il a un tutoriel pour cette manche Merci
13.01.2021 - 02:50DROPS Design answered:
Bonjour Joanne, tricotez les augmentations pour continuer le point de riz du début du tour jusqu'à la fin du tour; tous les 2 tours, le point de riz ne tombera pas juste mais il le sera de nouveau quand les augmentations seront terminées. Bon tricot!
13.01.2021 - 07:31Bonjour Je voudrais faire ce modèle en 24 mois, la taille est après les parenthèses mais dans l'explication il n'y a pas d'explication après les parenthèses. Combien dois-je monter de mailles? Merci d'avance Pamela
27.09.2020 - 21:17DROPS Design answered:
Bonjour Pamela, la taille 24 mois est la dernière, la parenthèse du début des explications a été corrigée, vous montez donc 156 m en taille 24 mois. Bon tricot!
28.09.2020 - 10:47Klopt het wel dat je de middelste 5 steken moet afkanten bij de mouw, want ik heb 78 steken op mijn naald en dan kun je alleen een even aantal steken in het midden afkanten.
29.06.2020 - 20:03Bij de mouw staat dat je bij een hoogte van 24 cm de middelste 5 steken moet afkanten. Maar hoe kun je de middelste 5 steken afkanten bij een even aantal steken?
27.06.2020 - 20:12DROPS Design answered:
Dag Jacqueline,
Dan komt het inderdaad niet precies in het midden. Je mag ook 4 of 6 steken doen, afhankelijk van de maat die je breit, zodat hetzelfde aantal steken wordt afgekant als bij het armsgat voor de panden.
30.06.2020 - 13:46Bij het breien van de mouw (maat 3 maanden) wordt er gesproken van 36 steken voor het boordje, meerderen van 4 steken in de 1e nld. daarna (dubbele gerstekorrel), verder nog 11x1 st meerderen in elke 4e nld. Totaal is dan 51 steken, maar er wordt verderop gesproken van 62 steken. Wat is nu juist?
24.07.2018 - 17:54DROPS Design answered:
Dag Hetty, Je begint met 36 steken. Na de boord meerder je 4 steken, dus dan heb je 40 steken. Daarna meerder je 11 keer 1 steek aan beide kanten (= 22 st) midden onder de mouw, waardoor je op een totaal van 62 steken komt.
06.08.2018 - 11:20Hola, me encanta este patrón, pero veo que solo esta en agujas circulares, ¿cambia mucho el mismo para dos agujas?, si es así ¿es posible conseguirlo?, gracias
12.06.2018 - 12:38DROPS Design answered:
Hola Erik. Los patrones para agujas circulares se pueden adaptar para agujas rectas. En este caso, la prenda se trabaja por partes y se cose después; no hay que olvidar que en este caso hay que añadir puntos de orillo para las costuras a cada lado de la prenda.
23.06.2018 - 19:27Hej, Jeg kan ikke se diagrammerne.
25.11.2017 - 18:29DROPS Design answered:
Hei Marie Louise. Her manglet den danske diagramteksten. Det er nå lagt til og du kan finne diagrammene helt nederst. God Fornøyelse!
28.11.2017 - 14:41Hei Holder på med venstre forstykket og skal felle 12 masker til skulder, men mønsteret blir jo ødelagt når det skal felles så mange masker. Eller e det bare jeg som ikke skjønner hvordan det skal gjøres?
09.10.2016 - 15:48DROPS Design answered:
Hei Maiken. Du feller til hals, dvs, midt for og ikke paa skuldersiden.
10.10.2016 - 15:53