
Popular categories
Looking for a yarn?


Comments / Questions (25)
![]() Carola wrote:
Carola wrote:
Ich möchte den Pullover stricken, und wissen ob das Muster im Vorder und Rückenteil ist.
05.05.2026 - 08:31DROPS Design answered:
Liebe Carola, dieser Pullover wird von oben nach unten gestrickt, das Muster strickt man in der Passe die ganze Runde, dh beim Vorder/Rückenteil sowie Ärmel. Wenn die Passe fertig ist, strickt man eventuell A.1 biz zur Ende im Falle es noch nicht fertig war, so dann beim Vorder-/Rückenteil. Viel Spaß beim Stricken!
20.05.2026 - 08:42
![]() Kate wrote:
Kate wrote:
If the pattern doesn't work under the sleeve area ,how do we work the extra stitches? Are they just worked in stocking st ?
10.04.2026 - 09:08DROPS Design answered:
Hi Kate, they are worked in stocking st. Happy knitting!
10.04.2026 - 09:40
![]() Kate wrote:
Kate wrote:
Is it possible to do German short rows in the maple whisper sweater Thank you
03.04.2026 - 08:47DROPS Design answered:
Dear Kate, sure you can work an elevation to make neck on back piece higher, look at this video (you can use German Short rows technique, the video shows the short rows with the basic technique). Happy knitting!
08.04.2026 - 07:33
![]() Sue wrote:
Sue wrote:
My personal recommendation to achieve nearer the colour in the photos; Lima 9024 Almond Mix, Karisma 91 Almond. Lima 0619 Beige Mix is also a lovely colour, of a similar hue.
28.02.2026 - 15:40
![]() Corina wrote:
Corina wrote:
Ik heb deze trui gemaakt en precies patroon gevolgd. De trui past alleen de pas rond de boord rimpelt en bij schouders zit vreemd. Wat heb ik fout gedaan? Heb gemeerderd zoals stond en tot 25 cm .Kan ik bovenste gedeelte uithalen en opnieuw breien?
17.02.2026 - 09:06DROPS Design answered:
Dag Corina,
Afhankelijk van hoe sterk het rimpelen is zou je er ook voor kunnen kiezen om het werk te bevochtigen, dan in vorm plat neer te leggen een oud matras of handdoek en dan te laten drogen. Omdat het werk van boven naar beneden gebreid is, is het lastiger om het van bovenaf uit te halen.
17.02.2026 - 19:42
![]() Tereza wrote:
Tereza wrote:
Dobrý den,podle instrukcí pro velikost S má být rozdělení na trup a rukávy ve výšce 22cm. Kam v tom případě ve vzoru umístit šipky 2 a 3, aby byla veškerá přidávání dokončená ještě před rozdělením? Protože tak, jak je vzor nakreslen v návodu, by došlo k poslednímu přidávání později než ve výšce 22 cm. Děkuji
31.01.2026 - 16:05
![]() Francesca wrote:
Francesca wrote:
Ho lavorato lo sprone fino alla divisione del corpo dalle maniche. Sto facendo una taglia M. Quindi sul corpo ho 236 maglie perché ho finito gli aumenti di A.1 come indicato dallo schema. Ora devo finire il motivo che si lavora su 12 maglie, ma 236 non è un multiplo di 12 quindi il motivo non può essere proseguito in modo corretto, dovrò fare delle diminuzioni o aumenti?
13.01.2026 - 21:52DROPS Design answered:
Buonasera Francesca, nel testo viene indicato che il motivo non combacerà sotto le maniche, deve lavorarlo fino a quando possibile. Buon lavoro!
17.01.2026 - 17:14
![]() Christine wrote:
Christine wrote:
Guten Tag! Ich würde gerne diesen oder einen ähnlichen Pullover mit dem angegebenen Garn stricken. Meine Frage: Könnte ich einen Faden vom Mohair Garn mitlaufen lassen ohne die Nadelstärke zu verändern? Herzlichen Dank für die Info Christine
13.01.2026 - 10:57DROPS Design answered:
Liebe Christine, wenn Sie eine zusätzliche Wolle dazu stricken, wird Ihre Maschenprobe wahrscheinlich nicht mehr stimmen, hier finden Sie alle unsere Pullover mit norwegischem Muster, filtern Sie die Modellen wie gewünscht, einschl. mit der neuen Maschenprobe, um passende Modellen zu finden. Viel Spaß beim Stricken!
14.01.2026 - 10:10
![]() Maribel wrote:
Maribel wrote:
Dónde puedo conseguir esa misma lana?
11.01.2026 - 22:56DROPS Design answered:
Hola Maribel, puedes encontrar aquí la lista de tiendas DROPS en España.
12.01.2026 - 00:19
![]() Eva wrote:
Eva wrote:
Hello, the patterns says complete all increase in the pattern before decide. In that case, the picture wouldn’t be possible because the divide would only happen right above the diamonds and not around the stars. Can you clarify?
24.12.2025 - 20:32
|
||||||||||
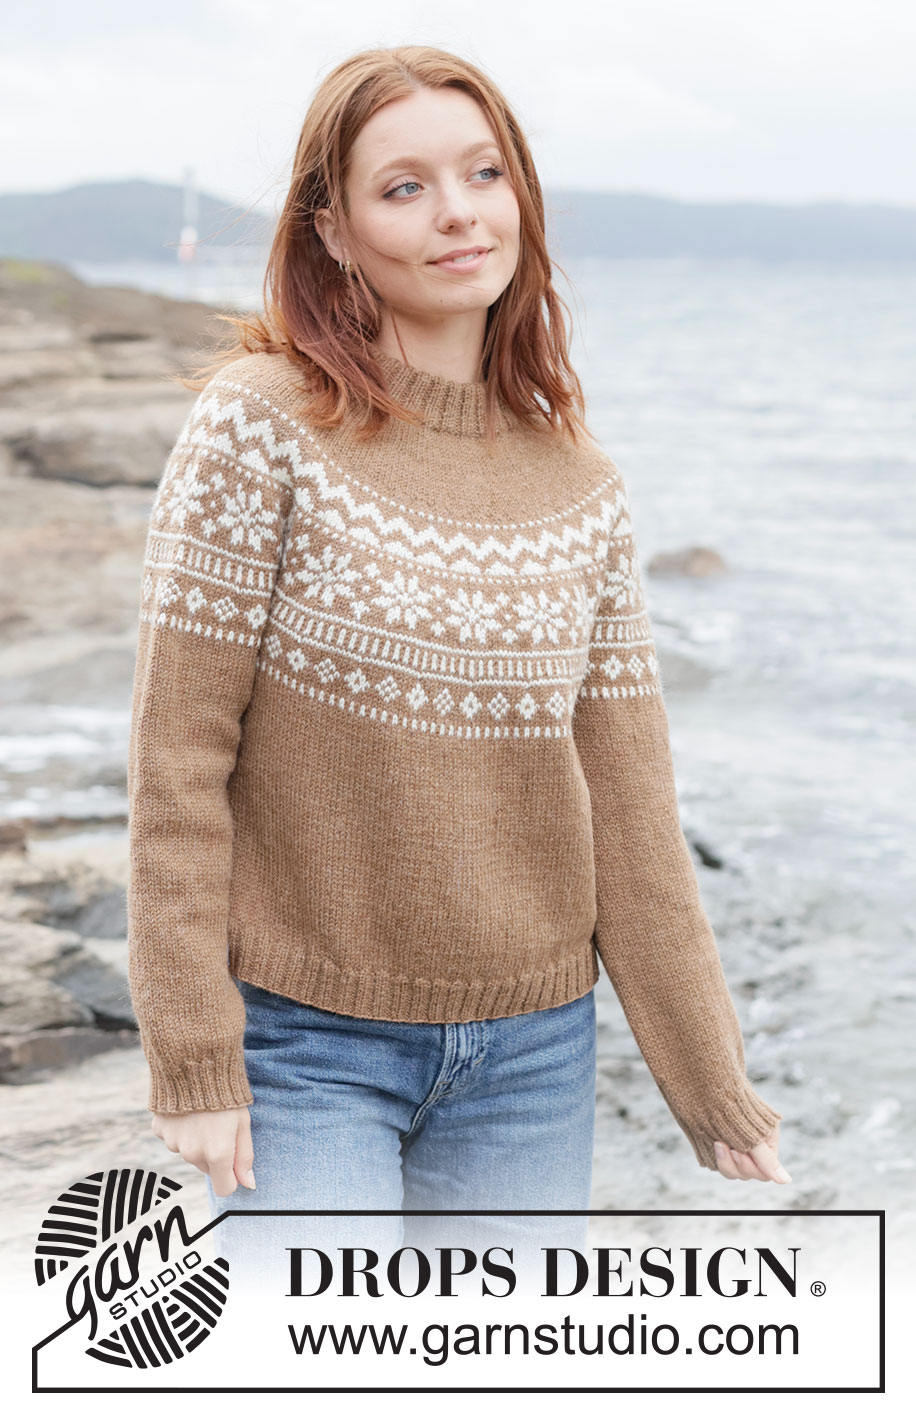
Maple Whisper Sweater#maplewhispersweater |
||||||||||
 |
 |
|||||||||
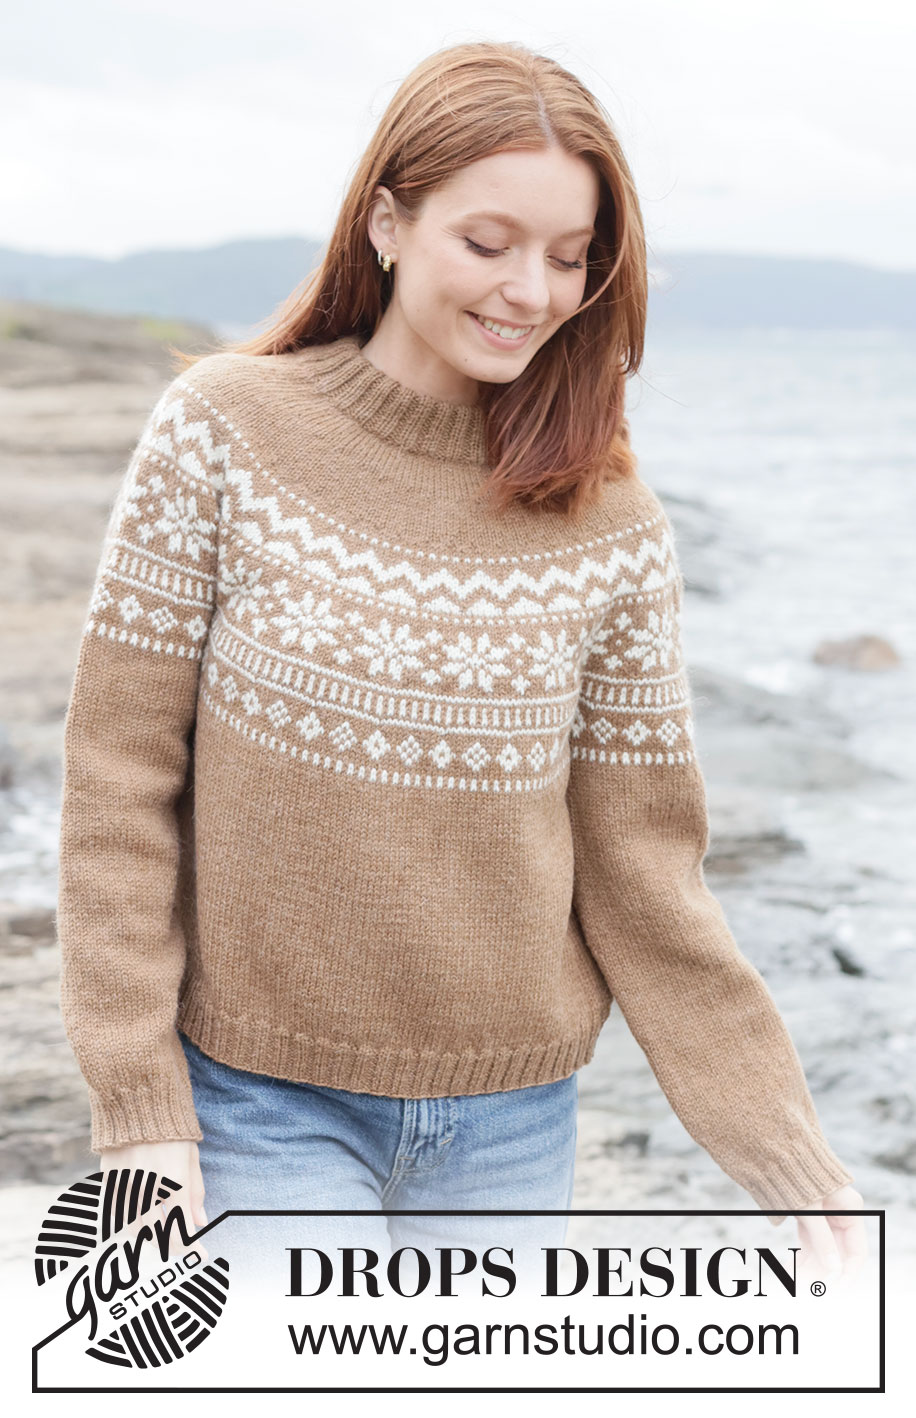
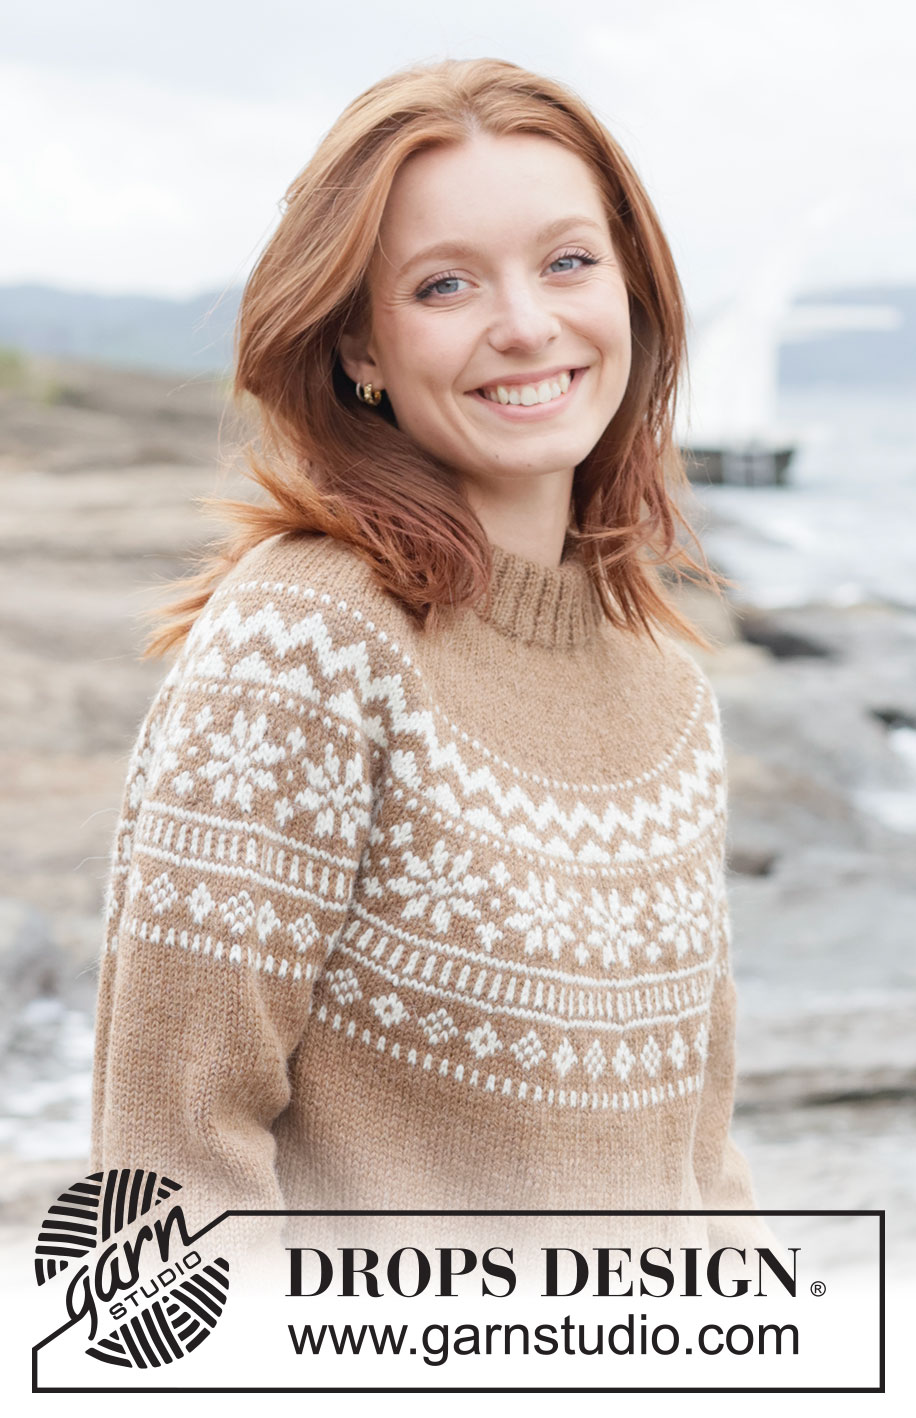
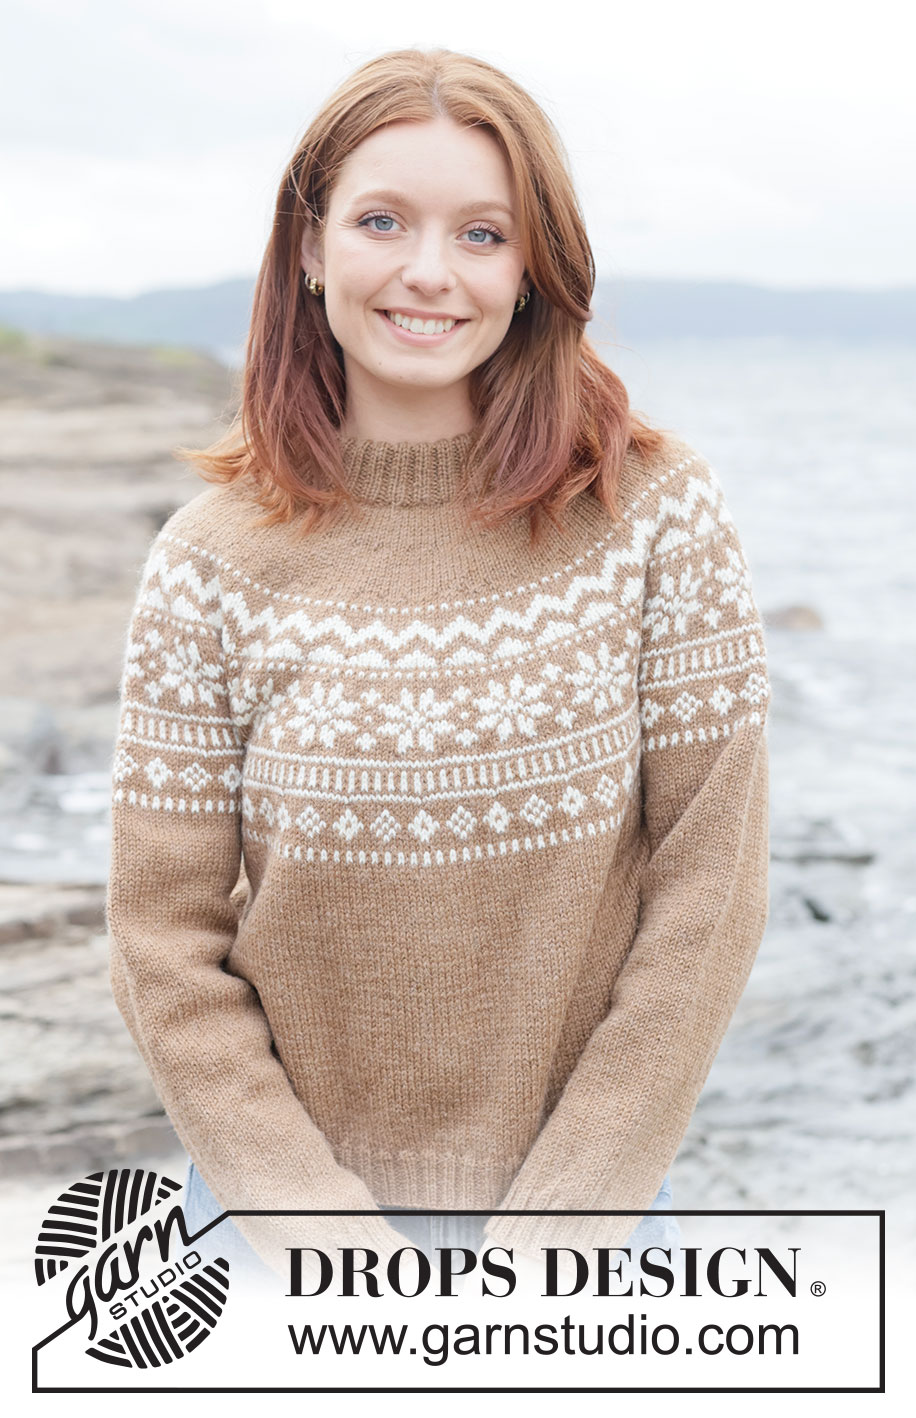
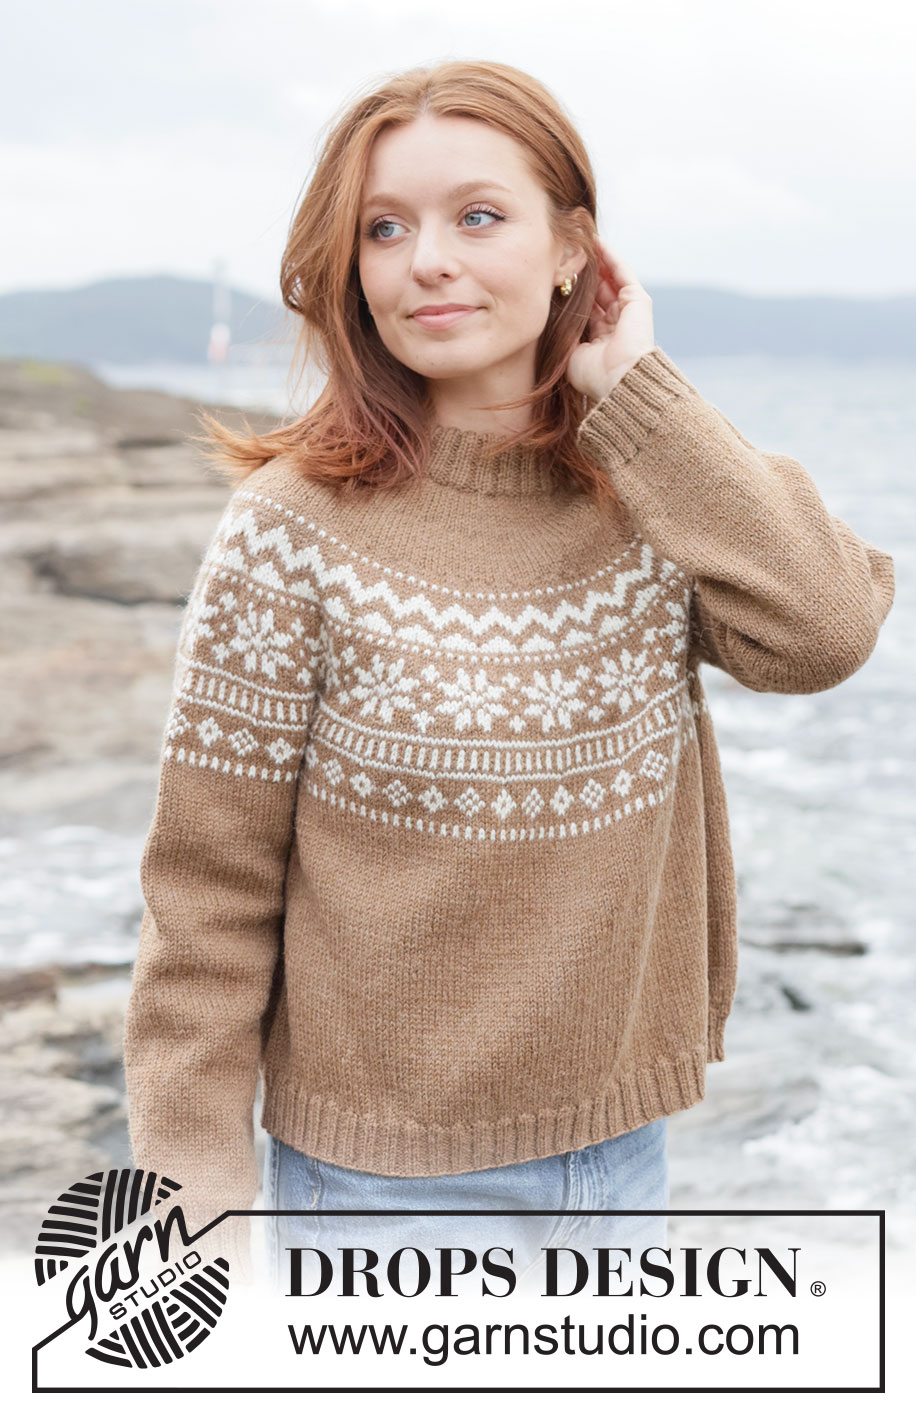
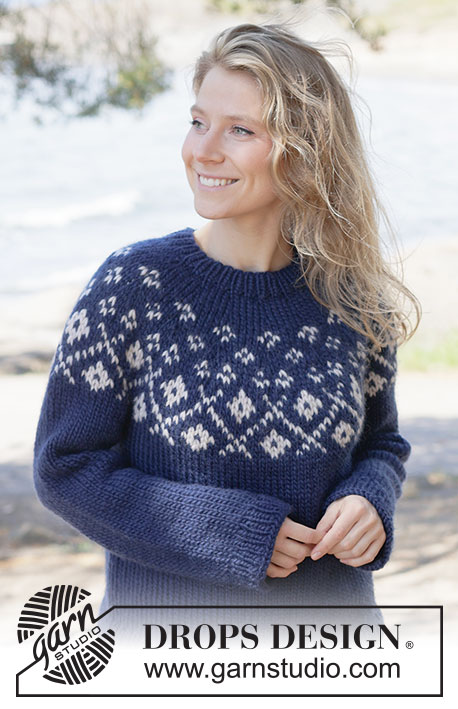
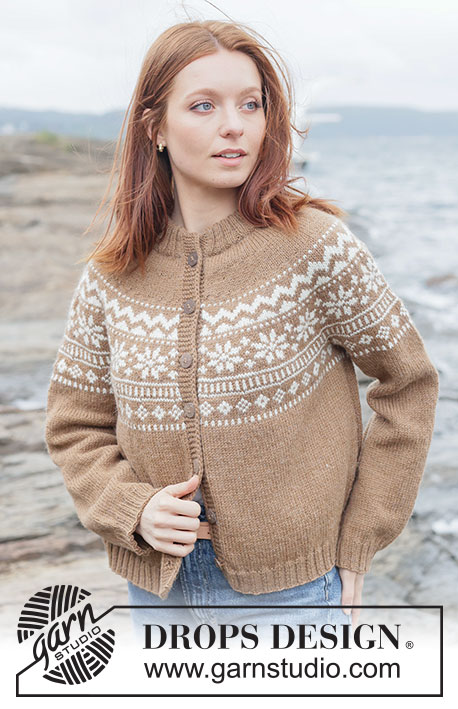
Knitted jumper in DROPS Lima or DROPS Karisma. The piece is worked top down with round yoke, Nordic pattern and double neck. Sizes XS - XXXL.
DROPS 262-5 |
||||||||||
|
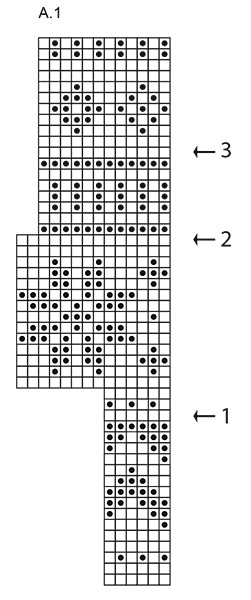
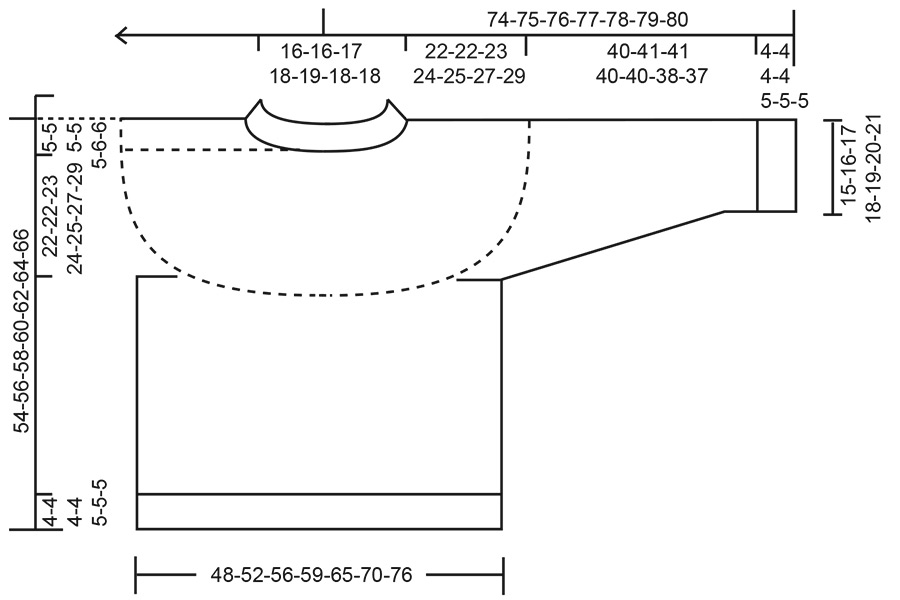
------------------------------------------------------- EXPLANATIONS FOR THE PATTERN: ------------------------------------------------------- INCREASE TIP (evenly spaced): To work out how to increase evenly, count the total number of stitches on the needle (e.g., 108 stitches) and divide by the number of increases to be made (e.g., 12) = 9. In this example, increase by making 1 yarn over after each 9th stitch. On the next round knit the yarn overs twisted to avoid holes. PATTERN: See diagram A.1. The pattern is worked in stocking stitch. KNITTING TIP: To avoid the knitting tension becoming tight when working pattern, it is important that the strands at the back are not tight. Use a size larger needle when working pattern if this is necessary. SLEEVE TIP: When knitting up stitches under the sleeve, you can get a small hole in the transition between stitches on the body and sleeve. This hole can be closed by picking up the strand between 2 stitches and working this strand twisted together with the first stitch between body and sleeve. DECREASE TIP: Decrease 1 stitch on each side of the marker thread as follows: Work until there are 3 stitches left before the marker thread, knit 2 together, knit 2 (marker thread sits between these 2 stitches) slip 1 stitch knit-wise, knit 1 and pass the slipped stitch over the knitted stitch (= 2 stitches decreased). ------------------------------------------------------- START THE PIECE HERE: ------------------------------------------------------- JUMPER – SHORT OVERVIEW OF THE PIECE: The pattern uses both long and short needles; start with the length which fits the number of stitches and change when necessary. The neck and yoke are worked in the round with circular needle, top down and from the right back shoulder. When the yoke is finished, it is divided for the body and sleeves and the body continued in the round, while the sleeves wait. The sleeves are worked top down, in the round. The neck is folded double and fastened to the inside. NECK: Cast on 108-108-112-116-120-124-128 stitches with circular needle size 4 mm and colour Chestnut DROPS Lima or colour Cocoa Bean DROPS Karisma. Change to circular needle size 3 mm (casting on with a larger needle size makes the cast-on edge elastic). Work rib in the round (knit 2, purl 2) for 8-8-8-8-10-10-10 cm. The neck is later folded double to the inside, giving a neck of approx. 4-4-4-4-5-5-5 cm. The round begins on the right back shoulder. Insert 1 marker after the first 36-36-37-39-40-41-43 stitches (approx. mid-front), the piece is now measured from here. YOKE: Change to circular needle size 4 mm. Knit 1 round and increase 12-14-16-16-18-18-20 stitches evenly spaced – read INCREASE TIP = 120-122-128-132-138-142-148 stitches. Continue with stocking stitch. Remember to maintain the knitting tension. When the yoke measures 4-4-4-4-4-4-4 cm from the marker, increase 28-30-36-36-44-42-46 stitches evenly spaced – remember INCREASE TIP = 148-152-164-168-182-184-194 stitches. Continue working until the yoke measures 8-8-8-8-9-9-9 cm from the marker. On the next round begin the PATTERN – read explanation above. Work A.1 across all stitches, AT THE SAME TIME increase 38-46-52-54-58-62-64 stitches evenly spaced = 186-198-216-222-240-246-258 stitches. Read KNITTING TIP! Continue the pattern increasing stitches on each row marked with an arrow as follows – remember INCREASE TIP: Arrow-1: Increase 38-54-50-58-54-62-64 stitches evenly spaced = 224-252-266-280-294-308-322 stitches. Continue A.1. Arrow-2: Increase 44-48-58-58-62-66-70 stitches evenly spaced = 268-300-324-338-356-374-392 stitches. Continue A.1. Arrow-3: Increase 44-48-48-46-52-58-64 stitches evenly spaced = 312-348-372-384-408-432-456 stitches. Continue A.1. AT THE SAME TIME, when the yoke measures 22-22-23-24-25-27-29 cm from the marker, divide for the body and sleeves. If A.1 is not finished, divide and continue the pattern on the body and sleeves – make sure you divide on a round with pattern (not a round of colour Chestnut/Cocoa Bean). NOTE! All the increases in A.1 should be finished before dividing. DIVIDE FOR BODY AND SLEEVES: Place the first 62-70-76-78-80-82-84 stitches on a thread for the sleeve, cast on 6-6-8-10-12-14-16 stitches (mid-under the sleeve), knit 94-104-110-114-124-134-144 (= front piece), place the next 62-70-76-78-80-82-84 stitches on a thread for the sleeve, cast on 6-6-8-10-12-14-16 stitches (mid-under the sleeve), knit the last 94-104-110-114-124-134-144 stitches (= back piece). The body and sleeves are finished separately. BODY: = 200-220-236-248-272-296-320 stitches. If A.1 is not finished, continue the pattern on the body. The pattern will not fit under the sleeves; continue the pattern neatly from the yoke and work it as far as it will go under each sleeve. When the pattern is finished continue with colour Chestnut/Cocoa Bean until the piece measures 45-47-49-51-52-53-55 cm from the marker mid-front. Change to circular needle size 3 mm. Work rib (knit 2, purl 2), AT THE SAME TIME increase 20-20-24-24-28-28-28 stitches evenly on the first round = 220-240-260-272-300-324-348 stitches. When the rib measures 4-4-4-4-5-5-5 cm, cast off. The jumper measures approx. 49-51-53-55-57-58-60 cm from the marker and 54-56-58-60-62-64-66 cm from the shoulder. SLEEVES: Place the 62-70-76-78-80-82-84 sleeve-stitches from one thread on circular needle size 4 mm and knit up 1 stitch in each of the 6-6-8-10-12-14-16 stitches cast on under the sleeve – read SLEEVE TIP = 68-76-84-88-92-96-100 stitches. Insert a marker-thread in the middle of the 6-6-8-10-12-14-16 stitches under the sleeve- the round starts by the marker-thread. Work stocking stitch in the round. If A.1 is not finished, continue the pattern on the sleeve. The pattern will not fit under the sleeve; continue the pattern neatly from the yoke and work it as far as it will go mid-under sleeve. When the pattern is finished continue with stocking stitch and colour Chestnut/Cocoa Bean. AT THE SAME TIME, when the sleeve measures 3 cm from the division, decrease mid-under the sleeve – read DECREASE TIP as follows: Decrease 2 stitches every 8-8-5-5-5-5-5 cm a total of 2-4-6-6-6-6-6 times = 64-68-72-76-80-84-88 stitches. Continue working until the sleeve measures 40-41-41-40-40-38-37 cm from the division. Change to double pointed needles size 3 mm. Work rib (knit 2, purl 2), AT THE SAME TIME increase 8-8-8-8-8-8-8 stitches evenly on the first round = 72-76-80-84-88-92-96 stitches. When the rib measures 4-4-4-4-5-5-5 cm, cast off. The sleeve measures approx. 44-45-45-44-45-43-42 cm from the division. ASSEMBLY: Fold the neck double to the inside and sew down. To avoid the neck being tight and rolling outwards, it is important that the seam is elastic. |
||||||||||
Diagram explanations |
||||||||||
|
||||||||||
 |
||||||||||
 |
||||||||||
Have you finished this pattern?Tag your pictures with #dropspattern #maplewhispersweater or submit them to the #dropsfan gallery. Do you need help with this pattern?You'll find 29 tutorial videos, a Comments/Questions area and more by visiting the pattern on garnstudio.com. © 1982-2026 DROPS Design A/S. We reserve all rights. This document, including all its sub-sections, has copyrights. Read more about what you can do with our patterns at the bottom of each pattern on our site. |
||||||||||


With over 40 years in knitting and crochet design, DROPS Design offers one of the most extensive collections of free patterns on the internet - translated to 17 languages. As of today we count 325 catalogues and 12298 patterns translated into English (UK/cm).
We work hard to bring you the best knitting and crochet have to offer, inspiration and advice as well as great quality yarns at incredible prices! Would you like to use our patterns for other than personal use? You can read what you are allowed to do in the Copyright text at the bottom of all our patterns. Happy crafting!
Post a comment to pattern DROPS 262-5
We would love to hear what you have to say about this pattern!
If you want to leave a question, please make sure you select the correct category in the form below, to speed up the answering process. Required fields are marked *.