
Popular categories
Looking for a yarn?


Comments / Questions (13)
![]() Maertens Vera wrote:
Maertens Vera wrote:
Volgens mij zit er een fout in A.3 rij 4. Op het einde mag geen bolletje staan
16.02.2026 - 08:38
![]() Toril wrote:
Toril wrote:
Er det ikke forskjell på høyde bak og foran? Det pleier å være flere omganger på bakstykket.
13.03.2025 - 10:50DROPS Design answered:
Hei Toril, Dette mønsteret har lik høyde bak og foran. Hvis du vil ha høyere bak må du strikke forkortede pinner . Her er lenke til en video som viser hvordan man strikker forkortede pinner samtidig som man øker til raglan: https://www.garnstudio.com/video.php?id=1735&lang=no Håper det hjelper og god fornøyelse!
13.03.2025 - 17:51
![]() Selam wrote:
Selam wrote:
...., increase 2- stitches evenly between marker-threads 2 and 3 while working A.1, A.2 2- times, A.3 across the front piece, I do not understand this either there are 24 st: how it is possible to knit A1 and A2 2 times and also A3 when I only have 24st on the back ?
18.01.2025 - 11:01DROPS Design answered:
Dear Selam, you knit the A.1 diagram 1 time, A.2 diagram 2 times, A.3 diagram 1 time. Since A.1, A.2 and A.3 all 6 stitches (on the first row/round) that is 6+12+6= 24 stitches. Happy Knitting!
19.01.2025 - 14:21
![]() Selam wrote:
Selam wrote:
Does that mean you are not counting the marker sts? How do you get 100 total then? I had 88 st before round 1.
18.01.2025 - 01:43DROPS Design answered:
Dear Selam, if you read carefully the first round of the yoke, you will see that the raglan sitches are not counted into the stitchnumber of patterns A.1, A.2, A.3 first row. The increases at the first round worked beside the colored patterns. Happy Knitting!
19.01.2025 - 14:12
![]() Selam wrote:
Selam wrote:
Corrected : After round one on the Raglan I have 24 ts but line 2 in the pattern is only for 20sts , what am I doing wrong. How many stitches should I have on the sleeves after first increase?bak and front?
17.01.2025 - 21:58
![]() Selam wrote:
Selam wrote:
After round one on the how I have 24 ts but line 2 in the pattern is only for 20 , what am I doing wrong. How many stiches should I have on the sleeves after first increase ?
17.01.2025 - 21:56DROPS Design answered:
Dear Selam, when you start knitting the row, you knit the (A.1, A.2, A.3) patterns (6+6+6= 18th stitch). When you increase in the first round, you increase 1 stitch at eash side of the sleeve that is 18+2 = 20 stitch, and that is what on the second row of the pattern. Happy Knitting!
18.01.2025 - 01:39
![]() Margaux wrote:
Margaux wrote:
Zu Beginn der Passe:„ Die 3. und 4. RUNDE insgesamt 11-11-11-17-20-17 x stricken (= 22-22-22-34-40-34 gestrickte Runden) „Nur die dritte und vierte Runde? Das kann nicht stimmen. Wie entsteht denn das Muster in der Höhe? Und weiter in der Passe: „Die 1. und 2. RUNDE insgesamt 12-12-15-9-12-15 x stricken (= 24-24-30-18-24-30 gestrickte Runden) = 236-236-248-296-332-320 Maschen auf der Nadel.“ Auch hier. Wie entsteht das Muster, wenn fortwährend nur R. 1 und 2 gestrickt werden?
16.12.2024 - 22:58DROPS Design answered:
Liebe Margaux, hier meinen wir nur, daß diese Raglanzunahmen in jeder 2. Runde insgesamt 11 bis 17 Mal insgesamt gestrickt werden, und wie bei den 3. und 4. Runden beschrieben, stricken Sie Muster wie im Diagram gezeichnet mit Zunahmen bei der 3. Runde und keine Zunahme bei der 4. Runde. Viel Spaß beim Stricken!
18.12.2024 - 09:18
![]() Emma wrote:
Emma wrote:
Det virker til at den går galt med antal masker i størrelse xxxl fra 4.omgang i bærestykket og frem. Der er færre masker end xxl.
06.10.2024 - 17:58DROPS Design answered:
Hej Emma, opskriften stemmer, maskeantallet justeres senere i opskriften som brystvidden bliver større :)
16.10.2024 - 11:15
![]() Paola Baldi wrote:
Paola Baldi wrote:
Molto elegante.mi piace il core sfumato con lo sfondo del motivo
01.10.2024 - 00:03
![]() Su wrote:
Su wrote:
Delft Tile
09.08.2024 - 15:25
|
|||||||
River Breakup#riverbreakupsweater |
|||||||
 |
 |
||||||
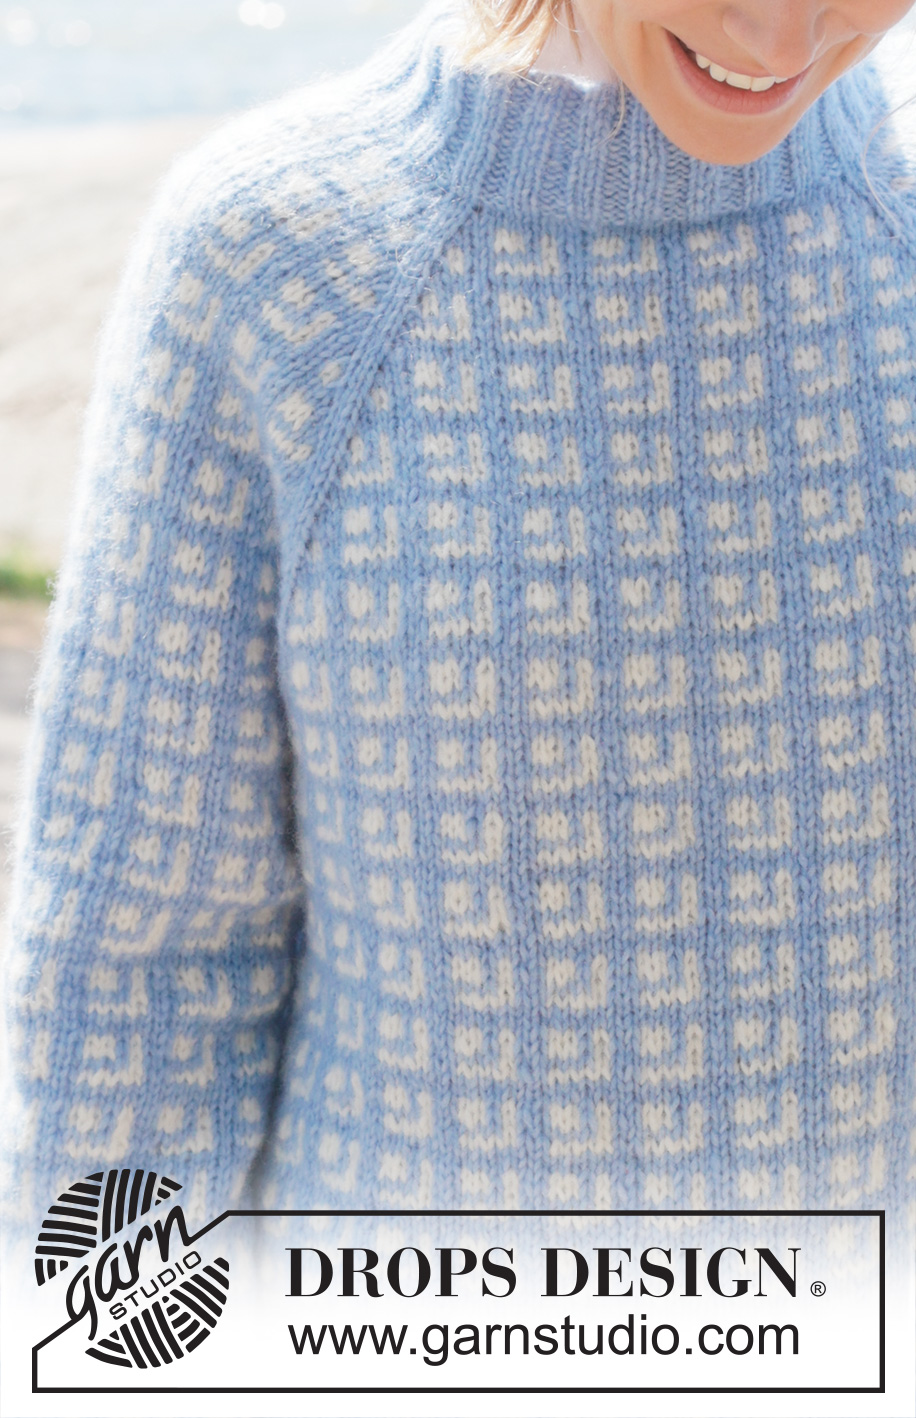
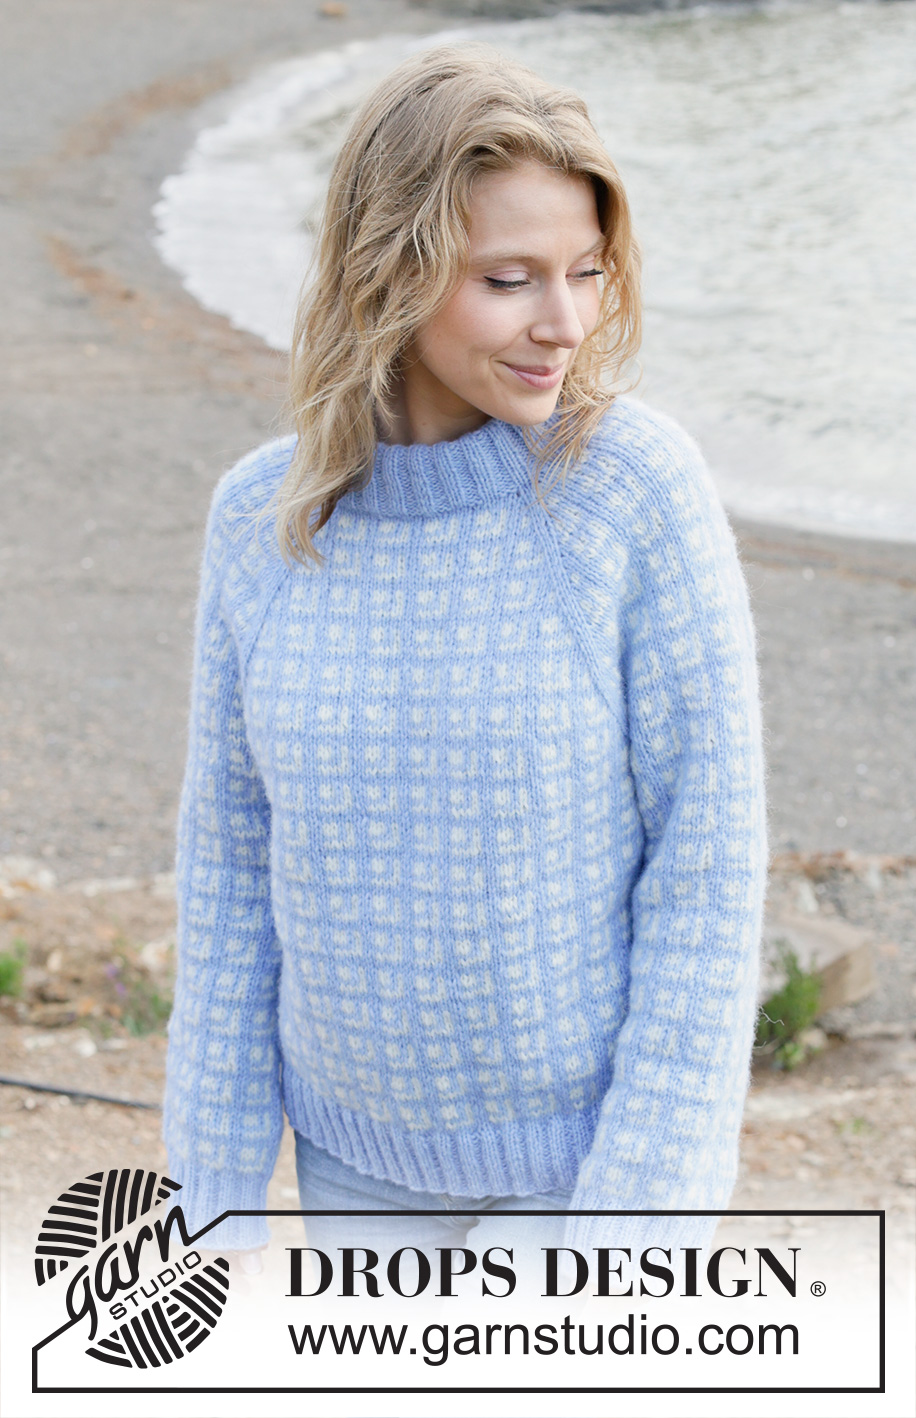
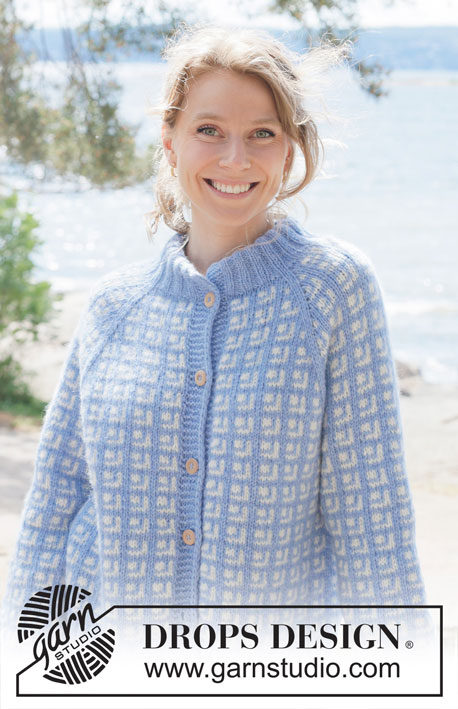
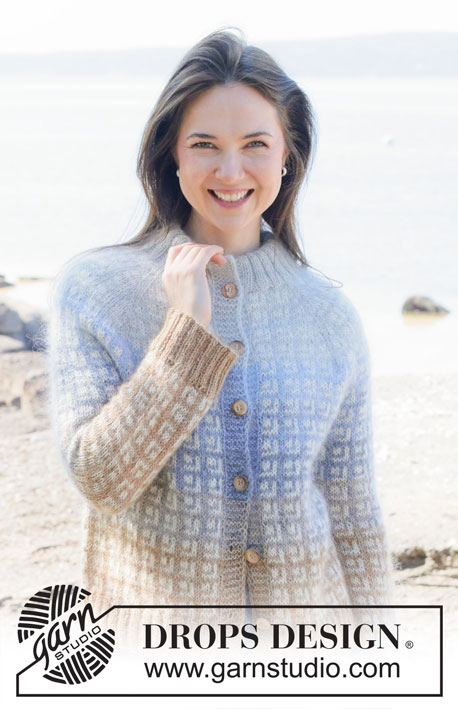
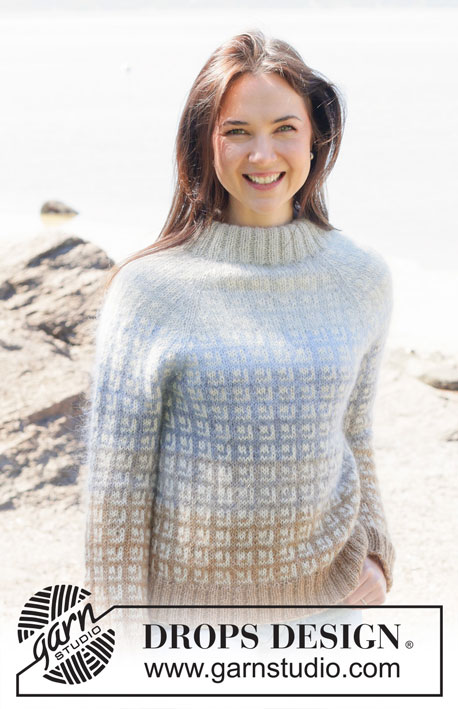
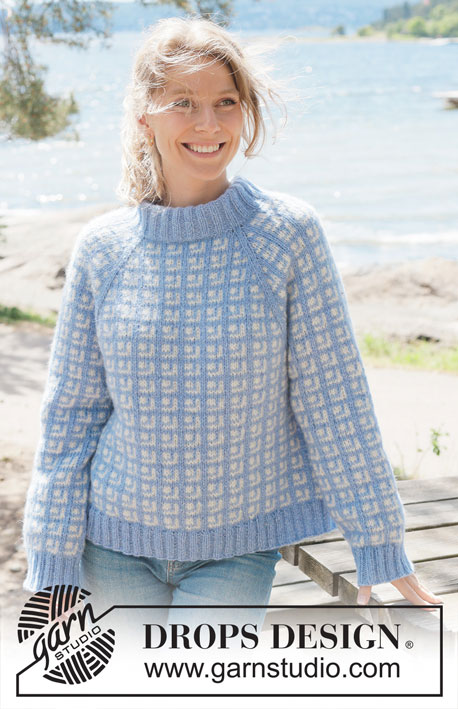
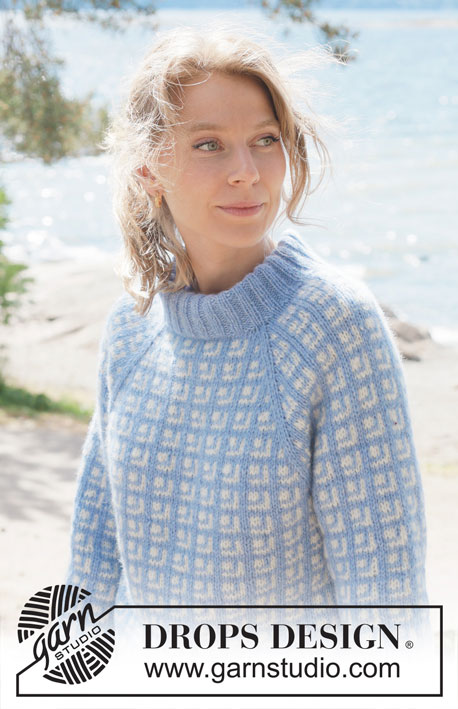
Knitted jumper in DROPS Air. The piece is worked top down with raglan, Nordic pattern and double neck. Sizes S - XXXL.
DROPS 254-30 |
|||||||
|
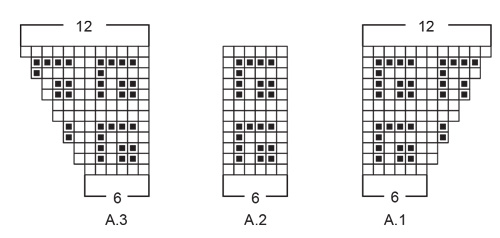
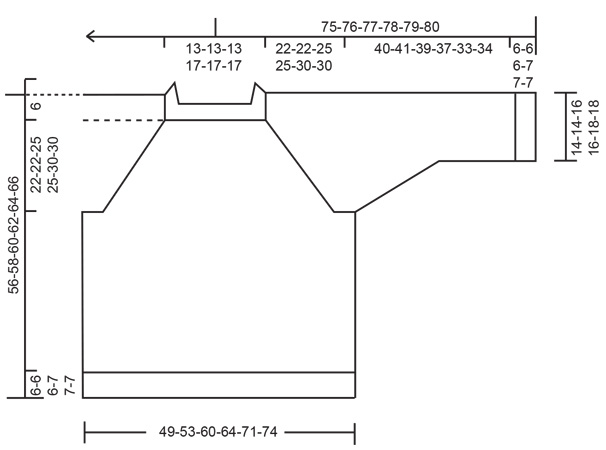
------------------------------------------------------- EXPLANATIONS FOR THE PATTERN: ------------------------------------------------------- PATTERN: See diagrams A.1 to A.3. The pattern is worked in stocking stitch. RAGLAN: Increase 1 stitch by making 1 yarn over as follows: INCREASE 1 STITCH TOWARDS THE RIGHT BEFORE RAGLAN-STITCHES: Make 1 yarn over the right needle, taking the strand from the back in front of the needle. On the next round knit the front loop. Continue the new stitch in stocking stitch. INCREASE 1 STITCH TOWARDS THE LEFT AFTER RAGLAN-STITCHES: Make 1 yarn over the right needle, taking the strand in front of the needle to the back. On the next round knit through the back loop of the yarn over. Continue the new stitch in stocking stitch. INCREASE TIP (evenly spaced): To work out how to increase evenly, count the total number of stitches on the needle (e.g., 168 stitches) and divide by the number of increases to be made (e.g., 28) = 6. In this example, increase by making 1 yarn over after each 6th stitch. On the next round knit the yarn overs twisted to avoid holes. DECREASE TIP: Decrease 1 stitch on each side of the marker-thread as follows: Work until there are 3 stitches left before the marker-thread, knit 2 together, knit 2 (marker-thread sits between these 2 stitches), slip 1 stitch knit-wise, knit 1 and pass the slipped stitch over the knitted stitch (2 stitches decreased). ------------------------------------------------------- START THE PIECE HERE: ------------------------------------------------------- JUMPER – SHORT OVERVIEW OF THE PIECE: The pattern uses both long and short needles; start with the length which fits the number of stitches and change when necessary. The neck and yoke are worked in the round with circular needle, top down, from the right back shoulder. When the yoke is finished, it is divided for the body and sleeves and the body continued in the round, while the sleeves wait. The sleeves are worked top down, in the round. The neck is folded double and fastened to the inside. NECK: Cast on 88-88-88-104-104-104 stitches with circular needle size 5 mm and colour light blue DROPS Air. Change to needle size 3.5 mm (casting on with a larger needle size makes the cast-on edge elastic). Work rib as follows: * knit 1, purl 2, knit 1 *, work from *-* to end of round. Work this rib for 11-11-11-13-13-13 cm. The neck is later folded double, leaving a neck-height of approx. 5-5-5-6-6-6 cm. The round begins on the back right shoulder. Insert 1 marker after the first 32-32-32-36-36-36 stitches (= mid-front), the piece is measured from here. YOKE: Change to circular needle size 5 mm. Insert 4 marker-threads as follows without working the stitches and each thread inserted between 2 stitches, which are called raglan-stitches. The raglan-stitches are always worked in stocking stitch with colour light blue. Insert 1 marker-thread at the beginning of the round, count 20 stitches (sleeve), insert 1 marker-thread before the next stitch, count 24-24-24-32-32-32 stitches (front piece), insert 1 marker-thread before the next stitch, count 20 stitches (sleeve), insert 1 marker-thread before the next stitch. There are 24-24-24-32-32-32 stitches left after the last marker-thread (back piece). Work PATTERN and start increasing for RAGLAN – read descriptions above, as follows: ROUND 1: Work 1 stocking stitch with colour light blue (= 1 raglan-stitch), increase 1 stitch for raglan, work A.1, A.2, A.3 across the sleeve-stitches, increase 1 stitch for raglan on each side of the 2 raglan-stitches, increase 2-2-2-6-6-6 stitches evenly between marker-threads 2 and 3 while working A.1, A.2 2-2-2-4-4-4 times, A.3 across the front piece, increase 1 stitch for raglan on each side of the 2 raglan-stitches, work A.1, A.2, A.3 across the sleeve-stitches, increase 1 stitch for raglan on each side of the 2 raglan-stitches, increase 2-2-2-6-6-6 stitches evenly between marker-threads 4 and 1 while working A.1, A.2 2-2-2-4-4-4 times, A.3 across the back piece, increase 1 stitch for raglan before the last stitch on the round, work this stitch in stocking stitch with colour light blue (= 1 raglan-stitch) = 100-100-100-124-124-124 stitches. ROUND 2: Continue with stocking stitch and pattern, working the new stitches into the pattern as shown in the diagrams (remember to work the yarn overs as described in RAGLAN). ROUND 3: Continue with stocking stitch and pattern, increasing for raglan on each side of the raglan-stitches (= 8 increased stitches). ROUND 4: Continue with stocking stitch and pattern, working the new stitches into the pattern as shown in the diagrams (remember to work the yarn overs as described in RAGLAN). Repeat ROUNDS 3 and 4, 11-11-11-17-20-17 times (= 22-22-22-34-40-34 rounds worked) = 188-188-188-260-284-260 stitches. Remember to maintain the knitting tension. NOTE: Each time A.1 to A.3 are worked once in height, there is room for 2 more repeats of A.2 in width. Continue with stocking stitch and pattern, now increasing for raglan as follows: ROUND 1: Increase for raglan after marker-thread 2, before marker-thread 3, after marker-thread 4 and before marker-thread 1; you are only increasing on the front and back piece, not on the sleeves (= 4 stitches increased). ROUND 2: Continue with stocking stitch and pattern, working the new stitches into the pattern as shown in the diagrams (remember to work the yarn overs as described in RAGLAN). Repeat ROUNDS 1 and 2, 12-12-15-9-12-15 times (= 24-24-30-18-24-30 rounds worked) = 236-236-248-296-332-320 stitches. All increases for raglan are now finished, with a total of 24-24-27-27-33-33 times on the front and back pieces and 12-12-12-18-21-18 times on the sleeves. The pattern begins and ends with either a whole or half repeat of A.2 on each side of each raglan-line. Continue with stocking stitch and pattern, without further increases, until the yoke measures 22-22-25-25-30-30 cm from the marker mid-front. Now divide for the body and sleeves. DIVIDE FOR BODY AND SLEEVES: Place the first 44-44-44-56-62-56 stitches on a thread for the sleeve, cast on 10-16-22-16-16-22 stitches (in side mid-under sleeve), work 74-74-80-92-104-104 stitches as before (= front piece), place the next 44-44-44-56-62-56 stitches on a thread for the sleeve, cast on 10-16-22-16-16-22 stitches (in side mid-under sleeve), work the last 74-74-80-92-104-104 stitches as before (= back piece). The body and sleeves are continued separately and the round starts in the transition between the back piece and the cast-on stitches under the sleeve. BODY: = 168-180-204-216-240-252 stitches. Continue stocking stitch and pattern (A.2 is worked across the 10-16-22-16-16-22 cast-on stitches under each sleeve; the pattern now fits on the round), until the piece measures 44-46-48-49-51-53 cm from the marker, finishing after 1 round of colour light blue after a complete square in height. Change to circular needle size 3.5 mm, using colour light blue and work rib (knit 2, purl 2) AT THE SAME TIME as increasing 28-32-36-40-44-44 stitches evenly on the first round – read INCREASE TIP = 196-212-240-256-284-296 stitches. When the rib measures 6-6-6-7-7-7 cm, cast off. The jumper measures approx. 50-52-54-56-58-60 cm from the marker and 56-58-60-62-64-66 cm from top of shoulder. SLEEVES: Place the 44-44-44-56-62-56 sleeve-stitches from the thread on one side of the piece on circular needle size 5 mm and knit up 1 stitch in each of the 10-16-22-16-16-22 stitches cast on under the sleeve = 54-60-66-72-78-78 stitches. Insert a marker-thread in the middle of the 10-16-22-16-16-22 stitches under the sleeve. Start at the marker-thread and continue the pattern from the yoke round the sleeve – the pattern will not fit under the sleeve while decreasing but will fit when the decreases are finished. When the sleeve measures 3-3-3-2-2-2 cm, decrease 2 stitches under the sleeve – read DECREASE TIP. Decrease like this every 3-2-2-1½-1½-1½ cm a total of 3-6-6-9-9-9 times = 48-48-54-54-60-60 stitches. Continue working until the sleeve measures 40-41-39-37-33-34 cm from the division, finishing in the same way as on the body. Change to double pointed needles size 3.5 mm. Work rib with colour light blue (knit 2, purl 2), increasing 8-8-10-10-12-12 stitches evenly on the first round = 56-56-64-64-72-72 stitches. When the rib measures 6-6-6-7-7-7 cm, cast off. The sleeve measures approx. 46-47-45-44-40-41 cm. ASSEMBLY: Fold the neck double to the inside and fasten down. |
|||||||
Diagram explanations |
|||||||
|
|||||||
 |
|||||||
 |
|||||||
Have you finished this pattern?Tag your pictures with #dropspattern #riverbreakupsweater or submit them to the #dropsfan gallery. Do you need help with this pattern?You'll find 31 tutorial videos, a Comments/Questions area and more by visiting the pattern on garnstudio.com. © 1982-2026 DROPS Design A/S. We reserve all rights. This document, including all its sub-sections, has copyrights. Read more about what you can do with our patterns at the bottom of each pattern on our site. |
|||||||


With over 40 years in knitting and crochet design, DROPS Design offers one of the most extensive collections of free patterns on the internet - translated to 17 languages. As of today we count 324 catalogues and 12290 patterns translated into English (UK/cm).
We work hard to bring you the best knitting and crochet have to offer, inspiration and advice as well as great quality yarns at incredible prices! Would you like to use our patterns for other than personal use? You can read what you are allowed to do in the Copyright text at the bottom of all our patterns. Happy crafting!
Post a comment to pattern DROPS 254-30
We would love to hear what you have to say about this pattern!
If you want to leave a question, please make sure you select the correct category in the form below, to speed up the answering process. Required fields are marked *.