
Popular categories
Looking for a yarn?


Comments / Questions (20)
![]() Silkw wrote:
Silkw wrote:
Ich habe mir den Pullover aus der Daisy gestrickt. Die Anleitung ist sehr gut beschrieben und die Wolle ist wunderbar weich. Sie kratzt kein bisschen. Schade nur, dass sie so sehr zur Knötchenbildung neigt.
26.03.2026 - 16:30
![]() Heike wrote:
Heike wrote:
Hallo, in der Anleitung steht für Größe M ich habe beim Rumpfteil 236 Maschen. Wenn ich aber jeweils 110 M für Vorder und rückenteil habe komme ich doch nur auf 220 M. Für die Ärmel jeweils 64 M und 8 neue angeschlagene. Ich bin gespannt auf Ihre Antwort Viele Grüße Heike
26.01.2026 - 13:27DROPS Design answered:
Liebe Heike, die neu angeschlagenen Maschen gehören auch noch zum Rumpfteil dazu, es werden ja nur die Ärmelmaschen stillgelegt. Also 110 + 8 + 110 + 8 = 236 Maschen. Viel Spaß beim Stricken!
28.01.2026 - 20:56
![]() Aileen wrote:
Aileen wrote:
Hi, It's going to be my first sweater. :) I'm wondering if it is possible to add a german short row after the neck band for neck shaping and if you can give me instructions for how to do that? Thank you!
10.12.2025 - 15:59DROPS Design answered:
Hi Aileen, of courese you can. Take as an example another pattern from the same yarn group like THIS ONE where the short rows are included. You can use the same pattern to do short rows in your sweater. Happy knitting!
10.12.2025 - 16:32
![]() Inger Kjær Hansen wrote:
Inger Kjær Hansen wrote:
Jeg har strikket Drops 254-13. Den er fin, men jeg kunne godt tænke mig en høj hals. Kan man det ? Og hvordan hvis det er muligt. Hilsen Inger
09.12.2025 - 16:06DROPS Design answered:
Hej Inger, ja det er bare at strikke halsen længere :)
10.12.2025 - 07:30
![]() Ulrika wrote:
Ulrika wrote:
Hej, Vid delning av fram och bakstycke ska man sätta de 64 första maskorna på en tråd och därefter lägga upp 8 nya maskor på varvet (= i sidan mitt under ärmen). Jag förstår ändå inte riktigt var de 8 nya maskorna ska läggas upp? Har tittat på instruktionsvideon men förstår ändå inte var? ”I sidan mitt under armen” gör mig heller tyvärr inte klokare. Tacksam för vägledning. Mvh Ulrika
02.11.2025 - 21:49DROPS Design answered:
Hej Ulrika. De här maskorna du lägger upp hamnar under armen och de maskorna du sätter på tråd till ärm hamnar runt/över armen, försök gärna att se videon igen och se om du förstår bättre nu. Mvh DROPS Design
19.11.2025 - 12:36
![]() Inger wrote:
Inger wrote:
Beklager min henvendelse igen, jeg har spurgt på en forkert opskrift. Det er Drops 254-13 . Hvor jeg ikke kan få diagram og billed til at stemme overens.? ?
24.10.2025 - 12:43DROPS Design answered:
Hej Inger. Det är samma sak på denna, om diagrammen stickas nedifra og opp, fra høyre til venstre ska det bli som på foto. Vad är det som inte ser ut att stemme overens? Mvh DROPS Design
24.10.2025 - 13:29
![]() Erika wrote:
Erika wrote:
Hej, ska mönstret börja stickas från markören eller från uppläggnings-varvets början? Tack för ett trevligt mönster!
26.03.2025 - 11:43DROPS Design answered:
Hej Erika, normalt har man mønsterovergangen midt på ryggen, men det bestemmer du naturligvis selv :)
27.03.2025 - 13:56
![]() Karolina wrote:
Karolina wrote:
A jakby tam dodać podwyższenie karczku to jak to przeliczyć?
07.02.2025 - 19:12DROPS Design answered:
Witaj Karolino, najlepiej znaleźć inny nasz sweter dla takiej samej próbki (22 - 20 oczek na 10 cm), w którym jest wykonane podwyższenie, wtedy nic nie trzeba przeliczać :) Zobacz np. wzór 197-4. W nim nabieramy nawet prawie tyle samo oczek na wykończenie dekoltu, więc idealnie pasuje. Pozdrawiamy!
10.02.2025 - 12:18
![]() Eva Bleeker wrote:
Eva Bleeker wrote:
Hi! I don't really get how to use the marker after the first 34 stitches (for size S) at the end of the neck part. In the videos this is a vertical mark, but then using this as a measuring point would be strange. Do you just put a piece of yarn there for the sole purpose of knowing from where to measure? Also, why are the sleeves for size S the longest?
14.01.2025 - 17:01DROPS Design answered:
Dear Mrs Bleeker, the marker inserted after the first 34 sts in S is just a mark to measure piece from afterwards, in other words, all further height measurements should be taken from this marker, this means from after the neck. Sleeves are longer in smaller size because yoke is shorter - remember to check all measurements, including half wingspan= 74 cm in S x 2 =148 cm from sleeve to sleeve. Happy knitting!
15.01.2025 - 08:06
![]() Karin wrote:
Karin wrote:
Hej! När jag ska maska av för fram- och bakstycke vilken typ rekommenderar ni? Maska av för elastiskt kant? Gör man det i sådana fall på något specifikt sätt när det är resår? Eller kan jag följa någon av metoderna (1,2 el 3) som finns under rubriken ”videor”.
10.12.2024 - 23:03DROPS Design answered:
Hej Karin, du kan maska av i resår, rm över rm och am över am :)
11.12.2024 - 13:47
|
||||||||||
Spring Memories#springmemoriessweater |
||||||||||
 |
 |
|||||||||
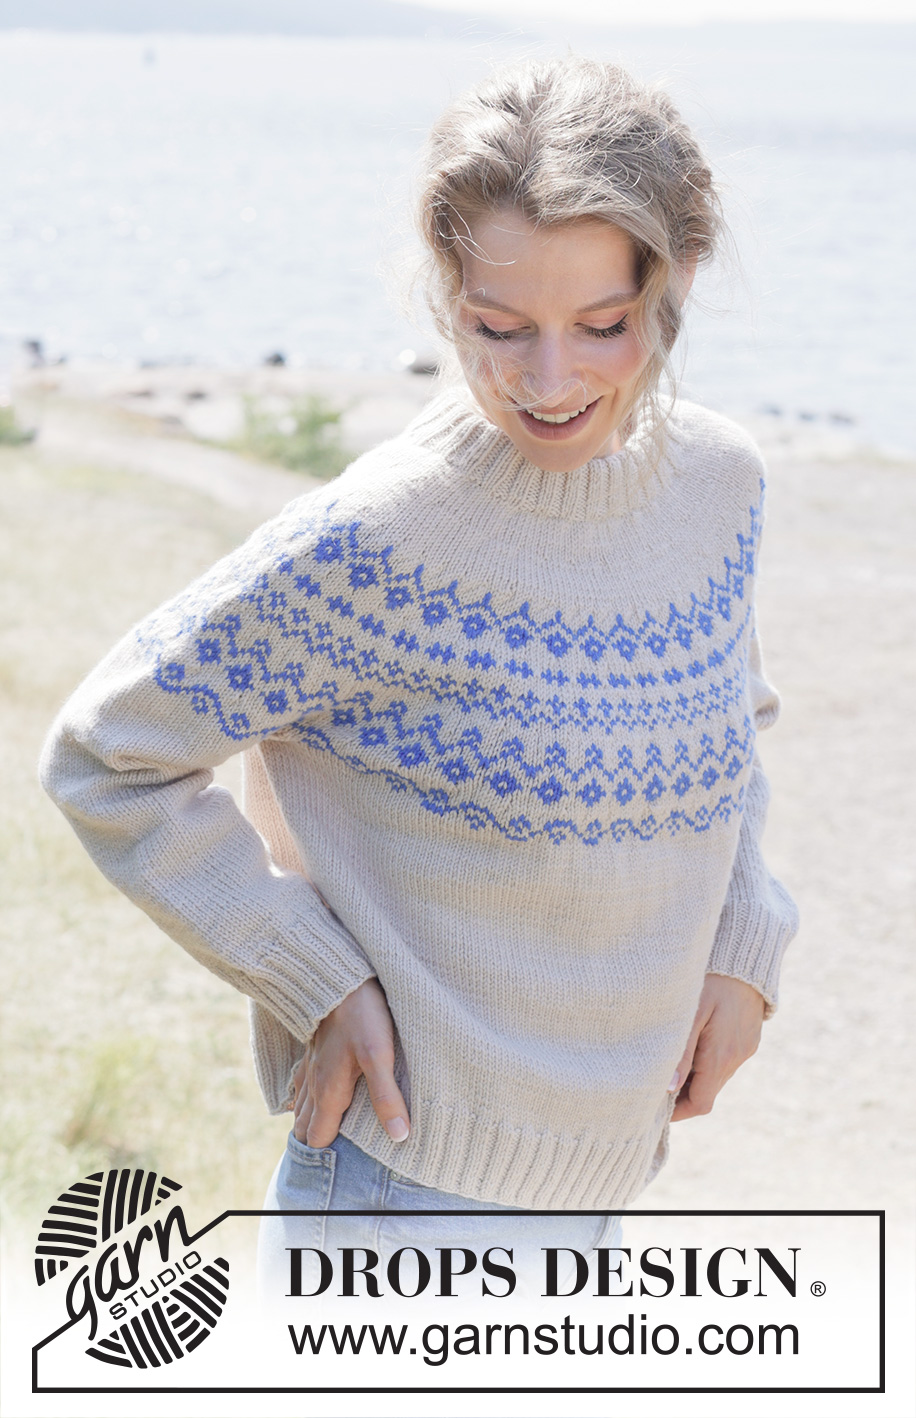
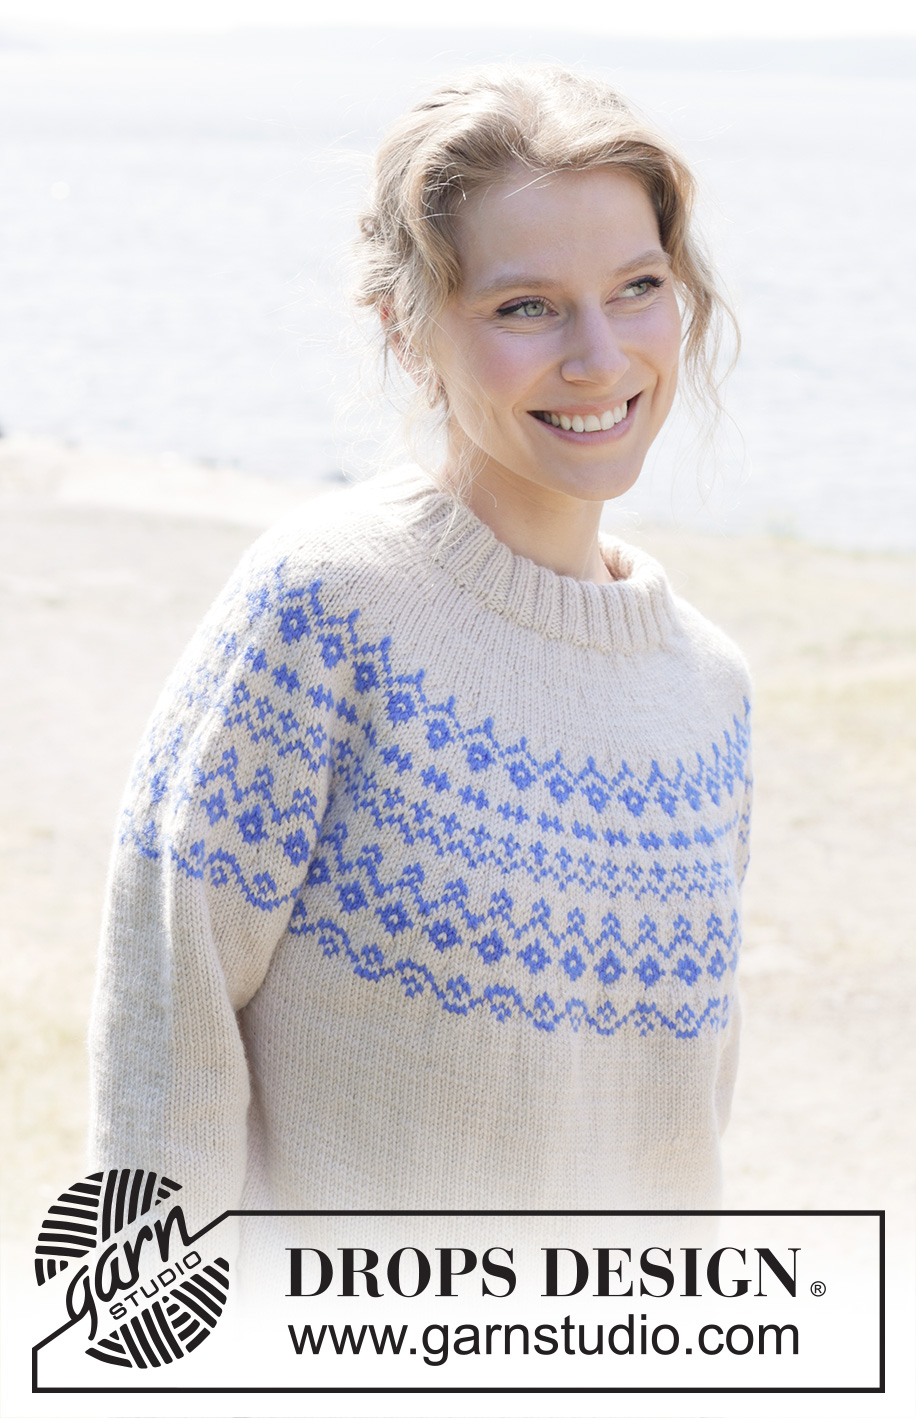
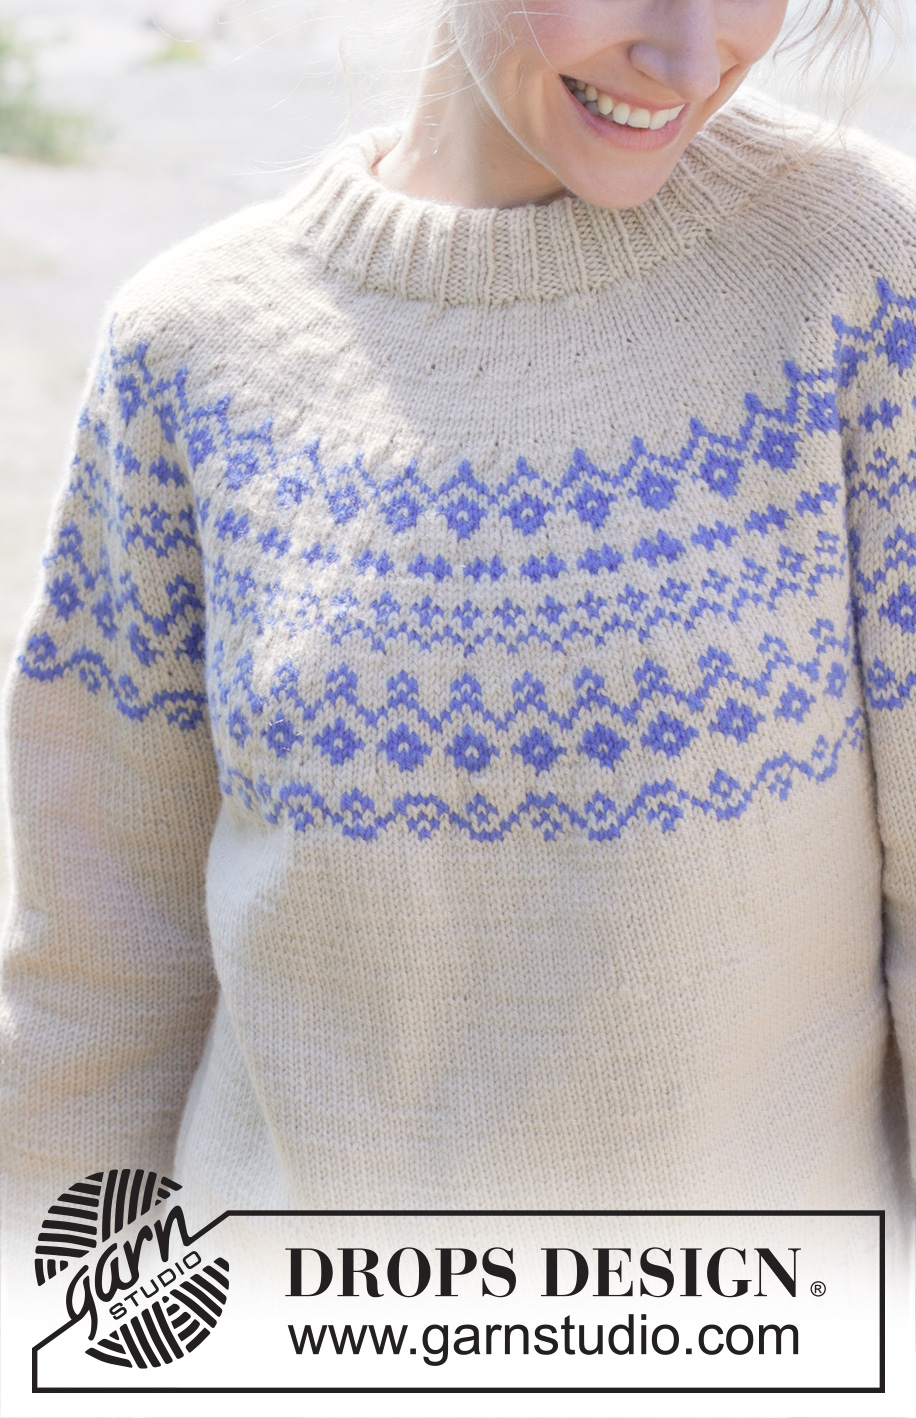
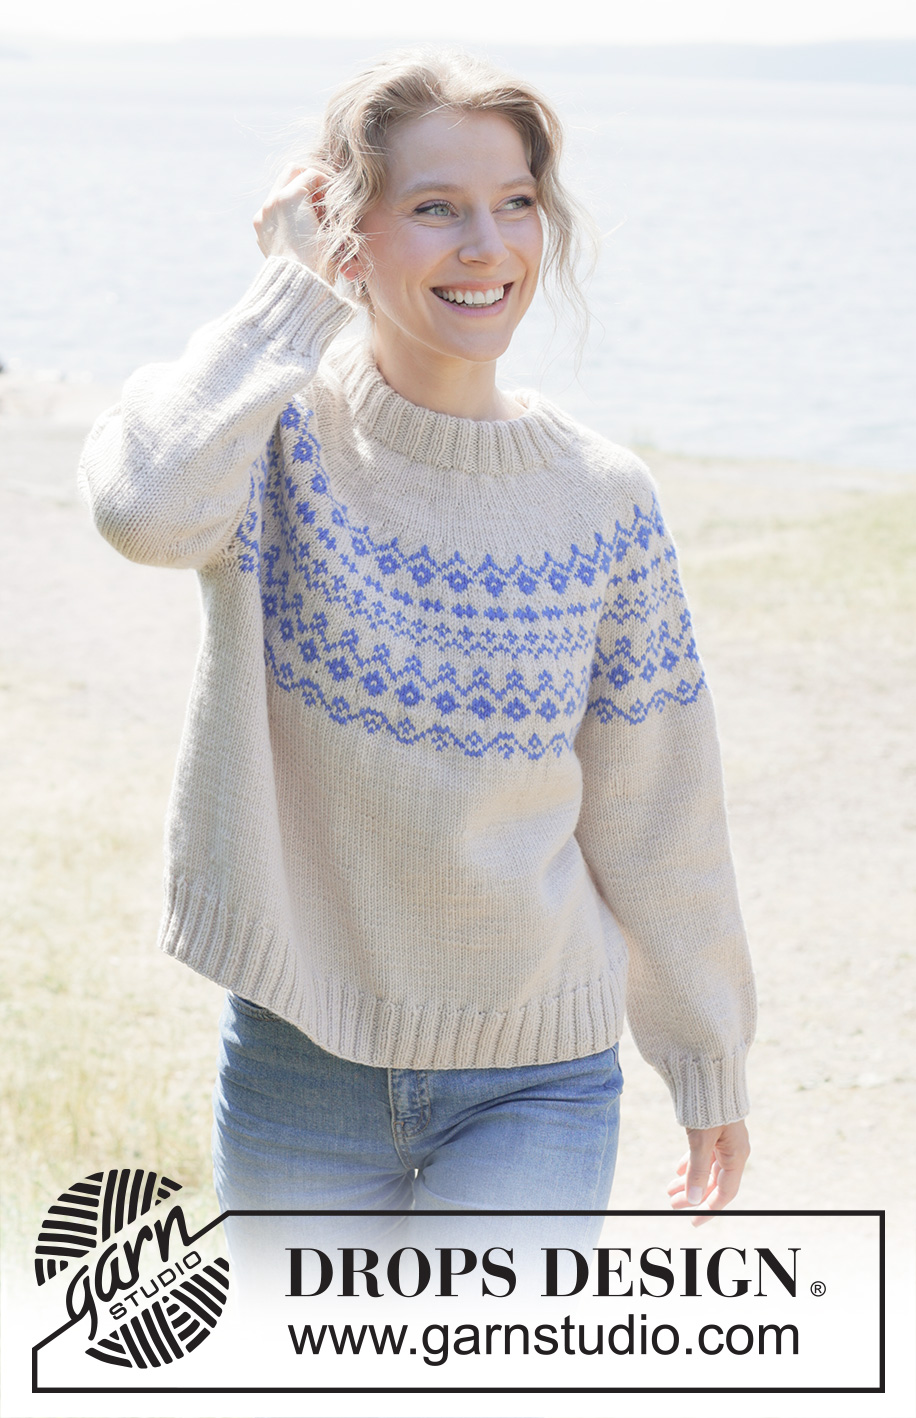
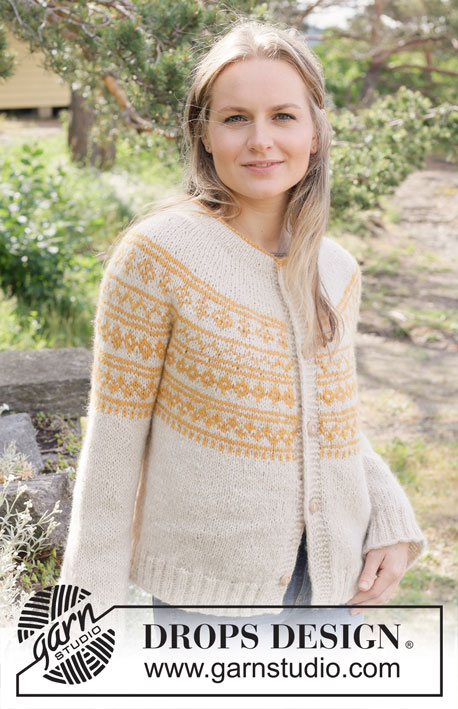
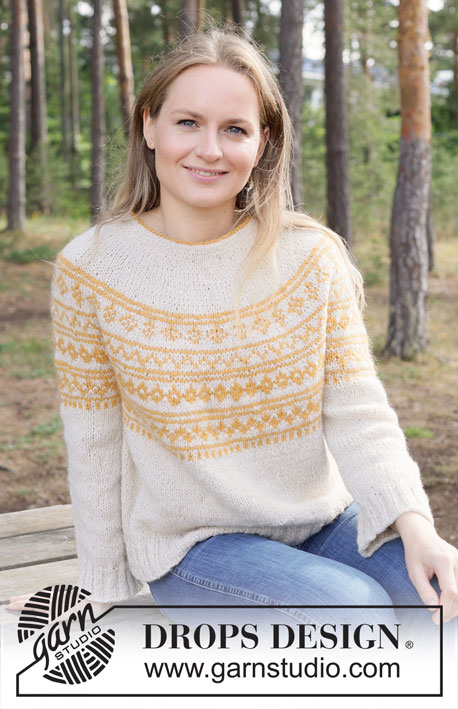
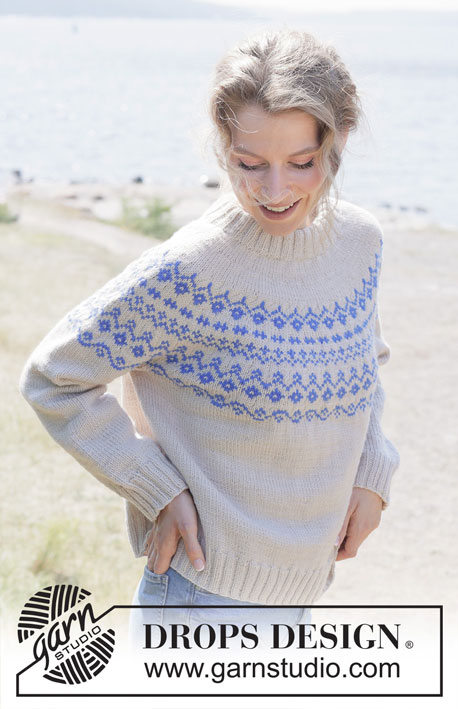
Knitted jumper in DROPS Daisy or DROPS Karisma. The piece is worked top down with round yoke, Nordic pattern and double neck. Sizes S - XXXL.
DROPS 254-13 |
||||||||||
|
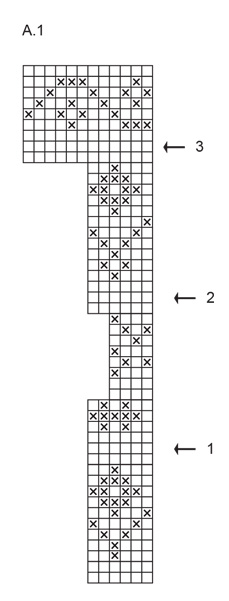
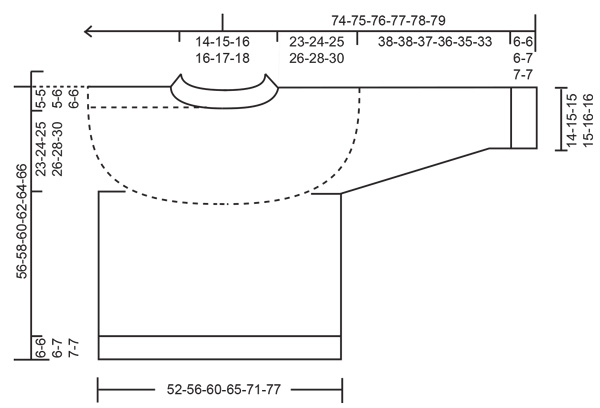
------------------------------------------------------- EXPLANATIONS FOR THE PATTERN: ------------------------------------------------------- PATTERN: See diagram A.1. The pattern is worked in stocking stitch. INCREASE TIP (evenly spaced): To work out how to increase evenly, count the total number of stitches on the needle (e.g., 102 stitches) and divide by the number of increases to be made (e.g., 15) = 6.8. In this example, increase by making 1 yarn over after approx. each 7th stitch. On the next round knit the yarn overs twisted to avoid holes. DECREASE TIP: Decrease 1 stitch on each side of the marker-thread as follows: Work until there are 3 stitches left before the marker-thread, knit 2 together, knit 2 (marker-thread sits between these 2 stitches), slip 1 stitch knit-wise, knit 1 and pass the slipped stitch over the knitted stitch (2 stitches decreased). ------------------------------------------------------- START THE PIECE HERE: ------------------------------------------------------- JUMPER – SHORT OVERVIEW OF THE PIECE: The pattern uses both long and short needles; start with the length which fits the number of stitches and change when necessary. The neck and yoke are worked in the round with circular needle, top down and from the right back shoulder. When the yoke is finished, it is divided for the body and sleeves and the body continued in the round, while the sleeves wait. The sleeves are worked top down, in the round. The neck is folded double and fastened to the inside. NECK: Cast on 100-104-112-116-116-120 stitches with circular needle size 4 mm and colour marzipan DROPS Daisy or colour light beige DROPS Karisma. Change to circular needle size 3 mm (casting on with a larger needle size makes the cast-on edge elastic). Knit 1 round. Work rib in the round (knit 2, purl 2) for 9 cm. The neck is folded double later to leave a neck-height of approx. 4 cm. Insert 1 marker after the first 34-35-37-38-39-41 stitches (approx. mid-front), the piece is now measured from here. YOKE: Change to circular needle size 4 mm. Knit 1 round and increase 17-19-14-17-23-25 stitches evenly spaced – read INCREASE TIP = 117-123-126-133-139-145 stitches. Continue with stocking stitch. Remember to maintain the knitting tension. When the yoke measures 3-3-4-4-4-4 cm from the marker, increase 30-34-33-37-43-45 stitches evenly spaced – remember INCREASE TIP = 147-157-159-170-182-190 stitches. Work until the yoke measures 5-6-7-8-9-9 cm from the marker. Now work PATTERN – read description above, working A.1 in the round. AT THE SAME TIME increase 45-47-51-58-64-68 stitches evenly spaced on round 1 = 192-204-210-228-246-258 stitches (there is room for 32-34-35-38-41-43 repeats of A.1 after this increase). Continue the pattern, increasing stitches on each round marked with an arrow in A.1 – remember INCREASE TIP, as follows: Arrow-1: Increase 48-60-54-60-66-78 stitches evenly spaced = 240-264-264-288-312-336 stitches. Arrow-2: Increase 48-48-60-60-66-72 stitches evenly spaced = 288-312-324-348-378-408 stitches. Arrow-3: Increase 36-24-36-48-54-48 stitches evenly spaced = 324-336-360-396-432-456 stitches. When A.1 is completed in height, finish the jumper with colour marzipan/light beige. Knit 1 round and adjust the stitch count to 332-348-372-400-436-460 stitches. Work until the yoke measures 23-24-25-26-28-30 cm from the marker. DIVIDE FOR BODY AND SLEEVES: Place the first 62-64-70-76-80-82 stitches on a thread for the sleeve, cast on 6-8-10-12-12-14 stitches (in side mid-under sleeve), knit 104-110-116-124-138-148 (= front piece), place the next 62-64-70-76-80-82 stitches on a thread for the sleeve, cast on 6-8-10-12-12-14 stitches (in side mid-under sleeve), knit the last 104-110-116-124-138-148 stitches (= back piece). The body and sleeves are finished separately. The round starts in the transition between the body and sleeve. BODY: = 220-236-252-272-300-324 stitches. Continue with stocking stitch in the round until the piece measures 45-47-49-49-51-53 cm from the marker. Change to circular needle size 3 mm. Work rib (knit 2, purl 2). AT THE SAME TIME increase 24-24-28-28-32-36 stitches evenly on round 1 = 244-260-280-300-332-360 stitches. When the rib measures 6-6-6-7-7-7 cm, cast off. The jumper measures approx. 51-53-55-56-58-60 cm from the marker and 56-58-60-62-64-66 cm from top of shoulder. SLEEVES: Place the 62-64-70-76-80-82 sleeve-stitches from the thread on one side of the piece on circular needle size 4 mm and knit up 1 stitch in each of the 6-8-10-12-12-14 stitches cast on under the sleeve = 68-72-80-88-92-96 stitches. Insert a marker-thread in the middle of the 6-8-10-12-12-14 stitches under the sleeve. Start at the marker-thread and work stocking stitch in the round with colour marzipan/light beige. When the sleeve measures 3-3-3-2-2-2 cm, decrease 2 stitches under the sleeve – read DECREASE TIP. Decrease like this every 8-8-4-3-2½-2 cm a total of 5-5-8-11-12-13 times = 58-62-64-66-68-70 stitches. Continue working until the sleeve measures 38-38-37-36-35-33 cm from the division. Change to double pointed needles size 3 mm. Work rib (knit 2, purl 2), AT THE SAME TIME increase 6-6-4-6-8-6 stitches evenly on the first round = 64-68-68-72-76-76 stitches. When the rib measures 6-6-6-7-7-7 cm, cast off. The sleeve measures approx. 44-44-43-43-42-40 cm from the division. ASSEMBLY: Fold the neck double to the inside and sew down. To avoid the neck being tight and rolling outwards, it is important that the seam is elastic. |
||||||||||
Diagram explanations |
||||||||||
|
||||||||||
 |
||||||||||
 |
||||||||||
Have you finished this pattern?Tag your pictures with #dropspattern #springmemoriessweater or submit them to the #dropsfan gallery. Do you need help with this pattern?You'll find 30 tutorial videos, a Comments/Questions area and more by visiting the pattern on garnstudio.com. © 1982-2026 DROPS Design A/S. We reserve all rights. This document, including all its sub-sections, has copyrights. Read more about what you can do with our patterns at the bottom of each pattern on our site. |
||||||||||


With over 40 years in knitting and crochet design, DROPS Design offers one of the most extensive collections of free patterns on the internet - translated to 17 languages. As of today we count 324 catalogues and 12290 patterns translated into English (UK/cm).
We work hard to bring you the best knitting and crochet have to offer, inspiration and advice as well as great quality yarns at incredible prices! Would you like to use our patterns for other than personal use? You can read what you are allowed to do in the Copyright text at the bottom of all our patterns. Happy crafting!
Post a comment to pattern DROPS 254-13
We would love to hear what you have to say about this pattern!
If you want to leave a question, please make sure you select the correct category in the form below, to speed up the answering process. Required fields are marked *.