
Popular categories
Looking for a yarn?


Comments / Questions (19)
![]() Fallourd wrote:
Fallourd wrote:
Bonjour, Dans empiècement, il est indiqué que dans le rang 2 des côtes anglaises on doit augmenter en même temps pour le raglan et l'encolure. Dans raglan, c'est au 6° rang que l'on doit augmenter. Ma question est : c'est au 2° rang ou au 6° rang que l'on doit augmenter ?
16.11.2024 - 18:17DROPS Design answered:
Bonjour Mme Fallourd, la 1ère augmentation du raglan se fait au 6ème rang depuis le départ: après avoir tricoté le 1er rang des côtes anglaises + après avoir répété 2 fois les rangs 2 et 3; en même temps, lorsque vous avez augmenté 3 fois (soit tricoté 3 fois le rang 2, sur l'endroit), vous augmentez pour l'encolure = sur l'endroit = rang 2 des côtes anglaises. Bon tricot!
18.11.2024 - 07:53
![]() B Boop wrote:
B Boop wrote:
Classic n' Warm
11.08.2024 - 15:48
![]() Alix wrote:
Alix wrote:
Cozy Evenings cardigan
09.08.2024 - 22:43
![]() Su wrote:
Su wrote:
Dublin
09.08.2024 - 15:23
![]() Ver wrote:
Ver wrote:
Sorry l like this pattern, how do l get this pattern can't open, what the pattern number, thanks
09.08.2024 - 03:14
![]() Gitte wrote:
Gitte wrote:
Schön sportlich und warm
09.08.2024 - 03:02
![]() Judy wrote:
Judy wrote:
Oldy but goldy
08.08.2024 - 21:02
![]() Robbie wrote:
Robbie wrote:
Classic cozy style cardigan :)
08.08.2024 - 20:26
![]() Erika wrote:
Erika wrote:
Underbart klassisk och mysig på samma gång.
08.08.2024 - 18:34
|
|
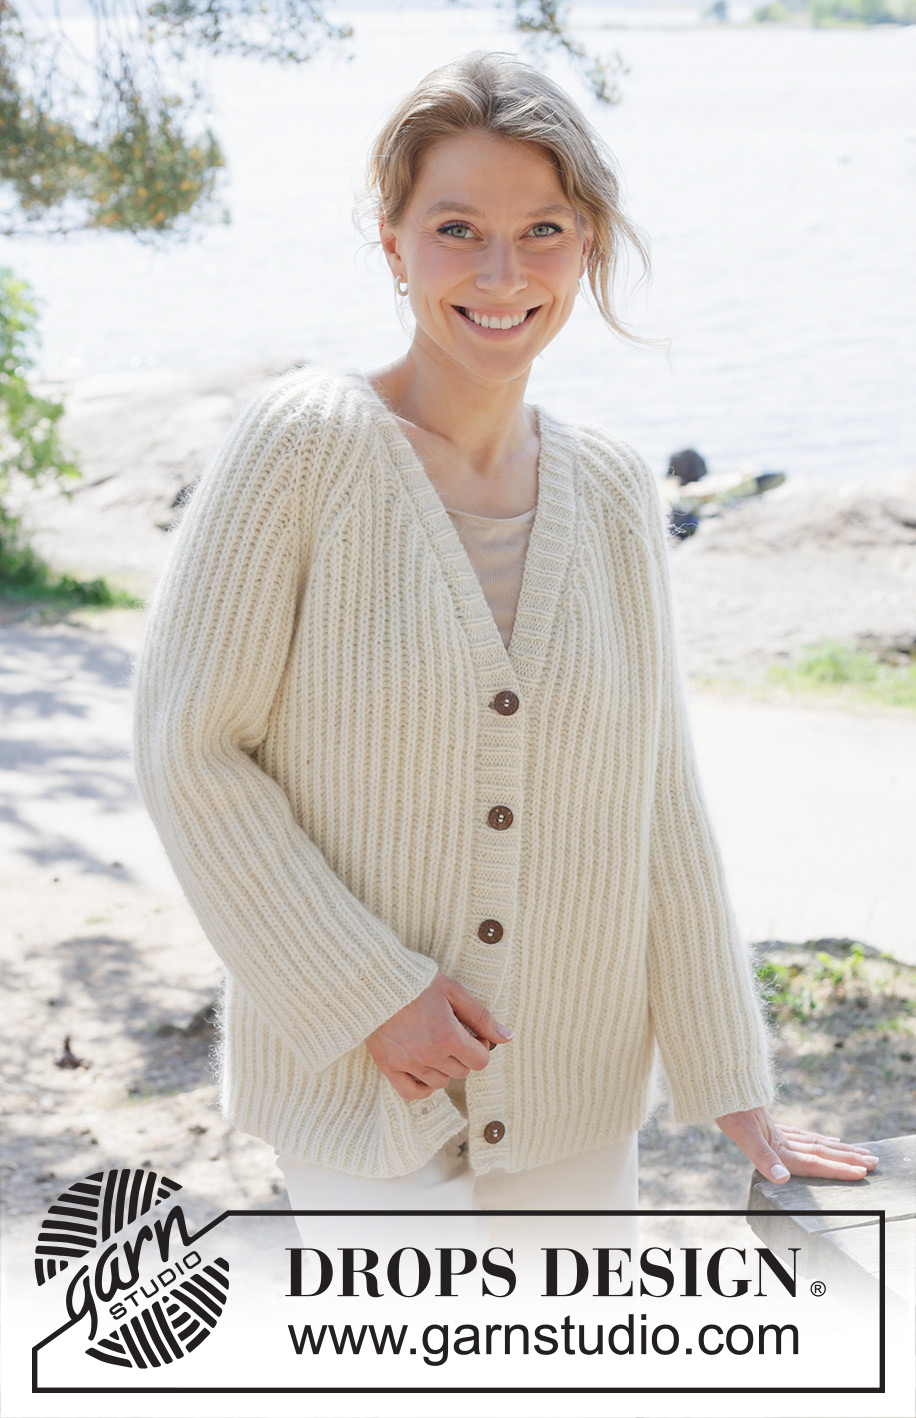
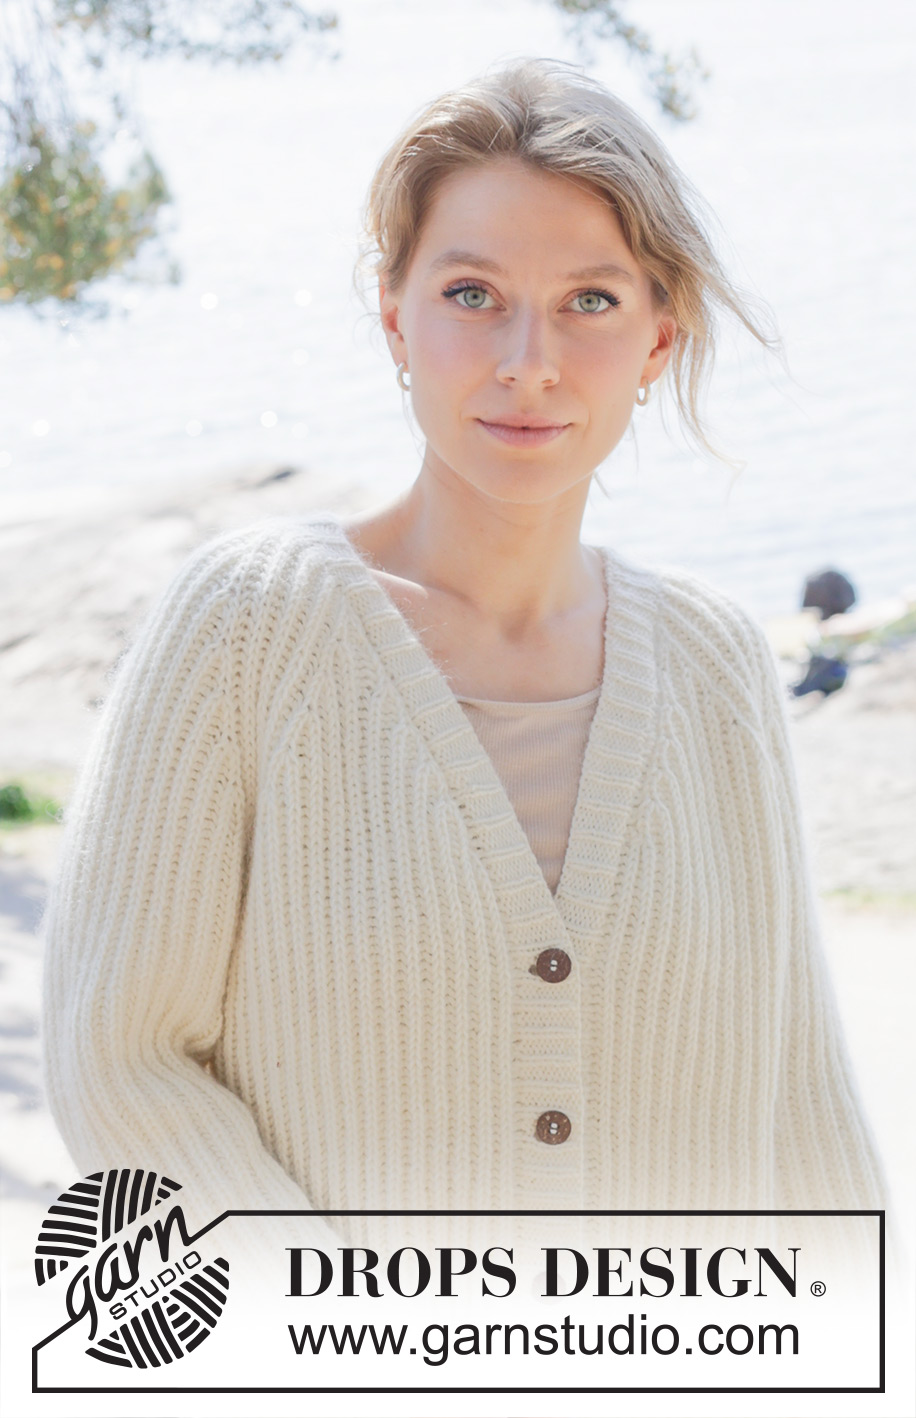
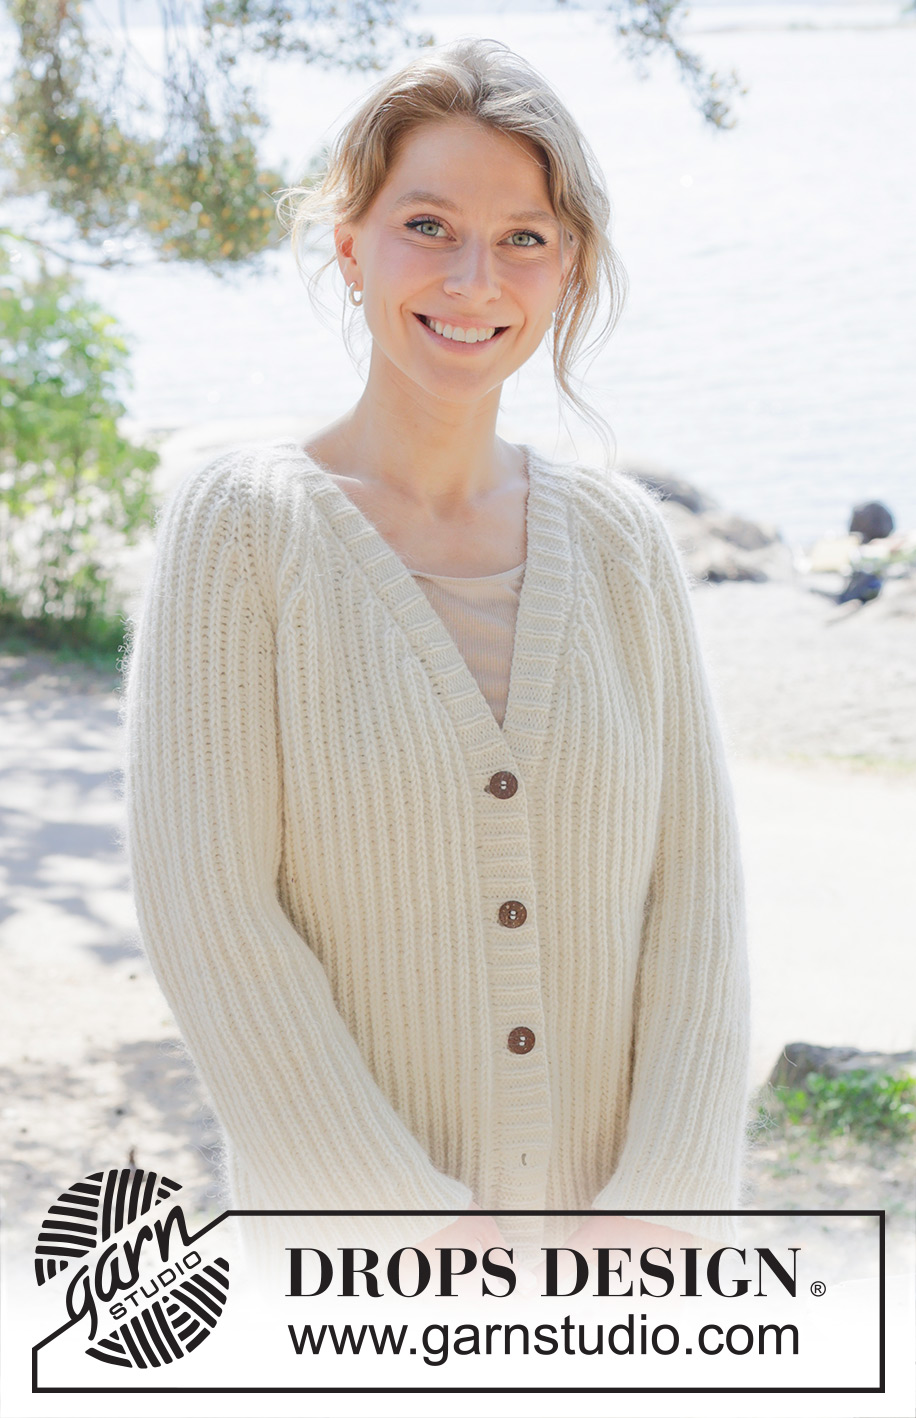
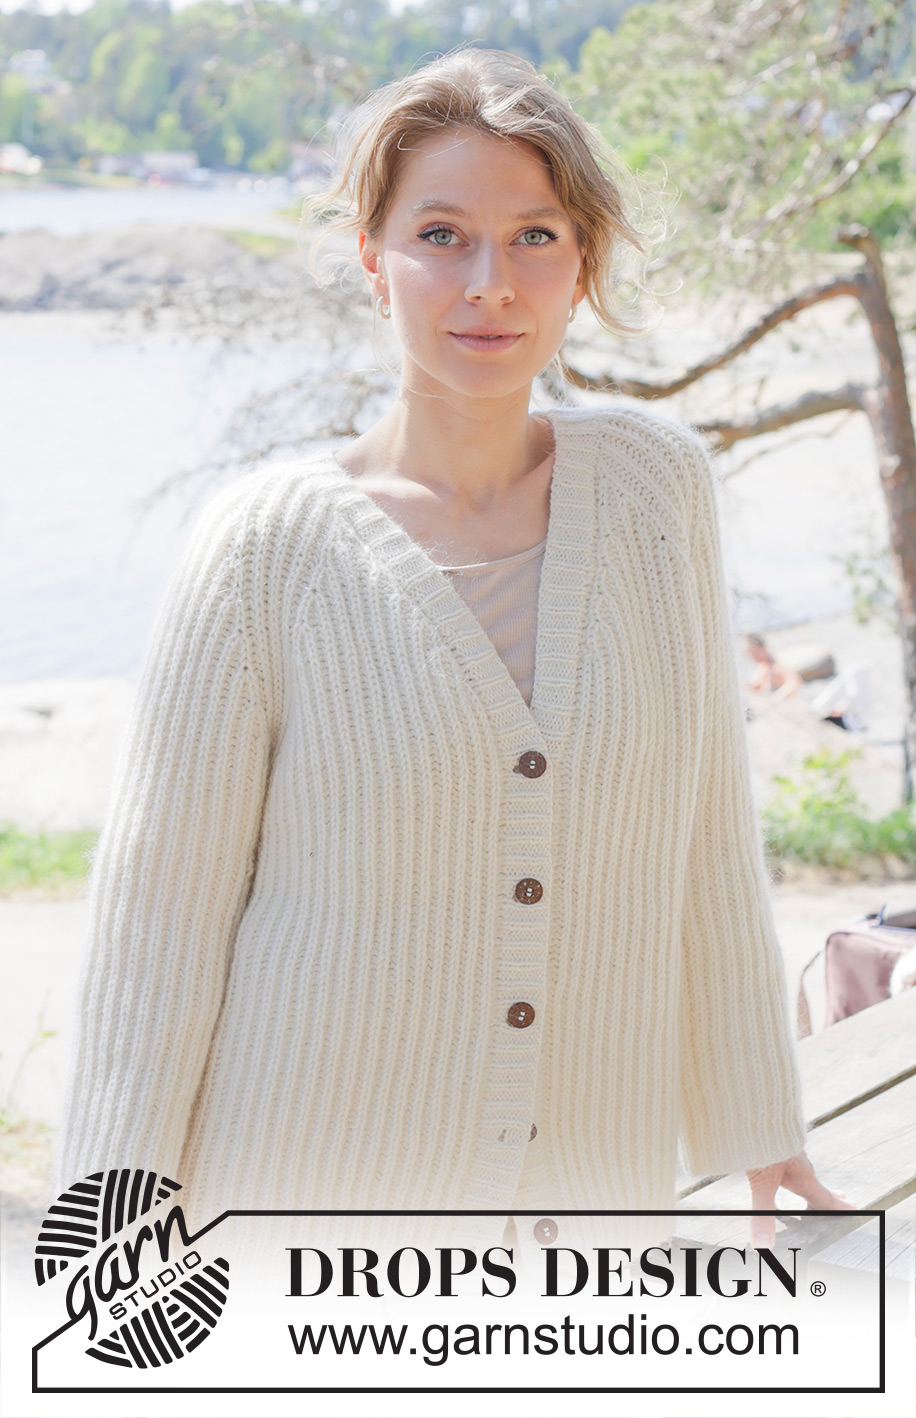
Cherish Cardigan#cherishcardigan |
|
 |
 |
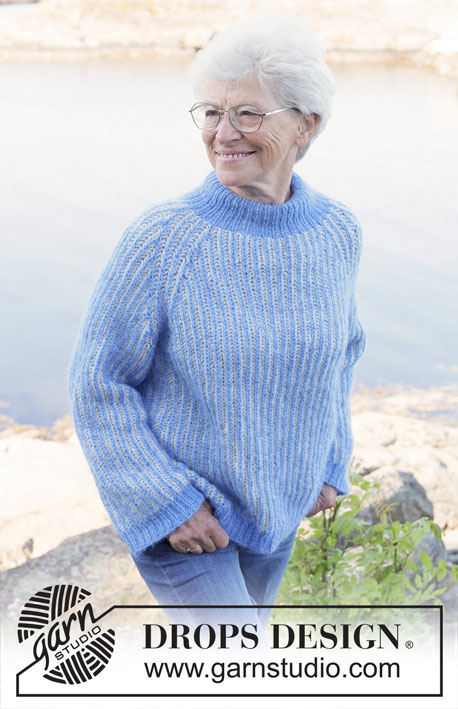
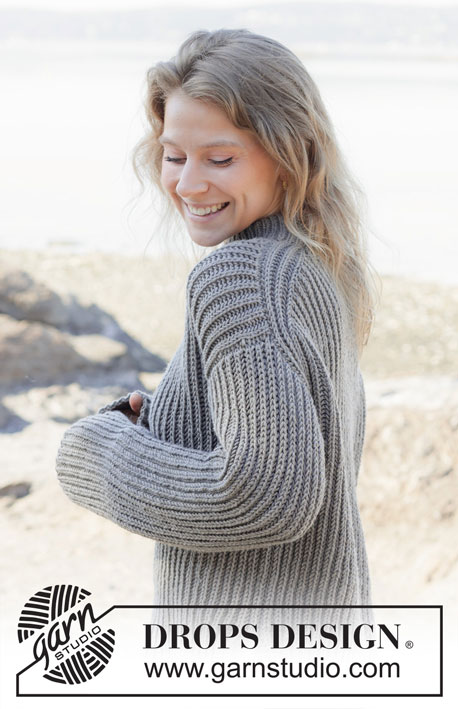
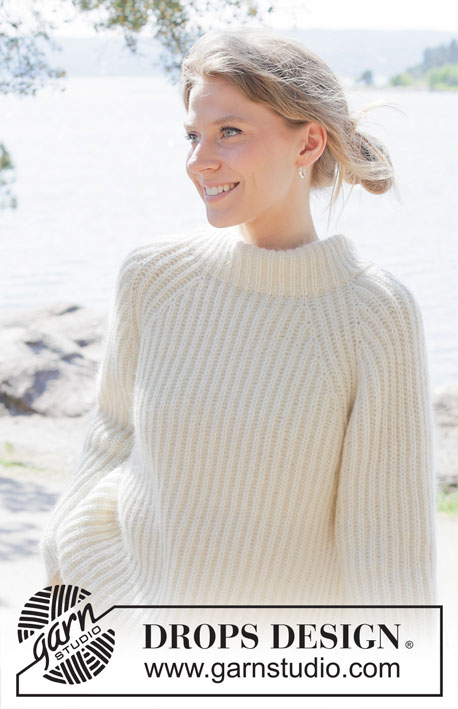
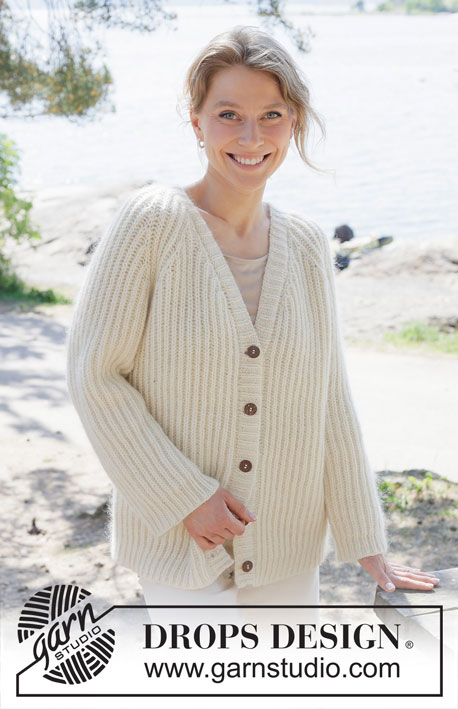
Knitted jacket in 1 strand DROPS Daisy and 1 strand DROPS Kid-Silk, or in 1 strand DROPS Puna and 1 strand DROPS Kid-Silk. The piece is worked top down with raglan, English rib and V-neck. Sizes S - XXXL.
DROPS 252-7 |
|
|
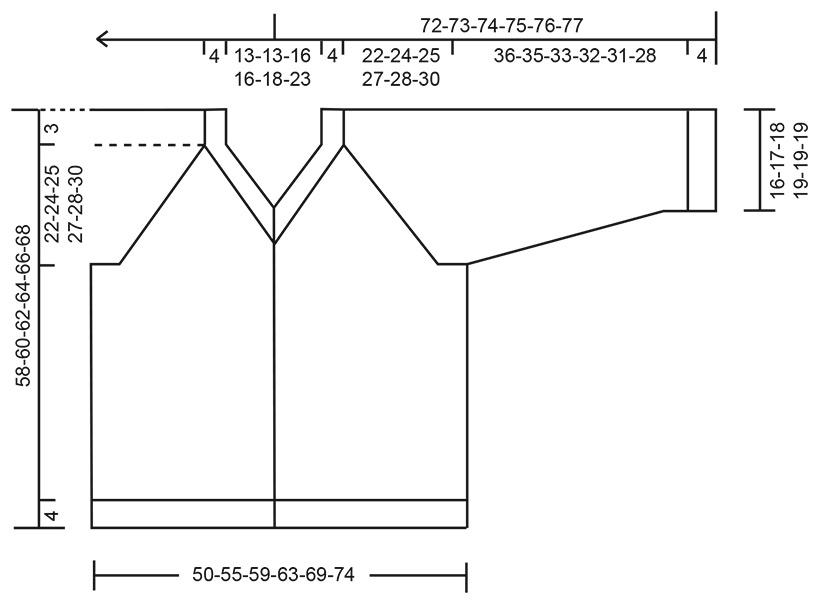
------------------------------------------------------- EXPLANATIONS FOR THE PATTERN: ------------------------------------------------------- GARTER STITCH (worked back and forth): Knit all rows, from both the right and wrong side. 1 ridge in height = knit 2 rows. KNITTING TIP: When doing stitch counts, the yarn overs are not included. From the right side, the rows always begin with 1 garter stitch and 1 purled stitch. ENGLISH RIB (back and forth - for body): ROW 1 (wrong side): Work 1 garter stitch, * knit 1, make 1 yarn over, slip 1 stitch purl-wise *, work from *-* until there are 2 stitches left, knit 1 and 1 garter stitch. ROW 2 (right side): Work 1 garter stitch, * make 1 yarn over, slip 1 stitch purl-wise, knit together the slipped stitch and yarn over *, work from *-* until there are 2 stitches left and finish with 1 yarn over, slip 1 stitch purl-wise, work 1 garter stitch. ROW 3 (wrong side): 1 garter stitch, * knit together yarn over and slipped stitch, make 1 yarn over, slip 1 stitch purl-wise *, work from *-* until there is 1 yarn over and 2 stitches left, knit together yarn over and slipped stitch, 1 garter stitch. AFTER ROW 3: Repeat rows 2 and 3 onwards. INCREASE TIP: All increases are worked from the right side! Increase 2 stitches in the knitted stitch by working 3 stitches in the stitch + yarn over as follows: Knit together the stitch and yarn-over but do not slip the stitch off the left needle, make 1 yarn over and knit together the stitch and yarn-over again (= 2 increased stitches). Work the new stitches in English rib but be aware that the new stitches lack yarn overs on the next row, so are worked alone. ENGLISH RIB (in the round - for sleeves): Make sure the English rib is continued from the yoke. ALL SIZES: ROUND 1: Pick up 1 stitch in each of the 5-7-5-7-11-9 stitches cast-on stitches under the sleeve, then work the sleeve stitches as follows: * knit together the yarn over and slipped stitch, make 1 yarn over, slip 1 stitch purl-wise *, work from *-* to the stitches mid under sleeve. Continue working the new stitches picked up under sleeve in English rib, note that the new stitches are missing the yarn over the first time they are worked. Start the next round by the marker mid-under the sleeve, find your size and work as described below: SIZES S, L and XXXL (= marker sits in a purled stitch): ROUND 2: * Purl together the yarn over and slipped stitch, make 1 yarn over, slip 1 stitch purl-wise*, work from *-* to end of round. ROUND 3: * Make 1 yarn over, slip 1 stitch purl-wise, knit together the yarn over and slipped stitch *, work from *-* to end of round. AFTER ROUND 3: Repeat rounds 2 and 3 onwards. SIZES M, XL and XXL (= marker sits in a knitted stitch): ROUND 2: * Make 1 yarn over, slip 1 stitch purl-wise, purl together the yarn over and slipped stitch *, work from *-* to end of round. ROUND 3: * Knit together the yarn over and slipped stitch, make 1 yarn over, slip 1 stitch purl-wise *, work from *-* to end of round. AFTER ROUND 3: Repeat rounds 2 and 3 onwards. DECREASE TIP (for sleeves): All decreases are worked on a round where yarn-overs and knitted stitches are knitted together. Decrease 2 stitches on each side of the marker-stitch as follows: AT BEGINNING OF ROUND: Start at the first knitted English rib stitch after the marker-stitch: Slip the first knitted stitch and yarn-over onto the right needle as if to knit together, knit the next 2 stitches together (i.e., 1 purled stitch + 1 knitted stitch + yarn over), pass the slipped stitch and yarn-over over the knitted together stitches (= 2 stitches decreased). AT END OF ROUND: Work to the next-to-last knitted English rib stitch before the marker-stitch: Slip the first knitted stitch and yarn-over onto the right needle as if to knit together, purl 1, pass the slipped stitch and yarn-over over the purled stitch, slip the stitch back onto the left needle, pass the stitch and yarn-over closest to the purled marker-stitch over the replaced stitch, slip the remaining stitch onto the right needle (= 2 stitches decreased). BUTTONHOLES (on right band when garment is worn): Work 5-5-5-6-6-6 buttonholes from the right side as follows: 1 buttonhole = purl together 2 purled stitches, make 1 yarn over. On the next row from the wrong side, knit the yarn over to leave a hole. The bottom buttonhole is worked in the transition between the rib and English rib. The other 4-4-4-5-5-5 buttonholes are worked with 9-9½-9½-8-8-8 cm between each one. ------------------------------------------------------- START THE PIECE HERE: ------------------------------------------------------- JACKET – SHORT OVERVIEW OF THE PIECE. The pattern uses both long and short needles; start with the length which fits the number of stitches and change when necessary. The yoke is worked back and forth with circular needle, from mid front and top down. When the yoke is finished, it is divided for body and sleeves and the body continued back and forth with circular needle, while the sleeves wait. The sleeves are worked in the round, top down. The bands are worked back and forth to finish. YOKE: Cast on 63-63-67-67-71-77 stitches with circular needle size 5 mm, 1 strand DROPS Daisy and 1 strand DROPS Kid-Silk, or 1 strand DROPS Puna and 1 strand DROPS Kid-Silk (= 2 strands). Work row 1 in ENGLISH RIB (back and forth) – read description above (= wrong side). Insert 8 marker-threads, each one between 2 stitches as follows: Count 3 stitches (= left front piece), insert 1 marker-thread before the next stitch, count 7 stitches (= raglan-stitches), insert 1 marker-thread before the next stitch, count 5 stitches (= sleeve), insert 1 marker-thread before the next stitch, count 7 stitches (= raglan-stitches), insert 1 marker-thread before the next stitch, count 19-19-23-23-27-33 stitches (= back piece), insert 1 marker-thread before the next stitch, count 7 stitches (= raglan-stitches), insert 1 marker-thread before the next stitch, count 5 stitches (= sleeve), insert 1 marker-thread before the next stitch, count 7 stitches (= raglan-stitches), insert 1 marker-thread before the next stitch, There are 3 stitches left after the last marker-thread (= right front piece). Read KNITTING TIP and work row 2 in English rib (back and forth) AT THE SAME TIME as you increase for both RAGLAN and the V-NECK as described below – read the next 2 sections before continuing. Remember to maintain the knitting tension. RAGLAN: When you have worked a total of 5 rows of English rib (next row from right side), increase 2 stitches in the knitted stitch and yarn-over on each side of the 7 raglan-stitches – read INCREASE TIP (= 16 increased stitches). Increase like this every 8th row (i.e., every 4th row of visible English rib stitches) a total of 9-10-11-12-12-13 times. V-NECK: AT THE SAME TIME, when increasing for raglan the 3rd time, begin increasing for the V-neck as follows: Increase 2 stitches on each side mid-front – remember INCREASE TIP (= 4 increased stitches, 2 on each front piece). The increases are worked in English rib (= knitted stitch + yarn over) after the first garter stitch + purled stitch and before the last purled stitch and garter stitch mid-front – always have 1 purled stitch between the increases and the 1 garter stitches mid-front. Increase for the V-neck every 8th row 4-4-5-5-6-7 times. When the increases for the V-neck are finished there are still 3-4-4-5-4-4 increases for raglan left. After all the increases for raglan and V-neck there are 223-239-263-279-287-313 stitches. Continue the English rib without further increases until the yoke measures 22-24-25-27-28-30 cm from the cast-on edge mid-back, with the last row from the wrong side. Now divide for the body and sleeves. DIVIDE FOR BODY AND SLEEVES: On the next row from the right side, work as follows: Work 34-36-40-42-44-48 stitches as before (= front piece), place the next 45-49-53-57-57-61 stitches on a thread for the sleeve, cast on 5-7-5-7-11-9 stitches (in side mid-under sleeve), work 65-69-77-81-85-95 stitches (= back piece), place the next 45-49-53-57-57-61 stitches on a thread for the sleeve, cast on 5-7-5-7-11-9 stitches (in side mid-under sleeve), work the last 34-36-40-42-44-48 stitches as before (= front piece). The body and sleeves are finished separately. BODY: = 143-155-167-179-195-209 stitches. Work in English rib and the edge stitches as before until the piece measures 51-53-55-57-59-61 cm from mid-back. On the next row from the right side, work rib as follows. Change to circular needle size 3.5 mm, work 1 garter stitch, * purl the purled stitch, make 1 yarn over, knit together the yarn over and the knitted stitch *, work from *-* until there are 2 stitches left, purl 1, make 1 yarn over, work 1 garter stitch = 214-232-250-268-292-313 stitches. Work next row from the wrong side as follows: work 1 garter stitch, * knit 1, knit yarn over, purl 1 *, work from *-* until 3 stitches remain, knit 1, knit yarn over and finish with 1 garter stitch. Continue in rib ( = purl 2 / knit 1 ), with 1 edge stitch in garter stitch on each side, for 4 cm. Cast off with rib. The jacket measures approx. 55-57-59-61-63-65 cm from mid-back and 58-60-62-64-66-68 cm from top of shoulder. SLEEVES: Place the 45-49-53-57-57-61 sleeve-stitches from one thread on circular needle size 5 mm and knit up 1 stitch in each of the 5-7-5-7-11-9 stitches cast on under the sleeve. Work 1 round of ENGLISH RIB (in the round) = 50-56-58-64-68-70 stitches. Insert 1 marker in the middle stitch of the 5-7-5-7-11-9 new stitches under the sleeve and start at this marker-stitch; allow the marker to follow your work onwards – it is used when decreasing under the sleeve. Continue English rib (in the round), finding your size in the explanation above to determine where to start. When the sleeve measures 4 cm, decrease under the sleeve as follows – read DECREASE TIP: Decrease 4 stitches every 4cm 1-2-2-3-4-4 times = 46-48-50-52-52-54 stitches. Work until the sleeve measures 36-35-33-32-31-28 cm from the division – adjust so that last round worked was a round with yarn overs and purled stitches were worked together. Change to double pointed needles size 3.5 mm and work 1st round as follows: SIZE S, L and XXXL: * Purl 1, knit yarn over and knitted stitch together, make 1 yarn over *, work from *-* to the end of the round. SIZE M, XL and XXL: * Knit yarn over and knitted stitch together, make 1 yarn over, purl 1 *, work from *-* to the end of the round. Work rib (knit 1, purl 2) as follows: Knit over knit and purl over purl, purling each yarn-over as a separate stitch = 69-72-75-78-78-81 stitches. When the rib measures 4 cm, cast off with rib. The sleeve measures approx. 40-39-37-36-35-32 cm from the division. RIGHT BAND: Insert 1 marker mid-back of neck, which is used when counting knitted-up stitches. Knit up stitches inside the 1 edge stitch on the front piece and in the cast-on edge around the neckline as follows: Start from the right side at the bottom of the right front piece, using circular needle size 3.5 mm, and knit up approx. 146-152-161-164-170-179 stitches up the front piece to the marker on the neckline (the stitch count should be divisible by 3 + 2). Turn and work back from the wrong side as follows: 1 garter stitch, knit 1, * purl 1, knit 2*, work from *-* until there are 3 stitches left, purl 1, 2 garter stitches. Work this rib back and forth until the band measures 1½ cm. Now work the BUTTONHOLES – see explanation above. Continue the rib until the band measures 4 cm. Cast off, making sure the cast-off edge is not tight. LEFT BAND: Knit up stitches, inside 1 edge stitch on the front pieces and in the cast-on edge around the neckline as follows: Using circular needle size 3.5 mm and starting from the right side by the marker mid-back, knit up approx. 146-152-161-164-170-179 stitches along front piece, working down to the bottom of the left front piece. Turn and work back from the wrong side as follows: 2 garter stitches, knit 1, * purl 1, knit 2*, work from *-* until there are 2 stitches left, purl 1 and finish with 1 garter stitch. Work this rib back and forth until the band measures 4 cm. Cast off, making sure the cast-off edge is not tight. ASSEMBLY: Sew the bands together mid-back with small stitches in the outermost stitch. Sew the buttons onto the left band. |
|
 |
|
Have you finished this pattern?Tag your pictures with #dropspattern #cherishcardigan or submit them to the #dropsfan gallery. Do you need help with this pattern?You'll find 29 tutorial videos, a Comments/Questions area and more by visiting the pattern on garnstudio.com. © 1982-2026 DROPS Design A/S. We reserve all rights. This document, including all its sub-sections, has copyrights. Read more about what you can do with our patterns at the bottom of each pattern on our site. |
|


With over 40 years in knitting and crochet design, DROPS Design offers one of the most extensive collections of free patterns on the internet - translated to 17 languages. As of today we count 324 catalogues and 12290 patterns translated into English (UK/cm).
We work hard to bring you the best knitting and crochet have to offer, inspiration and advice as well as great quality yarns at incredible prices! Would you like to use our patterns for other than personal use? You can read what you are allowed to do in the Copyright text at the bottom of all our patterns. Happy crafting!
Post a comment to pattern DROPS 252-7
We would love to hear what you have to say about this pattern!
If you want to leave a question, please make sure you select the correct category in the form below, to speed up the answering process. Required fields are marked *.