
Popular categories
Looking for a yarn?


Comments / Questions (3)
![]() Bella wrote:
Bella wrote:
Hvilken størrelse er vist på billedet? På forhånd mange tak :)
19.11.2024 - 12:17DROPS Design answered:
Hej Bella, Det er nok en Small, men du finder målene i måleskitsen nederst i opskriften.
22.11.2024 - 13:55
![]() Rosy wrote:
Rosy wrote:
Bonjour, pour les diminutions du col V, je ne comprends pas ce que veut dire le terme "band" dans cette phrase : "AVANT LA BORDURE DEVANT: Tricoter jusqu'à ce qu'il reste 10 mailles, tricoter 2 mailles ensemble à l'endroit, tricoter band comme avant (= on a diminué 1 maille)." Merci si vous pouviez m'indiquer ce que ça veut dire.
11.11.2024 - 16:03DROPS Design answered:
Bonjour Rosy, bien sûr, il s'agit des mailles de la bordure devant, simple typo qui est désormais corrigée, merci pour votre retour. Bonne continuation!
11.11.2024 - 16:20
![]() Véronique Leroux wrote:
Véronique Leroux wrote:
Je trouve dommage que maintenant la plupart des modèles qui me plaisent je ne puisse pas les réaliser car ils sont tous faits avec des aiguilles circulaires .Même un petit cache- coeur enfant ou femme basic qu'avant je réalisais sans problème ,je n'en trouve plus avec des aiguilles ou crochet .
29.05.2024 - 12:37DROPS Design answered:
Bonjour Mme Leroux, les aiguilles circulaires sont souvent utilisées pour avoir suffisamment de place pour y loger toutes les mailles quand on tricote en allers et retours, on peut ainsi dans ce cas facilement les remplacer par des aiguilles droites; pour les manches de ce modèle par ex. cette leçon devrait pouvoir vous aider. Bon tricot!
30.05.2024 - 08:16
|
|
Brown Butterflies Cardigan#brownbutterfliescardigan |
|
 |
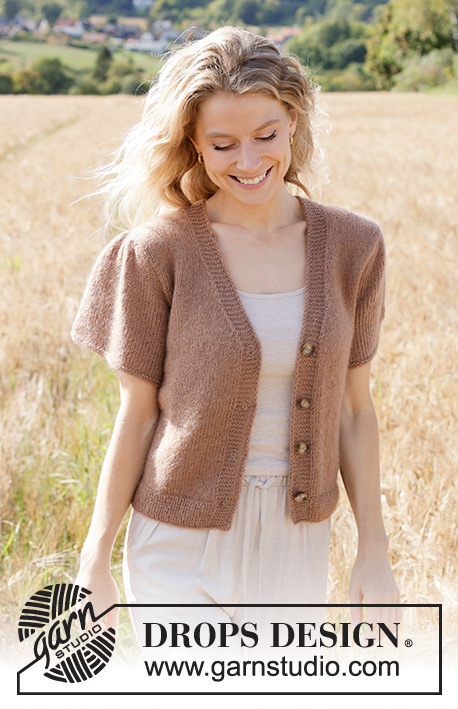 |
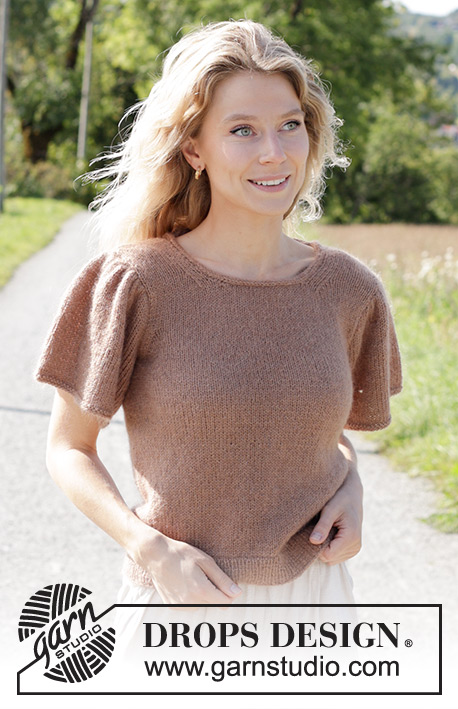
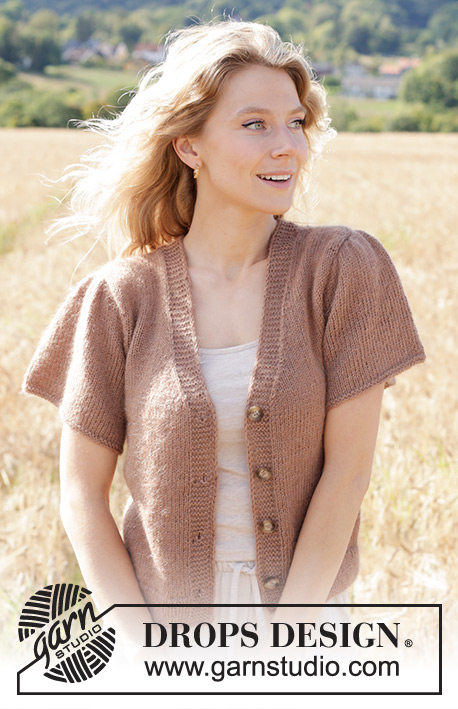
Knitted jacket in DROPS Alpaca and DROPS Kid-Silk. The piece is worked bottom up with V-neck, I-cord and short, puffed sleeves. Sizes S - XXXL.
DROPS 248-19 |
|
|
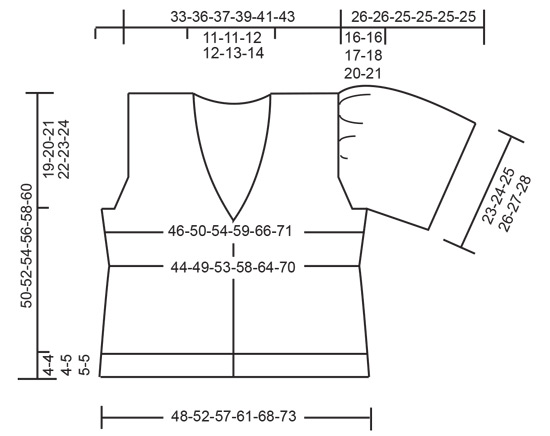
------------------------------------------------------- EXPLANATIONS FOR THE PATTERN: ------------------------------------------------------- GARTER STITCH (worked back and forth): Knit all rows, from both the right and wrong side. 1 ridge in height = knit 2 rows. GARTER STITCH (worked in the round): Alternate rounds of knit and purl. 1 ridge in height = 2 rounds. BANDS WITH I-CORD: START OF ROW: Work the band as follows: Slip 1 stitch purl-wise, with yarn in front, knit 1, work 6 garter stitches. END OF ROW: Work the band as follows: Work until there are 8 stitches left on the row, work 6 garter stitches, slip 1 stitch purl-wise with yarn in front, knit 1. Work like this from both the right and wrong side. INCREASE TIP (for sides of body): All increases are worked from the right side! Increase 4 stitches on the row by increasing on each side of the marker-threads as follows: Work until there are 2 stitches left before the marker-thread, make 1 yarn over, knit 4 (marker-thread sits in the middle of these 4 stitches), make 1 yarn over. Repeat at the marker-thread on the other side (= 4 increased stitches). On the next row work the yarn overs twisted to avoid holes. Then work the new stitches in stocking stitch. DECREASE TIP-1 (for sides of body): All decreases are worked from the right side! Decrease 4 stitches on the row by decreasing on each side of the marker-threads as follows: Work until there are 4 stitches left before the marker-thread, knit 2 together, knit 4 (marker-thread sits in the middle of these 4 stitches), slip 1 stitch knit-wise, knit 1, pass the slipped stitch over the knitted stitch. Repeat at the marker-thread on the other side (= 4 decreased stitches). DECREASE TIP-2 (for V-neck): All decreases are worked from the right side! AFTER THE BAND (8 stitches): Slip 1 stitch knit-wise, knit 1, pass slipped stitch over the knitted stitch (= 1 stitch decreased). BEFORE THE BAND: Work until there are 10 stitches left, knit 2 together, work band as before (= 1 stitch decreased). DECREASE TIP-3 (for armholes and neckline): All decreases are worked from the right side! DECREASE 1 STITCH AT BEGINNING OF ROW: Work 4 stocking stitches, slip 1 stitch knit-wise, knit 1, pass slipped stitch over the knitted stitch (= 1 stitch decreased). DECREASE 2 STITCHES AT BEGINNING OF ROW: Work 4 stocking stitches, slip 1 stitch knit-wise, knit 2 together, pass slipped stitch over the knitted-together stitches (= 2 stitches decreased). DECREASE 1 STITCH AT END OF ROW: Work until there are 6 stitches left, knit 2 together, 4 stocking stitches (= 1 stitch decreased). DECREASE 2 STITCHES AT END OF ROW: Work until there are 7 stitches left, knit 3 together, 4 stocking stitches (= 2 stitches decreased). BUTTONHOLES (bottom up): Work the buttonholes on the right band. 1 BUTTONHOLE = knit together the 4th and 5th stitch from the edge and make 1 yarn over. On the next row (wrong side) knit the yarn over to leave a hole. Work the buttonholes when the piece measures: S: 4, 12, 19 and 26 cm. M: 4, 12, 19 and 27 cm. L: 4, 12, 20 and 28 cm. XL: 5, 13, 21 and 29 cm. XXL: 5, 14, 22 and 30 cm. XXXL: 5, 14, 22 and 31 cm. ------------------------------------------------------- START THE PIECE HERE: ------------------------------------------------------- JACKET – SHORT OVERVIEW OF THE PIECE. The pattern uses both long and short needles; start with the length which fits the number of stitches and change when necessary. The piece is worked back and forth with circular needle, bottom up as far as the armholes, then divided for the front and back pieces, and each piece is finished separately back and forth. The sleeves are worked in the round, bottom up as far as the armhole, then finished back and forth. The sections are sewn together. BODY: Cast on 217-235-255-273-301-323 stitches with circular needle size 3 mm, 1 strand DROPS Alpaca and 1 strand DROPS Kid-Silk (= 2 strands). Work as follows from the right side: 8 stitches according to BANDS WITH I-CORD – read description above, work rib (knit 1, purl 1) until there are 9 stitches left, knit 1 and 8 stitches according to BANDS WITH I-CORD. Continue this rib for 4-4-4-5-5-5 cm. All measurements are taken from the cast-on edge! Change to circular needle size 4.5 mm. Work stocking stitch with 8 band stitches on each side, AT THE SAME TIME on the first row, decrease 29-31-35-37-41-43 stitches evenly spaced (do not decrease over the bands) = 188-204-220-236-260-280 stitches – remember the BUTTONHOLES on the right band – read description above. Insert a marker-thread, 51-55-59-63-69-74 stitches in from each side (= 86-94-102-110-122-132 stitches between the marker-threads on the back piece). Allow the threads to follow your work onwards; they are used when decreasing/increasing in the sides. When the piece measures 6-6-6-7-7-7 cm, decrease 1 stitch on each side of both marker-threads – read DECREASE TIP-1 (4 stitches decreased). Decrease like this every 6-6-6-7-7-7 cm a total of 3 times = 176-192-208-224-248-268 stitches. REMEMBER THE KNITTING TENSION! When the piece measures 23-24-25-26-27-28 cm, increase 1 stitch on each side of both marker-threads – read INCREASE TIP (4 increased stitches) = 180-196-212-228-252-272 stitches. When the piece measures 27-28-29-30-31-32 cm (1 cm after the last buttonhole), begin to decrease for the V-neck as described below. You will begin casting off for the armholes before the V-neck decreases are finished, so remember this as you continue working! Decrease 1 stitch for the V-neck, inside the band at the beginning and end of the row – read DECREASE TIP-2. Decrease like this every 2nd row a total of 4-4-4-4-5-5 times, then every 4th row 6-6-7-7-7-8 times. DIVIDE FOR ARMHOLES: When the piece measures 31-32-33-34-35-36 cm, and the next row is from the wrong side, cast off as follows: Work as before until there are 3-3-4-4-5-5 stitches left before the first marker-thread, cast off 6-6-8-8-10-10 stitches for the armhole, work until there are 3-3-4-4-5-5 stitches left before the second marker-thread, cast off 6-6-8-8-10-10 stitches for the armhole, work to end of row. Each piece is finished separately. RIGHT FRONT PIECE: Start from the right side, work stocking stitch back and forth with 8 band stitches as before and continue decreasing for the V-neck – but after 2 rows have been worked, and next row should be worked from the right side, begin decreasing for the armhole every 2nd row as follows – read DECREASE TIP-3: Decrease 2 stitches 1-2-3-4-4-5 times, then 1 stitch 6-6-6-6-9-10 times. After all the decreases for V-neck and armhole there are 28-30-30-32-33-34 stitches left. Work until the piece measures 50-52-54-56-58-60 cm from the cast-on edge. On the next row from the wrong side cast off the first 20-22-22-24-25-26 stitches for the shoulder = 8 band stitches left. Work as before back and forth over the band-stitches for 6-6-7-7-7-8 cm. Cast off. LEFT FRONT PIECE: Start from the right side, work stocking stitch back and forth with 8 band stitches as before and continue decreasing for the V-neck – but after 2 rows have been worked, and next row should be worked from the right side, begin decreasing for the armhole every 2nd row as follows – remember DECREASE TIP-3: Decrease 2 stitches 1-2-3-4-4-5 times, then 1 stitch 6-6-6-6-9-10 times. After all the decreases for V-neck and armhole there are 28-30-30-32-33-34 stitches left. Work until the piece measures 50-52-54-56-58-60 cm from the cast-on edge. On the next row from the right side cast off the first 20-22-22-24-25-26 stitches for the shoulder = 8 band stitches left. Work back and forth as before over the band for 6-6-7-7-7-8 cm. Cast off. BACK PIECE: = 76-84-90-98-108-118 stitches. Start from the right side, work stocking stitch back and forth - but after 2 rows have been worked, and next row should be worked from the right side, begin decreasing for the armholes on each side every 2nd row as follows – remember DECREASE TIP-3: Decrease 2 stitches 1-2-3-4-4-5 times, then 1 stitch 6-6-6-6-9-10 times = 60-64-66-70-74-78 stitches. When the piece measures 48-50-52-54-56-58 cm, and next row should be worked from the right side, cast off the middle 18-18-20-20-22-24 stitches for the neckline and finish each shoulder separately. Continue with stocking stitch, but when 1 row after decrease for neck has been worked and next row should be worked from the right side, decrease 1 stitch for the neck on the next row from the right side – remember DECREASE TIP-3 = 20-22-22-24-25-26 stitches. Work until the piece measures 50-52-54-56-58-60 cm from the cast-on edge. Cast off. Work the other shoulder in the same way. SLEEVES: The sleeves are worked in the round. Cast on 82-86-90-94-98-100 stitches with circular needle size 4.5 mm and 1 strand of each quality (= 2 strands). Work 1 ridge – see GARTER STITCH (in the round) above. Insert 1 marker-thread at the beginning of the round (= mid-under sleeve) and allow it to follow your work onwards. Work stocking stitch until the sleeve measures 10-10-8-7-5-4 cm from the cast-on edge. Now cast off under the sleeve and finish the sleeve cap back and forth. SLEEVE CAP: Start 3-3-4-4-5-5 stitches before the marker-thread, cast off 6-6-8-8-10-10 stitches and work stocking stitch to end of round. The sleeve is now finished back and forth. Cast off for the sleeve cap on each side every 2nd row as follows: 2 stitches 1-3-1-1-0-0 times and 1 stitch 18-16-19-21-24-25 times = 36-36-40-40-40-40 stitches left. On the next row from the right side, knit all stitches together 2 and 2 = 18-18-20-20-20-20 stitches. Cast off. The sleeve measures approx. 26-26-25-25-25-25 cm from the cast-on edge. ASSEMBLY: Sew the shoulder seams, starting from the armhole and sewing stitch to stitch (the 8 band stitches are not included in the seam). Sew in the sleeves – gathering extra material together at the top of the sleeve, so it fits into the armhole. Sew the band stitches together mid-back with the seam to the wrong side, sew the bands to the neckline at the back. Sew the buttons onto the left band. |
|
 |
|
Have you finished this pattern?Tag your pictures with #dropspattern #brownbutterfliescardigan or submit them to the #dropsfan gallery. Do you need help with this pattern?You'll find 32 tutorial videos, a Comments/Questions area and more by visiting the pattern on garnstudio.com. © 1982-2026 DROPS Design A/S. We reserve all rights. This document, including all its sub-sections, has copyrights. Read more about what you can do with our patterns at the bottom of each pattern on our site. |
|


With over 40 years in knitting and crochet design, DROPS Design offers one of the most extensive collections of free patterns on the internet - translated to 17 languages. As of today we count 324 catalogues and 12290 patterns translated into English (UK/cm).
We work hard to bring you the best knitting and crochet have to offer, inspiration and advice as well as great quality yarns at incredible prices! Would you like to use our patterns for other than personal use? You can read what you are allowed to do in the Copyright text at the bottom of all our patterns. Happy crafting!
Post a comment to pattern DROPS 248-19
We would love to hear what you have to say about this pattern!
If you want to leave a question, please make sure you select the correct category in the form below, to speed up the answering process. Required fields are marked *.