
Popular categories
Looking for a yarn?


Comments / Questions (26)
![]() Olivia Costabile wrote:
Olivia Costabile wrote:
Ciao e innanzitutto grazie x i bellissimi modelli. In questo (clear lake) non capisco una cosa: dopo aver fatto gli aumenti nel DIETRO, dici di lavorare fino a 14,15,16 etc cm misurati "lungo il bordo dello scalfo" . Cioè? Dalla fine degli aumenti, dalla spalla o da dove? Non capisco. Grazie mille
06.04.2026 - 21:47DROPS Design answered:
Buonasera Olivia, le misure vanno prese dal segnapunti. Buon lavoro!
15.04.2026 - 22:36
![]() Amanda wrote:
Amanda wrote:
Im knitting the icord on the back neck (at the end of the pattern). When the directions say " begin at shoulder line from right side and pick up inside 1 stitch to the other shoulder line" do you mean right as in the right shoulder or the right side (RS) of the fabric?
03.03.2026 - 01:36DROPS Design answered:
Hi Amanada, This is from the right side (opposite of wrong side). Regards, Drops Team.
03.03.2026 - 06:38
![]() María Del Carmen wrote:
María Del Carmen wrote:
Saludos, me gustaría ver un vídeo de este patrón....como se hace, me interesa mucho el cuello en v
11.01.2026 - 11:49DROPS Design answered:
Hola María del Carmen, todos los vídeos relevantes para realizar la labor se encuentran en la sección "Videos", en la parte superior del patrón.
23.02.2026 - 01:10
![]() Brigitte wrote:
Brigitte wrote:
Suite de ma demande....qu'appelez vous augmentation I-cord ? Merci de votre réponse et explication Brigitte
01.10.2025 - 11:12DROPS Design answered:
Bonjour Brigitte, je ne trouve pas cette expression dans les explications, on va augmenter 1 m inclinée à droite ou 1 maille inclinée à gauche , sur l'endroit ou sur l'envers - retrouvez sous l'onglet "Vidéos" une vidéo montrant comment réaliser chacune de ces augmentations. En espérant avoir compris votre question. Bon tricot!
01.10.2025 - 16:47
![]() Brigitte wrote:
Brigitte wrote:
Pouvez-vous svp m'expliquer plus en détail les augmentations I cord....je ne les comprends pas bien et n'arrive pas à les faire .....pouvez-vous guider svp...je suis arrivée à ces augmentations maintenant ....merci d'une réponse rapide brigitte
01.10.2025 - 11:05DROPS Design answered:
Bonjour Brigitte, je ne suis pas bien sûre de comprendre de quelles augmentations I-cord vous parlez. On relève les mailles pour les devants comme on le montre dans cette leçon ou dans cette vidéo, et on va tricoter les 3 mailles côté encolure comme indiqué sous la bordure I-cord cf BORDURE I-CORD DEVANT DROIT / DEVANT GAUCHE. Bon tricot!
01.10.2025 - 16:43
![]() Brigitte Berger wrote:
Brigitte Berger wrote:
Bonjour pouvez-vous me dire comment je dois faire lorsque le tricot arrive à l\'aiguille circulaire car je tricote ce pull avec 2 aiguilles merci Brigitte
26.09.2025 - 16:32DROPS Design answered:
Bonjour Mme Berger, vous trouverez ici quelques astuces pour vous permettre d'adapter les explications sur aiguilles droites. Bon tricot!
26.09.2025 - 17:07
![]() Betty wrote:
Betty wrote:
Merci beaucoup pour votre réponse, je vais continuer mon ouvrage
17.09.2025 - 20:06
![]() Betty wrote:
Betty wrote:
Bonjour, je suis rendue à tricoter les manches, concernant les rangs raccourcis du haut de la manche, doit-on commencer à partir du milieu sous emmanchure jusqu\'au milieu epaule et faire les rangs raccourcis ?
13.09.2025 - 09:01DROPS Design answered:
Bonjour Betty, le 1er des rangs raccourcis commence au milieu sous la manche et vous tricotez jusqu'à 9, 10 ou 11 mailles (cf taille) après le marqueur au milieu du haut de la manche, vous tournez et vous tricotez sur l'envers 9, 10 ou 11 mailles après le marqueur (vous avez ainsi tricoté 18, 20 ou 22 mailles) et ainsi de suite en tricotant 10, 11, 8, 6 ou 5 mailles en plus tous les rangs jusqu'à ce que vous ayez tricoté le nombre de mailles indiqué pour votre taille. Bon tricot!
15.09.2025 - 07:38
![]() Eedisy wrote:
Eedisy wrote:
What size is used in the photo? Size M or L?
21.08.2025 - 07:01DROPS Design answered:
Dear Eedisy, our models usually wear an M size. Happy knitting!
25.08.2025 - 00:07
![]() Pia wrote:
Pia wrote:
Tack för svar. Nu skall jag sätta ihop framstyckena. Vad betyder ”sätta på en flätsticka”? Finns det video som visar?
01.11.2024 - 16:25DROPS Design answered:
Hei Pia. Ta en titt på den generelle videoen: Hur man sätter maskor på en tråd (flera samtidigt). Du finner videoen til høyre/eller under bildet. Istedenfor å bruke en tråd, kan du bruke en flettepinne (kommer litt an på hvor mange masker som skal settes på tråden/flettepinnen, og hva du selv syns er best. mvh DROPS Design
04.11.2024 - 07:40
|
|||||||
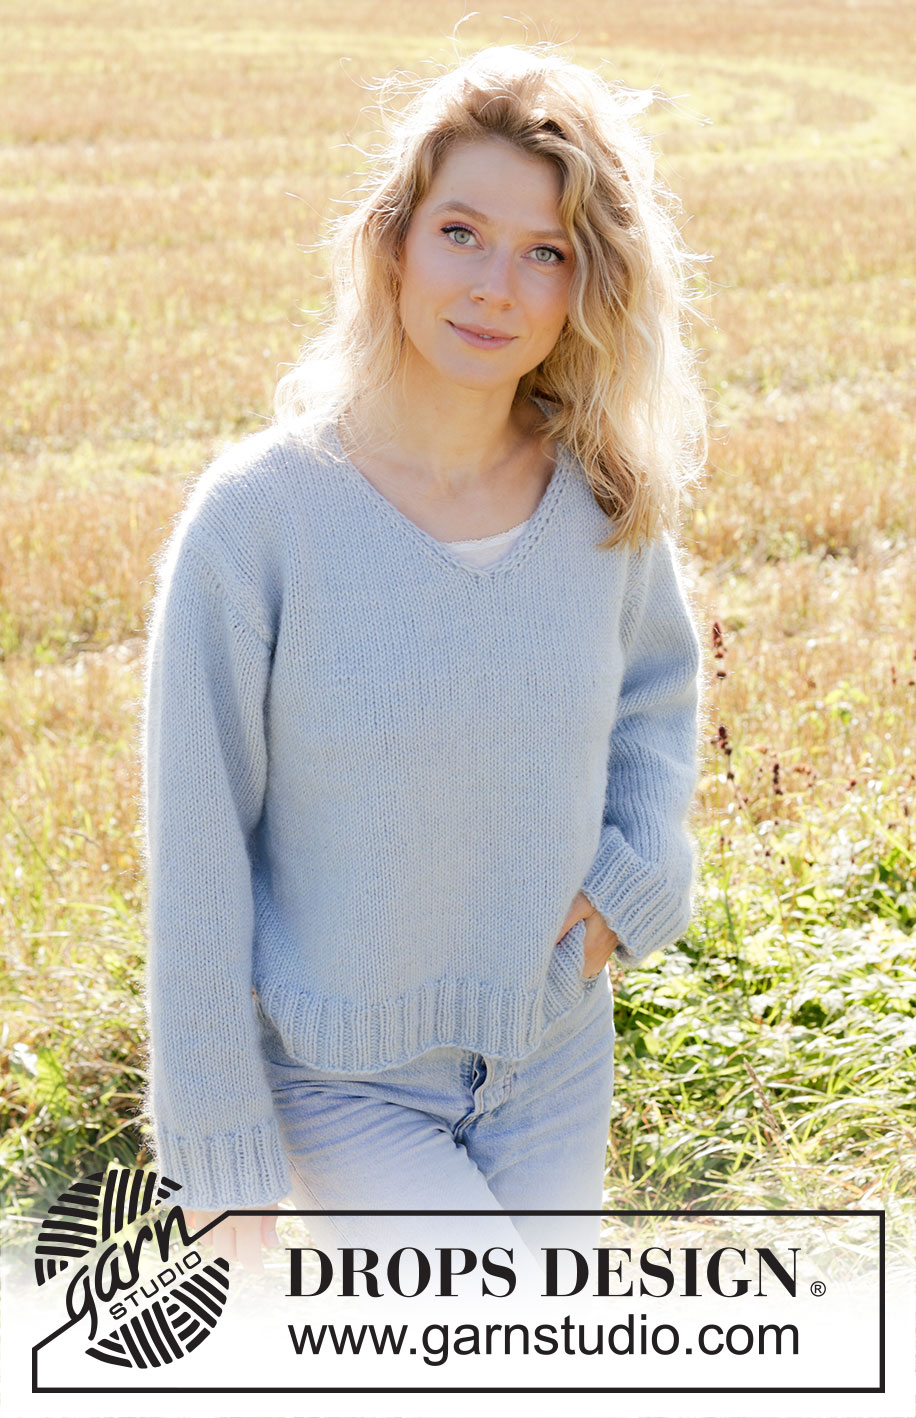
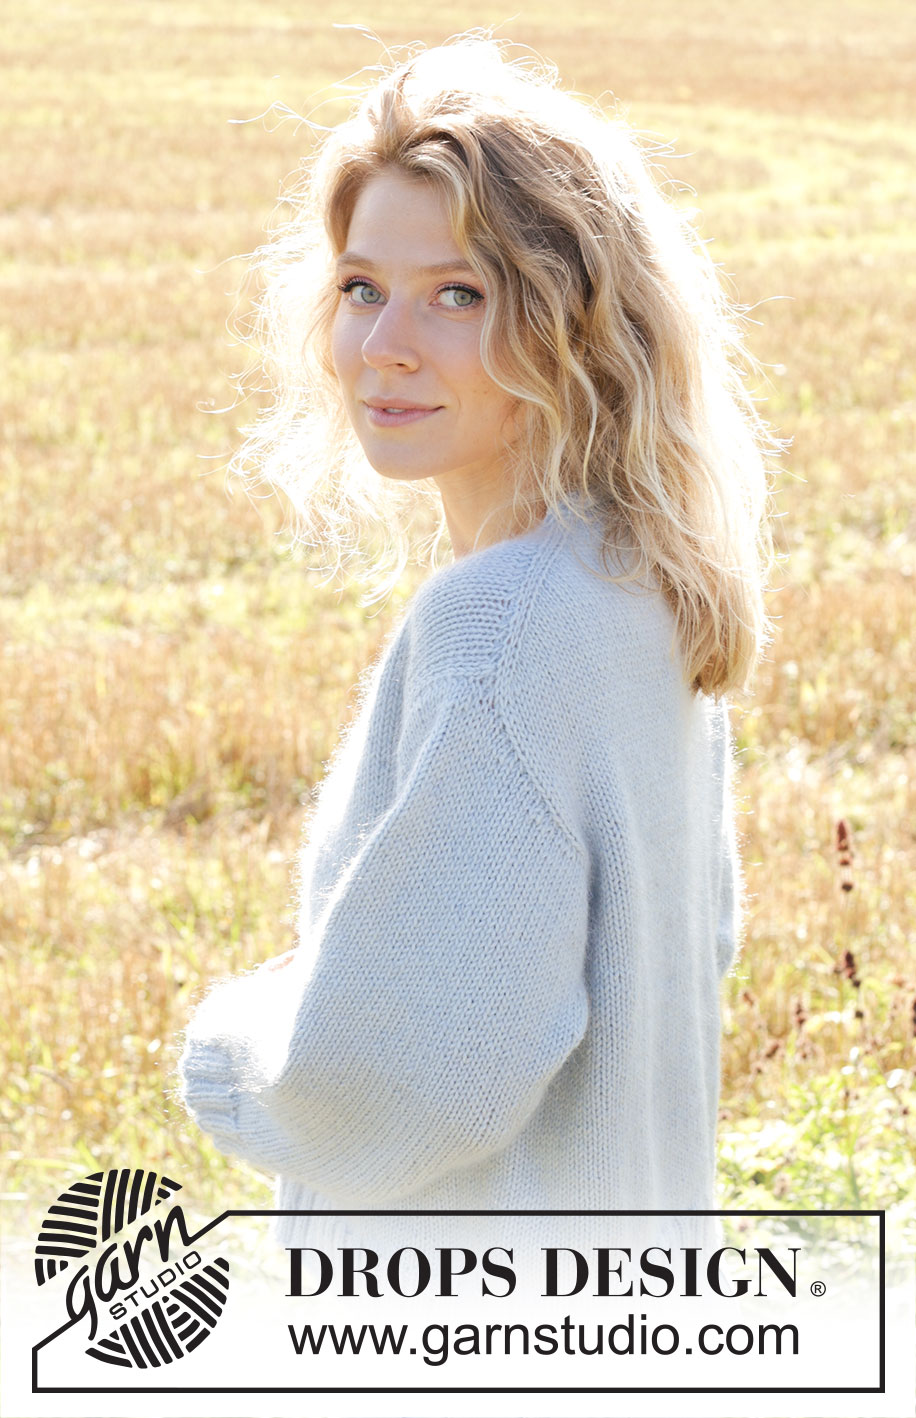
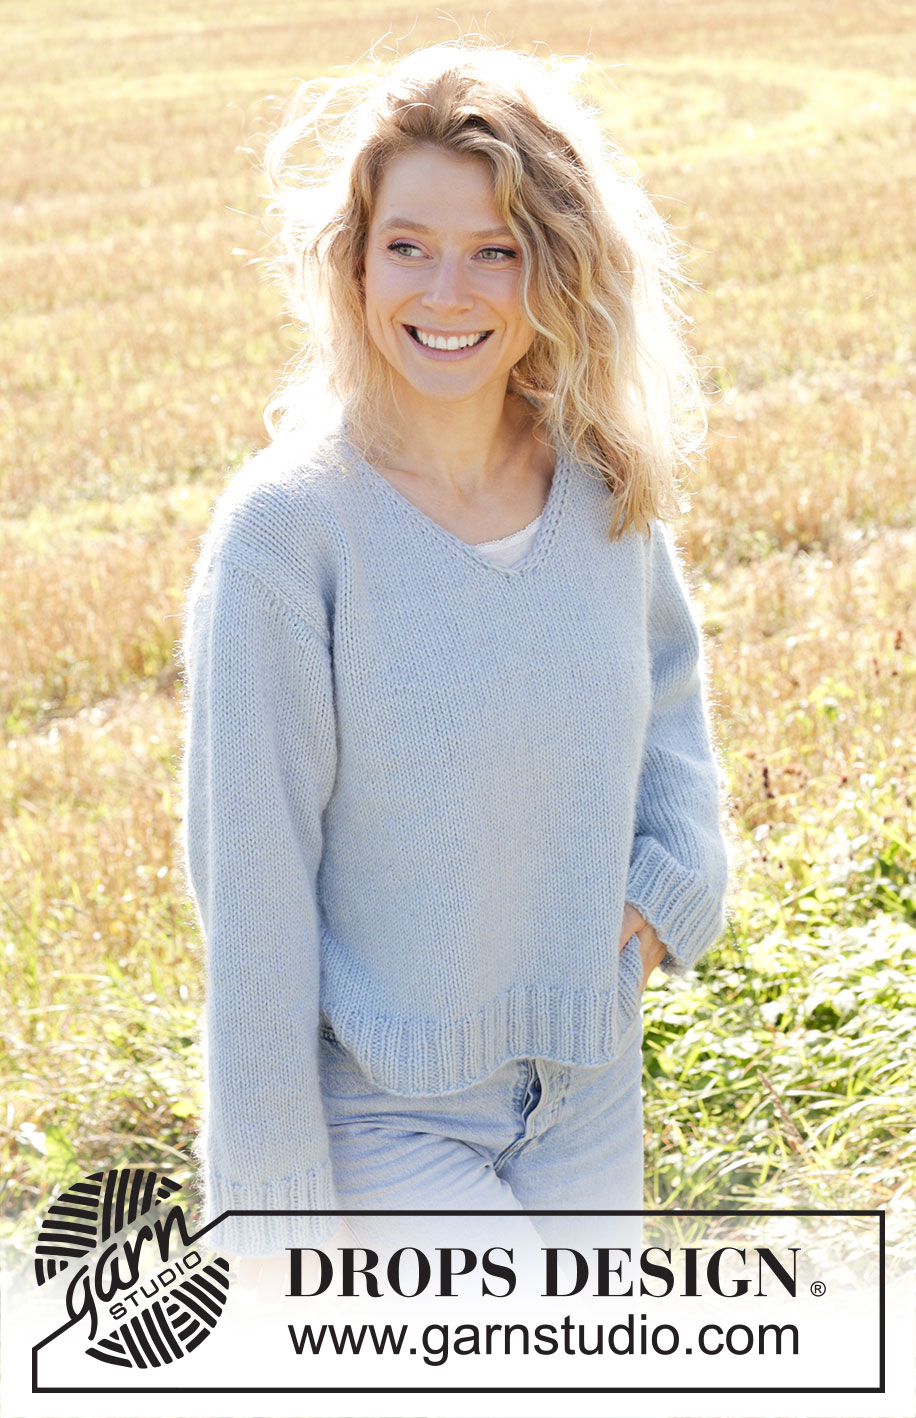
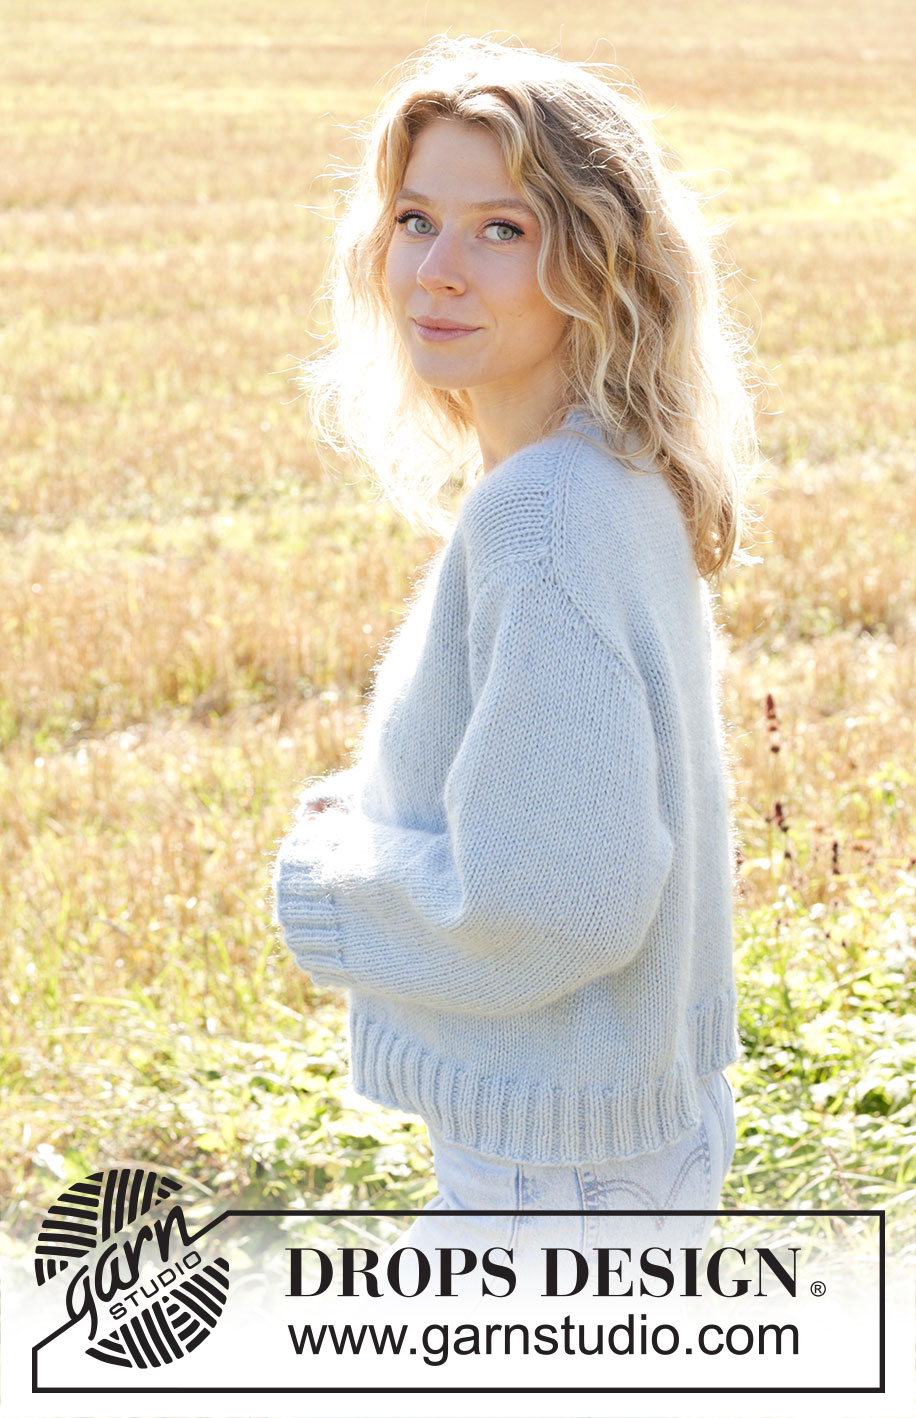
Clear Lake#clearlakesweater |
|||||||
 |
 |
||||||
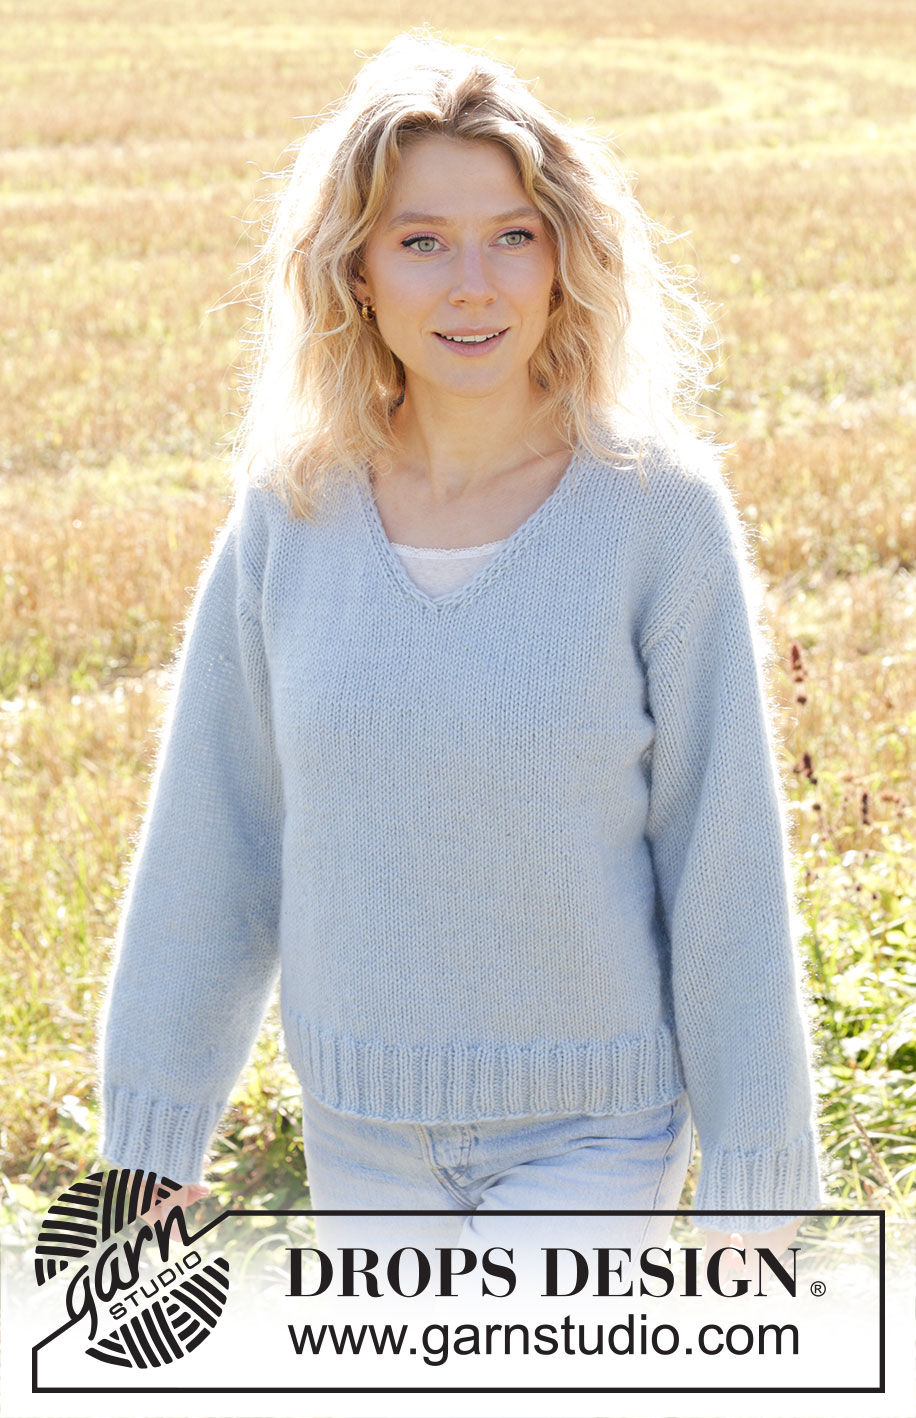
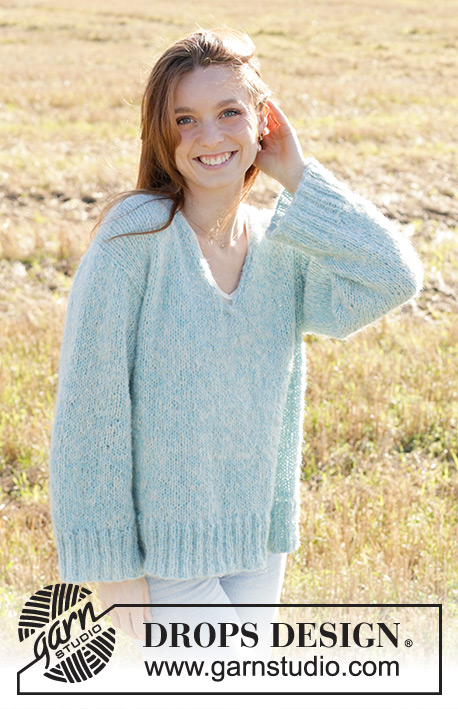
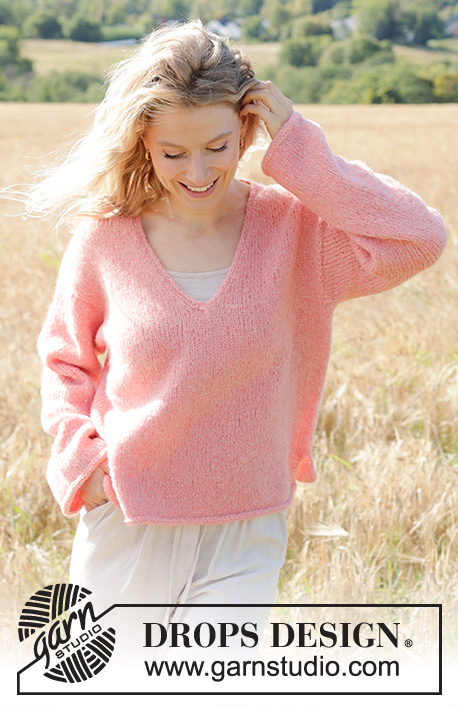
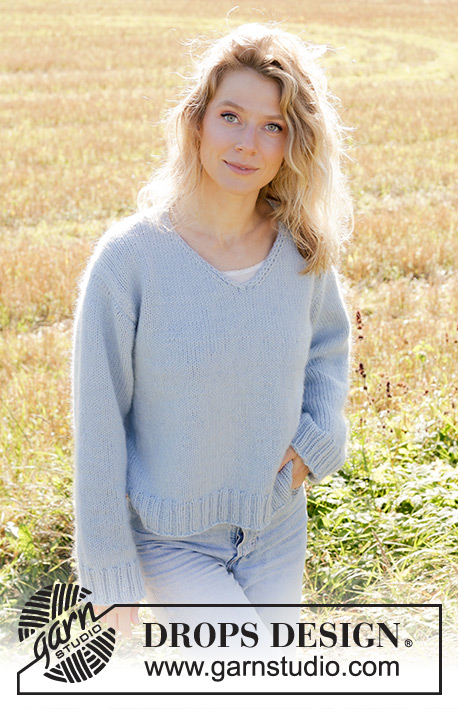
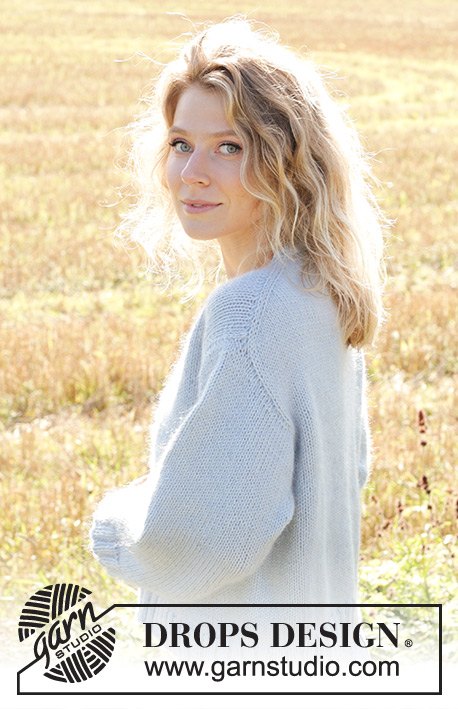
Knitted jumper in DROPS Daisy and DROPS Kid-Silk. Piece is knitted top down with European shoulder / diagonal shoulder, V-neck and I-Cord. Size: XS - XXL
DROPS 250-12 |
|||||||
|
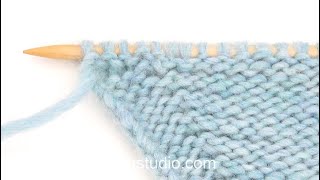
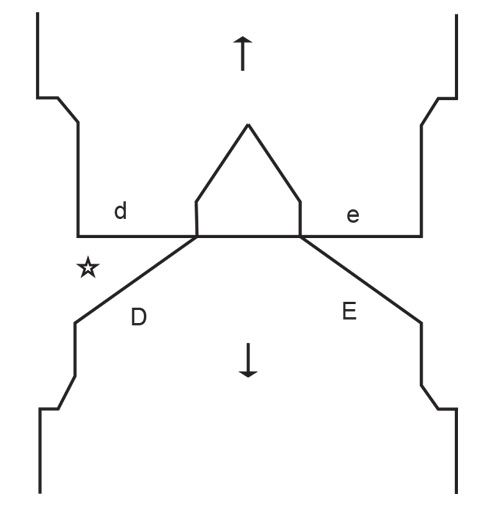
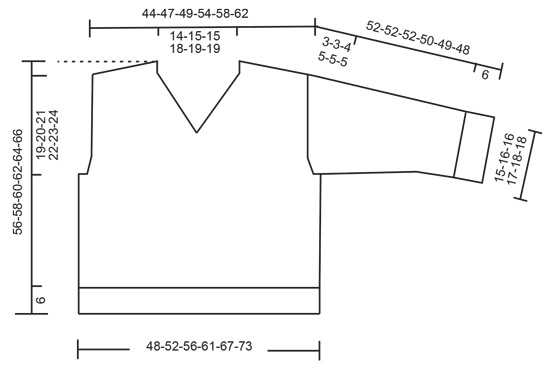
---------------------------------------------------------- EXPLANATION FOR THE PATTERN: ---------------------------------------------------------- INCREASE TIP-1: INCREASE 1 STITCH TOWARDS THE LEFT - from RIGHT SIDE: Use left needle to pick up yarn between 2 stitches from row below, pick up yarn from the front and knit in the stitch loop that is on the back of the needle. INCREASE 1 STITCH TOWARDS THE RIGHT - from RIGHT SIDE: Use left needle to pick up yarn between 2 stitches from row below, pick up yarn from the back and knit in the stitch loop that is on the front side of the needle. INCREASE TIP-2: INCREASE 1 STITCH TOWARDS THE RIGHT - from WRONG SIDE: Use left needle to pick up yarn between 2 stitches from row below, pick up yarn from the back and purl in the stitch loop that is on the front side of the needle. INCREASE 1 STITCH TOWARDS THE LEFT - from WRONG SIDE: Use left needle to pick up yarn between 2 stitches from row below, pick up yarn from the front and purl in the stitch loop that is on the back side of the needle. EDGE STITCHES I-CORD RIGHT FRONT PIECE: Right side: Work until 3 stitches remain, purl 1, slip 1 stitch purlwise with strand in front of piece and knit 1. Wrong side: Slip 1 stitch purlwise with strand in front of piece and knit 1, knit 1, work the rest of row. EDGE STITCHES I-CORD LEFT FRONT PIECE: Right side: Slip 1 stitch purlwise with strand in front of piece, knit 1, purl 1, work the rest of row. Wrong side: Work until 3 stitches remain, knit 1, slip 1 stitch purlwise with strand in front of piece, knit 1. DECREASE TIP (applies to mid under sleeves): Decrease 1 stitch on each side of marker thread as follows: Work until 3 stitches remain before marker thread and knit 2 together, knit 2 (marker thread is between these 2 stitches), slip 1 stitch knitwise, knit 1, pass slipped stitch over stitch worked. I-CORD CAST-OFF: ROW 1 (= right side): Knit 2, knit the next 2 stitches twisted together. ROW 2 (= right side): Slip the 3 stitches from right needle back on left needle, knit 2, knit the next 2 stitches twisted together. Repeat ROW 2 until 3 stitches remain on right needle. Slip the 3 stitches from right needle back on left needle. Cast off. Sew a little stitch that binds beginning/end of I-cord to the garment. ---------------------------------------------------------- START THE PIECE HERE: ---------------------------------------------------------- JUMPER - SHORT OVERVIEW OF THE PIECE: In this pattern long and short needles have been used - begin with fitting length and switch as needed. Work piece back and forth on needle. Begin by casting on stitches in the back of neck. Then work back piece downwards while at the same time increasing in each side of piece until number of stitches for shoulder width is reached. Back piece has a slight diagonal shoulder. Then work down to armholes. Now put back piece aside and work the front piece. Front piece is first worked in 2 parts. Begin by picking up stitches along right shoulder, work while increasing towards the neck. Repeat on the left shoulder. Put right and left front piece together when increases for neck are done. Then work front piece down to armholes. Now slip front piece and back piece on to same needle and work body downwards in the round on circular needle. Pick up stitches for sleeves around the armholes. First work back and forth with short rows to form a sleeve cap. Then work sleeves downwards in the round on needle. BACK PIECE: Cast on 26-28-28-32-34-34 stitches on circular needle size 5 mm with 1 strand of each colour (2 strands). Purl 1 row from wrong side. Read INCREASE TIP-1 and work next row from right side as follows: Knit 3, increase towards the left, knit until 3 stitches remain, increase towards the right, knit 3. Read INCREASE TIP-2 and work next row from wrong side as follows: Purl 3, increase towards the right, purl until 3 stitches remain, increase towards the left, purl 3. Continue like this and increase the same way from both right side and wrong side 24-26-28-30-32-36 times in total. REMEMBER THE KNITTING TENSION! After last increase there are 74-80-84-92-98-106 stitches on needle. Insert 1 marker in the side. Now measure piece from here! Work stocking stitch back and forth until piece measures 12-13-13-14-13-14 cm, measured along the edge of armhole. Work next row as follows from right side: Knit 3, increase towards the left, work until 3 stitches remain, increase towards the right, knit 3 – remember INCREASE TIP-1 Increase like this on every row from right side 2-2-3-3-4-4 times in total = 78-84-90-98-106-114 stitches. Work until piece measures 14-15-16-17-17-18 cm, measured along armhole. Cut the yarn, slip stitches on a thread or stitch holder, and work front piece as explained below. FRONT PIECE: Begin with right shoulder (when garment is worn). Pick up 24-26-28-30-32-36 stitches inside outermost stitch along right shoulder on back piece (i.e. pick up 1 stitch in every row from edge at the top of back piece, see E on chart). All length measurements are done from here! Purl 1 row from wrong side, work next row as follows from right side: stocking stitch until 3 stitches remain, 3 EDGE STITCHES in I-CORD - read explanation above. When piece measures 6 cm, increase stitches towards the neck. Increase towards the right at the end of every row from right side, increase before 4 stitches - remember INCREASE TIP-1. Increase 1 stitch on every other row (every row from right side) 13-14-14-16-17-17 times in total = 37-40-42-46-49-53 stitches. When last row with increase is done, slip stitches on a thread or needle. Then work left shoulder as explained below. Pick up 24-26-28-30-32-36 stitches inside outermost stitch along left shoulder on back piece (i.e. pick up 1 stitch in every row from edge at the top of back piece, see D on chart). All length measurements are done from here! Purl 1 row from wrong side, then work as follows from right side: 3 EDGE STITCHES in I-CORD - read explanation above, stocking stitch over the remaining stitches. Continue like this. When piece measures 6 cm, increase stitches towards the neck. Increase towards the left at the beginning of every row from right side, increase after 4 stitches– remember INCREASE TIP-1. Increase 1 stitch on every other row (every row from right side) 13-14-14-16-17-17 times in total = 37-40-42-46-49-53 stitches. Work next row as follows from wrong side: Work stocking stitch over the 37-40-42-46-49-53 stitches from left shoulder, slip stitches from right shoulder on left needle and then work them in stocking stitch = 74-80-84-92-98-106 stitches. Work next row as follows - from right side: Knit 36-39-41-45-48-52, slip next stitch on a cable needle in front of piece, knit 1, knit stitch from cable needle, work the last 36-39-41-45-48-52 stitches on row. Continue in stocking stitch. Continue to work until piece measures 22-23-23-24-25-26 cm. Work next row as follows from right side: Knit 3, increase towards the left, knit until 3 stitches remain, increase towards the right, knit 3 – remember INCREASE TIP-1. Increase like this on every row from right side 2-2-3-3-4-4 times in total = 78-84-90-98-106-114 stitches. Continue in stocking stitch until piece measures 24-25-26-27-29-30 cm, finish with a row from wrong side. Now put front piece and back piece together for body as explained below. BODY: Work stocking stitch over the 78-84-90-98-106-114 stitches from front piece, cast on 4-4-6-6-8-10 new stitches at the end of this row (in the side), work stocking stitch over the 78-84-90-98-106-114 stitches from back piece, cast on 4-4-6-6-8-10 new stitches at the end of row = 164-176-192-208-228-248 stitches. Work stocking stitch until piece measures 50-52-54-56-58-60 cm, measured from the top point on shoulder on front piece. Knit 1 round while increasing 20-24-24-24-28-28 stitches evenly = 184-200-216-232-256-276 stitches. Switch to circular needle size 4 mm. Work rib (knit 2/purl 2) in the round for 6 cm. Cast off. Jumper measures 56-58-60-62-64-66 cm in total, measured from the top of shoulder in towards the neck. SLEEVES: Place piece flat and insert 1 marker at the top of armhole (NOTE! It is not where stitches were picked up for front piece but approx. 5-6 cm down on front piece = mid on top of shoulder). All length measurements on sleeve piece are done from here! Use circular needle size 5 mm, begin in the middle of the new stitches cast on under sleeve, and pick up 68-74-80-82-90-94 stitches along armhole - adjust to pick up same number of stitches on each side of marker along armhole. Now work stocking stitch back and forth with short rows over sleeve cap, this is done to get a better shape on sleeve. Begin mid under sleeve. 1st row (right side): work 9-10-10-10-11-11 stitches past marker, turn 2nd row (wrong side): work 9-10-10-10-11-11 stitches past marker, turn. 3rd row (right side): 10-11-8-6-5-5 stitches past where the previous turn was, turn 4th row (wrong side): work 10-11-8-6-5-5 stitches past where the previous turn was, turn Repeat 3rd and 4th row until 29-32-34-34-36-36 stitches have been worked past marker mid on top of sleeve (3-3-4-5-6-6 turns have been done in each side). Work from right side until beginning of round (mid under sleeve). Insert 1 marker thread here, this is used when decreasing stitches under sleeve. Move marker thread upwards when working. Continue working in the round in stocking stitch over all stitches. When sleeve measures 5-5-6-7-7-7 cm, decrease 2 stitches mid under sleeve - read DECREASE TIP. Decrease every other round 2-2-3-3-4-4 times, then decrease every 4½-3½-2½-2½-2-1½ cm 6-8-9-9-11-12 times, 8-10-12-12-15-16 times in total = 52-54-56-58-60-62 stitches. Continue to work until sleeve measures 46-46-46-44-43-42 cm. 6 cm remain until finished measurements. Try the jumper and work to desired length before rib. Knit 1 round while increasing 8-6-8-6-8-6 stitches evenly = 60-60-64-64-68-68 stitches. Switch to double pointed needles size 4 mm. Work rib (knit 2/purl 2) for 6 cm. Loosely cast off. Sleeve measures approx. 52-52-52-50-49-48 cm. I-CORD NECK EDGE AT THE BACK: Use circular needle size 5 mm and cast on 2 stitches on needle with 1 strand in each quality, then pick up stitches along the neck edge at the back, begin at shoulder line from right side and pick up inside 1 stitch to the other shoulder line. Pick up 24-26-28-30-32-36 stitches in total. Fasten off. Begin in the side where stitches were cast on and cast off with I-CORD - read explanation above. |
|||||||
Diagram explanations |
|||||||
|
|||||||
 |
|||||||
 |
|||||||
Have you finished this pattern?Tag your pictures with #dropspattern #clearlakesweater or submit them to the #dropsfan gallery. Do you need help with this pattern?You'll find 36 tutorial videos, a Comments/Questions area and more by visiting the pattern on garnstudio.com. © 1982-2026 DROPS Design A/S. We reserve all rights. This document, including all its sub-sections, has copyrights. Read more about what you can do with our patterns at the bottom of each pattern on our site. |
|||||||


With over 40 years in knitting and crochet design, DROPS Design offers one of the most extensive collections of free patterns on the internet - translated to 17 languages. As of today we count 324 catalogues and 12290 patterns translated into English (UK/cm).
We work hard to bring you the best knitting and crochet have to offer, inspiration and advice as well as great quality yarns at incredible prices! Would you like to use our patterns for other than personal use? You can read what you are allowed to do in the Copyright text at the bottom of all our patterns. Happy crafting!
Post a comment to pattern DROPS 250-12
We would love to hear what you have to say about this pattern!
If you want to leave a question, please make sure you select the correct category in the form below, to speed up the answering process. Required fields are marked *.