
Popular categories
Looking for a yarn?


Comments / Questions (26)
![]() Elies wrote:
Elies wrote:
Let op: ik heb dit patroon gebreid in de juiste verhoudingen in maat 5/6. Het resultaat komt niet overeen met de bijgeplaatste foto. Voor een dergelijk ruimvallend resultaat moet je zeker een maat groter nemen.
14.06.2026 - 22:33
![]() Mollet Jeanne wrote:
Mollet Jeanne wrote:
Col doubler 68 à 84 m mais pour la taille 6ans c’est combien j’arrive pas à comprendre est-ce pour toute les tailles 68 à 84?
26.12.2025 - 21:35DROPS Design answered:
Bonjour Jeanne, ce n'est pas tres precis, le nombre des mailles a monter doit etre entre 68 et 84, il doit etre divisible par 4. Vous pouvez ajuster le nombre des mailles au tour suivant. Bon tricot!
30.12.2025 - 19:33
![]() Charlotte wrote:
Charlotte wrote:
Bonjour, Lorsqu’il faut compter un nombre de cm (5 pour moi) depuis le début de la manche. est-ce que c’est depuis le haut de l'épaule ou le bas? étant donné que nous avons fait des rangs raccourcis, les dimensions en haut et en bas de la manche ne sont pas les mêmes. merci d'avance pour votre retour
16.12.2025 - 20:47DROPS Design answered:
Bonjour Charlotte, les 5 cm (dans toutes les tailles) à mesurer avant de commencer à diminuer au milieu sous la manche se mesurent à partir des mailles relevées en haut de la manche. Bon tricot!
17.12.2025 - 17:39
![]() Corinne wrote:
Corinne wrote:
Je ne comprends pas les augmentations vos vidéos ne correspondent pas! Augmenter à 3 m avant le marqueur puis sur le rang envers ? Que ce passe t-il est-ce un rang sur 2 ? À 3 m après le marqueur est ce sur le même rang ? Et sur l’envers on refait augmentation Il serait bien de faire vidéo dès le départ du tricot 😫 merci pour votre compréhension
12.11.2025 - 15:21
![]() Corinne wrote:
Corinne wrote:
Je ne comprends pas les augmentations vos vidéos ne correspondent pas! Augmenter à 3 m avant le marqueur puis sur le rang envers ? Que ce passe t-il est-ce un rang sur 2 ? À 3 m après le marqueur est ce sur le même rang ? Et sur l’envers on refait augmentation Il serait bien de faire vidéo dès le départ du tricot 😫 merci pour votre compréhension
12.11.2025 - 15:19DROPS Design answered:
Bonjour Corinne, il y avait effectivement une erreur dans les augmentations sur l'envers, mais après vérification des vidéos, (et correction des augmentations sur l'envers: après le marqueur = de l'arrière vers l'avant), elles correspondent bien à la vidéo - retrouvez précisément ce modèle dans cette leçon. Bon tricot!
12.11.2025 - 16:39
![]() Pipart wrote:
Pipart wrote:
Bjr, je souhaite faire ce pull tout en Drops Brushed Alpaca Silk 18 rose cerise. Combien de gramme fait-il? Je supprime alpage qui est de A et celle -ci de C. Merci
28.10.2025 - 14:08DROPS Design answered:
Bonjour Mme Pipart, retrouvez ici comment calculer la quantité nécessaire, sous le paragraphe 2 fils de métrage différents par 1 fil. Bon tricot!
28.10.2025 - 19:16
![]() Ine wrote:
Ine wrote:
Kunnen jullie categorie maken met alleen patronen voor twee breinaalden? En dan ook voor rondbreinaalden vanzelf. Ik zoek met rot. Brei alleen met twee naalden.
13.10.2025 - 17:29DROPS Design answered:
Dag Ine,
We hebben inderdaad nog geen categorie voor 2 naalden, maar om een patroon aan te passen om op rechte naalden te breien hebben we een instructie gemaakt. Deze vind je hier.
21.10.2025 - 21:46
![]() Hanne wrote:
Hanne wrote:
Takk for en fin oppskrift! Jeg har et spørsmål: om forstykket står det «Strikk glattstrikk frem og tilbake til arbeidet måler 11-13-14-15-16-18 cm, målt ytterst langs ermehullet.» Betyr det målt fra der man strikket opp masker? Og betyr det målt i kurve rundt ermehullet og ikke loddrett? På forhånd takk for svar.
03.09.2025 - 23:35DROPS Design answered:
Hei Hanne, Ja, du måler fra oppstrikkede maskene og langs ermehull, ikke loddrett. Hilsen Drops Team.
04.09.2025 - 10:20
![]() Hannah wrote:
Hannah wrote:
For the instructions for the back piece, after the armhole increases when it says “continue until the piece measures 3 1/2” along the armhole,” is it saying 3 1/2” from the marker? Or is it saying 3 1/2” from the top of the piece? The translation is not so clear. Thanks!
03.09.2025 - 06:32DROPS Design answered:
Dear Hannah, in the previous paragraph it stated: "Move the markers to the outermost stitch on each side; the piece is now measured from here." So it should measure 3 1/2" from this marker. Happy knitting!
15.09.2025 - 00:37
![]() Y2krabuH wrote:
Y2krabuH wrote:
Бывает, что нужное кракен ссылка актуальная оказывается ближе, чем кажется. Рабочая ссылка KRAKEN — прямо здесь. Проверено лично.
26.07.2025 - 00:34
|
|||||||
Sweet Peppermint#sweetpeppermintsweater |
|||||||
 |
 |
||||||
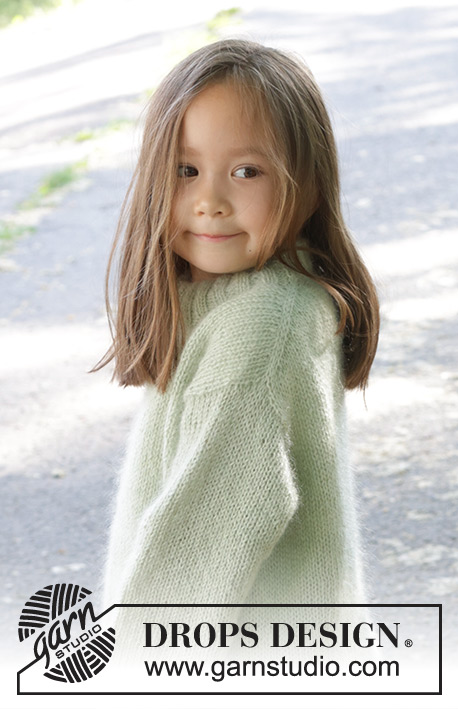
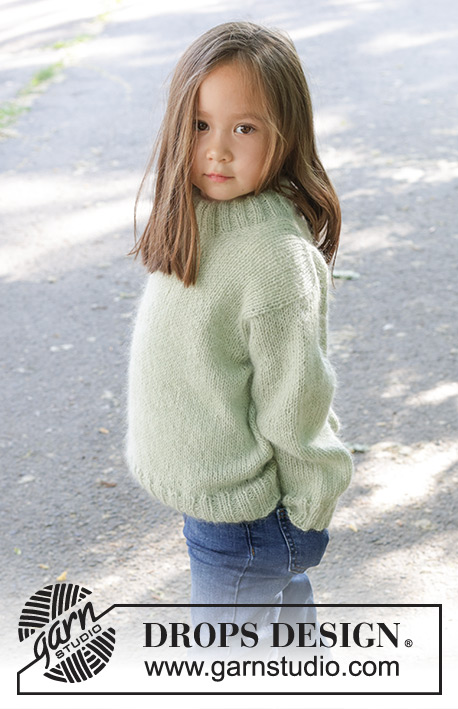
Knitted jumper for children in DROPS Alpaca and DROPS Kid-Silk. The piece is worked top down, with European/diagonal shoulders and double neck. Sizes 2 – 12 years.
DROPS Children 47-12 |
|||||||
|
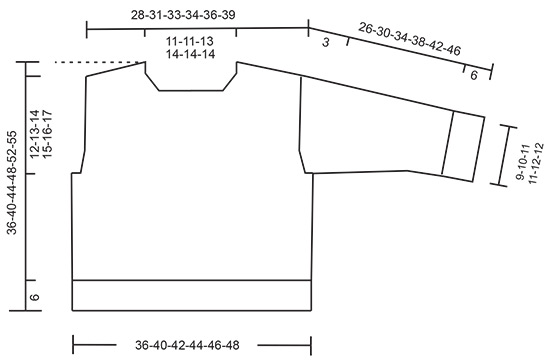
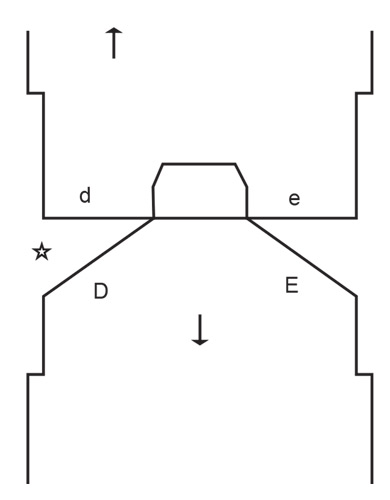
------------------------------------------------------- EXPLANATIONS FOR THE PATTERN: ------------------------------------------------------- INCREASE TIP FROM THE RIGHT SIDE: Increase towards the left AFTER MARKER: Use left needle to pick up yarn between 2 stitches from row below, pick up yarn from the front and knit in the stitch loop that is on the back of the needle. Increase towards the right BEFORE MARKER: Use left needle to pick up yarn between 2 stitches from row below, pick up yarn from the back and knit in the stitch loop that is on the front side of the needle. INCREASE TIP FROM THE WRONG SIDE: Increase towards the right AFTER MARKER: Use left needle to pick up yarn between 2 stitches from row below, pick up yarn from the back and purl in the stitch loop that is on the front side of the needle. Increase towards the left BEFORE MARKER: Use left needle to pick up yarn between 2 stitches from row below, pick up yarn from the front and purl in the stitch loop that is on the back side of the needle. DECREASE TIP (for sleeves): Decrease 1 stitch on each side of the marker-thread as follows: Work until there are 3 stitches left before the marker-thread, knit 2 together, knit 2 (marker-thread sits between these 2 stitches), slip 1 stitch knit-wise, knit 1 and pass the slipped stitch over the knitted stitch. ------------------------------------------------------- START THE PIECE HERE: ------------------------------------------------------- JUMPER – SHORT OVERVIEW OF THE PIECE: The back piece is worked back and forth with circular needle and top down until the armholes are finished. Stitches are knitted up along each back shoulder for the front piece, then cast on for the neck and the front piece is worked back and forth with circular needle until the armholes are finished. The front and back pieces are joined and the body continued in the round with circular needle. Stitches are knitted up around each armhole and the sleeves worked first back and forth with circular needle for the sleeve cap, then finished in the round with circular needle/ double pointed needles. The neck is worked in the round to finish. BACK PIECE: Cast on 20-20-24-26-26-26 stitches with circular needle size 5 mm and 1 strand of each quality (2 strands). Purl 1 row from the wrong side. Insert 1 marker inside the 3 outermost stitches on each side. Keep the markers inside 3 stitches as you work onwards. Work stocking stitch back and forth. AT THE SAME TIME, increase AFTER the marker at the beginning of the row and BEFORE the marker at the end of the row – read INCREASE TIP FROM THE RIGHT SIDE. On the next row (wrong side) increase in the same way – read INCREASE TIP FROM THE WRONG SIDE. Continue increasing, both from the right and wrong side, a total of 14-16-16-16-18-20 times = 48-52-56-58-62-66 stitches. Work 4 rows. Move the markers to the outermost stitch on each side; the piece is now measured from here. REMEMBER THE KNITTING TENSION! Continue stocking stitch until the piece measures 5-5-6-7-7-8 cm, from the markers measured along the armhole. Now increase 1 stitch inside 3 stitches on each side - remember INCREASE TIP FROM THE RIGHT SIDE. Increase every 2nd row (= each row from the right side) 4 times in total = 56-60-64-66-70-74 stitches. Continue working until the piece measures 9-9-10-11-12-12 cm along the armhole. Cut the strand, place the stitches on a stitch holder and work the front piece. FRONT PIECE: Start with left shoulder (when garment is worn): Knit up 14-16-16-16-18-20 stitches evenly along the left back shoulder, working from the neck to the marker in the side, see D in sketch. Work stocking stitch back and forth. When the front piece measures 4 cm, increase 1 stitch at the beginning of each row from the right side (after 3 stitches) - remember INCREASE TIP FROM THE RIGHT SIDE. Increase a total of 4 times = 18-20-20-20-22-24 stitches. Purl back from the wrong side. Cut the strand, place the stitches on a stitch holder and work the right front shoulder. Knit up 14-16-16-16-18-20 stitches evenly along the right back shoulder, working from the marker in the side to the neck, see E in sketch. Work stocking stitch back and forth. When the front piece measures 4 cm, increase 1 stitch at the end of each row from the right side (before 3 stitches) - remember INCREASE TIP FROM THE RIGHT SIDE. Increase a total of 4 times = 18-20-20-20-22-24 stitches. Purl back from the wrong side. Now work as follows from the right side: Knit the 18-20-20-20-22-24 stitches from the right front piece, cast on 12-12-16-18-18-18 stitches for the neck, knit the 18-20-20-20-22-24 stitches from the left front piece = 48-52-56-58-62-66 stitches. Continue stocking stitch back and forth until the piece measures 11-13-14-15-16-18 cm along the armhole. Now increase 1 stitch inside 3 stitches on each side, remember INCREASE TIP FROM THE RIGHT SIDE. Increase every 2nd row (= each row from the right side) 4 times in total = 56-60-64-66-70-74 stitches. Continue with stocking stitch until the front piece measures 15-17-18-19-20-22 cm. Now join the front and back pieces for the body. BODY: Work the 56-60-64-66-70-74 stitches from the front piece, cast on 6-8-8-8-8-8 stitches (side), work the 56-60-64-66-70-74 stitches from the back piece, cast on 6-8-8-8-8-8 stitches = 124-136-144-148-156-164 stitches. Work stocking stitch in the round until the piece measures 30-34-38-42-46-49 cm, from the top of the shoulder on the front piece. Knit 1 round and increase 20-24-24-28-28-28 stitches evenly spaced = 144-160-168-176-184-192 stitches. Change to circular needle size 3.5 mm. Work rib (knit 2, purl 2) for 6 cm. Cast off a little loosely. The jumper measures approx. 36-40-44-48-52-55 cm from the top of the shoulder and down the front piece. LEFT SLEEVE: Lay piece flat and insert 1 marker on the top of armhole (NB: This is not where the stitches were knitted up for the front piece, but approx. 3-5 cm down on the front piece, this is the middle of the shoulder). Using circular needle size 5 mm and 1 strand of each quality, start in the middle of the new stitches cast on under sleeve and pick up 42-44-46-50-54-56 stitches around armhole – adjust so that there are the same number of stitches along armhole on each side of the marker. Now work stocking stitch back and forth with short rows over sleeve cap, to give the sleeve a better fit. 1st row (from right side): work 4 stitches after marker, turn. 2nd row (from wrong side): work 4 sts after marker, turn. 3rd row (from right side): work 8 sts after marker, turn. 4th row (from wrong side): work 8 sts after marker, turn. 5th row (from right side): work 12 sts after marker, turn. 6th row (from wrong side): work 12 sts after marker, turn. 7th row (from right side): work to the beginning of the round. Continue working in the round in stocking stitch over all stitches. Insert a marker-thread at the beginning of the round (mid-under sleeve). Allow the marker-thread to follow your work onwards. Work stocking stitch in the round. When the sleeve measures 5 cm from the knitted-up stitches, decrease 2 stitches mid-under sleeve – read DECREASE TIP. Decrease like this every 3-4-5-5-4½-5 cm a total of 5-5-5-6-7-7 times = 32-34-36-38-40-42 stitches. Continue working until the sleeve measures 20-24-28-32-36-40 cm from the knitted-up stitches. There is approx. 6 cm left; try the jumper on and work to desired length before the rib. Knit 1 round and increase 8-6-8-6-8-6 stitches evenly spaced = 40-40-44-44-48-48 stitches. Change to double pointed needles size 3.5 mm and work rib (knit 2, purl 2) for 6 cm. Loosely cast off. The sleeve measures approx. 26-30-34-38-42-46 cm. RIGHT SLEEVE: Work in the same way as the left sleeve. DOUBLE NECK: Use short circular needle size 3.5 mm and 1 strand of each quality. Start on one shoulder and knit up from the right side, inside 1 edge stitch, 68 to 84 stitches around the neck. The stitch-count must be divisible by 4. Work rib in the round (knit 2, purl 2) for 14 cm. Cast off a little loosely. Fold the neck double to the inside and fasten down with a couple of stitches. |
|||||||
Diagram explanations |
|||||||
|
|||||||
 |
|||||||
 |
|||||||
Have you finished this pattern?Tag your pictures with #dropspattern #sweetpeppermintsweater or submit them to the #dropsfan gallery. Do you need help with this pattern?You'll find 32 tutorial videos, a Comments/Questions area and more by visiting the pattern on garnstudio.com. © 1982-2026 DROPS Design A/S. We reserve all rights. This document, including all its sub-sections, has copyrights. Read more about what you can do with our patterns at the bottom of each pattern on our site. |
|||||||


With over 40 years in knitting and crochet design, DROPS Design offers one of the most extensive collections of free patterns on the internet - translated to 17 languages. As of today we count 325 catalogues and 12298 patterns translated into English (UK/cm).
We work hard to bring you the best knitting and crochet have to offer, inspiration and advice as well as great quality yarns at incredible prices! Would you like to use our patterns for other than personal use? You can read what you are allowed to do in the Copyright text at the bottom of all our patterns. Happy crafting!
Post a comment to pattern DROPS Children 47-12
We would love to hear what you have to say about this pattern!
If you want to leave a question, please make sure you select the correct category in the form below, to speed up the answering process. Required fields are marked *.