
Popular categories
Looking for a yarn?


Comments / Questions (27)
![]() Monique wrote:
Monique wrote:
De hoeveelheid wol voor maat 38-40 (200 gram) is wat krap. Heb de slof minder lang moeten maken om uit te komen met de wol.
16.02.2026 - 18:51
![]() Teresa wrote:
Teresa wrote:
Where do I increase the 6 stitches?
13.11.2025 - 04:44DROPS Design answered:
Hi Teresa, You increase 6 stitches evenly across the next 10 knitted stitches by making yarn overs. E.g., K1, 1YO, K2, 1YO, K1, 1YO, K2, 1YO, K1, 1YO, K2, 1YO, K1. Regards, Drops Team.
13.11.2025 - 06:30
![]() Terri wrote:
Terri wrote:
I cast on 64 sts. Then decrease to 60 sts. Where do I increase to 66 sts?
13.11.2025 - 04:42DROPS Design answered:
Hi Terri, The 6 increased stitches are worked in the middle of the Ankle Elevation (See Explanations for the pattern). Regards, Drops Team.
13.11.2025 - 06:34
![]() Gerd Pedersen wrote:
Gerd Pedersen wrote:
Nå jeg har fundet ud af det. Det står der jo, når blot man læser det hele. ;-)
29.09.2025 - 13:03DROPS Design answered:
Hei Gerd. Så fint att du fant ud af det :)
02.10.2025 - 07:48
![]() Gerd Pedersen wrote:
Gerd Pedersen wrote:
Begynder forhøjning og mønster samtidig, eller er det først når man starter på hælen ? Det er først der mønsteret bliver nævnt.
29.09.2025 - 12:29
![]() Bethan Powell wrote:
Bethan Powell wrote:
I made these slippers for someone and they seem too be too slippery to wear safely. Are there any suggestions how to make the soles less slippery?
09.02.2025 - 21:59DROPS Design answered:
Dear Bethan, you can sew some not slippery material to the soles, such as leather soles or some old jeans fabric, that will allow the slippers to be less slippery. Happy knitting!
10.02.2025 - 00:15
![]() Alda wrote:
Alda wrote:
Sto lavorando la prima pantofola e vedo che non basteranno i due gomitoli raccomandati (taglia 38/40 : 200g). Uso ferri n° 5,5 e il mio campione era giusto. Inoltre la mia treccia è già composta da otto ”intrecci” e ne verranno ancora due per raggiungere la lunghezza prescritta prima della punta, mentre sulla foto vedo solo sei “intrecci”. È normale? Ho comprato la lana online, adesso ordinerò un altro gomitolo, sperando che il colore sia uguale. Grazie.
06.02.2025 - 19:30DROPS Design answered:
Buongiorno Alda, probabilmente ha una tensione diversa nella lavorazione del motivo rispetto a quella del campione. Buon lavoro!
09.02.2025 - 11:32
![]() Kris wrote:
Kris wrote:
Bonjour, il est marqué à la fin du pied de continuer en point mousse jusque 25cm après le marqueur + 5 cm jusqu'à la fin , or j'ai déjà 10cm jusqu'au marqueur, est ce que la taille finale est bien de 40 cm ? cela parait beaucoup ? merci d'avance
09.12.2024 - 16:01DROPS Design answered:
Bonjour Kris, avant feutrage, le pied mesure environ 30 m (cf en-tête), si votre échantillon est juste en hauteur, vous devriez avoir les bonnes mesures finales; le pied mesure 25 cm après le talon + environ 5 cm pour les 15 derniers rangs = 30 cm de long à partir du marqueur du talon, avant feutrage. Bon tricot!
11.12.2024 - 08:15
![]() Aline wrote:
Aline wrote:
Bonjour, je ne comprends pas le début de vos explications. Il est noté, RANG 1 (= sur l’envers): Tricoter à l’envers en diminuant 4 mailles à intervalles réguliers = 54-60-64-64 mailles. je ne comprends pas pourquoi je dois monter 64 m par ex et diminuer 4 m sur le 1er rg. Pourquoi ne pas monter 60 m tt de suite ? merci pour votre retour
19.11.2024 - 09:21DROPS Design answered:
Bonjour Aline, on monte davantage de mailles au 1er rang que l'on en a besoin ensuite puis on diminue de suite au 1er rang pour que la bordure du chausson soit suffisamment souple. Bon tricot!
19.11.2024 - 16:22
![]() Pappillon wrote:
Pappillon wrote:
Bonjour, J\'aimerais réaliser ce motif mais j\'ai une laine que je ne pourrai pas faire feutrer (25% nylon). J\'ai commencé avec une base de 52m pour 28cm de longueur (taille 44/46), mais je me suis aperçue qu\'il fallait adapter toutes les mesures. Je vois qu\'il y a des comptes de mailles proportionnels et d\'autres non... Y a-t-il un moyen simple de calculer pour toutes les mesures ? Comme d\'appliquer un pourcentage à partir d\'une des mesures données ? Merci
18.10.2024 - 00:00DROPS Design answered:
Bonjour Mme Pappillon, les modèles feutrés ont leur propres explications car ils sont calculés sur la base du feutrage, il sera bien plus simple et plus facile de trouver un modèle qui ne doit pas être feutré. Merci pour votre compréhension. Bon tricot!
18.10.2024 - 08:39
|
||||||||||||||||
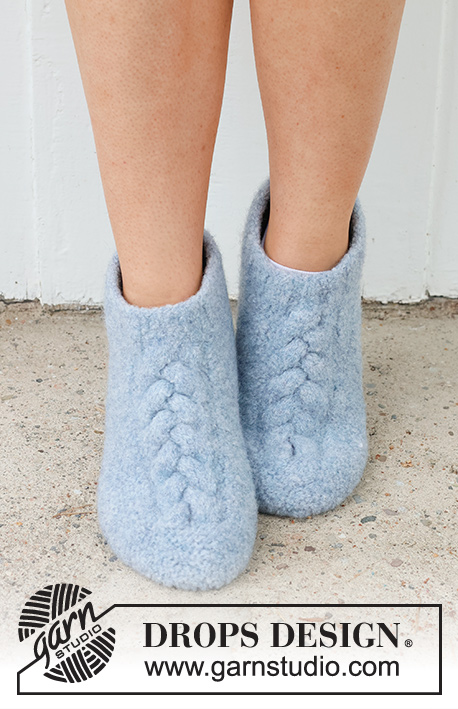
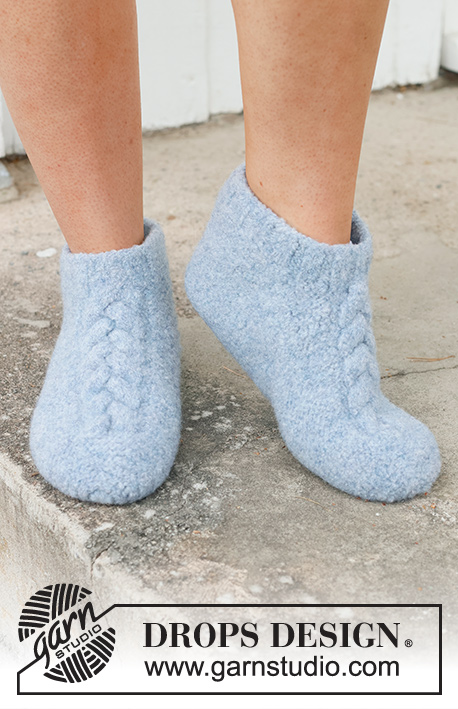
Braided Slippers#braidedslippers |
||||||||||||||||
 |
 |
|||||||||||||||
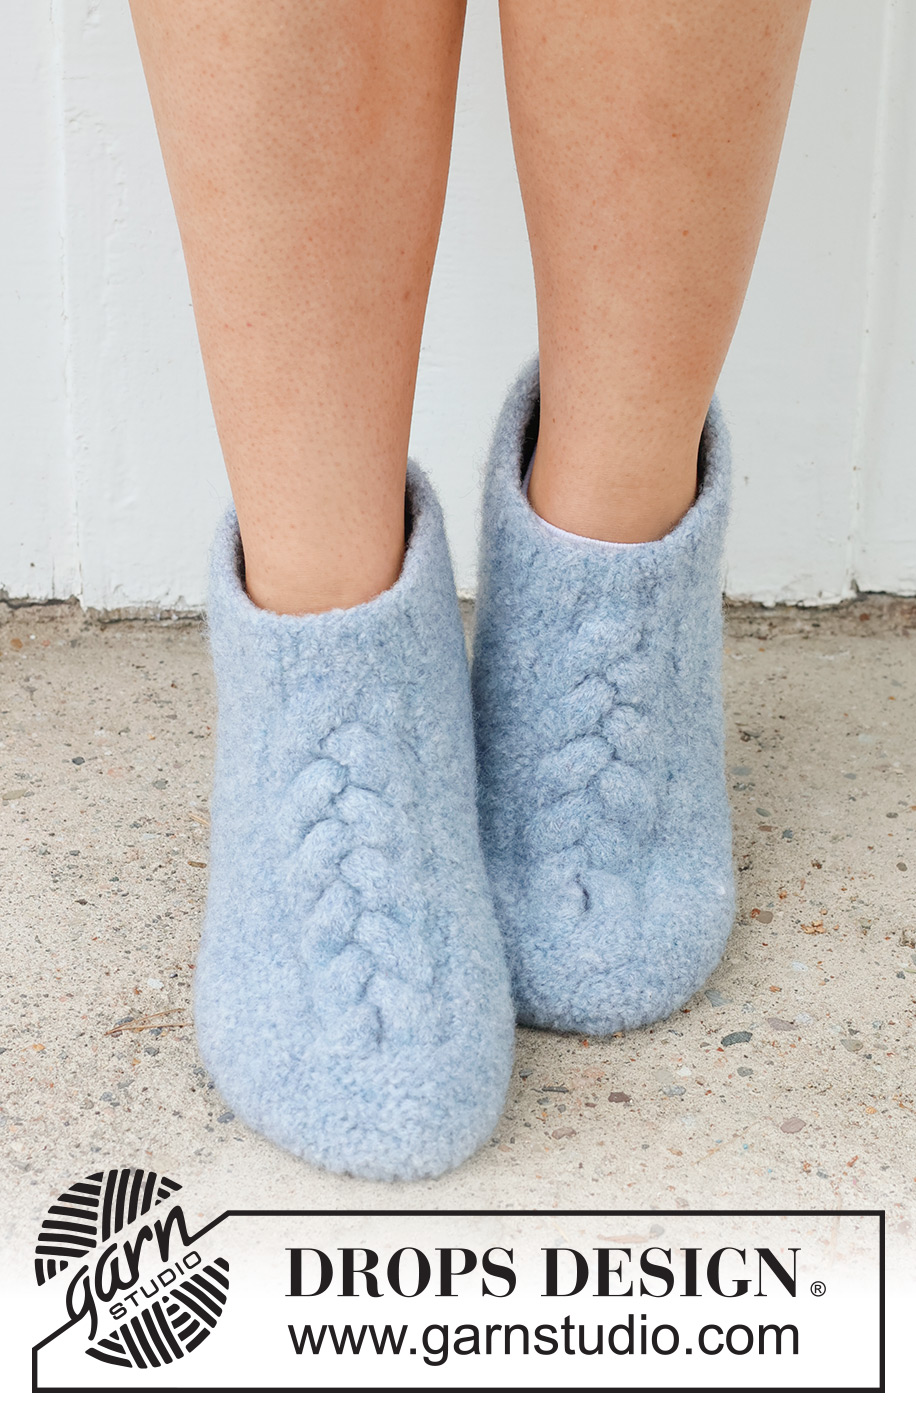
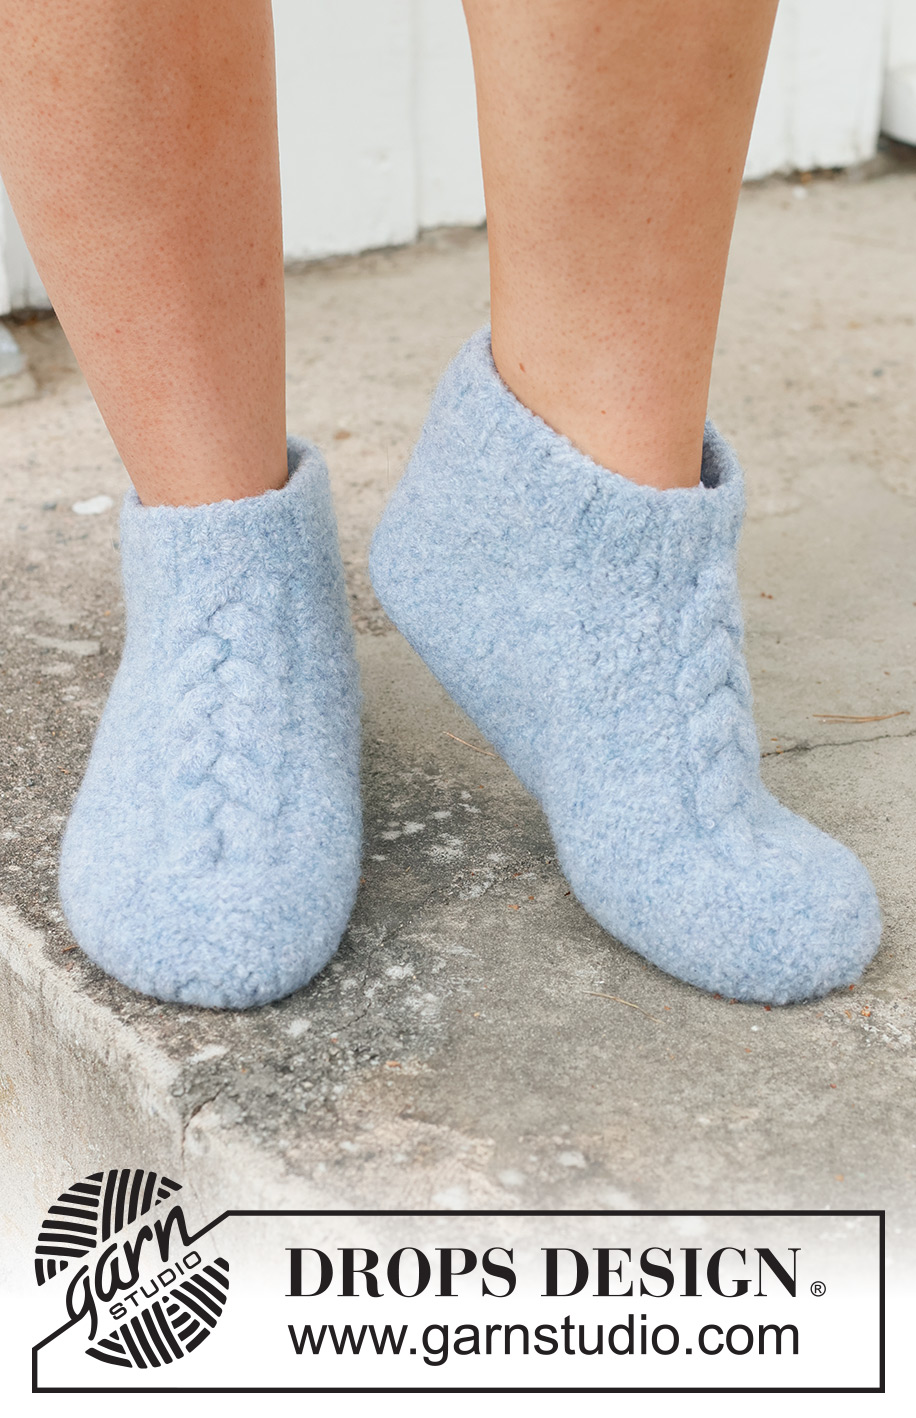
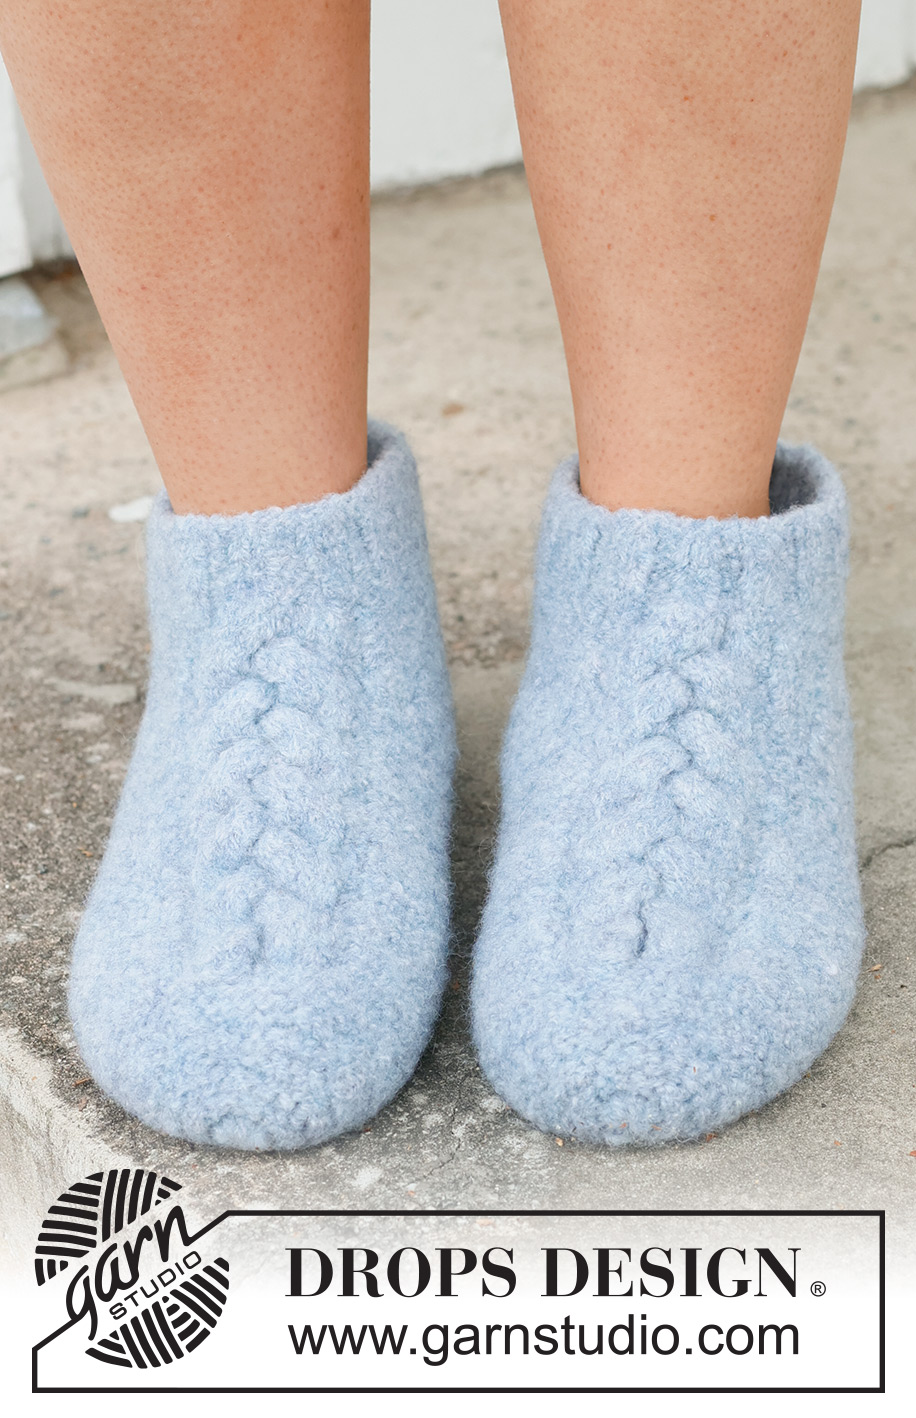
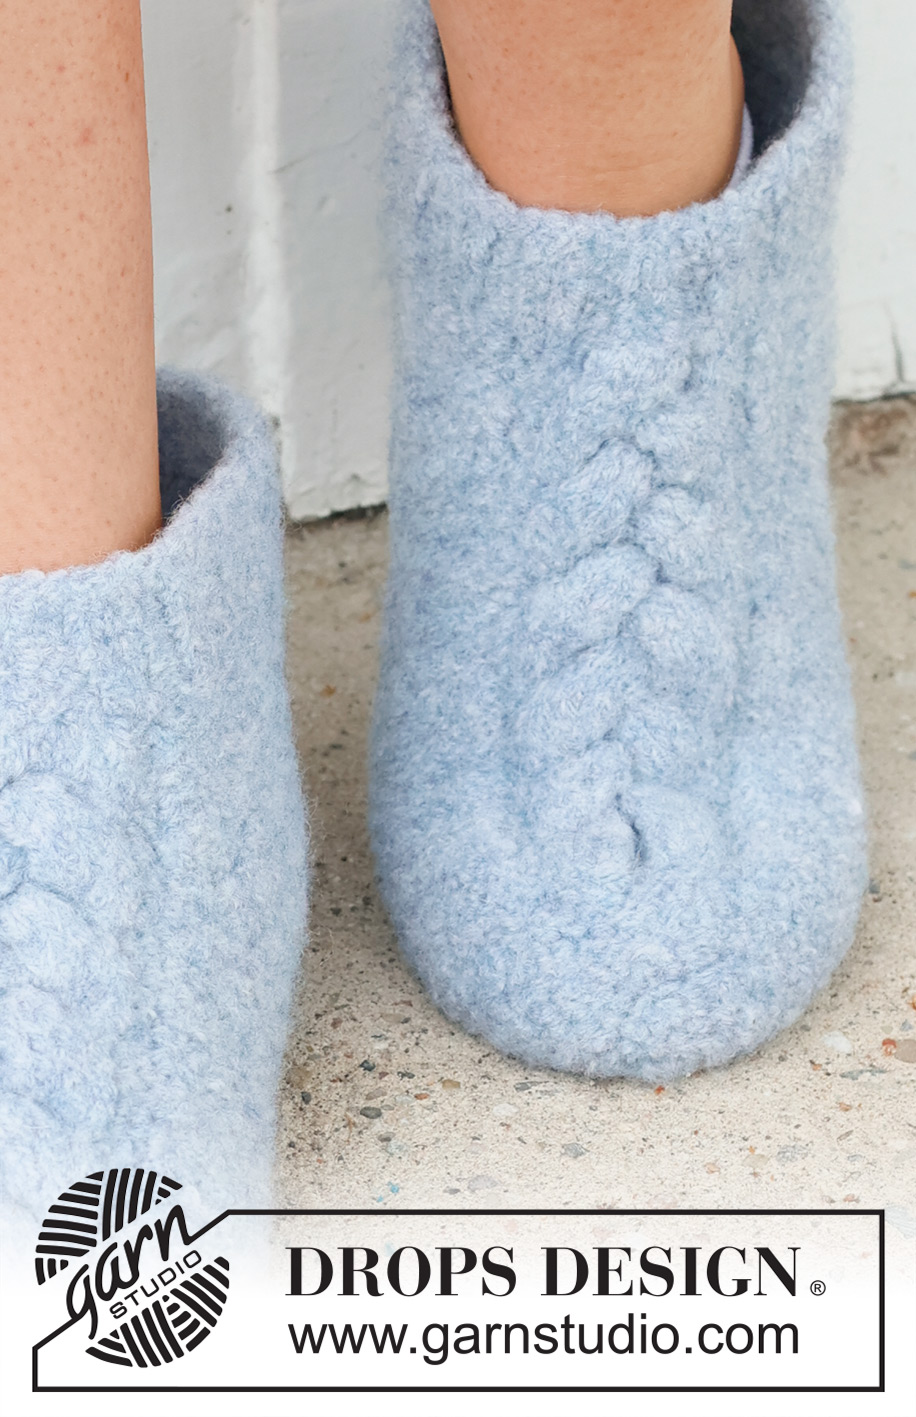
Felted and knitted slippers with cable in DROPS Alaska. Piece is knitted top. Size 35-46.
DROPS 234-71 |
||||||||||||||||
|
---------------------------------------------------------- EXPLANATION FOR THE PATTERN: ---------------------------------------------------------- PATTERN: See diagrams A.1 and A.2. Diagrams show all rows in pattern seen from the right side. ANKLE ELEVATION: Knit all rows unless otherwise is written (1st row is from right side): Work 5-5-6-6 stitches, turn piece and work 5-5-6-6 stitches. Work 10-11-12-12 stitches, turn piece and work 10-11-12-12 stitches. Work 15-17-18-18 stitches, turn piece and work 15-17-18-18 stitches. Work 20-23-25-25 stitches, turn piece and work 20-23-25-25 stitches. Work 15-17-18-18 stitches, turn piece and work 15-17-18-18 stitches. Work 10-11-12-12 stitches, turn piece and work 10-11-12-12 stitches. Work 5-5-6-6 stitches, turn piece and work 5-5-6-6 stitches. Work next row as follows from right side: Work 22-25-27-27 stitches, knit and increase 6 stitches (by making a yarn over) evenly over the next 10 stitches, work 22-25-27-27 stitches, turn piece = 60-66-70-70 stitches. Work 5-5-6-6 stitches, turn piece and work 5-5-6-6 stitches. Work 10-11-12-12 stitches, turn piece and work 10-11-12-12 stitches. Work 15-17-18-18 stitches, turn piece and work 15-17-18-18 stitches. Work 20-23-25-25 stitches, turn piece and work 20-23-25-25 stitches. Work 15-17-18-18 stitches, turn piece and work 15-17-18-18 stitches. Work 10-11-12-12 stitches, turn piece and work 10-11-12-12 stitches. Work 5-5-6-6 stitches, turn piece and work 5-5-6-6 stitches. Work next row as follows from wrong side: Work 22-25-27-27 stitches, purl 16 (purl yarn overs twisted) and work 22-25-27-27 stitches. KNITTING TIP: There will be a small hole when turning in the middle of a row but this evens out after the piece is felted. ---------------------------------------------------------- START THE PIECE HERE: ---------------------------------------------------------- SLIPPERS - SHORT OVERVIEW OF THE PIECE: Work slippers back and forth in one piece, top down. Sew piece together under foot and at the back on heel. Then felt the piece in a washing machine. SLIPPER: Cast on 58-64-68-68 stitches on single pointed needles size 5.5 mm with DROPS Alaska. ROW 1 (= wrong side): Purl and decrease 4 stitches evenly = 54-60-64-64 stitches. ROW 2 (= right side): Work 1 edge stitch in GARTER STITCH - read explanation above, work rib (knit 2/purl 2) until 3 stitches remain, knit 2 and work 1 edge stitch in garter stitch. ROW 3-5: Work garter stitch over garter stitch, knit over knit and purl over purl. On next row from right side work ANKLE ELEVATION – read explanation above. There are 60-66-70-70 stitches on needle. Read KNITTING TIP! REMEMBER THE KNITTING TENSION! HEEL: Then knit all rows but work the middle 16 stitches in pattern A.1 - AT THE SAME TIME increase for heel as follows (1st row is from right side): * Work 18 stitches, turn piece. Knit until 1 stitch remains and work 2 stitches in last stitch, turn piece = 1 stitch increased. Work until 6 stitches remain before last turn, turn piece and knit until 1 stitch remains and work 2 stitches in last stitch, turn piece = 1 stitch increased. Work until 6 stitches remain before last turn, turn piece and work until 1 stitch remains and work 2 stitches in last stitch. Turn piece = 1 stitch increased. Work 1 row over all stitches (= 63-69-73-73 stitches) from right side - remember A.1 over the middle 16 stitches. Work 18 stitches, turn piece. Knit until 1 stitch remains and work 2 stitches in last stitch, turn piece = 1 stitch increased. Work until 6 stitches remain before last turn, turn piece and knit until 1 stitch remains and work 2 stitches in last stitch, turn piece = 1 stitch increased. Work until 6 stitches remain before last turn, turn piece and work until 1 stitch remains and work 2 stitches in last stitch. Turn piece = 1 stitch increased. Work 1 row over all stitches (= 66-72-76-76 stitches) from wrong side - remember A.1. * Work from *-* 2 times in total. 12 stitches have been increased and there are 72-78-82-82 stitches on needle. Work 1 row from right side and work 1 row from wrong side. Then insert 1 marker in the 5th stitch counted from one of the edges of piece, measure the foot length from here. Then knit all rows and work the middle 16 stitches in pattern A.1 - AT THE SAME TIME decrease for heel as follows (1st row is from right side): * Work 18 stitches, turn piece. Work 16 stitches, knit 2 together and turn piece = 1 stitch decreased. Work 12 stitches, turn piece. Work 10 stitches, knit 2 together and turn piece = 1 stitch decreased. Work 6 stitches, turn piece. Work 4 stitches, knit 2 together and turn piece = 1 stitch decreased. Work 1 row over all stitches from right side - remember A.1. Work 18 stitches, turn piece. Work 16 stitches, knit 2 together and turn piece = 1 stitch decreased. Work 12 stitches, turn piece. Work 10 stitches, knit 2 together and turn piece = 1 stitch decreased. Work 6 stitches, turn piece. Work 4 stitches, knit 2 together and turn piece = 1 stitch decreased. Work 1 row over all stitches (= 66-72-76-76 stitches) from wrong side - remember A.1 *. Work from *-* 2 times in total. 12 stitches have been decreased and there are 60-66-70-70 stitches on needle. FOOT: Work next row as follows from right side: Work 14-17-17-21 stitches, knit the next 8-8-10-6 stitches together 2 by 2, work A.1, knit the next 8-8-10-6 stitches together 2 by 2 and work 14-17-17-21 stitches = 52-58-60-64 stitches. Work 1 row from wrong side - remember A.1. Continue in garter stitch and decrease as follows from right side: Work 12-14-15-16 stitches, knit the next 2 stitches together, work as before until 14-16-17-18 stitches remain, knit the next 2 stitches together, work the rest of row. Decrease like this on every row from right side until decrease has been done 3-3-3-4 times in total = 46-52-54-56 stitches. Continue in garter stitch and pattern A.1 until piece measures approx. 25-27-32-35 cm from marker on heel (approx. 5 cm remain until finished measurements). TOE: Continue in garter stitch but now work pattern A.2 over the middle 16 stitches. When pattern A.2 has been worked, there are 40-46-48-50 stitches on needle. Work in garter stitch over all stitches and decrease 4 stitches evenly on every row from right side 7 times in total = 12-18-20-22 stitches. On next row knit all stitches together 2 by 2 = 6-9-10-11 stitches. Cut the yarn. Pull yarn through the remaining stitches, tighten together and fasten. Knit another slipper the same way. ASSEMBLY: Sew seam mid under piece - sew in outer loops of edge ridge to avoid a chunky seam. FELTING: The piece can be felted either in the washing machine or the tumble dryer – read description below. Remember: Subsequent washes are as for a normal wool garment. IN WASHING MACHINE: Washing machines will vary when felting. If the piece is not felted enough, it can be felted again. If it is felted too much, it can be stretched to the correct size while still wet. DO THE FOLLOWING: Lay the piece in the washing machine, using a programme of approx. 40 minutes (not a wool programme). Wash at 40 degrees without pre-wash, detergent is optional. After washing, shape the piece while it is still wet. IN TUMBLE DRYER: Felting in a tumble dryer gives good control over the degree of felting. The tumble dryer can be opened during drying to check the size of the piece. If it is not felted enough it can be thoroughly wetted and felted again. If it is felted too much it can be stretched to the correct size while still wet. DO THE FOLLOWING: Lay the piece in water so it becomes completely wet, then place it in the tumble dryer and begin the drying process. Dry to the desired size, checking regularly. |
||||||||||||||||
Diagram explanations |
||||||||||||||||
|
||||||||||||||||
 |
||||||||||||||||
Have you finished this pattern?Tag your pictures with #dropspattern #braidedslippers or submit them to the #dropsfan gallery. Do you need help with this pattern?You'll find 17 tutorial videos, a Comments/Questions area and more by visiting the pattern on garnstudio.com. © 1982-2026 DROPS Design A/S. We reserve all rights. This document, including all its sub-sections, has copyrights. Read more about what you can do with our patterns at the bottom of each pattern on our site. |
||||||||||||||||


With over 40 years in knitting and crochet design, DROPS Design offers one of the most extensive collections of free patterns on the internet - translated to 17 languages. As of today we count 324 catalogues and 12290 patterns translated into English (UK/cm).
We work hard to bring you the best knitting and crochet have to offer, inspiration and advice as well as great quality yarns at incredible prices! Would you like to use our patterns for other than personal use? You can read what you are allowed to do in the Copyright text at the bottom of all our patterns. Happy crafting!
Post a comment to pattern DROPS 234-71
We would love to hear what you have to say about this pattern!
If you want to leave a question, please make sure you select the correct category in the form below, to speed up the answering process. Required fields are marked *.