
Popular categories
Looking for a yarn?


Comments / Questions (21)
![]() LOUISE wrote:
LOUISE wrote:
Bonjour peut on travailler ce modèle avec des aiguilles droite classique en gardant les même taille d'aiguille ?
17.10.2025 - 18:25DROPS Design answered:
Bonjour Louise, tout à fait, dans la mesure où le dos/les devants se tricotent en allers et retours; pour les manches, vous trouverez ici quelques astuces. Bon tricot!
28.10.2025 - 18:20
![]() Sheena wrote:
Sheena wrote:
I really like the guacamole colour of the soft tweed. What colour of the kid silk would you suggest is best. Difficult to see from monitors
02.11.2024 - 21:41DROPS Design answered:
Dear Sheena, we don't have a specific pairing of Soft Tweed 16 and Kid-Silk. You could use a brownish tone of Kid-Silk, since the green would overwhelm the guacamole of Soft Tweed. It would be best to contact your DROPS supplier and ask them for advice or visit your local DROPS store and check the yarns themselves physically so that you can have a more informed choice (since the colour on the webpage depends also on the dyelot and the screen used). Happy knitting!
03.11.2024 - 18:38
![]() Johanna wrote:
Johanna wrote:
Ich stelle bei jedem Modell leider immer erst bei der Fertigstellung fest, dass mir meine übliche Größe (L) viiiel zu groß ist :-( muss also nachträglich alles einkürzen und enger nähen auf Größe M oder sogar S. Jetzt habe ich aber fürs nächste Mal dazu gelernt... ansonsten super Anleitung, vielen Dank!
29.05.2024 - 12:27
![]() Lise Renaud wrote:
Lise Renaud wrote:
Bonjour, j\'ai reçu de la laine Mérino en cadeau et j\'amerais faire le Tweed en avec aiguille numéro 3. Le calcul en large de votre patron 240 mailles devient 325 mailles, mais je suis incertaine du résultat, pouvez-vous m\'aider Merci Lise Renaud
04.04.2024 - 17:11DROPS Design answered:
Bonjour Mme Renaud, vous n'auriez pas le bon échantillon et il vous faudrait alors tout recalculer, retrouvez ici tous les modèles de gilets et de vestes que vous pouvez tricoter en Muskat (utilisez le convertisseur si besoin), avec 1 seul fil. Bon tricot!
05.04.2024 - 08:03
![]() Sigonneau wrote:
Sigonneau wrote:
Existe-t-il une version en Français S.V.P. merci de la mettre accessibl à toutes.
27.03.2024 - 09:51
![]() Luse wrote:
Luse wrote:
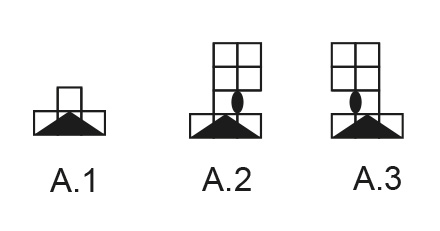
Bonjour, j’en suis à faire les diminutions pour l’encolure. Si je comprends bien, je dois faire sur le premier rang endroit le diagramme A.1. Faire ensuite mon rang envers et sur le rang endroit suivant faire A.2 au début du rang et A.3 à la fin. Je recommence ensuite au 4e rang le diagramme A.1 ?
28.02.2024 - 20:11DROPS Design answered:
Bonjour Luse, pas exactement, on diminue d'abord 4 fois 2 mailles = on va alors diminuer comme indiqué par le diagramme A.1 (devant gauche et devant droit) tous les 4 rangs (on tricote 2 rangs sans diminuer après A.1), puis on va diminuer 1 maille comme indiqué par les diagrammes A.2 (devant droit)/A.3 (devant gauche) tous les 4 rangs. Les diminutions se font sur l'endroit au 1er rang, dans A.2 et A.3 on fait 1 jeté pour diminuer comme dans A.1 mais en diminuant 1 seule maille. Bon tricot!
29.02.2024 - 08:00
![]() Susi wrote:
Susi wrote:
Kann ich die Maschen für die Ärmel auch direkt anstricken, um das lästige und unschöne Zusammen nähen zu vermeiden? Wie gehe ich dabei vor ?
31.10.2023 - 11:42DROPS Design answered:
Liebe Susi, hier würde ich lieber die Ärmel auch genauso wie in der Anleitung stricken, sonnst sollen Sie die Armkugel komplett umrechnen/anpassen. Viel Spaß beim stricken!
31.10.2023 - 16:14
![]() Elaine wrote:
Elaine wrote:
I do not understand any of the instructions for the button band. Is there a video somewhere which would explain this? Thank you.
16.09.2023 - 01:18DROPS Design answered:
Dear Elaine, you can see a video on this kind of button band here: https://www.garnstudio.com/video.php?id=1728&lang=en. Happy knitting!
17.09.2023 - 21:39
![]() Mary McLeod wrote:
Mary McLeod wrote:
Thank you Drops. I wasn't implying that the pattern was wrong, but what I have before me is. The circumference of the sleeve top is 29cm and I am knitting the medium size. The circumference of the arm hole is 52cm. The body is fine, but the whole sleeve is very tight. Could it be that I am knitting tightly by using DPKN ? Should I try again with circular needles? Or do you have another solution?
20.08.2023 - 22:59DROPS Design answered:
Dear McLeod, make sure to check and keep the same tension as for the body, this means you should also get 16 sts = 10 cm, use larger needle if you have more than 16 sts for 10 cm. And yes it can happen that the tension differ when working in the round. It's very important to keep the correct measurements. Happy knitting!
21.08.2023 - 09:23
![]() Mary McLeod wrote:
Mary McLeod wrote:
I have followed the pattern carefully but find that the hole for the sleeve, in the body of the work, is at least twice the size of the top of the sleeve. There is no earthly way to make it fit. Can anyone advise what I should do?
19.08.2023 - 19:57DROPS Design answered:
Dear Mary, the pattern is correct. For the smallest size, the circunference of the top of the sleeve should measure 38cm and match the armhole. Could you indicate which size you are working and the measurements of the armhole and the top of the sleeve? Happy knitting!
20.08.2023 - 18:43
|
|||||||||||||
Tweed Casual#tweedcasualcardigan |
|||||||||||||
 |
 |
||||||||||||
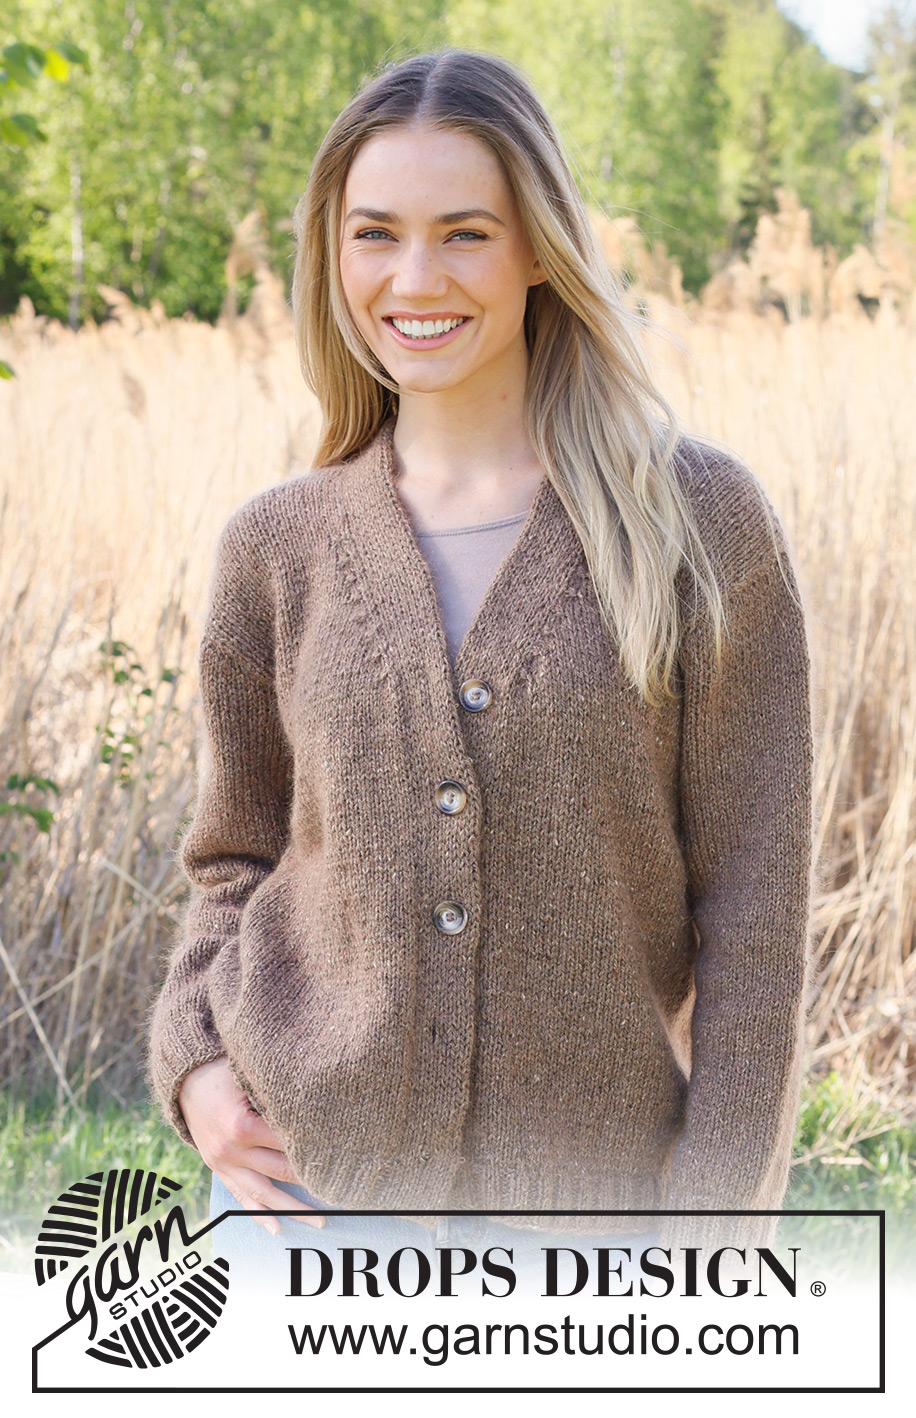
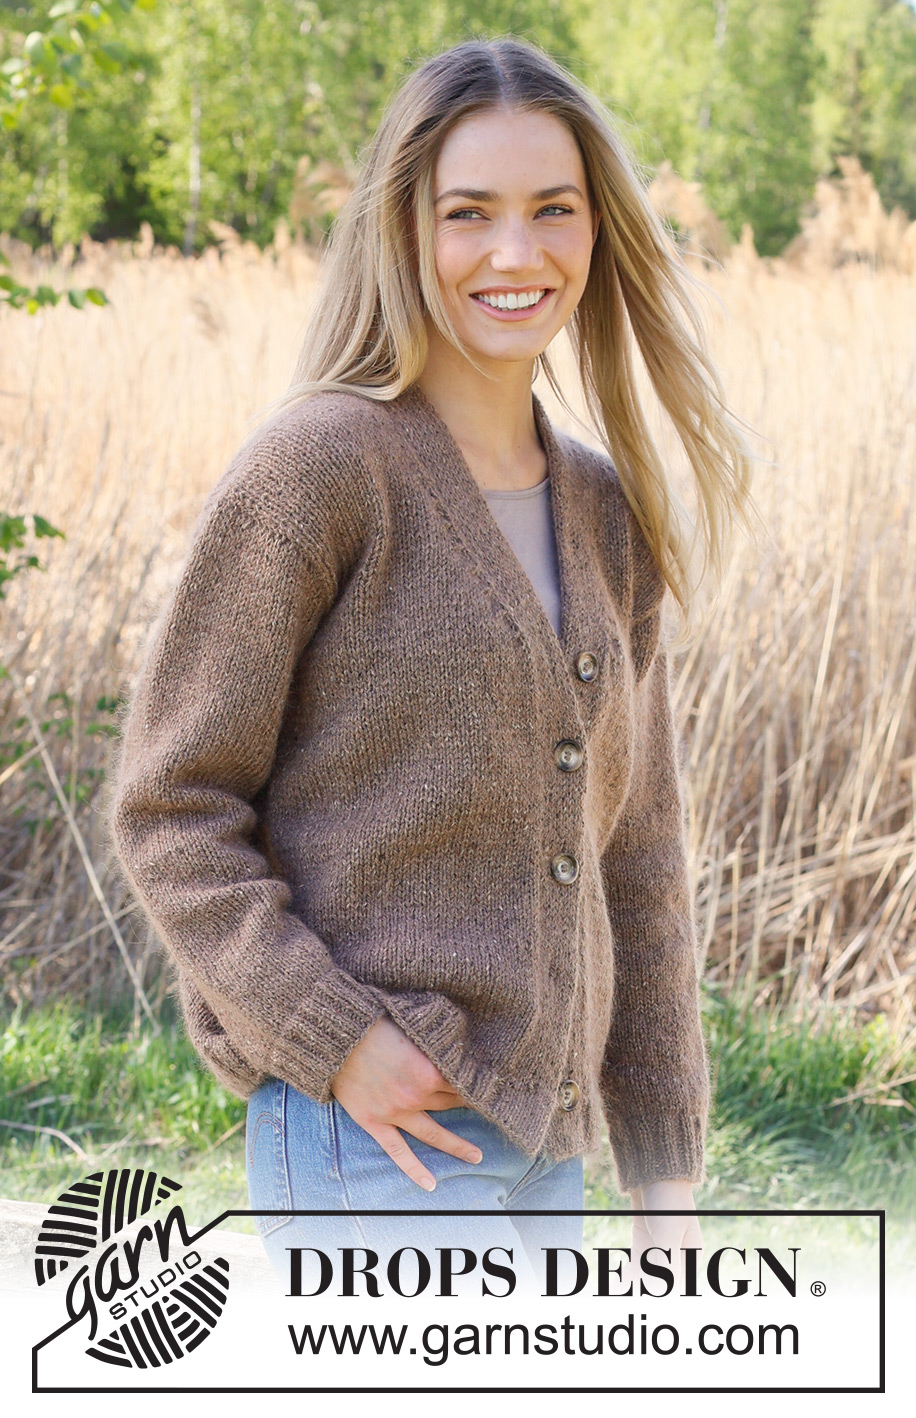
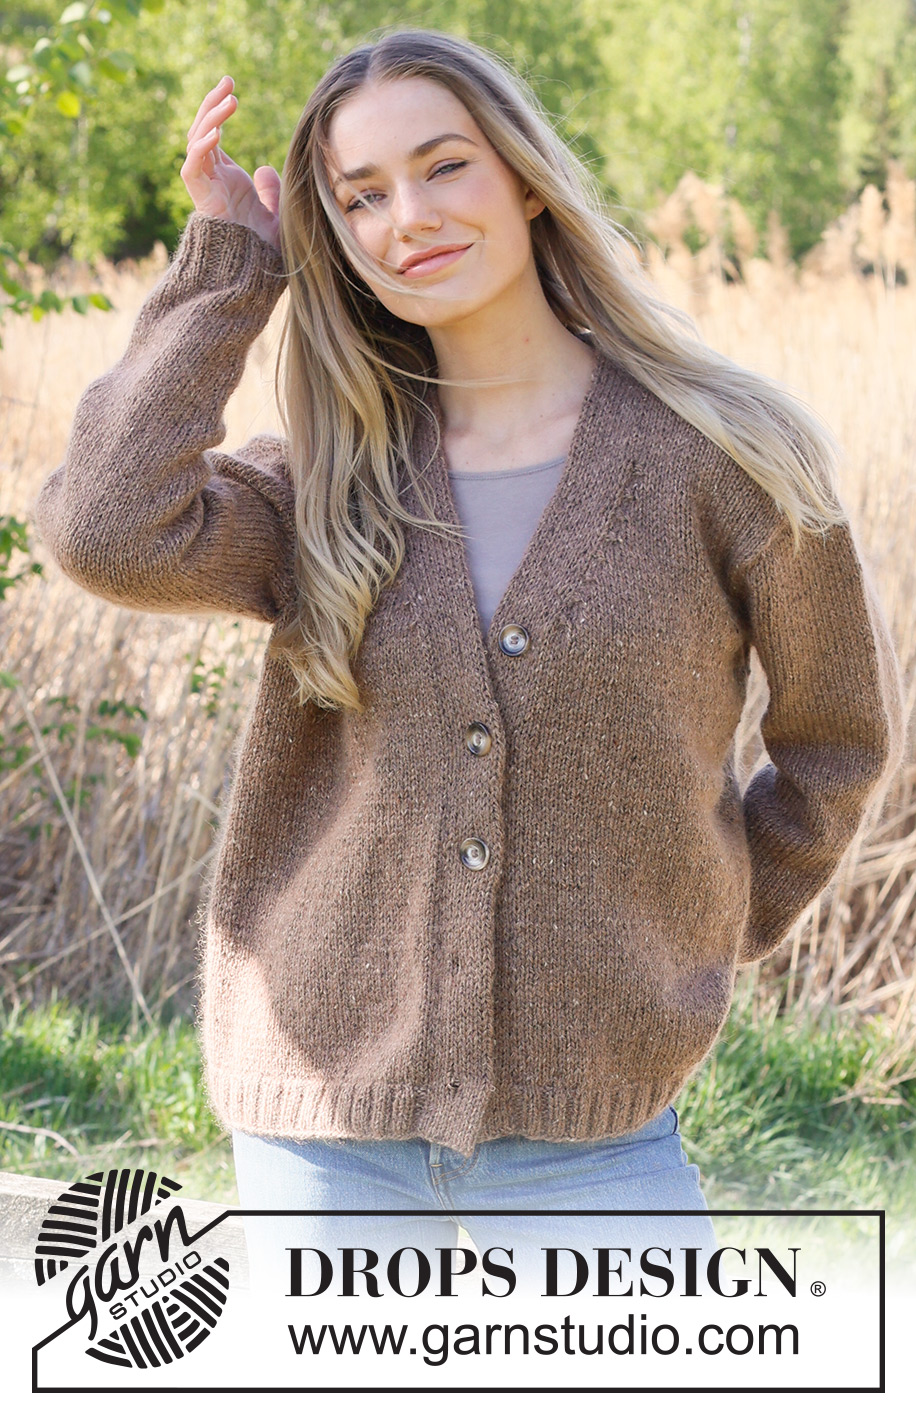
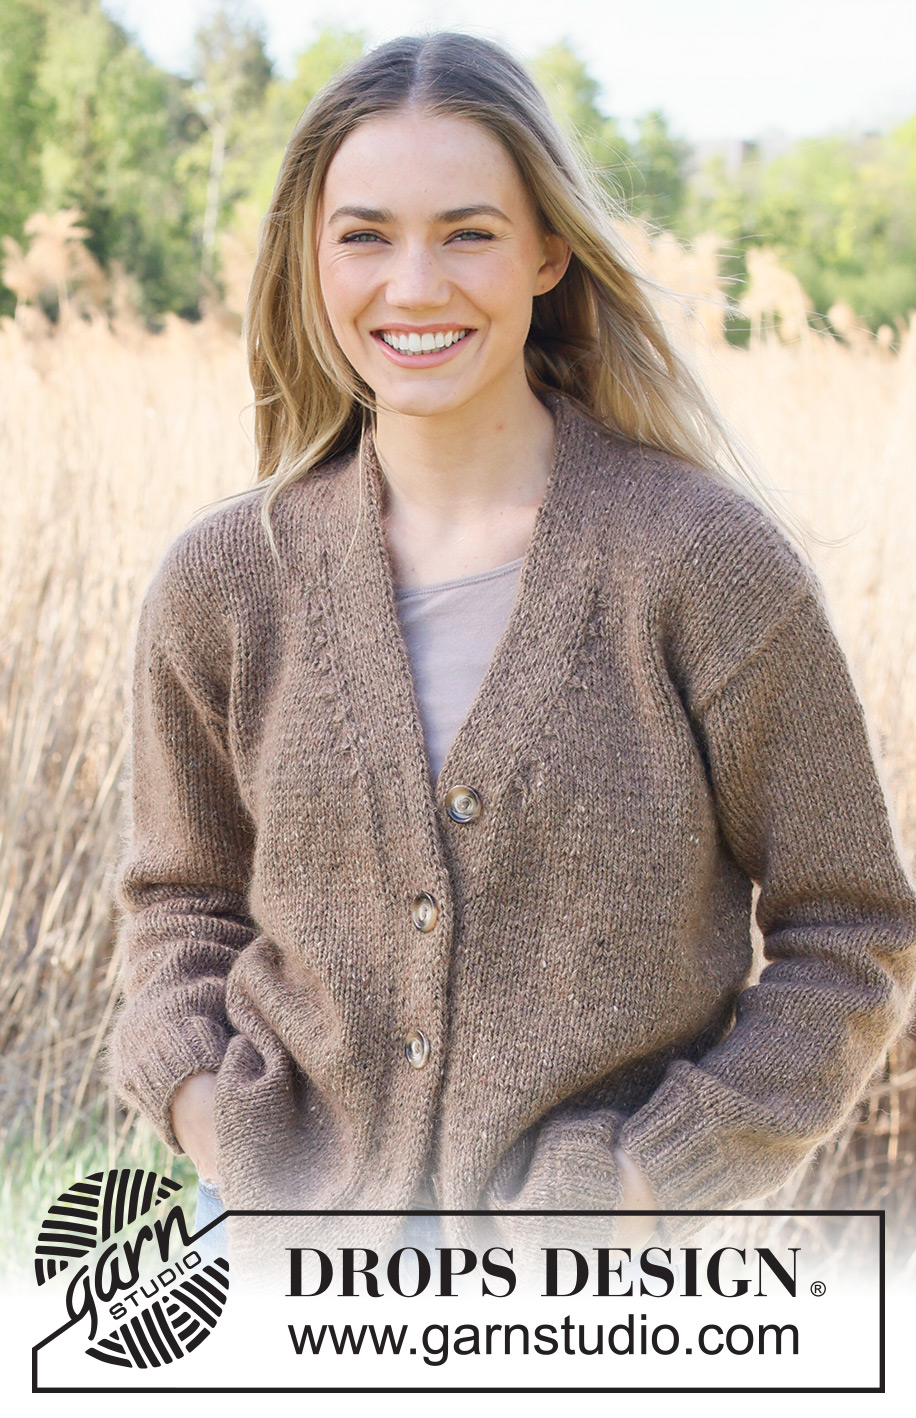
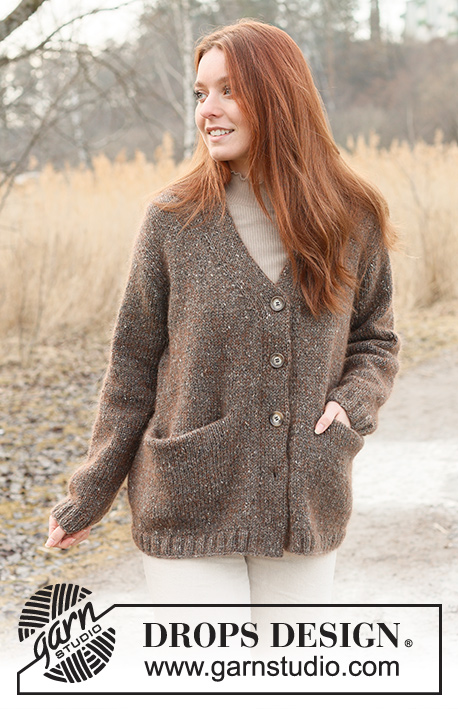
Knitted jacket in DROPS Soft Tweed and DROPS Kid-Silk. Piece is knitted bottom up with V-neck and double knitted band. Size XS – XXL.
DROPS 237-38 |
|||||||||||||
|
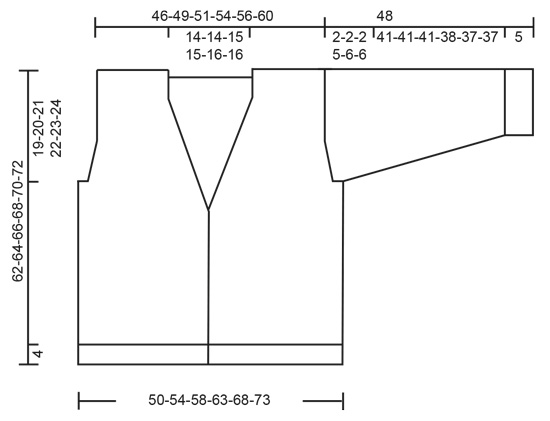
---------------------------------------------------------- EXPLANATION FOR THE PATTERN: ---------------------------------------------------------- PATTERN: See diagrams A.1 to A.3. Diagrams show all rows in pattern seen from the right side. GARTER STITCH (back and forth): Knit all rows. 1 ridge vertically = knit 2 rows. DECREASE TIP (applies to decreases for V-neck and armholes): All decreases are done from the right side! DECREASE 2 STITCHES AT THE BEGINNING OF ROW AS FOLLOWS: Work 1 edge stitch in garter stitch, knit 1, work A.1 over the next 3 stitches. DECREASE 2 STITCHES AT THE END OF ROW AS FOLLOWS: Work until 5 stitches remain on row, A.1 over the next 3 stitches, knit 1 and 1 edge stitch in garter stitch. DECREASE 1 STITCH AT THE BEGINNING OF ROW AS FOLLOWS: Work 1 edge stitch in garter stitch, knit 1, work A.2 over the next 3 stitches. DECREASE 1 STITCH AT THE END OF ROW AS FOLLOWS: Work until 5 stitches remain on row, A.3 over the next 3 stitches, knit 1 and 1 edge stitch in garter stitch. INCREASE TIP (applies to sleeves): Knit 1 past marker thread, make 1 yarn over, knit until 1 stitch remain before marker thread, make 1 yarn over. On next row knit yarn overs twisted. BUTTONHOLES: Work buttonhole, begin from right side, as follows: Work the first 8 stitches as before, turn and work over the 8 stitches as before, work 3 rows in total over the 8 stitches (work last row from right side). Cut the yarn. Work 4 rows in total as before over the remaining 8 band stitches (work first row from right side) and work last stitch from right side together with next stitch along edge of jacket as before. On last row from wrong side work as before over all band stitches and continue as before over all band stitches. Work buttonholes when band measures: XS: 6, 13, 21, 29 and 37 cm. S: 6, 13, 21, 29 and 37 cm. M: 6, 13, 21, 29 and 37 cm. L: 6, 14, 22, 30 and 38 cm. XL: 6, 15, 23, 31 and 39 cm. XXL: 6, 15, 24, 32 and 40 cm. ---------------------------------------------------------- START THE PIECE HERE: ---------------------------------------------------------- JACKET - SHORT OVERVIEW OF THE PIECE: Work piece back and forth on circular needle, from the bottom up to armholes. Then divide the piece, and work back piece and front piece back and forth on circular needle separately. Work sleeves in the round on double pointed needles/short circular needle up to where sleeve cap begins, then work back and forth on circular needle. Pick up stitches along front pieces, and work a double knitted band. BODY: Cast on 192-208-224-240-264-280 stitches on circular needle size 4 mm with 1 strand DROPS Soft Tweed and 1 strand DROPS Kid-Silk. Purl 1 row from wrong side. On next row (from right side ) work rib as follows: 1 edge stitch in GARTER STITCH - read explanation above, * purl 2, knit 2 *, work from *-* until 3 stitches remain, purl 2, 1 edge stitch in garter stitch. When rib measures 4 cm, knit 1 row (from right side) while decreasing 30-34-38-38-46-46 stitches evenly = 162-174-186-202-218-234 stitches. Switch to circular needle size 5 mm. Insert 1 marker thread after 41-44-47-51-55-59 stitches in from each side. Move the markers threads upwards when working, they mark the sides of body and should be used when decreasing for armholes. Work in stocking stitch with 1 edge stitch in garter stitch in each side. REMEMBER THE KNITTING TENSION! OVERVIEW OF NEXT SECTION: When piece measures 38-38-38-39-40-41 cm, begin decreases for V-neck. AT THE SAME TIME as decreasing for V-neck, cast off stitches for armholes, and then finish each part separately as explained below. Read V-NECK and ARMHOLES before continuing. V-NECK: When piece measures 38-38-38-39-40-41 cm, decrease for V-neck in each side on next row from right side - read DECREASE TIP. Decrease 2 stitches in each side on every 4th row 4 times in total in all sizes. Then decrease 1 stitch in each side every 4th row 3-3-4-4-5-5 times in total. ARMHOLES: AT THE SAME TIME when piece measures 43-44-45-46-47-48 cm and next row is from right side, cast off for armholes as follows: Work as before until 2-3-4-4-4-5 stitches remain before first marker thread in the side, cast off 4-6-8-8-8-10 stitches for armhole, work as before until 2-3-4-4-4-5 stitches remain before the other marker thread, cast off 4-6-8-8-8-10 stitches for armholes, work as before the rest of row. Finish front pieces and back piece separately. LEFT FRONT PIECE (when garment is worn): Begin from wrong side, work in stocking stitch with 1 edge stitch in garter stitch in each side and continue decrease for V-neck. In addition, decrease for armhole as follows: ARMHOLE: At the beginning of next row from right side decrease 1-1-1-2-2-2 stitches, then decrease 1 stitch on every 4th row 0-0-0-1-3-3 times in total – remember DECREASE TIP. After all decreases for V-neck and armhole, 27-29-30-32-33-36 stitches remain on shoulder. Work in stocking stitch with 1 edge stitch in garter stitch in each side of piece. Cast off when piece measures 62-64-66-68-70-72 cm. RIGHT FRONT PIECE: Begin from wrong side, work in stocking stitch with 1 edge stitch in garter stitch in each side and continue decrease for V-neck. In addition, decrease for armhole as follows: ARMHOLE: At the end of next row from right side decrease 1-1-1-2-2-2 stitches, then decrease 1 stitch on every 4th row 0-0-0-1-3-3 times in total – remember DECREASE TIP. After all decreases for V-neck and armhole, 27-29-30-32-33-36 stitches remain on shoulder. Work in stocking stitch with 1 edge stitch in garter stitch in each side of piece. Cast off when piece measures 62-64-66-68-70-72 cm. BACK PIECE: = 76-80-84-92-100-106 stitches. Begin from wrong side and work in stocking stitch with 1 edge stitch in garter stitch in each side. In addition, decrease for armhole as follows: On next row from right side decrease 1-1-1-2-2-2 stitches in each side of piece, then decrease 1 stitch in each side on every 4th row 0-0-0-1-3-3 times in total – remember DECREASE TIP = 74-78-82-86-90-96 stitches. When piece measures 59-61-63-65-67-69 cm, cast off the middle 18-18-20-20-22-22 stitches for neck (28-30-31-33-34-37 stitches remain on each shoulder). Finish each shoulder separately. On next row from neck cast off 1 stitch for neck = 27-29-30-32-33-36 stitches. Cast off when piece measures 62-64-66-68-70-72 cm. Work the other shoulder the same way. SLEEVES: Cast on 44-44-48-48-52-52 stitches on double pointed needles size 4 mm with 1 strand of each quality. Knit 1 round. Then work rib in the round (knit 2/purl 2) for 5 cm. Knit 1 round while decreasing 6-4-6-4-6-6 stitches evenly = 38-40-42-44-46-46 stitches. Insert a marker thread at beginning of round (mid under sleeve). Move the marker thread upwards when working - marker thread should be used for increase mid under sleeve. Switch to double pointed needles size 5 mm, and work in stocking stitch. When sleeve measures 10-10-10-10-10-8 cm, increase 1 stitch on each side of marker thread - read INCREASE TIP. Increase like this every 3½-3-3-2½-2-2 cm 11-12-13-13-14-15 times in total = 60-64-68-70-74-76 stitches. When sleeve measures 46-46-46-43-42-42 cm, work next round as follows: Begin 2-3-4-4-4-5 stitches before marker thread, cast off 4-6-8-8-8-10 stitches, work in stocking stitch the entire round = 56-58-60-62-66-66 stitches. Then work a sleeve cap as follows: Begin from wrong side and work in stocking stitch back and forth and cast off at the beginning of every row in each side as follows: Cast off 9-9-10-5-4-4 stitches at the beginning of every row 2-2-2-5-6-6 times in total = 20-22-20-12-18-18 stitches. Cast off. Work the other sleeve the same way. ASSEMBLY: Sew shoulder seams inside cast-off edge. Sew in sleeves inside 1 edge stitch along armholes. RIGHT BAND: Work band bottom up towards the neck. Pick up stitches along right front piece, skip 1½ to 2 meters in on thread and use yarn end to pick up stitches with (that way you can continue to work with the ball without cutting the yarn afterwards) as follows: Begin pick up at the bottom of front piece and pick up 1 stitch in every knitted row along the entire front piece inside 1 edge stitch, use circular needle size 4.5 mm and 1 strand of each quality. Now continue piece at the end of row where ball is = at the bottom of front piece. Cast on 16 stitches for band as an extension of the stitches pick up at the bottom of front piece (cast on stitches from wrong side). Work band over the 16 stitches at the same time as band is knitted together with stitches picked up along the front piece as follows: ROW 1 (= right side): Slip first stitch on to right needle purlwise with strand in front of piece, * knit 1, slip 1 stitch on to right needle purlwise with strand in front of piece *, work from *-* until 1 stitch remains of the 16 band stitches, slip last stitch on to right needle knitwise, with strand behind piece, knit next stitch, pass slipped stitch over stitch worked, turn. ROW 2 (= wrong side): * Slip first/next stitch on to right needle purlwise with strand in front of piece, knit 1 *, work from *-* over all the 16 band stitches, turn. Repeat rows 1 and 2. NB! If the band becomes too long for the front piece, the band stitches can be worked together with 1 extra stitch from the front piece. Then work every 10th row as follows from the right side: Work until 1 stitch remains of the 16 band stitches, slip the last stitch onto the right needle as if to knit, with the yarn behind the work, knit the next 2 stitches together, pass the slipped stitch over the stitches knitted together, turn. Work BUTTONHOLES - read explanation above. When all stitches from front piece have been worked together with band, work neck edge at the back. BACK NECK EDGE: Now work over the 16 band stitches as follows: ROW 1: * Slip first/next stitch on to right needle purlwise, with strand in front of piece, knit 1 *, work from *-* over the 16 stitches. Repeat row 1 both from right side and wrong side for 8-8-9-9-10-10 cm. On last row from right side knit all stitches together 2 by 2 and then cast off. LEFT BAND: Work band bottom up. Pick up stitches at the top by shoulder on front piece, pick up 1 stitch in every knitted row down along the entire front piece inside 1 edge stitch, use circular needle size 4.5 mm and 1 strand of each quality. After the pick up cast on 16 stitches for band (= at the bottom of front piece). Work band over the 16 stitches at the same time as band is knitted together with stitches picked up along the front piece as follows: ROW 1 (= wrong side): Knit 1, * slip 1 stitch on to right needle purlwise with strand in front of piece, knit 1 *, work from *-* until 1 stitch remains of the 16 band stitches, slip the next 2 stitches on to right needle purlwise with strand in front of piece, turn. ROW 2 (= right side): Knit 2 together, *, slip 1 stitch on to right needle purlwise with strand in front of piece, knit 1 *, work from *-* until 1 stitch remains, slip last stitch on to right needle purlwise with strand in front of piece, turn. Repeat rows 1 and 2. NB! If the band becomes too long for the front piece, the band stitches can be worked together with 1 extra stitch from the front piece on every 9th and 10th row as follows: slip 3 stitches onto the right needle at the end of the row from the wrong side and knit 3 together from the right side. When all stitches from front piece have been worked together with band work neck edge at the back. BACK NECK EDGE: Now work over the 16 band stitches as follows: ROW 1: * Knit 1, slip next stitch on to right needle purlwise with strand in front of piece *, work from *-* over the 16 stitches. Repeat row 1 both from right side and wrong side for 8-8-9-9-10-10 cm. On last row from right side work all stitches together as follows: Slip 1 stitch on to right needle knitwise, knit 1, pass slipped stitch over stitch worked. Then cast off the stitches. ASSEMBLY: Sew the band together mid back and sew it to the neck edge on back piece. Sew the buttons on to the left band. |
|||||||||||||
Diagram explanations |
|||||||||||||
|
|||||||||||||
 |
|||||||||||||
 |
|||||||||||||
 |
|||||||||||||
Have you finished this pattern?Tag your pictures with #dropspattern #tweedcasualcardigan or submit them to the #dropsfan gallery. Do you need help with this pattern?You'll find 29 tutorial videos, a Comments/Questions area and more by visiting the pattern on garnstudio.com. © 1982-2026 DROPS Design A/S. We reserve all rights. This document, including all its sub-sections, has copyrights. Read more about what you can do with our patterns at the bottom of each pattern on our site. |
|||||||||||||


With over 40 years in knitting and crochet design, DROPS Design offers one of the most extensive collections of free patterns on the internet - translated to 17 languages. As of today we count 324 catalogues and 12290 patterns translated into English (UK/cm).
We work hard to bring you the best knitting and crochet have to offer, inspiration and advice as well as great quality yarns at incredible prices! Would you like to use our patterns for other than personal use? You can read what you are allowed to do in the Copyright text at the bottom of all our patterns. Happy crafting!
Post a comment to pattern DROPS 237-38
We would love to hear what you have to say about this pattern!
If you want to leave a question, please make sure you select the correct category in the form below, to speed up the answering process. Required fields are marked *.