DROPS Children 49 · Lots of new kid designs!
Product image DROPS Alpaca yarn
DROPS Alpaca
100% Alpaca
from 3.40 £ /50g
Get the yarn to make this pattern from 40.80£.

The yarn cost is calculated from the pattern’s smallest size and the yarn’s cheapest product type. Looking for an even better price? You might find it on the DROPS Deals!

DROPS AW2425

Lucky Wish

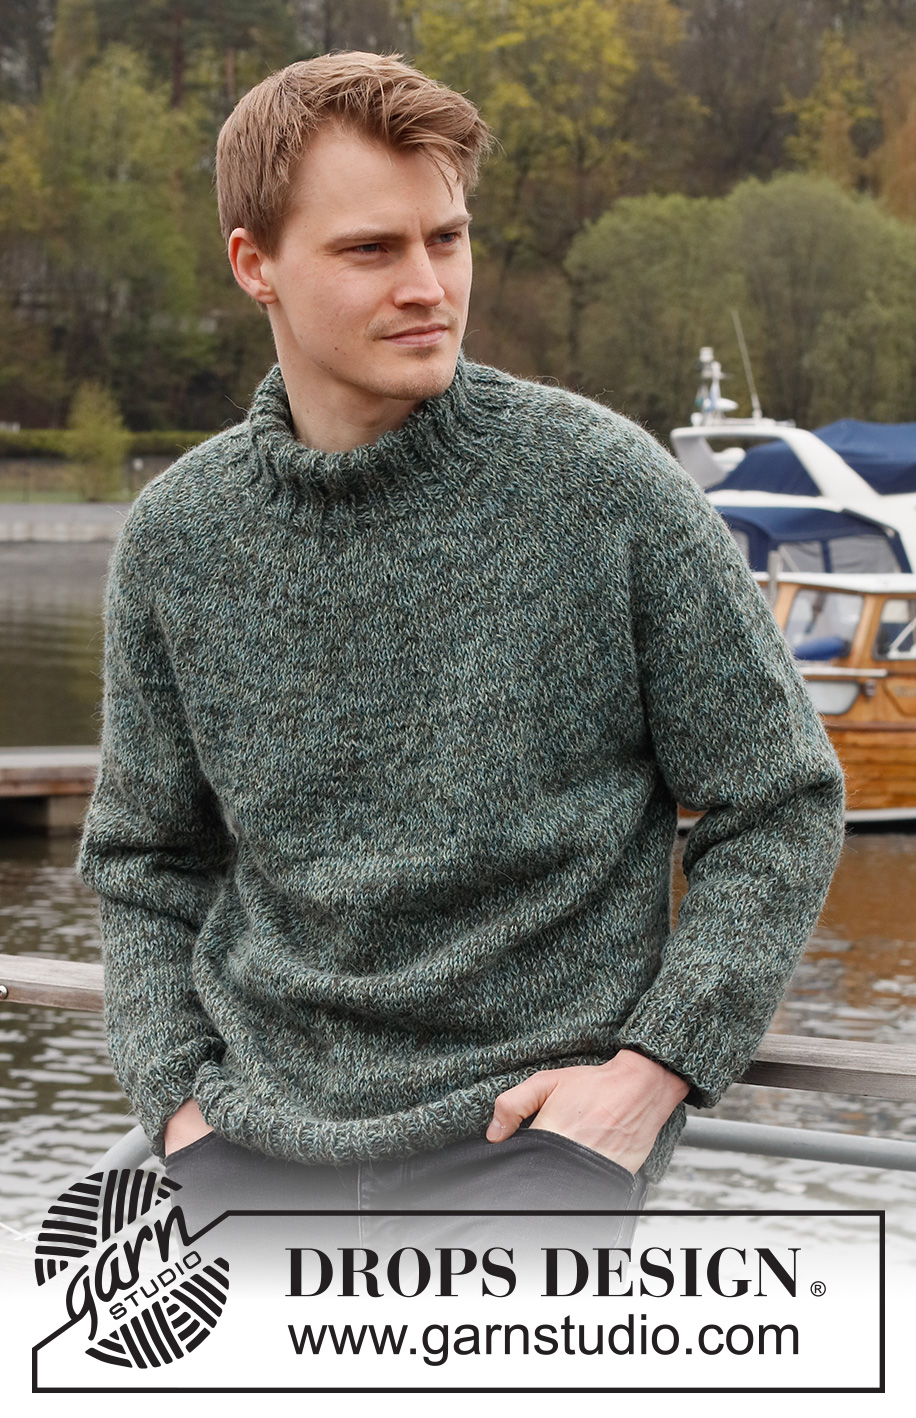
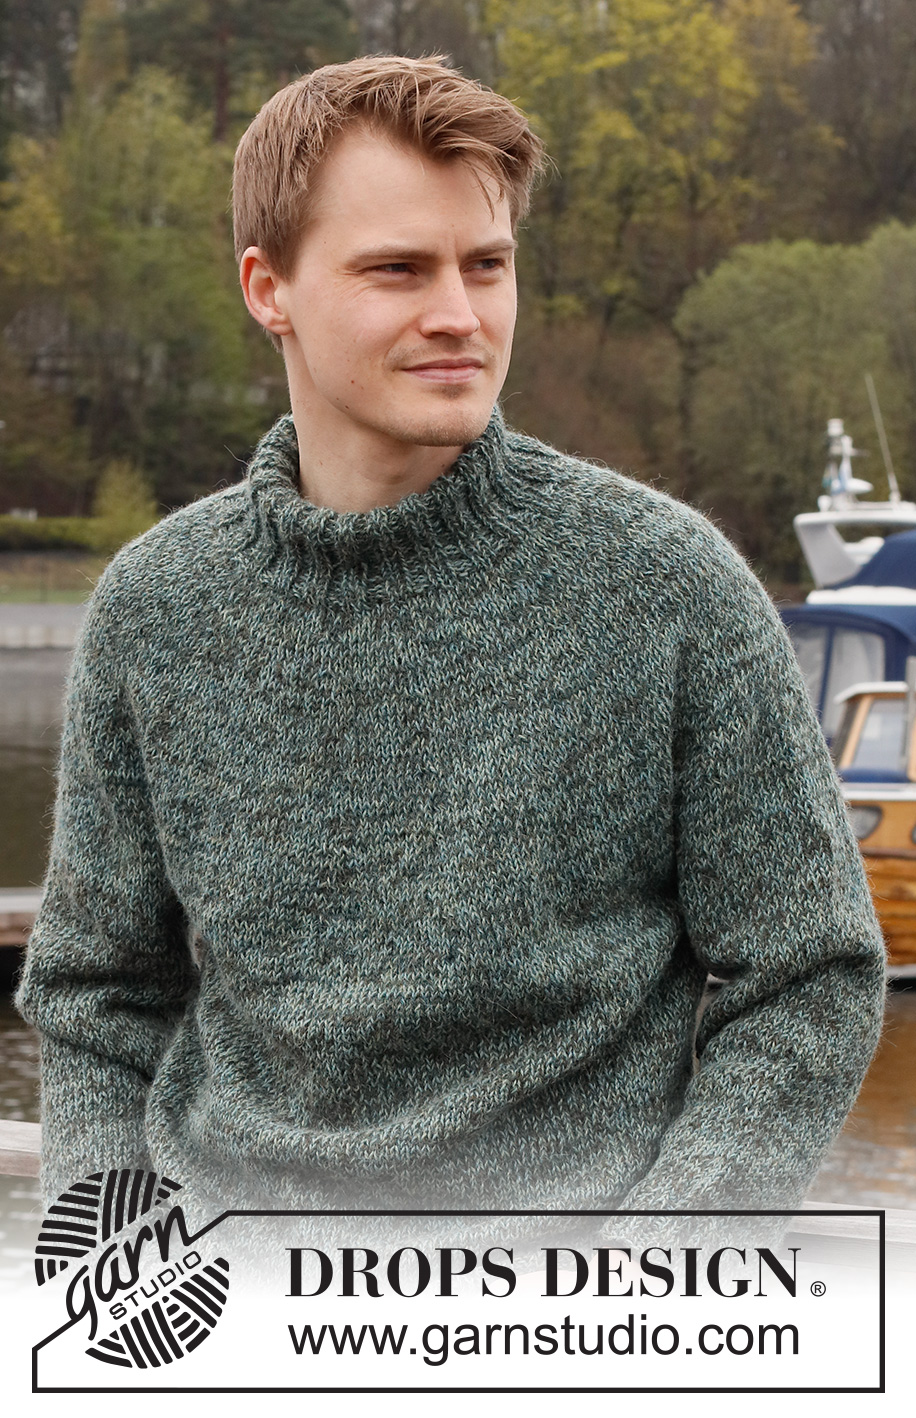
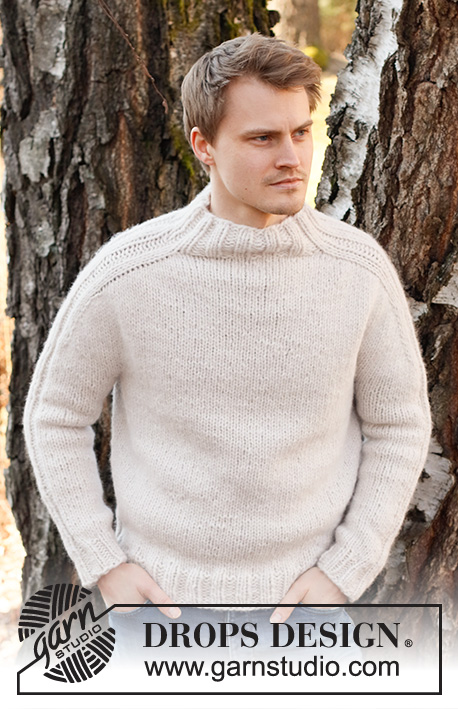
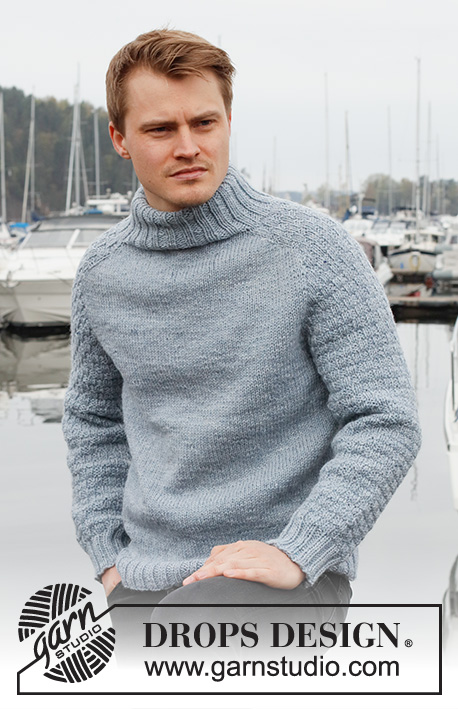
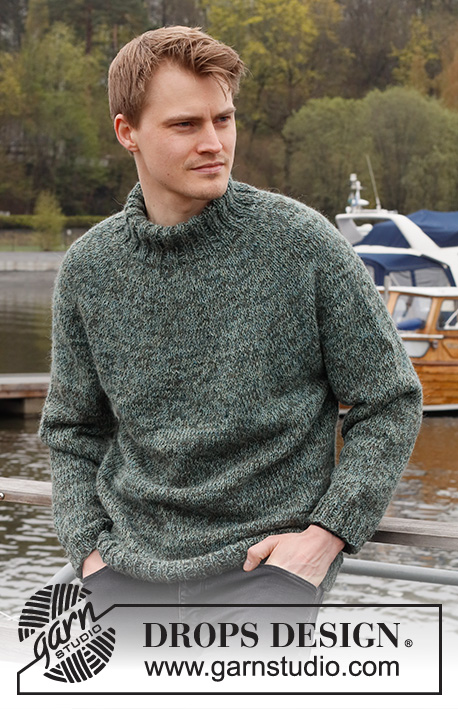
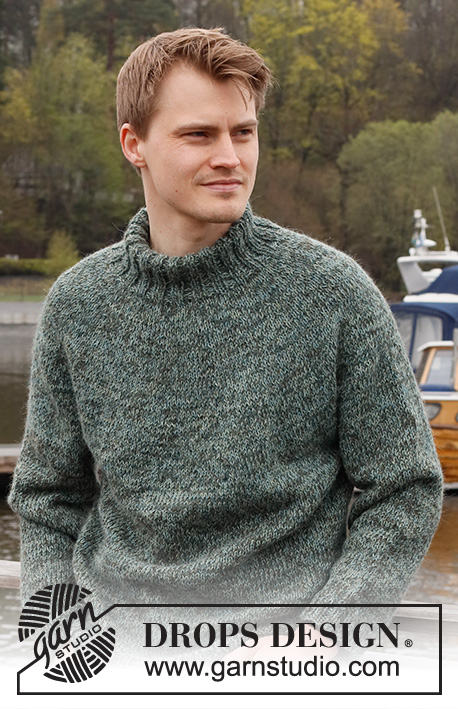
Knitted jumper for men in 2 strands DROPS Alpaca. The piece is worked top down with double neck and round yoke. Sizes S - XXXL.

Highlight Size:
DROPS 224-21

#luckywishsweater

DROPS Design: Pattern no z-953
Yarn group A + A or C
-------------------------------------------------------

SIZES:
S - M - L - XL - XXL - XXXL

MATERIALS:
DROPS Alpaca from Garnstudio (belongs to yarn group A)
300-300-350-400-400-450 g colour 7815, forest mix
300-300-350-400-400-450 g colour 7323, sea fog

NEEDLES:
DROPS CIRCULAR NEEDLE SIZE 5 MM: Length 40 cm and 80 cm.
DROPS CIRCULAR NEEDLE SIZE 4 MM: Length 40 cm and 80 cm.
DROPS DOUBLE POINTED NEEDLES SIZE 5 MM.
DROPS DOUBLE POINTED NEEDLES SIZE 4 MM.
The technique MAGIC LOOP can be used – you then only need circular needle of 80 cm in each size.

KNITTING TENSION:
17 stitches in width and 22 rows in height with stocking stitch and 2 strands = 10 x 10 cm.
NOTE: Needle size is only a guide. If you get too many stitches on 10 cm, change to a larger needle size. If you get too few stitches on 10 cm, change to a smaller needle size.

-------------------------------------------------------

Alternative Yarn – See how to change yarns here
Yarn Groups A to F – Use the same pattern and change the yarn here
Yarn usage using an alternative yarn – Use our yarn converter here

-------------------------------------------------------

You might also like...

Product image DROPS Alpaca
DROPS Alpaca
100% Alpaca
from 3.40 £ /50g
Get the yarn to make this pattern from 40.80£.

The yarn cost is calculated from the pattern’s smallest size and the yarn’s cheapest product type. Looking for an even better price? You might find it on the DROPS Deals!

Pattern instructions

NOTE: This pattern is written in British English. All measurements in charts are in cm. Convert from cm to inches here. There are different terms for crocheting in British and American English. If this pattern includes crochet, convert "crochet terms" here. See this pattern in American English here..
-------------------------------------------------------

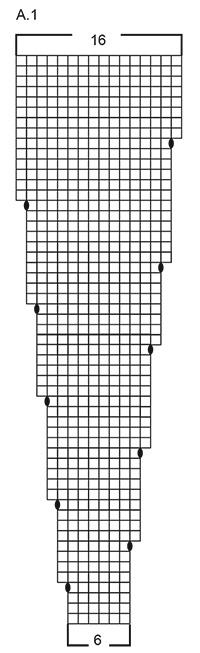
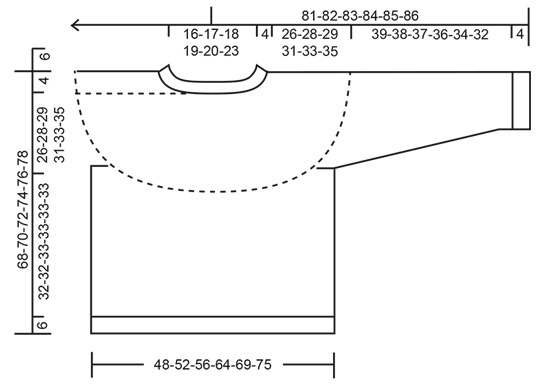
EXPLANATIONS FOR THE PATTERN:

-------------------------------------------------------

INCREASE TIP (evenly spaced):
To work out how to increase evenly, count the total number of stitches on the needle (e.g. 80 stitches) and divide by the number of increases to be made (e.g. 16) = 5. 
In this example, increase by making 1 yarn over after each 5th stitch. On the next round knit the yarn overs twisted to avoid holes.

PATTERN:
See diagram A.1. The whole pattern is worked in stocking stitch.

DECREASE TIP (for sleeves): 
Decrease 1 stitch on either side of the marker thread as follows: Work until there are 3 stitches left before the marker thread, knit 2 together, knit 2 (marker thread sits between these 2 stitches), slip 1 stitch as if to knit, knit 1 and pass the slipped stitch over the knitted stitch (2 stitches decreased).

CASTING-OFF TIP:
To avoid the cast-off edge being tight you can cast off with a larger size needle. If the edge is still tight, make 1 yarn over after approx. each 4th stitch at the same time as casting off; the yarn overs are cast off as normal stitches.

-------------------------------------------------------

START THE PIECE HERE:

-------------------------------------------------------

JUMPER – SHORT OVERVIEW OF THE PIECE:
The neck and yoke are worked in the round with circular needle, from mid back and top down. The yoke is divided for body and sleeves and the body is continued in the round with circular needle. The sleeves are worked with double pointed needles, top down.

DOUBLE NECK:
Cast on 100-105-110-115-120-130 stitches with short circular needle size 4 mm and 1 strand of each colour DROPS Alpaca (= 2 strands). Knit 1 round. Work rib (knit 2, purl 3) for 4 cm. Now decrease 1 stitch in all the purled sections by purling 2 together = 80-84-88-92-96-104 stitches. Continue the new rib until the neck measures 12 cm. Change to circular needle size 5 mm.

YOKE:
Insert 1 marker at the beginning of the round mid-back; the yoke is measured from this marker! Knit 1 round where you increase 16-18-26-28-30-34 stitches evenly spaced – read INCREASE TIP = 96-102-114-120-126-138 stitches.
Work A.1 over all stitches (= 16-17-19-20-21-23 repeats of 6 stitches). REMEMBER THE KNITTING TENSION! When A.1 has been completed in height there are 256-272-304-320-336-368 stitches on the round. Knit 1 round where you increase 0-0-0-4-8-0 stitches evenly spaced = 256-272-304-324-344-368 stitches. Continue working until the yoke measures 26-28-29-31-33-35 cm from the marker.

The yoke is now divided for the body and sleeves as follows:
Knit 38-40-44-49-53-58 (= half back piece), place the next 52-56-64-64-66-68 stitches on 1 thread for the sleeve, cast on 6-8-8-10-12-12 stitches (= in side under sleeve), knit 76-80-88-98-106-116 (= front piece), place the next 52-56-64-64-66-68 stitches on 1 thread for the sleeve, cast on 6-8-8-10-12-12 stitches (= in side under sleeve), knit 38-40-44-49-53-58 (= half back piece). The body and sleeves are finished separately. THE PIECE IS NOW MEASURED FROM HERE!

BODY:
There are now 164-176-192-216-236-256 stitches on the round. Continue with stocking stitch in the round for 32-32-33-33-33-33 cm (or to desired length; there is approx. 6 cm left). Change to circular needle size 4 mm and work rib (knit 2, purl 2) for 6 cm. Loosely cast off with knit over knit and purl over purl – read CASTING-OFF TIP. The jumper measures approx. 68-70-72-74-76-78 cm from the shoulder down.

SLEEVES:
Place the 52-56-64-64-66-68 stitches from the thread on the one side of the piece on double pointed needles/short circular needle size 5 mm and knit up 1 stitch in each of the 6-8-8-10-12-12 stitches cast on under the sleeve = 58-64-72-74-78-80 stitches. Insert a marker thread in the middle of the 6-8-8-10-12-12 stitches under the sleeve. Allow the thread to follow your work onwards; it will be used when decreasing under the sleeve.
Start at the marker thread and work stocking stitch in the round for 3 cm. Now decrease 2 stitches under the sleeve – read DECREASE TIP. Decrease like this every 6-4-3-2½-2½-2½ cm a total of 6-8-11-11-12-12 times = 46-48-50-52-54-56 stitches. Continue without further decreases until the sleeve measures 39-38-37-36-34-32 cm from the division (there is approx. 4 cm left; try the jumper on and work to desired length). Shorter measurements in larger sizes due to wider neck and longer yoke.
Knit 1 round where you increase 2-4-2-4-2-4 stitches evenly spaced = 48-52-52-56-56-60 stitches. Change to double pointed needles size 4 mm and work rib (knit 2, purl 2) for 4 cm. Cast off with knit over knit and purl over purl – remember CASTING-OFF TIP!
The sleeve measures approx. 43-42-41-40-38-36 cm. Work the other sleeve in the same way.

ASSEMBLY:
Fold the neck double to the inside and sew down. To avoid the neck being tight and rolling outwards, it is important that the seam is elastic.

This pattern has been corrected.

Updated online: 09.09.2022
SLEEVES:... Insert a marker thread in the middle of the 6-8-8-10-12-12 stitches under the sleeve. ... Continue without further decreases until the sleeve measures 39-38-37-36-34-32 cm from the division

Diagram

stocking stitch = stocking stitch
between 2 stitches make 1 yarn over; on the next round knit the yarn over twisted to avoid a hole = between 2 stitches make 1 yarn over; on the next round knit the yarn over twisted to avoid a hole
Diagram for DROPS 224-21
Do you have a question? See a list of frequently asked questions (FAQ)

Knitting tension is what determines the final measurements of your work, and is usually measured per 10 x 10 cm. It is provided like so: number of stitches in width x number of rows in height - eg: 19 stitches x 26 rows = 10 x 10 cm.

The knitting tension is very individual; some people knit/crochet loosely while others work tightly. You adjust the knitting tension with the needle size, which is why the suggested needle size is only meant as a guide! You need to adjust this (up or down) to ensure that YOUR knitting tension matches the knitting tension provided in the pattern. If you work with a different knitting tension than provided you will have a different yarn consumption, and your work will have different measurements than what the pattern suggests.

The knitting tension also determines which yarns can replace each other. As long as you achieve the same knitting tension you can replace one yarn with another.

See DROPS lesson: How to measure your tension/gauge

See DROPS video: How to make a gauge tension swatch

The required amount of yarn is provided in grams, eg: 450 g. To calculate how many balls you’ll need you first need to know how many grams are in 1 ball (25g, 50g or 100g). This information is available if you click on the individual yarn quality on our pages. Divide the amount required with the amount of each ball. For example, if each ball is 50g (the most common amount), the calculation will be as follows: 450 / 50 = 9 balls.

The important thing when changing from one yarn to another is that the knitting/crochet tension remains the same. This is so that the measurements of the finished piece will be the same as on the sketch provided. It is easier to achieve the same knitting tension using yarns from the same yarn group. It is also possible to work with multiple strands of a thinner yarn to achieve the knitting tension of a thicker one. Please try our yarn converter. We recommend you to always work a test swatch.

Please NOTE: when changing yarn the garment might have a different look and feel to the garment in the photo, due to individual properties and qualities of each yarn.

See DROPS lesson: Can I use a different yarn than the one mentioned in the pattern?

All our yarns are categorised into yarn groups (from A to F) according to thickness and knitting tension – group A contains the thinnest yarns and group F the thickest. This makes it easier for you to find alternative yarns to our patterns, should you wish to switch yarn. All yarns within the same group have a similar knitting tension and can easily replace each other. However, different yarn qualities have different structures and properties which will give the finished work a unique look and feel.

Click here for an overview of the yarns in each yarn group

At the top of all our patterns you’ll find a link to our yarn calculator, which is a helpful tool should you wish to use a different yarn than suggested. By filling in the yarn quality you wish to replace, the amount (in your size) and number of strands, the calculator will present good alternative yarns with the same knitting tension. Additionally it will tell you how much you’ll require in the new qualities and whether you’ll need to work with multiple strands. Most skeins are 50g (some are 25g or 100g).

If the pattern is worked with multiple colours, every colour will have to be calculated separately. Similarly, if the pattern is worked with several strands of different yarns (for example 1 strand Alpaca and 1 strand Kid-Silk) you will have to find alternatives for each, individually.

Click here to see our yarn calculator

Since different yarns have different qualities and textures we have chosen to keep the original yarn in our patterns. However, you can easily find options among our available qualities by using our yarn calculator, or simply pick a yarn from the same yarn group.

It is possible that some retailers still have discontinued yarns in stock, or that someone has a few skeins at home that they would like to find patterns for.

The yarn calculator will provide both alternative yarn as well as required amount in the new quality.

If you think it's hard to decide what size to make, it can be a good idea to measure a garment you own already and like the size of. Then you can pick the size by comparing those measures with the ones available in the pattern's size chart.

You'll find the size chart at the bottom of the pattern.

See DROPS lesson: How to read size chart

The needle size provided in the pattern serves only as a guide, the important thing is to follow the knitting tension. And since knitting tension is very individual, you will have to adjust the needle size to ensure that YOUR tension is the same as in the pattern – maybe you’ll have to adjust 1, or even 2 needle sizes, up or down to achieve the correct tension. For this, we recommend that you work test swatches.

Should you work with a different knitting tension than the one provided, the measurements of the finished garment might deviate from the measurement sketch.

See DROPS lesson: How to measure your tension/gauge

See DROPS video: How to make a tension/gauge swatch

Working a garment top-down provides more flexibility and room for personal adjustment. For example it is easier to try the garment on while working, as well as making adjustments to length of yoke and shoulder caps.

The instructions are carefully explaining every step, in the correct order. Diagrams are adjusted to the knitting direction and are worked as usual.

The diagram depicts all rows/rounds, and every stitch seen from the right side. It is read from bottom to top, from right to left. 1 square = 1 stitch.

When working back and forth, every other row is worked from the right side and every other row is worked from the wrong side. When working from the wrong side, the diagram will have to be worked reversed: from left to right, knit stitches are purled, purl stitches are knit etc.

When working in the round every round is worked from the right side and the diagram are worked from right to left on all rounds.

See DROPS lesson: How to read knitting diagrams

The diagram depicts all rows/rounds, and every stitch seen from the right side. It is worked from bottom to top, from right to left.

When working back and forth every other row is worked from the right side: from right to left and every other row is worked from the wrong side: from left to right.

When working in the round, every row in the diagram are worked from the right side, from right to left.

When working a circular diagram you start in the middle and work your way outwards, counter clockwise, row by row.

The rows usually start with a given number of chain stitches (equivalent to the height of the following stitch), this will either be depicted in the diagram or explained in the pattern.

See DROPS lesson: How to read crochet diagrams

Instructions for working several diagrams after each other on the same row/round, will often be written like so: “work A.1, A.2, A.3 a total of 0-0-2-3-4 times". This means you work A.1 once, then A.2 is worked once, and A.3 is repeated (in width) the number of times provided for your size – in this case like so: S = 0 times, M = 0 times, L=2 times, XL= 3 times and XXL = 4 times.

The diagrams are worked as usual: begin with the first row in A.1, then work the first row in A.2 etc.

See DROPS lesson: How to read knitting diagrams

See DROPS lesson: How to read crochet diagrams

The total width of the garment (from wrist-to-wrist) will be larger in the larger sizes, despite the actual sleeves being shorter. The larger sizes have longer sleeve caps and wider shoulders, so there will be a good fit in all sizes.

The measurement sketch/schematic drawing provides information regarding the full length of the garment. If it’s a jumper or a jacket the length is measured from the highest point on the shoulder closest to the neckline, and straight down to the bottom of the garment. It is NOT measured from the tip of shoulder. Similarly, the length of yoke is measured from the highest point on the shoulder and down to where yoke is split into body and sleeves.

On a jacket measures are never taken along bands, unless specifically stated. Always measure inside band stitches when measuring the length.

See DROPS lesson: How to read a schematic drawing

Diagrams are often repeated on the round or in height. 1 repeat is the diagram the way it appears in the pattern. If it says to work 5 repeats of A.1 in the round, then you work A.1 a total of 5 times after/next to each other in the round. If it says to work 2 repeats of A.1 vertically/in height you work the entire diagram once, then begin again at the start and work the entire diagram one more time.

Chain stitches are slightly narrower than other stitches and to avoid working the cast-on edge too tight, we simply chain more stitches to begin with. The stitch count will be adjusted on the following row to fit the pattern and measurement sketch.

The rib edge is more elastic and will contract slightly compared to, for example, stocking stitch. By increasing before the rib edge, you avoid a visible difference in width between the rib edge and the rest of the body.

It’s very easy to cast off too tightly, and by making yarn overs while casting off (and simultaneously casting these off) you avoid a too tight cast off edge.

See DROPS video: How to bind off with yarn overs (yo)

To achieve an even increase (or decrease) you can increase on, for example: every 3rd and 4th row alternately, like so: work 2 rows and increase on the 3rd row, work 3 rows and increase on the 4th. Repeat this until the increase is complete.

See DROPS lesson: Increase or decrease 1 st on every 3rd and 4th row alternately

Should you prefer to work in the round instead of back and forth, you may of course adjust the pattern. You’ll need to add steeks mid-front (usually 5 stitches), and follow the instructions. When you would normally turn and work from the wrong side, simply work across the steek and continue in the round. At the end you’ll cut the piece open, pick up stitches to work bands, and cover the cut edges.

See DROPS video: How to knit steeks and cut open

Should you prefer to work back and forth instead of in the round, you may of course adjust the pattern so you work the pieces separately and then assemble them at the end. Divide the stitches for the body in 2, add 1 edge stitch in each side (for sewing) and work the front and back pieces separately.

See DROPS lesson: Can I adapt a pattern for circular needles into straight needles?

Pattern repeats can vary slightly in the different sizes, in order to get the correct proportions. If you’re not working the exact same size as the garment in the photo, yours might deviate slightly. This has been carefully developed and adjusted so that the complete impression of the garment is the same in all sizes.

Make sure to follow instructions and diagrams for your size!

If you have found a pattern you like which is available in women’s size it’s not very difficult to convert it to men’s size. The biggest difference will be the length of sleeves and body. Start working on the women size that you think would fit across the chest. The additional length will be worked right before you cast off for the armhole/sleeve cap. If the pattern is worked top-down you can add the length right after the armhole or before the first decrease on sleeve.

Regarding additional yarn amount, this will depend on how much length you add, but it is better with a skein too many than too few.

All yarns will have excess fibres (from production) that might come off as lint or shedding. Brushed yarns (ie hairier yarns) have more of these loose, excess fibres, causing more shedding.

Shedding also depends on what is worn under or over the garment, and whether this pulls at the yarn fibres. It’s therefore not possible to guarantee that there will be no shedding

Below are some tips on how to get the best result when working with hairier yarns:

1. When the garment is finished (before you wash it) shake it vigorously so the looser hairs come off. NOTE: do NOT use a lint roller, brush or any method that pulls at the yarn.

2. Place the garment in a plastic bag and put it in your freezer - the temperature will cause the fibres to become less attached to each other, and excess fibres will come off easier.

3. Leave in the freezer for a few hours before taking it out and shaking it again.

4. Wash the garment according to the instructions on the yarn label.

Pilling is a natural process that happens to even the most exclusive of fibers. It's a natural sign of wear and tear that is hard to avoid, and that is most visible in high friction areas of your garment like a sweater's arms and cuffs.

You can make your garment look as new by removing the pilling, using a fabric comb or a pill/lint remover.

Still can't find the answer you need? Then scroll down and leave your question so one of our experts can try to help you. This will be done normally within 5 to 10 working days.
In the meantime, you can read the questions and answers that others have left to this pattern or join the DROPS Workshop on Facebook to get help from fellow knitters/crocheters!

Post a comment to pattern DROPS 224-21

We would love to hear what you have to say about this pattern!

If you want to leave a question, please make sure you select the correct category in the form below, to speed up the answering process. Required fields are marked *.

Comments / Questions (64)

country flag Chantel wrote:

Hello, so if I were to use drops merino, I would have to use 390g of the merino, being converted from 350g of drops alpaca. That doesn't seem like a lot of wool for a sweater. Am I misunderstanding?

06.12.2023 - 23:42

DROPS Design answered:

Dear Chantal, if you like to use one of our merino yarns, use Big Merino (yarn group C) to replace 2 strands yarn group A - use the yarn converter to get the new amount in Big Merino to replace these 2 strands Alpaca for the choose size. Happy knitting!

07.12.2023 - 08:40

country flag Maria Ramos wrote:

Bonjour Ci je veux faire le pull homme avec 1 seul fil d’une laine plus gros et aussi aiguilles 4 et 5, quelle sera la quantité de fil necessaire? L’ échantillon que vous indiquez sur le pattron de 17 mailles en largeur et 22 rangs en hauteur en Jersey et avec les 2 fils c’ est depuis bloquer le travaille? Merci

06.12.2023 - 18:44

DROPS Design answered:

Bonjour Mme Ramos, on tricote ici 2 fils Alpaca (groupe A) que vous pouvez remplacer par 1 fil du groupe C, utilisez notre convertisseur pour voir la nouvelle quantité nécessaire en fonction de la laine choisie. L'échantillon n'est pas bloqué, toutefois, si vous êtes susceptibles d'avoir une différence avant/après, il peut être alors utile de bloquer votre échantillon/ouvrage. Bon tricot!

07.12.2023 - 08:34

country flag Lieve wrote:

BEGINT DE EERSTE STEEK VAN HET TELPATROON (A1) ALTIJD OP DEZELFDE HOOGTE OF MOET GE TERUG GAAN?

03.12.2023 - 22:05

DROPS Design answered:

Dag Lieve,

Je leest het telpatroon van onder naar boven, dus de eerste naald van het telpatroon is de onderste rij van 6 steken. Deze steken herhaal je steeds in de breedte over de hele toer, totdat je weer aan het begin van de toer bent. Dan brei je de volgende rij ook weer helemaal rondom en zo ga je verder totdat je bovenaan bij A.1 bent.

06.12.2023 - 20:02

country flag Mila wrote:

Hey! Ik vroeg me af hoe we het telpatroon moeten lezen. Is 1 rij hokjes 1 volledige naald? Of moet je in een naald al de hokjes volgen tot het einde van je naald?

21.11.2023 - 09:56

DROPS Design answered:

Dag Mila,

Het telpatroon geeft alle naalden weer. Dus, inderdaad alle hokjes volgen. Het telpatroon wordt in de breedtet herhaald en je leest van onder naar boven. Op de eerste naald heb je dus een x aantal herhalingen (afhankelijk van je maat) van 6. Je volgt het patroon ook helemaal in de hoogte, waarbij elke rij dus staat aangegeven.

21.11.2023 - 22:50

country flag Lise Fauerby wrote:

Tak for svare. Er det nok med 10 garnnøgler af hver farve til en L og Xl herre = 20 ialt. hilsen Lise

13.11.2023 - 17:53

DROPS Design answered:

Hej Lise, ja det er samme garnforbrug som i opskriften, du har 167 m i både DROPS Alpaca og DROPS Baby Alpaca Silk :)

15.11.2023 - 07:35

country flag Lise Fauerby wrote:

Vedr. Lucky Wish by DROPS Design - herre sweatre hvor starter man ud fra diagram A1 - ?? ved 6 eller 16, og hvad betyder de sorte prikker ? og kan jeg bruge 2 tråde baby alpaca - til denne bluse str. L

08.11.2023 - 10:18

DROPS Design answered:

Hei Lise. Man leser et strikkediagram motsatt av slik man normalt leser: Fra høyre mot venstre, nedenfra og opp. Du begynner altså nederst i det høyre hjørnet, (6 masker) og jobber deg mot venstre og oppover. Se gjerne vår Lessjon om hvordan man leser et strikkediagram (scroll ned til under målskissen og videohjelp). Over diagrammet står diagramforklaringen. Den sorte prikken betyr at det skal gjøres et kast (økning) og på neste omgang strikkes kastet vridd rett, slik at det ikke blir hull. Ja, du kan bruke 2 tråder Baby Alpaca så lenge du får den strikkefastheten som er oppgitt i oppskriften. mvh DROPS Design

13.11.2023 - 11:40

country flag Renza wrote:

Purtroppo non sono capace di lavorare con i ferri circolari e pertanto mi chiedevo se potete fornirmi il modello da lavorare con i ferri in linea. Grazie infinite

31.10.2023 - 09:35

DROPS Design answered:

Buonasera Renza, questo modello è stato progettato per essere lavorato in tondo: in questa sede purtroppo non ci è possibile adattare i modelli alle singole esigenze. Sul nostro sito può trovare tantissimi modelli lavorati in piano oppure dei tutorial che la possono aiutare ad avvicinarsi alla lavorazione in tondo. Buon lavoro!

01.11.2023 - 14:48

country flag Mara wrote:

Buonasera. Volevo chiedere come posso fare questo modelo nella misura XS per mio nipote Oppure dove trovo con la misura XS per maschi????

16.10.2023 - 20:32

DROPS Design answered:

Buonasera Mara, questo modello parte dalla taglia S: provi a vedere lo schema delle misure in fondo alla pagina, per vedere se la misura più piccola può andar bene a suo nipote. Buon lavoro!

17.10.2023 - 00:03

country flag Kathy wrote:

Hi, to clarify my question I submitted a minute ago about starting the sleeves in Lucky Wish: The pattern says to knit up one stitch in each of the eight stitches cast on under the sleeve and to insert a marker thread in the middle of the eight stitches. Then the pattern says to start at the marker thread and work stocking stitches in the round. My question is: how can I start at the marker thread when the working yarn is at the end of the eight stitches under the sleeve? Thank you.

17.09.2023 - 19:55

DROPS Design answered:

Dear Kathy, see answer below.

17.09.2023 - 21:37

country flag Kathy wrote:

Hello, I am starting the sleeves of Lucky Wish. The pattern says to knit up the 8 cast on stitches and place the marker, then says to “Start at the marker thread and work stocking stitch …”. My question is: How can I start at the marker when the working yarn is at the end of the eight knit-up stitches? Thank you.

17.09.2023 - 19:41

DROPS Design answered:

Dear Kathy, you don't need to go back: continue working after the eight knit up stitches but end the round on the marker. You can see a video on this here: https://www.garnstudio.com/video.php?id=1634&lang=en. Happy knitting!

17.09.2023 - 21:37