
Popular categories
Looking for a yarn?


Comments / Questions (9)
![]() Isabel Marchand wrote:
Isabel Marchand wrote:
Bonjour. Pour faire le col, pourquoi est-ce qu'il y a plus de mailles au début du col qu'a la base du col? Je voulais utiliser la technique avec des mailles provisoires au début pour ensuite coudre ensemble les deux bords du col pour continuer le chandail a partir de la. Est-ce que cette technique va fonctionner?
02.11.2025 - 20:48DROPS Design answered:
Bonjour Mme Marchand, on commence le col avec des côtes 2 m end, 3 m env et, après 4 cm, on va diminuer pour continuer en côtes 2 m end, 2 m env, on obtient ainsi l'effet souhaité; vous pouvez probablement utiliser la technique du montage provisoire, lorsque vous assemblerez les mailles du montage en les tricotant à celles de l'aiguille, ajustez vos mailles à relever/tricoter ensemble pour que le tour tombe juste. Bon tricot!
03.11.2025 - 08:52
![]() Annick Dupal wrote:
Annick Dupal wrote:
Loved knitting this pattern! Good instructions, fun knit. Fast results.
25.05.2024 - 13:56
![]() Ursula Schwarz wrote:
Ursula Schwarz wrote:
Ich stricke das Modell in L als Jacke, ich habe nach Ärmelzunahme 236 M:1/2 VT je 36, Sattel je 46 , RT 72 . Versetzen Markierer jetzt so, dass Ärmel 44 M. Verstehe Zunahmeschema für Passe nicht und bitte um Erläuterung. Vielen Dank!
05.01.2023 - 22:17DROPS Design answered:
Liebe Frau Schwarz, es waren 20 Maschen für jede Schulter/Ärmel, dann nehmen Sie 1 Masche beidseitig 13 Mal zu = es sind 46 Maschen für jede Ärmel - die Markierungen setzen Sie jetzt in die 1. und in die letzte dieser 46 Maschen so haben Sie: 1 Masche mit Markierer, 44 Maschen (Ärmel), 1 Maschen mit Markierer (46 M). Viel Spaß beim stricken!
06.01.2023 - 08:59
![]() Uschi wrote:
Uschi wrote:
Die 4 Markierer der Ärmelzunahmen so versetzen, dass jeder dieser Markierer in der äußersten Masche an beiden Seiten des Ärmels sitzt Hallo, ich habe jetzt insgesamt 50 Ärmel Maschen. Ich soll also den markierer nach der 1. und vor der letzten Masche setzen? Vielen Dank im Voraus liebe Grüße
09.03.2022 - 12:04DROPS Design answered:
Lieber Uschi, stricken Sie die 4. Größe? dann haben Sie ja 50 Masche für jede Ärmel und so setzen Sie die Markierungen ein: 1 M mit Markierung (= die erste Masche der Ärmel), 48 Maschen, 1 M mit Markierung (= die letzte Masche der Ärmel). Viel Spaß beim stricken!
09.03.2022 - 18:40
![]() Uschi wrote:
Uschi wrote:
Ich habe meinen Denkfehler selbst erkannt 🙈 liebe Grüße
06.03.2022 - 18:37
![]() Uschi wrote:
Uschi wrote:
SATTELSCHULTER-ZUNAHMEN: Ich soll 16 Maschen zunehmen. Soll ich in JEDER Runde zunehmen oder nur in jeder 2. ? LG Uschi
06.03.2022 - 16:55DROPS Design answered:
Lieber Uschi, Sie sollen jeweils nur 4 Maschen zunehmen und diese Zunahmen in jeder Runde insgesamt 16 Mal stricken (= nach diesen 16 Runden haben Sie 2 Maschen je auf Vorder- und Rückenteil zugenommen, und so haben Sie 168-184 M auf der Nadel. Viel Spaß beim stricken!
07.03.2022 - 09:15
![]() Jana Ratnasabapathy wrote:
Jana Ratnasabapathy wrote:
Dear Sir I have noted that in your patterns for men the sizes given are: SIZES: S - M - L - XL - XXL – XXXL Could you please give these chest sizes in centimetres for each of the above? I would be very grateful to hear from you soon Kind regards Jana Ratnasabapathy
06.01.2022 - 07:10DROPS Design answered:
Dear Jana, You will find a measurements chart for all sizes at the bottom of the pattern. Kind regards, Drops Team
06.01.2022 - 07:48
![]() Bettina wrote:
Bettina wrote:
Halsudskæringen ser helt forfærdeligt dårligt tilpasset ud. Den laver en tydelig fold foran, fordi der ikke er lavet dyb nok udskæring. Det har jeg bemærket på flere af jeres herremodeller, desværre.
03.01.2022 - 00:38
![]() Maria wrote:
Maria wrote:
Come posso fare il collo più basso e più scavato davanti? Grazie.
12.10.2021 - 19:02DROPS Design answered:
Buonasera Maria, per un'assistenza così personalizzata può rivolgersi al suo rivenditore DROPS di fiducia. Buon lavoro!
13.10.2021 - 18:16
|
|||||||||||||||||||
Winter Winds#winterwindssweater |
|||||||||||||||||||
 |
 |
||||||||||||||||||
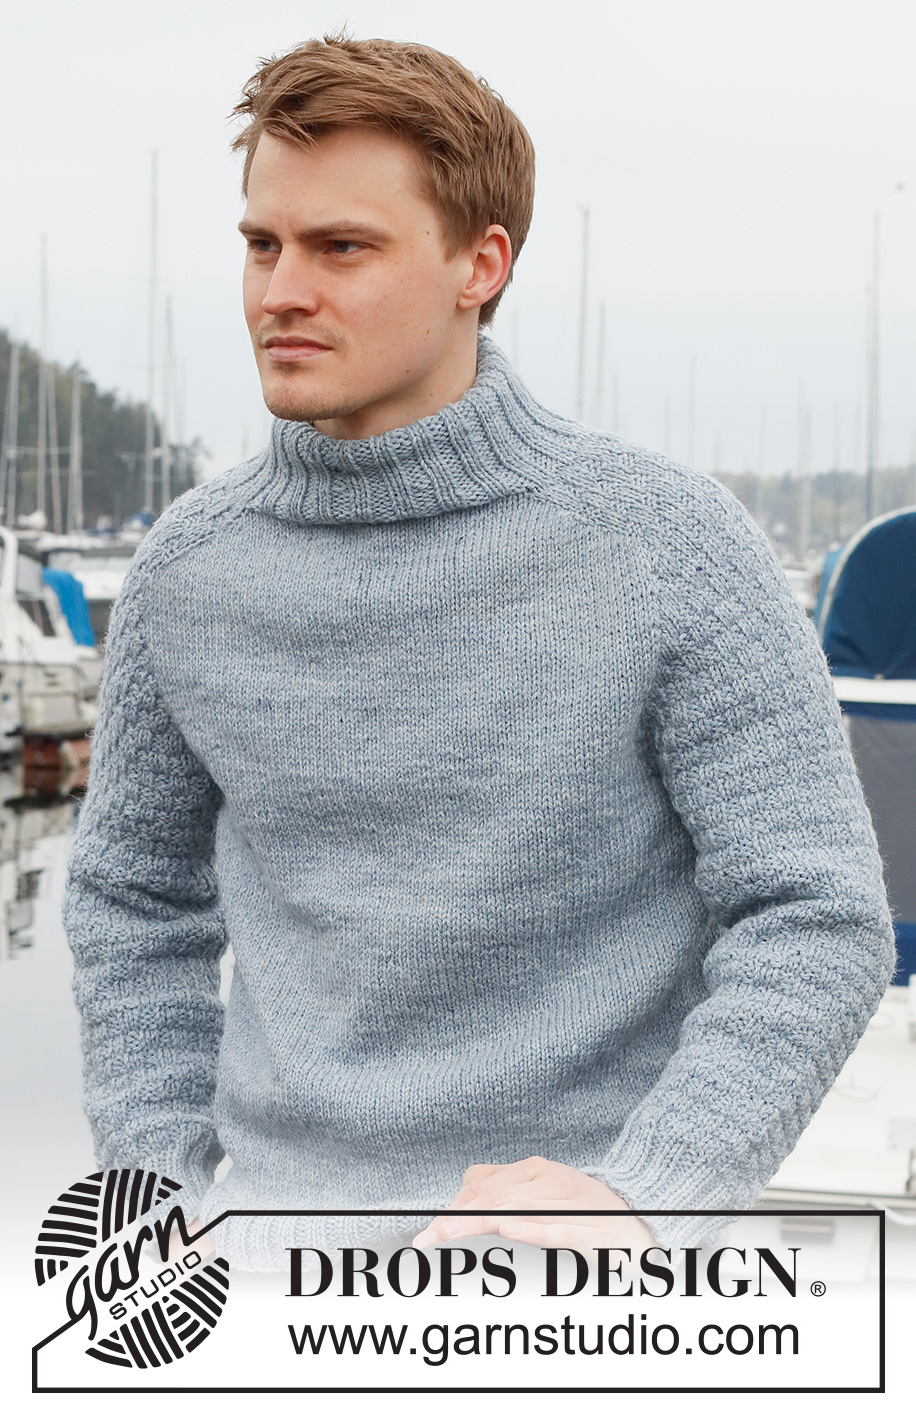
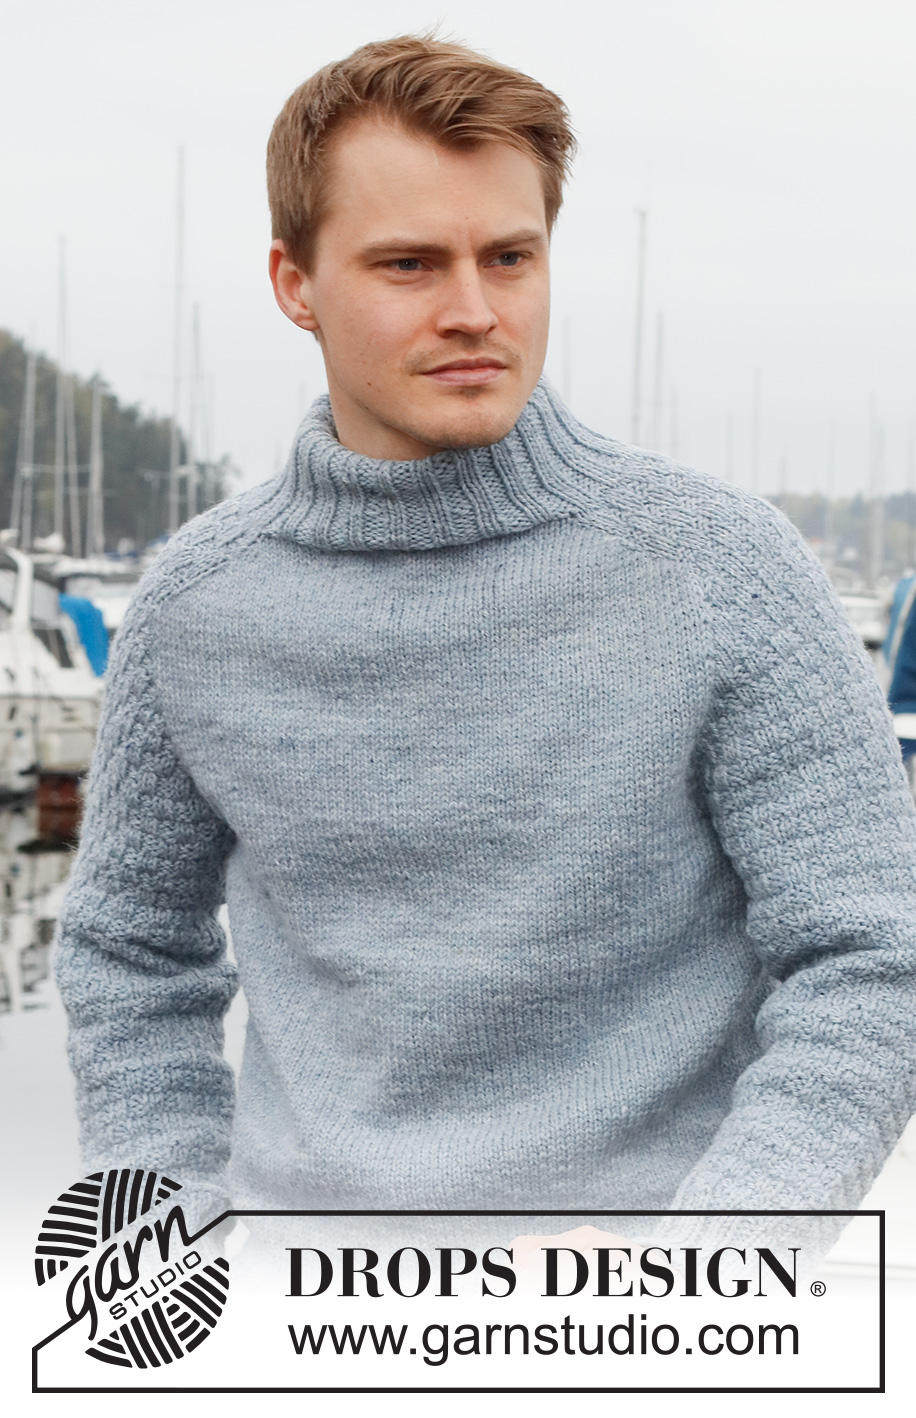
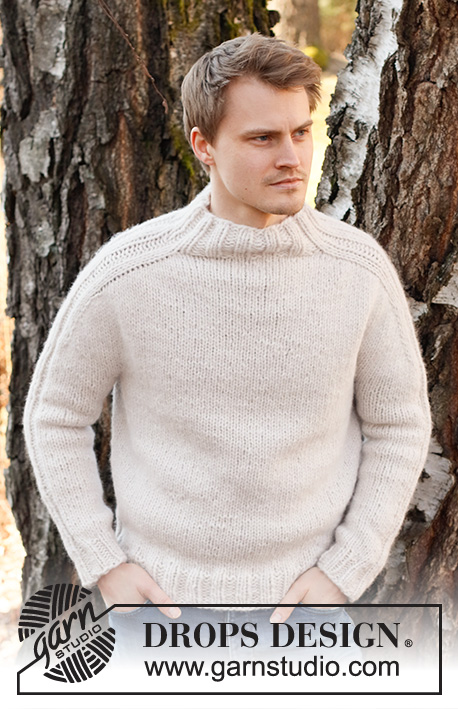
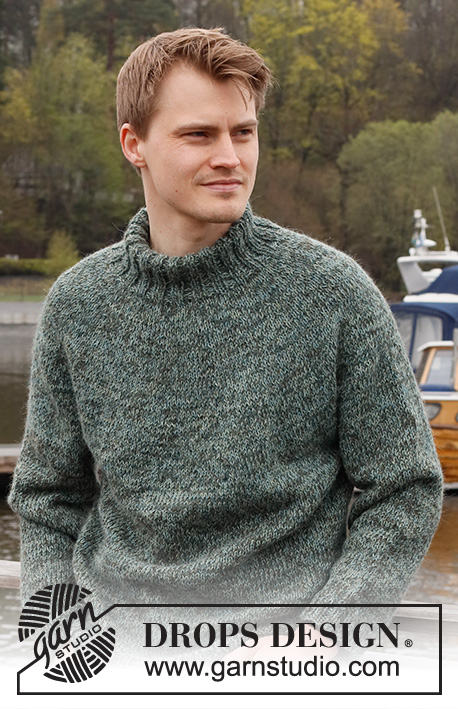
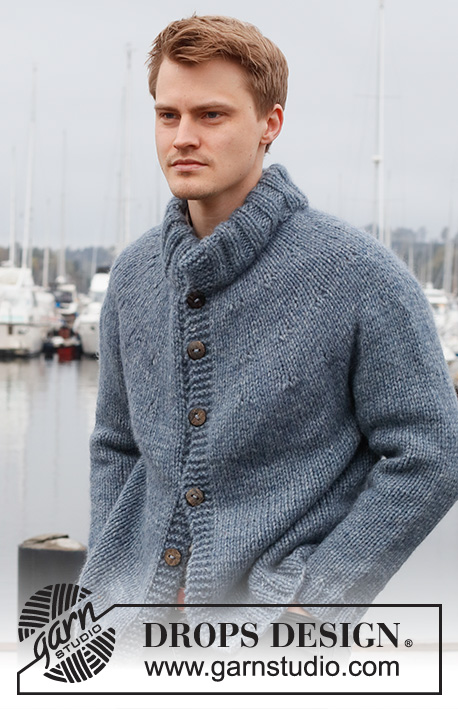
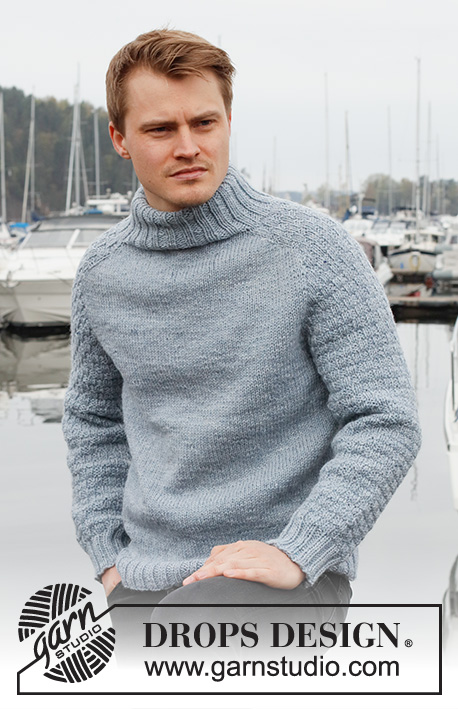
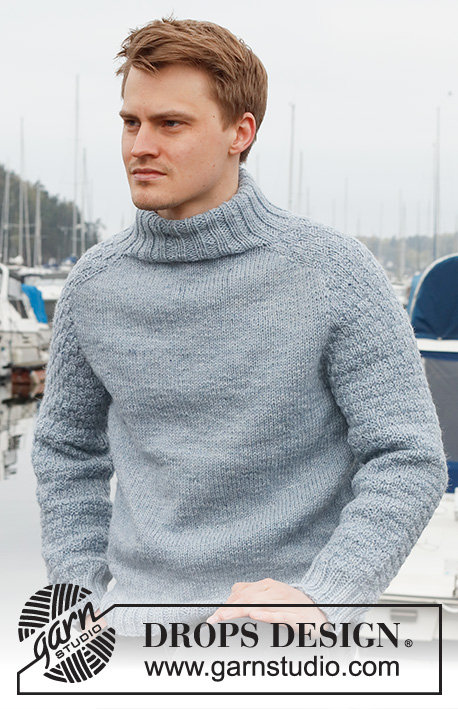
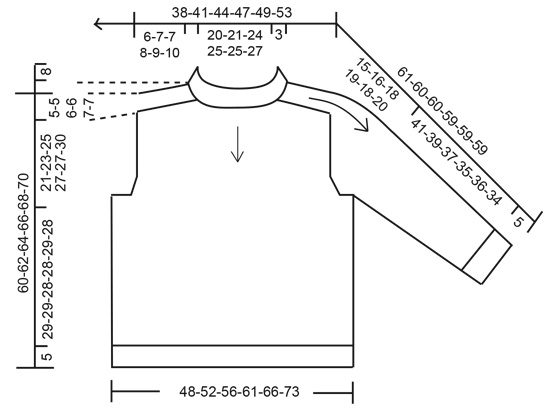
Knitted jumper for men in DROPS Nepal. The piece is worked top down, with double neck, saddle shoulders and textured pattern on the sleeves. Sizes S - XXXL.
DROPS 224-7 |
|||||||||||||||||||
|
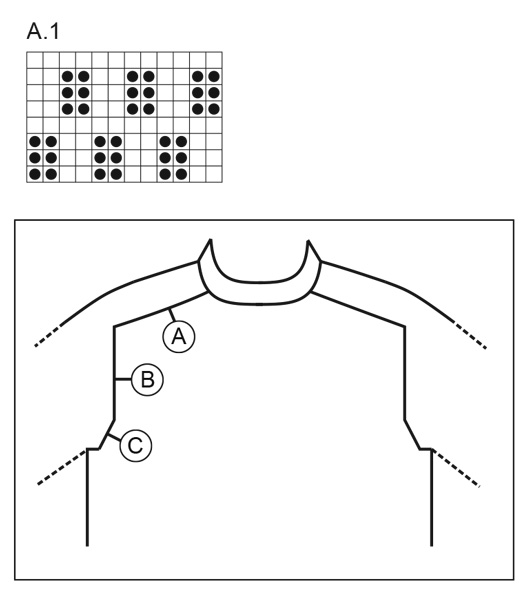
------------------------------------------------------- EXPLANATIONS FOR THE PATTERN: ------------------------------------------------------- PATTERN: See diagram A.1. PATTERN TIP: When increasing for the sleeves, work the first and last stitches on the sleeve in stocking stitch, until 2 stitches have been increased on each side – gives a neat transition between the increases and the pattern, i.e. there should be always at least 2 knitted stitches on each side of the sleeve. Then work the stitches into the pattern each time you have increased 2 stitches. INCREASE/DECREASE TIP (evenly spaced): To work out how to increase/decrease evenly, count the total number of stitches on needle (e.g. 78 stitches), and divide by the number of increases/decreases to be made (e.g. 22) = 3.5. In this example, increase by making 1 yarn over after alternately each 3rd and 4th stitch. On the next row work the yarn overs twisted to avoid holes. When decreasing, knit together alternately each 2nd and 3rd stitch and each 3rd and 4th stitch. INCREASE TIP: BEFORE MARKER: The new stitch twists to the right. Use the left needle to pick up the strand between 2 stitches from the previous round, pick up the back strand and knit in the front loop. AFTER MARKER: The new stitch twists to the left. Use the left needle to pick up the strand between 2 stitches from the previous round, pick up the front strand and knit in the back loop. DECREASE TIP (for sleeves): Decrease 1 stitch on either side of the marker as follows: Work until there are 3 stitches left before the marker, knit 2 together, knit 2 (marker sits between these 2 stitches), slip 1 stitch as if to knit, knit 1 and pass the slipped stitch over the knitted stitch (2 stitches decreased). CASTING-OFF TIP: To avoid the cast-off edge being tight you can cast off with a larger size needle. If the edge is still tight, make 1 yarn over after approx. each 4th stitch at the same time as casting off; the yarn overs are cast off as normal stitches. ------------------------------------------------------- START THE PIECE HERE: ------------------------------------------------------- JUMPER – SHORT OVERVIEW OF THE PIECE: The neck and yoke are worked in the round with circular needle, from mid back and top down. The yoke is divided for body and sleeves and the body is continued in the round with circular needle. The sleeves are worked with short circular needle/double pointed needles, top down. The body is worked in stocking stitch, the sleeves in textured pattern. DOUBLE NECK: Cast on 100-105-110-115-125-130 stitches with short circular needle size 4 mm and DROPS Nepal. Work rib in the round (knit 2, purl 3) for 4 cm. Now decrease all purl-3 to purl-2 = 80-84-88-92-100-104 stitches. Continue the new rib until the neck measures 16½ cm. Knit 1 round where you increase 20-20-32-32-32-36 stitches evenly spaced – read INCREASE/DECREASE TIP = 100-104-120-124-132-140 stitches. Change to circular needle size 5 mm. YOKE: Insert a marker thread at the beginning of the round (= mid-back) – THE YOKE IS MEASURED FROM HERE! In addition insert 4 markers as follows, without working the stitches and inserting the markers between 2 stitches: Marker 1: Start mid-back, count 17-18-20-21-21-23 stitches (= ½ back piece), insert the marker before the next stitch. Marker 2: Count 16-16-20-20-24-24 stitches (= shoulder), insert the marker before the next stitch. Marker 3: Count 34-36-40-42-42-46 stitches (= front piece), insert the marker before the next stitch. Marker 4: Count 16-16-20-20-24-24 stitches (= shoulder), insert the marker before the next stitch. There are 17-18-20-21-21-23 stitches left after marker 4 (= ½ back piece). Allow the markers to follow your work onwards; increase are worked at each marker. INCREASES TO SADDLE SHOULDERS: Work pattern A.1 on the shoulders and stocking stitch on the front and back pieces. AT THE SAME TIME, on the first round, increase 4 stitches for the shoulders as follows: Increase BEFORE markers 1 and 3 and AFTER markers 2 and 4 – read INCREASE TIP. You are only increasing on the front and back pieces; the number of stitches on the shoulders remains the same. Increase like this every round a total of 14-16-16-18-20-22 times = 156-168-184-196-212-228 stitches. REMEMBER THE KNITTING TENSION! After the last increase the piece measures approx. 6-7-7-8-9-10 cm from the marker on the neck. INCREASES TO SLEEVES: Continue with A.1 on the shoulders and stocking stitch on the front and back pieces.. On the next round increase 4 stitches for the sleeves as follows: Increase AFTER markers 1 and 3 and BEFORE markers 2 and 4 – remember INCREASE TIP. You only increase on the sleeves; the number of stitches on the front and back pieces remains the same – work the increased stitches into A.1 – read PATTERN TIP. Increase like this every 2nd round a total of 11-13-13-15-12-12 times = 200-220-236-256-260-276 stitches. The piece now measures 16-19-19-22-20-21 cm from the marker. In size S continue working until the piece measures 17 cm. In sizes M, L, XL, XXL and XXXL, continue working to the correct length if necessary, without further increases. INCREASES TO YOKE: Move the 4 sleeve-markers so they sit in the outermost stitch on each side of the sleeves. There are 36-40-44-48-46-46 stitches between the markers on each sleeve. On the next round increase 8 stitches for the yoke, both before and after all 4 markers. You are now increasing on the front and back pieces and on the sleeves. Increase like this every 2nd round a total of 4-4-6-6-8-10 times = 232-252-284-304-324-356 stitches. When all the increases are finished, the piece measures 21-23-25-27-27-30 cm. If the piece is shorter than this, continue working to the correct length without further increases. Now divide for the body and sleeves on the next round as follows: Work the first 35-38-42-45-49-55 stitches (= ½ back piece), place the next 46-50-58-62-64-68 stitches on a thread for the sleeve, cast on 12-12-12-14-14-14 stitches (= in side under sleeve), work 70-76-84-90-98-110 stitches (= front piece), place the next 46-50-58-62-64-68 stitches on a thread for the sleeve, cast on 12-12-12-14-14-14 stitches (= in side under sleeve), work the last 35-38-42-45-49-55 stitches (= ½ back piece). The body and sleeves are finished separately. THE PIECE IS NOW MEASURED FROM HERE. BODY: = 164-176-192-208-224-248 stitches. Continue with stocking stitch in the round for 29-29-28-28-29-28 cm. Try the jumper on and work to desired length (approx. 5 cm left to finished length). Knit 1 round where you increase 16-20-20-20-20-24 stitches evenly spaced = 180-196-212-228-244-272 stitches. Change to circular needle size 4 mm and work rib (knit 2, purl 2) for 5 cm. Cast off with knit over knit and purl over purl – read CASTING-OFF TIP. The jumper measures approx. 60-62-64-66-68-70 cm from the shoulder down. SLEEVES: Place the 46-50-58-62-64-68 stitches from the thread on the one side of the piece on double pointed needles/short circular needle size 5 mm and knit up 1 stitch in each of the 12-12-12-14-14-14 stitches cast on under the sleeve = 58-62-70-76-78-82 stitches. Insert a marker in the middle of the new stitches under the sleeve. Continue working A.1 in the round. When the sleeve measures 3 cm from the division, decrease 1 stitch on each side of the marker – read DECREASE TIP. Decrease like this every 11-6-3½-3-3-2½ cm a total of 4-6-9-11-11-13 times = 50-50-52-54-56-56 stitches. Continue working until the sleeve measures 41-39-37-35-36-34 cm from the division. Try the jumper on and work to desired length (approx. 5 cm left to finished length). Knit 1 round where you decrease 10-6-8-6-8-8 stitches evenly spaced = 40-44-44-48-48-48 stitches. Change to double pointed needles size 4 mm and work rib (knit 2, purl 2) for 5 cm. Cast off with knit over knit and purl over purl – remember CASTING-OFF TIP. The sleeve measures approx. 46-44-43-40-41-39 cm from the division. Work the other sleeve in the same way. ASSEMBLY: Fold the neck double to the inside and sew down. To avoid the neck being tight and rolling outwards, it is important that the seam is elastic. |
|||||||||||||||||||
Diagram explanations |
|||||||||||||||||||
|
|||||||||||||||||||
 |
|||||||||||||||||||
 |
|||||||||||||||||||
Have you finished this pattern?Tag your pictures with #dropspattern #winterwindssweater or submit them to the #dropsfan gallery. Do you need help with this pattern?You'll find 31 tutorial videos, a Comments/Questions area and more by visiting the pattern on garnstudio.com. © 1982-2026 DROPS Design A/S. We reserve all rights. This document, including all its sub-sections, has copyrights. Read more about what you can do with our patterns at the bottom of each pattern on our site. |
|||||||||||||||||||


With over 40 years in knitting and crochet design, DROPS Design offers one of the most extensive collections of free patterns on the internet - translated to 17 languages. As of today we count 324 catalogues and 12290 patterns translated into English (UK/cm).
We work hard to bring you the best knitting and crochet have to offer, inspiration and advice as well as great quality yarns at incredible prices! Would you like to use our patterns for other than personal use? You can read what you are allowed to do in the Copyright text at the bottom of all our patterns. Happy crafting!
Post a comment to pattern DROPS 224-7
We would love to hear what you have to say about this pattern!
If you want to leave a question, please make sure you select the correct category in the form below, to speed up the answering process. Required fields are marked *.