
Popular categories
Looking for a yarn?


Comments / Questions (82)
![]() Mari Cruz wrote:
Mari Cruz wrote:
20 en total no queda bien la forma de la sisa se pasa de empezar disminuyendo un punto y después de la cuarta vuelta 9 de golpe
15.03.2024 - 23:53
![]() Mari Cruz wrote:
Mari Cruz wrote:
´cuantos menguados lleva la sisa
13.03.2024 - 21:49
![]() Cruz wrote:
Cruz wrote:
´cuantos menguados lleva la sisa
13.03.2024 - 21:42
![]() Ursula Frau Kessler wrote:
Ursula Frau Kessler wrote:
Danke ins Strickstudio, es macht wirklich Spass! Dann muss ich also in jeder 4.Reihe 9Mal 1Masche abnehmen? Freundliche Grüsse Ursula
04.03.2024 - 09:44DROPS Design answered:
Liebe Frau Kessler, es wird beidseitig 1 masche abgenommen, dh 2 Maschen pro Reihe = 1 am Anfang + 1 am ende der Reihe - siehe ABNAHMETIPP-3:. Viel Spaß beim Stricken!
04.03.2024 - 10:16
![]() Ursula Kessler wrote:
Ursula Kessler wrote:
Grüezi ins Strickstudio, ich verstehe die Abnehmen für die Armausschnitte nicht. für Grösse M: beidseits in jeder 2.Reihe 1xM abnehmen, wieviel mal, 1x1M? am Ende jeder 4.Reihe 9x abnehmen, 1x9M? ich muss gemäss Anleitung beidseitig je 10M abnehmen=20M. aber wie…ist mir völlig unklar?? bitte um genaue Angaben. Freundliche Grüsse Ursula Kessler
01.03.2024 - 20:57DROPS Design answered:
Liebe Frau Kessler, es wird beidseitig zuerst in jeder 2. Reihe 1 Mal abgenommen, dann in jeder 4. Reihe 9 Mal (= je 10 Maschen beidseitig abgenommen für die Armausschnitte) = so sind es 91-20= 71 Maschen. Viel Spaß beim Stricken!
04.03.2024 - 07:31
![]() Cruz wrote:
Cruz wrote:
Hola cuando termino la cenefa y cambio agujas circulares el punto bobo no me queda bien como lo tengo que hacer
01.03.2024 - 00:29
![]() Baudic wrote:
Baudic wrote:
Bonjour je voudrais sa voir sur 151m il faut il rajouté 6m pour les bordures et les diminué les 6m fur a mesure
01.02.2024 - 11:31DROPS Design answered:
Bonjour Mme Baudic, en taille XL, montez 151 mailles, ce nombre comprend les côtes et les 6 mailles de bordure au point mousse de chaque côté. Bon tricot!
01.02.2024 - 15:46
![]() Christina Lundkvist wrote:
Christina Lundkvist wrote:
Hej Jag mäter 104 cm i omkrets över bysten när jag bara har bh på mig. Vilken storlek är lämplig?
26.01.2024 - 08:06DROPS Design answered:
Hej Christina, vil du have den lidt tight så vælg M eller om den skal se ud som på billedet skal du vælge L :)
02.02.2024 - 12:29
![]() Diane wrote:
Diane wrote:
Hi... Am I blind or does it not say how much yarn for this vest? If someone could let me know that would be great and ill order the correct amount of Karisma Drops. thanks.
21.01.2024 - 06:25DROPS Design answered:
Hi, the amount of yarn is specified in the header under Material, next to the main photo of the model :-) . Choose the quantity according to your size: S - M - L - XL - XXL - XXXL, MATERIALS: DROPS KARISMA from Garnstudio (belongs to yarn group B) 450-450-500-550-600-700 g colour 21, medium grey. Happy knitting!
21.01.2024 - 10:44
![]() KRISTIN STEEN wrote:
KRISTIN STEEN wrote:
The V-neck area either is not laid out properly for the pic or the V-neck needs to be re-knitted...looks crooked with a space there on the left side of starting the V...they are tricky-dicky until one learns how to do them...Also the knitted stitch up the middle is not straight...looks like a twisted stitch...I love long necked Vs and have 2 of them. I see where the boxed triangle shows over the pattern but there are other ways of working with these 3 stitches . I am out of space to write
18.01.2024 - 21:52
|
||||||||||||||||
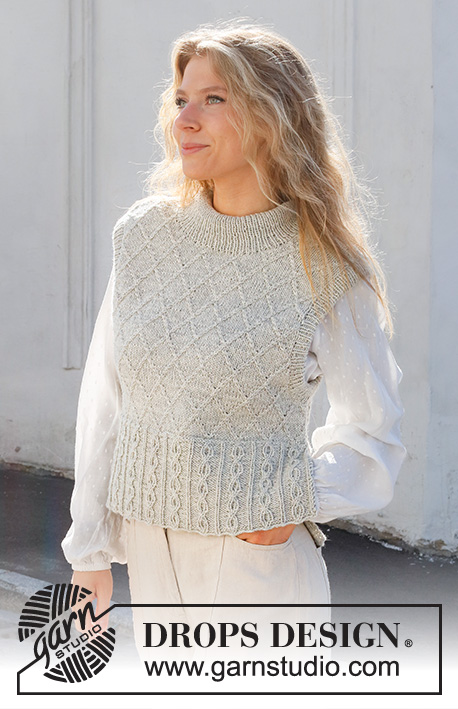
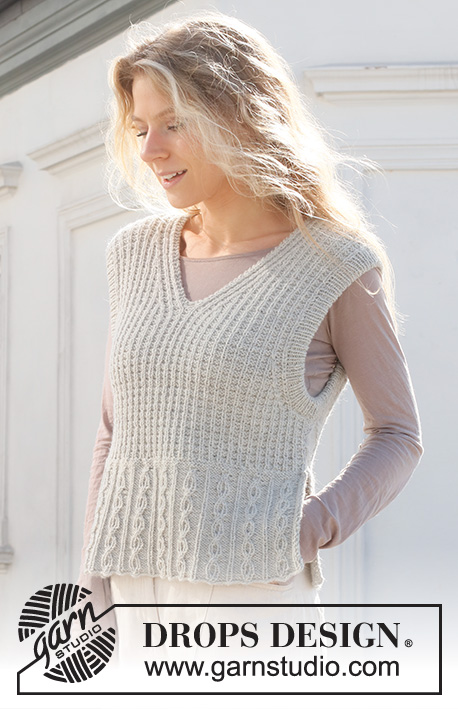
Skyscraper Vest#skyscrapervest |
||||||||||||||||
 |
 |
|||||||||||||||
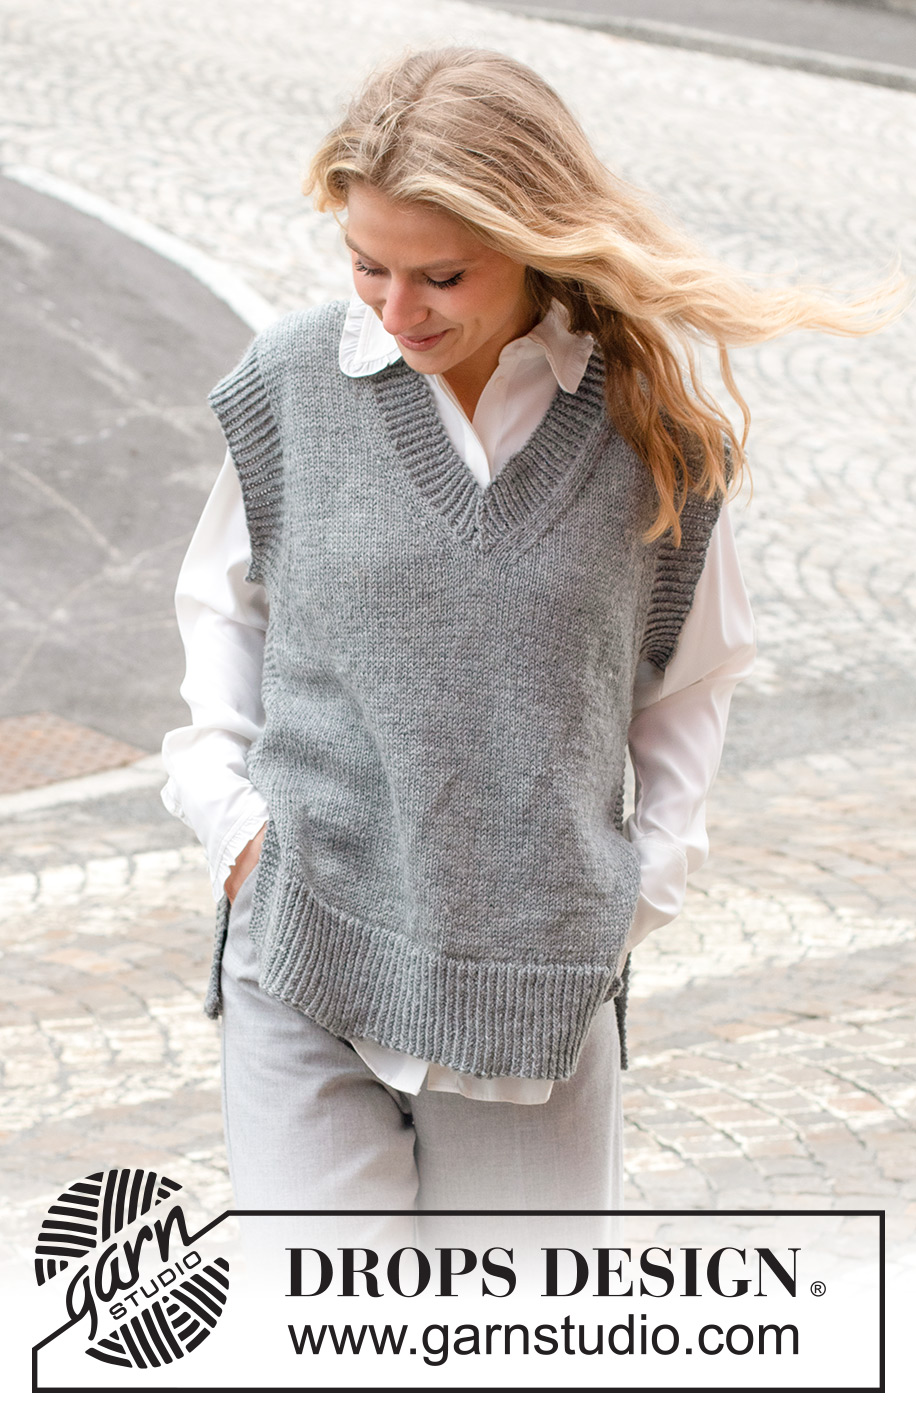
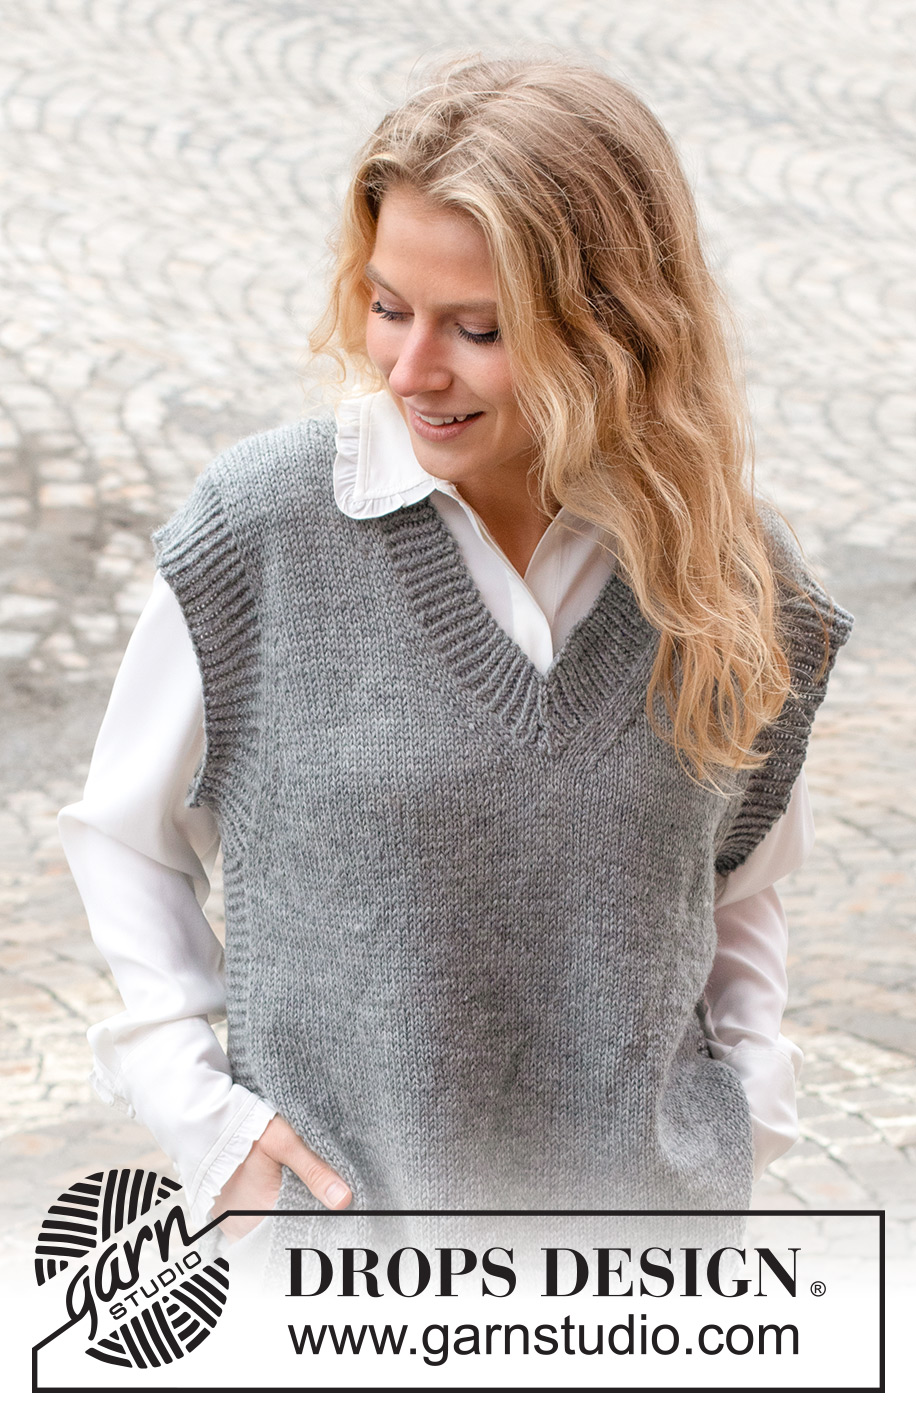
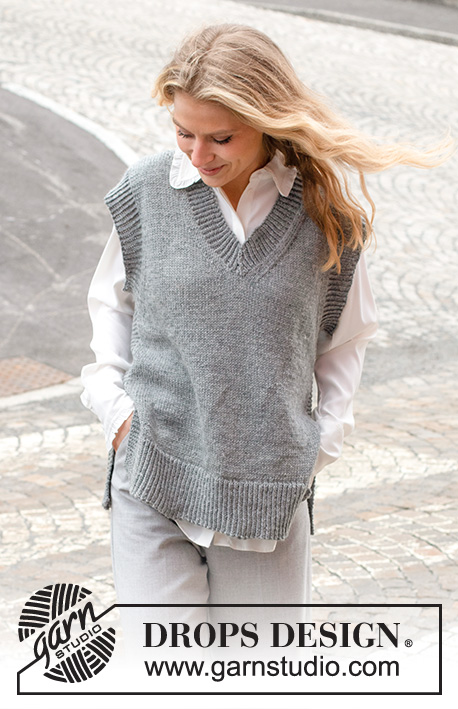
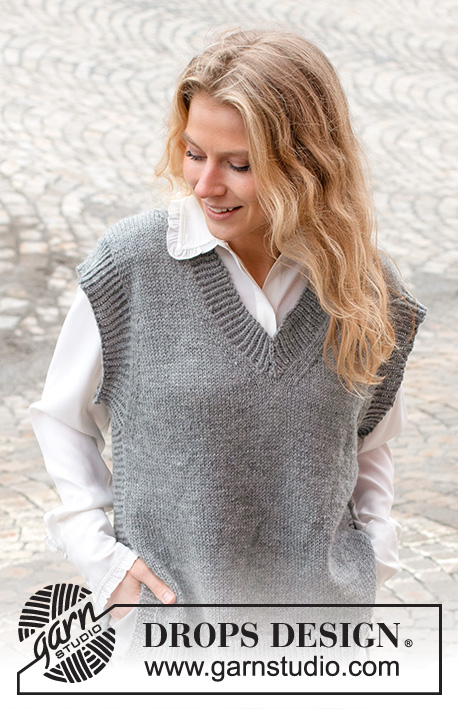
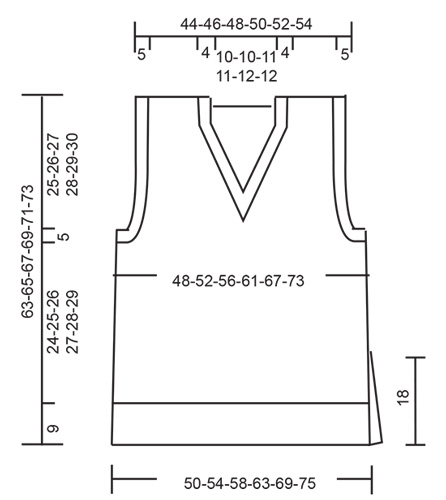
Knitted vest / slipover in DROPS Karisma. Piece is knitted with V-neck, edges in rib and vents in the sides. Size: S - XXXL
DROPS 228-3 |
||||||||||||||||
|
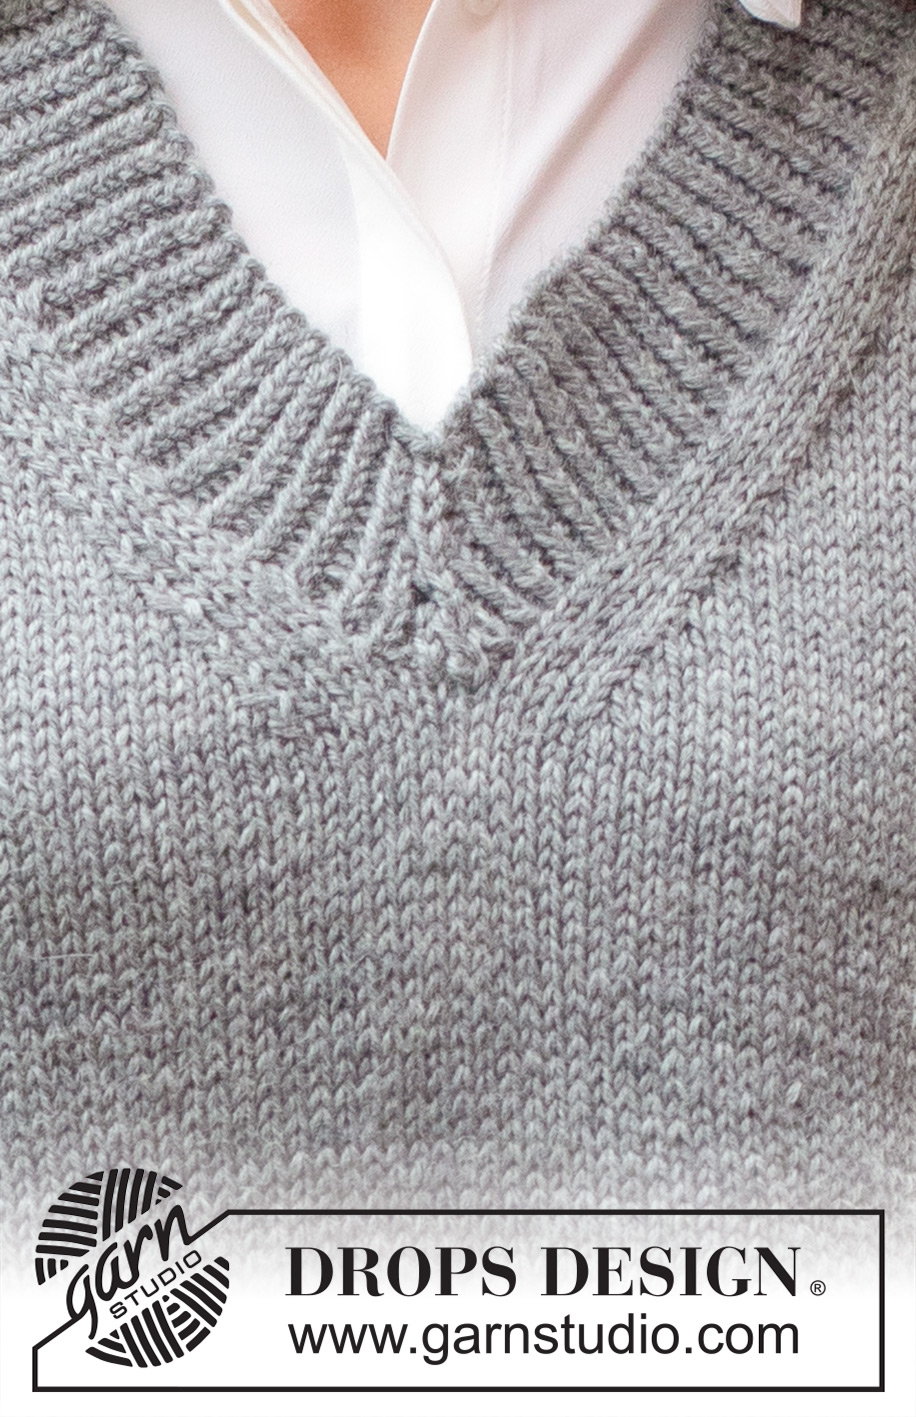
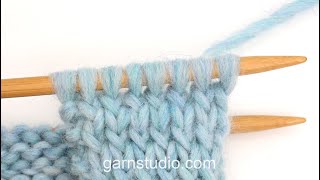
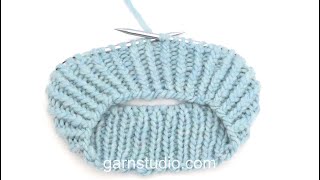
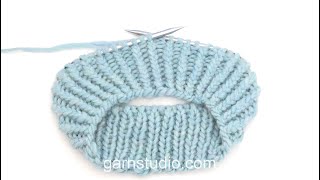
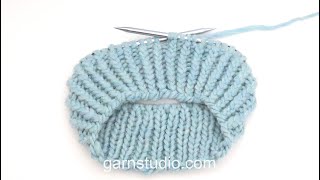
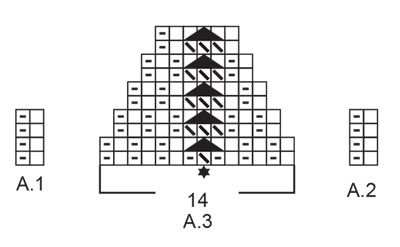
---------------------------------------------------------- EXPLANATION FOR THE PATTERN: ---------------------------------------------------------- GARTER STITCH (worked in the round): 1 ridge vertically = 2 rounds, i.e. knit 1 round and purl 1 round. GARTER STITCH (back and forth): Knit all rows. 1 ridge vertically = knit 2 rows. PATTERN: See diagrams A.1 to A.3. Diagrams show all rows in pattern seen from the right side. DECREASE TIP-1 (evenly): To calculate how to decrease evenly, use the total number of stitches on row (e.g. 119 stitches), minus edge stitches (e.g. 12 stitches) , and divide the remaining 107 stitches by number of increases/decreases to be done (e.g. 20) = 5.3. If decreasing knit in this example approx. every 4th and 5th stitch and every 5th and 6th stitch together. DECREASE TIP-2 (applies to sides of body): Decrease 1 stitch on each side of stitches in garter stitch as follows: Work until 2 stitches remain before stitches in garter stitch, knit 2 together, work 12 stitches in garter stitch, slip 1 stitch knitwise, knit 1, pass slipped stitch over stitch worked. DECREASE TIP-3: All decreases are done from the right side! Decrease at beginning of row as follows: Decrease 1 stitch after 1 edge stitch in garter stitch and 3 knit stitches as follows: Slip 1 stitch knitwise, knit 1, pass slipped stitch over stitch worked (= 1 stitch decreased). Decrease at end of row as follows: Decrease 1 stitch before 3 knit stitches and 1 edge stitch in garter stitch as follows: Work until 6 stitches remain on needle, knit 2 together, knit 3, work 1 edge stitch in garter stitch (= 1 stitch decreased). CAST-OFF TIP: To avoid a tight cast-off edge when casting off, you may use a larger needle. If this still is too tight make 1 yarn over after approx. every 4th stitch while casting off (cast off yarn overs as stitches). ---------------------------------------------------------- START THE PIECE HERE: ---------------------------------------------------------- VEST – SHORT SUMMARY OF PIECE: Work back piece and front piece back and forth on circular needle upwards until vent is done, then slip the 2 part on to same circular needle and work in the round on circular needle up to armhole. Divide piece for front piece and back piece, and finish each part separately back and forth. Work sleeve edges and neck edge in the round on circular needle. BACK PIECE: Cast on 119-129-139-151-165-179 stitches on circular needle size 3.5 mm with DROPS Karisma. Work rib as follows: 6 stitches in GARTER STITCH – read explanation above, A.1 until 7 stitches remain, work first stitch in A.1, 6 stitches in garter stitch. Continue back and forth like this until piece measures 9 cm. Work next row as follows from right side: Work garter stitch as before over the first 6 stitches, knit the next 107-117-127-139-153-167 stitches and decrease at the same time 20-22-24-26-28-30 stitches evenly – read DECREASE TIP-1, work in garter stitch as before over the last 6 stitches = 99-107-115-125-137-149 stitches. Switch to circular needle size 4.5 mm. Now work in stocking stitch with 6 stitches in garter stitch in each side. REMEMBER THE KNITTING TENSION! When piece measures 18 cm – adjust so that next row is worked from right side, put piece aside. Work front piece. FRONT PIECE: Work as on back piece. BODY: Slip stitches on front piece and back front piece on to same circular needle size = 198-214-230-250-274-298 stitches. Begin round before 12 stitches in garter stitch in one side. Continue in stocking stitch and 12 stitches in GARTER STITCH in each side - read explanation above. When piece measures 20 cm, decrease 1 stitch on each side of the 12 stitches in garter stitch - read DECREASE TIP-2. Repeat decrease when piece measures 28-29-30-31-32-33 cm = 190-206-222-242-266-290 stitches. When piece measures 33-34-35-36-37-38 cm, cast off 12-12-14-16-18-20 stitches in each side for armholes (i.e. cast off the 12 stitches in garter stitch and 0-0-1-2-3-4 stitches on each side of garter stitches). Then finish front and back piece separately. BACK PIECE: = 83-91-97-105-115-125 stitches. Continue back and forth in stocking stitch with 1 edge stitch in garter stitch in each side. At the same time on next row from right side begin decrease for armhole - read DECREASE TIP-3. Decrease like this every other row 1-1-3-7-12-18 times, then every 4th row 7-9-8-6-4-1 times (= 8-10-11-13-16-19 stitches decreased for armhole in each side) = 67-71-75-79-83-87 stitches. Continue to work until piece measures 61-63-65-67-69-71 cm. Now cast off the middle 33-33-35-35-37-37 stitches for neck and finish each shoulder separately. Then on next row from the neck, decrease 1 stitch = 16-18-19-21-22-24 stitches remain on shoulder. When piece measures 63-65-67-69-71-73 cm, cast off. Work the other shoulder the same way. FRONT PIECE: = 83-91-97-105-115-125 stitches. Continue back and forth in stocking stitch with 1 edge stitch in garter stitch in each side. At the same time decrease for armholes the same way as on back piece. When piece measures 41-42-43-44-45-46 cm, slip the middle stitch on front piece on a stitch holder (= middle stitch), and slip all stitches after this middle stitch on a stitch holder (= right front piece). Stitches before middle stitch are still on the needle (= left front piece). Left front piece: Continue back and forth with stocking stitch, 1 edge stitch in garter stitch in each side and decrease for armholes as before, at the same time on next row from right side begin decrease for V-neck: Work until 6 stitches remain towards the neck, knit 2 together (= 1 stitch decreased), knit 3, 1 edge stitch in garter stitch. Decrease like this every other row 11-11-11-11-11-11 times, then every 4th row 6-6-7-7-8-8 times (= 17-17-18-18-19-19 stitches decreased for V-neck) = 16-18-19-21-22-24 stitches remain for shoulder. Continue to work until piece measures approx. 63-65-67-69-71-73 cm. Cast off. Right front piece: Continue back and forth with stocking stitch, 1 edge stitch in garter stitch in each side and decrease for armholes as before, at the same time on next row from right side begin decrease for V-neck: Work 1 edge stitch in garter stitch, knit 3, slip 1 stitch knitwise, knit 1, pass slipped stitch over (= 1 stitch decreased), work the rest of row. Decrease like this every other row 11-11-11-11-11-11 times, then every 4th row 6-6-7-7-8-8 times (= 17-17-18-18-19-19 stitches decreased for neck) = 16-18-19-21-22-24 stitches remain for shoulder. Continue to work until piece measures approx. 63-65-67-69-71-73 cm. Cast off. ASSEMBLY: Sew shoulder seams with grafting/kitchener stitches inside cast-off edges. SLEEVE EDGES: Begin from right side where piece was divided for armhole. Use circular needle size 3.5 mm and pick up approx. 132 to 154 stitches around the entire armhole (number of stitches must be divisible by 2). Work rib according to diagram A.1 in the round for 4½-5 cm. Cast off stitches with knit over knit and purl over purl. Repeat around the other armhole. NECK EDGE: Begin mid on top of one shoulder with circular needle size 3.5 mm and DROPS Karisma and pick up 158 to 188 stitches inside 1 edge stitch in garter stitch around the entire neck edge including middle stitch on stitch holder mid front (number of stitches must be divisible by 2). Work rib according to pattern A.2 in the round - adjust so that pattern is worked according to A.3 over the 14 stitches mid front (stitch with star in A.3 should be middle stitch mid front), and so that pattern fits knit 1 twisted / purl 1 in the round on first round worked. Continue in the round and decrease as shown in A.3 until rib measures 4 cm. Cast off with knit over knit and purl over purl, at the same time decrease as before over the middle 3 stitches mid front. |
||||||||||||||||
Diagram explanations |
||||||||||||||||
|
||||||||||||||||
 |
||||||||||||||||
 |
||||||||||||||||
Have you finished this pattern?Tag your pictures with #dropspattern #skyscrapervest or submit them to the #dropsfan gallery. Do you need help with this pattern?You'll find 33 tutorial videos, a Comments/Questions area and more by visiting the pattern on garnstudio.com. © 1982-2026 DROPS Design A/S. We reserve all rights. This document, including all its sub-sections, has copyrights. Read more about what you can do with our patterns at the bottom of each pattern on our site. |
||||||||||||||||


With over 40 years in knitting and crochet design, DROPS Design offers one of the most extensive collections of free patterns on the internet - translated to 17 languages. As of today we count 325 catalogues and 12298 patterns translated into English (UK/cm).
We work hard to bring you the best knitting and crochet have to offer, inspiration and advice as well as great quality yarns at incredible prices! Would you like to use our patterns for other than personal use? You can read what you are allowed to do in the Copyright text at the bottom of all our patterns. Happy crafting!
Post a comment to pattern DROPS 228-3
We would love to hear what you have to say about this pattern!
If you want to leave a question, please make sure you select the correct category in the form below, to speed up the answering process. Required fields are marked *.