
Popular categories
Looking for a yarn?


Comments / Questions (125)
![]() Helene wrote:
Helene wrote:
Hej jag vill att tröjan skall bli lite utställd som Dandelion Dreams och lika lång som den. Jag kommer sticka Swing by Spring Top i stl XXL och undrar hur många nystan jag behöver beställa. 8, 9 eller 10?
26.04.2022 - 14:24DROPS Design answered:
Hej Helene, så skal du nok bruge 10 nøgler. God fornøjelse!
26.04.2022 - 15:50
![]() Dominique Bruggmann wrote:
Dominique Bruggmann wrote:
Merci de votre réponse. Ai-je bien compris ? vous proposez de faire la réhausse après le col ( cad après les côtes 1/1) ? mais alors faut-il la faire en jersey (mais alors on ne peut plus raccrocher A1 aux côtes 1/1) ou alors la faire en côte 1/1 ?
25.04.2022 - 20:42DROPS Design answered:
Bonjour Mme Bruggmann, je pense qu'effectivement une réhausse serait plus discrète tricoté en côtes après le col, ainsi l'enchaînement avec A.1 se fera en douceur. Bon tricot!
26.04.2022 - 09:40
![]() Anna Laura Casu wrote:
Anna Laura Casu wrote:
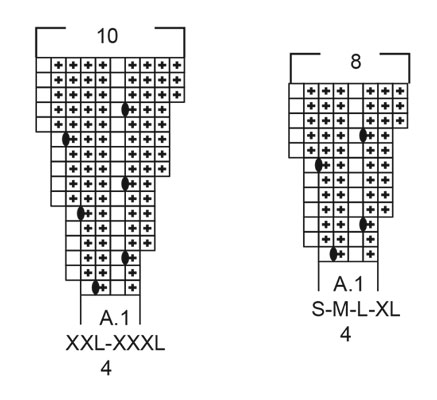
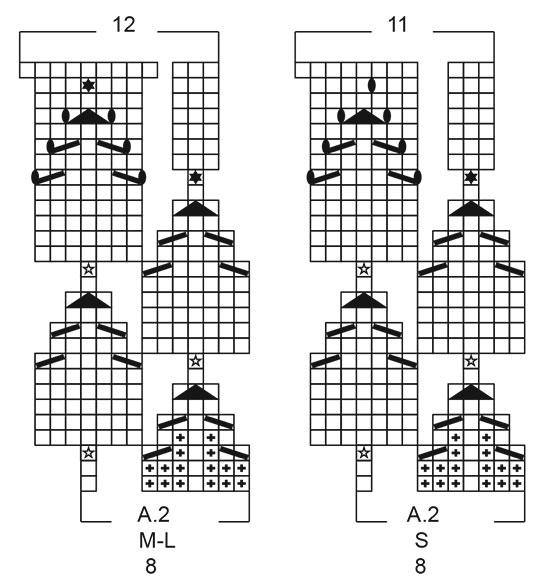
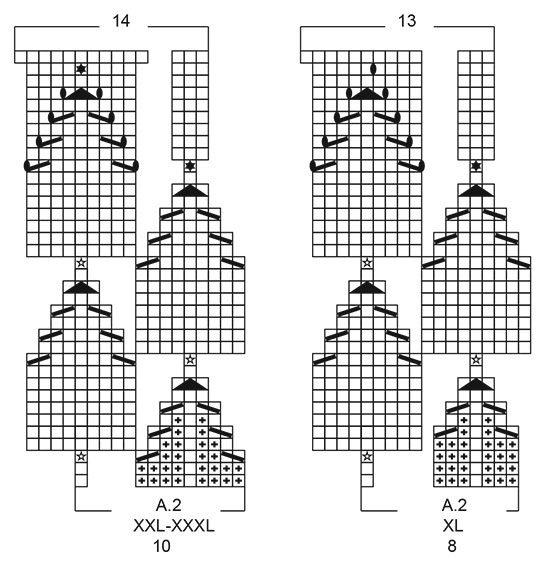
Buongiorno. Sono Anna Laura da Cagliari. In riferimento al modello 222-32, ho difficoltà a capire il diagramma A.2 della taglia L. In particolare il passaggio dalla riga 3 in cui ci sono 8 maglie, al passaggio alla riga 4 in cui compaiono 12 maglie nonostante ci siano, nell intervallo, 2 diminuzioni (per una maglia accavallate e 2 maglie lavorate assieme) e 3 aumenti in una sola maglia
24.04.2022 - 11:10DROPS Design answered:
Buonasera Anna Laura, per la taglia L nella riga 3 per il simbolo a stellina si lavorano 7 maglie in 1 maglia, ecco perchè cambia il n° di maglie. Buon lavoro!
24.04.2022 - 16:38
![]() Dominique Bruggmann wrote:
Dominique Bruggmann wrote:
Bonjour, Je viens de terminer ce modèle que j'aime beaucoup et ai trouvé très agréable à tricoter. Mais l'encolure me gêne , j'aimerais le refaire avec une rehausse au dos de l'encolure, en rangs raccourcis (jamais fait ), est-ce possible, et si oui, comment. Merci de votre réponse
17.04.2022 - 19:49DROPS Design answered:
Bonjour Mme Bruggmann, vous pouvez effectivement choisir de tricoter une réhausse pour l'encolure dos à la fin du col (avant de commencer l'empiècement). Tricotez en rangs raccourcis le nombre de rangs souhaités pour la différence encolure dos/devant; vous pouvez vous aider d'un modèle de tension similaire avec une réhausse si besoin. Bon tricot!
19.04.2022 - 11:14
![]() Lilli-Ann Studsgaard wrote:
Lilli-Ann Studsgaard wrote:
Jeg er gået i stå ved mønsteret forneden på kjolen hvor mønsteret skal strikkes efter A3, men jeg kan ikke se noget diagram A3. Er der noget jeg har misforstået? Vh Lilli-Ann
03.04.2022 - 08:46DROPS Design answered:
Hei Lilli-Ann. Om du har sett på oppskriften du har lagt dit spørsmål under er det oppskrift på en bluse (DROPS 222-32). Men om du ser på oppskrift 223-2 finner du oppskrift på kjolen og der vil du se diagram A.3. mvh DROPS Design
04.04.2022 - 13:34
![]() Anne-Birthe Bladt wrote:
Anne-Birthe Bladt wrote:
Kan ikke få diagrammet til at passe i A2. Man ender jo uden masker til sidst når man kun tager ind ?
25.02.2022 - 17:06DROPS Design answered:
Hei Anne-Birthe Om du ser på diagrammene og på de hvite og sorte stjernene, og leser diagramforklaringene så skal det økes 3 eller 7 masker i 1 maske. Se også hjelpevideo på hvordan man øker om du trenger det. mvh DROPS Design
28.02.2022 - 14:31
![]() Małogrzata wrote:
Małogrzata wrote:
Chciałabym zrobić ten sweter w rozmiarze L, ale o długości 65 cm. Nie wiem, ale włóczki kupić. proszę o pomoc. Dziękuję
15.09.2021 - 20:38DROPS Design answered:
Witaj Gosiu, dół musi być szerszy więc będziesz potrzebować łącznie jakieś 450 g. Pozdrawiamy!
16.09.2021 - 10:17
![]() Tove Hanssen wrote:
Tove Hanssen wrote:
Ferdig med vrangborden, skiftet pinne til 4 Så står det:Strikk A1 rundt på omgangen(25 raportet a 4 masker, blir jo 5 med kastet som skal strikkes vridd på neste omgang, og da stemmer jo ikke maskeantallet??
02.08.2021 - 17:18DROPS Design answered:
Hei Tove, Neste omgang, som du sier, har kastene, men A.1 begynner med 4 masker x 25 = 100 masker, som er det du har etter vrangbord. Når A.1 er ferdig har du 200 masker på omgangen. God fornøyelse!
03.08.2021 - 08:45
![]() Caroline wrote:
Caroline wrote:
Hej! I sista rapporten på A2 står det att omslaget ska stickas vridet på nästa varv så det inte blir hål. Men ska det inte bli hål? Tycker det ser ut som det på fotot.
25.07.2021 - 10:19
![]() Caroline wrote:
Caroline wrote:
Hej! I sista rapporten på A2 står det att omslaget ska stickas brödet på nästa varv så det inte blir hål. Men ska det inte blå hål? Tycker det ser ut som det på fotot.
25.07.2021 - 10:07DROPS Design answered:
Hej Caroline, det vill bli ett litet hål. Vill du har det större så går det bra att inte sticka det vridet :)
06.08.2021 - 14:28
|
|||||||||||||||||||||||||
Swing by Spring Top#swingbyspringtop |
|||||||||||||||||||||||||
 |
 |
||||||||||||||||||||||||
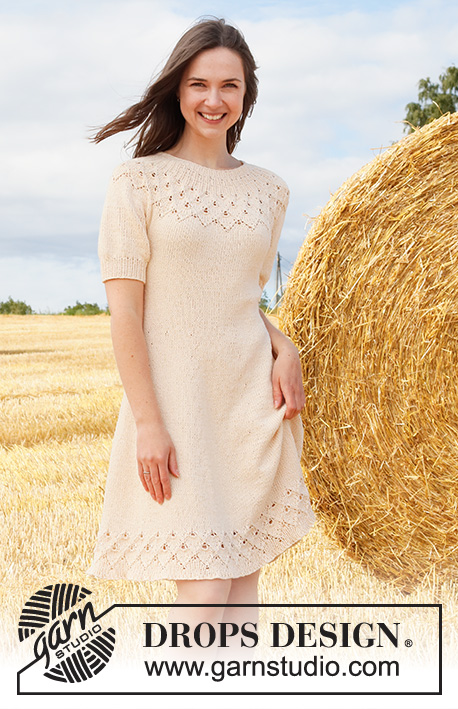
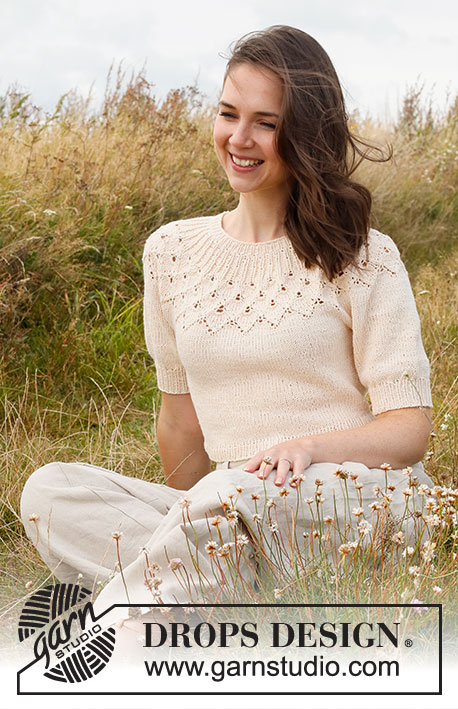
Knitted jumper in DROPS Belle. Piece is knitted top down with round yoke, lace pattern, leaf pattern and short balloon sleeves. Size: S - XXXL
DROPS 222-32 |
|||||||||||||||||||||||||
|
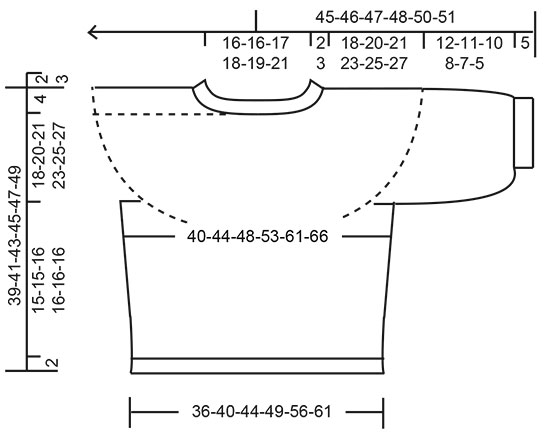
------------------------------------------------------- EXPLANATION FOR THE PATTERN: ------------------------------------------------------- PATTERN: See diagrams A.1 and A.2. Choose diagram for your size. DECREASE TIP (applies to side of body): Decrease 1 stitch on each side of marker thread as follows: Work until 3 stitches remain before marker thread and knit 2 together, knit 2 (marker thread is between these 2 stitches), slip 1 stitch knitwise, knit 1, pass slipped stitch over stitch worked. CAST-OFF TIP: To avoid a tight cast-off edge you may use a larger needle size. If this also is too tight, work a 1 yarn over after approx. every 4th stitch while casting off (cast off yarn overs as regular stitches). ------------------------------------------------------- START THE PIECE HERE: ------------------------------------------------------- JUMPER - SHORT OVERVIEW OF THE PIECE: Work neck edge and yoke in the round from mid back, top down. Now divide yoke for body and sleeves. Body is worked in the round on circular needle, top down. Work sleeves in the round on double pointed needles/short circular needle, top down. NECK EDGE: Cast on 100-100-104-108-112-120 stitches on circular needle size 3 mm with Belle. Knit 1 round. Then work rib = knit 1/purl 1. When rib measures 2-2-3-3-3-3 cm, switch to circular needle size 4 mm. Insert 1 marker at the beginning of round mid back, measure yoke from this marker! YOKE: Work A.1 in the round (= 25-25-26-27-28-30 repetitions of 4 stitches). When A.1 has been worked, there are 200-200-208-216-280-300 stitches on needle. Piece now measures 4-4-4-4-6-6 cm from marker. Then work A.2 in the round (= 25-25-26-27-28-30 repetitions of 8-8-8-8-10-10 stitches). REMEMBER THE KNITTING TENSION! When A.2 has been worked, there are 275-300-312-351-392-420 stitches on needle. Piece measures approx. 14-14-14-17-19-19 cm from marker (i.e. 16-16-17-20-22-22 cm from cast-on edge). Work in stocking stitch until piece measures 18-20-21-23-25-27 cm from marker. Now divide piece for body and sleeves. Work next round as follows: Knit 38-42-44-50-58-63 (= ½ back piece), slip the next 62-66-68-76-80-84 stitches on a stitch holder for sleeve, cast on 8-8-12-12-12-12 new stitches on needle (= in the side under sleeve), knit 75-84-88-99-116-126 (= front piece), slip the next 62-66-68-76-80-84 stitches on a stitch holder for sleeve, cast on 8-8-12-12-12-12 new stitches on needle (= in the side under sleeve), knit the last 38-42-44-50-58-63 stitches (= ½ back piece). Finish body and sleeves separately. NOW MEASURE PIECE FROM HERE! BODY: = 167-184-200-223-256-276 stitches. Insert 1 marker thread in the middle of the 8-8-12-12-12-12 new stitches under each sleeve (= in the side of body). There are now 83-92-100-111-128-138 stitches on front piece and 84-92-100-112-128-138 stitches on back piece. Move the marker threads upwards when working; they are used when decreasing in the sides later. Work in stocking stitch in the round. When piece measures 3 cm from division, decrease 1 stitch on each side of every marker thread - read DECREASE TIP (= 4 stitches decreased). Decrease like this every 2 cm 4-4-4-4-5-5 times in total = 151-168-184-207-236-256 stitches. Work in stocking stitch in the round until piece measures 15-15-16-16-16-16 cm from division – or desired length (approx. 2 cm remain until finished measurements). Knit 1 round while increasing 23-26-28-31-36-38 stitches evenly = 174-194-212-238-272-294 stitches. Switch to circular needle size 3 mm. Work rib (knit 1/purl 1) in the round for 2 cm. Cast off with knit over knit and purl over purl - read CAST-OFF TIP. Jumper measures approx. 39-41-43-45-47-49 cm from shoulder and down. SLEEVES: Slip the 62-66-68-76-80-84 stitches from stitch holder in one side of piece on double pointed needles/a short circular needle size 4 mm, and pick up 1 stitch in each of the 8-8-12-12-12-12 new stitches cast on in the side under sleeve = 70-74-80-88-92-96 stitches. Work in stocking stitch in the round until sleeve measures 12-11-10-8-7-5 cm from division (approx. 5 cm remain until finished measurements, try the jumper on and work to desired length. Knit 1 round while decreasing 16-16-14-14-14-14 stitches evenly = 54-58-66-74-78-82 stitches. Switch to double pointed needles size 3 mm. Work rib in the round = knit 1/purl 1 for 5 cm. Cast off with knit over knit and purl over purl - remember CAST-OFF TIP! Sleeve measures approx. 17-16-15-13-12-10 cm from division. Work the other sleeve the same way. |
|||||||||||||||||||||||||
Diagram explanations |
|||||||||||||||||||||||||
|
|||||||||||||||||||||||||
 |
|||||||||||||||||||||||||
 |
|||||||||||||||||||||||||
 |
|||||||||||||||||||||||||
 |
|||||||||||||||||||||||||
Have you finished this pattern?Tag your pictures with #dropspattern #swingbyspringtop or submit them to the #dropsfan gallery. Do you need help with this pattern?You'll find 31 tutorial videos, a Comments/Questions area and more by visiting the pattern on garnstudio.com. © 1982-2026 DROPS Design A/S. We reserve all rights. This document, including all its sub-sections, has copyrights. Read more about what you can do with our patterns at the bottom of each pattern on our site. |
|||||||||||||||||||||||||


With over 40 years in knitting and crochet design, DROPS Design offers one of the most extensive collections of free patterns on the internet - translated to 17 languages. As of today we count 324 catalogues and 12290 patterns translated into English (UK/cm).
We work hard to bring you the best knitting and crochet have to offer, inspiration and advice as well as great quality yarns at incredible prices! Would you like to use our patterns for other than personal use? You can read what you are allowed to do in the Copyright text at the bottom of all our patterns. Happy crafting!
Post a comment to pattern DROPS 222-32
We would love to hear what you have to say about this pattern!
If you want to leave a question, please make sure you select the correct category in the form below, to speed up the answering process. Required fields are marked *.