
Popular categories
Looking for a yarn?


Comments / Questions (125)
![]() Naomi P wrote:
Naomi P wrote:
Hi, can you explain where to cast on 8 additional stitches after A2 in the yoke instructions? Is it before or after the slipped sleeve stitches? Is there a video? Thank you!
03.05.2023 - 04:31DROPS Design answered:
Dear Naomi, in this lesson, we show from picture 9 how to slip stitches for sleeve on a thread and how to cast on the new stitches (8 in this pattern) under sleeve (picture 11 for 1st sleeve). Hope this will help you. Happy knitting!
03.05.2023 - 08:04
![]() Monique Jelmorini wrote:
Monique Jelmorini wrote:
In patroon A2 moeten 7 steken uit 1 steek worden gebreid. Moeten de omslagen die hiervoor worden gemaakt, op de volgende naald verdraaid worden gebreid, of juist niet? English: In A2 pattern, 7 stitched are made out of one. In the next needle, do the yarn overs need to be knitted through the back loop to avoid holes, or not?
02.04.2023 - 10:50DROPS Design answered:
Dag Monique,
Staat inderdaad niet aangegeven, maar deze zou ik inderdaad gedraaid breien, zodat er geen gaatjes ontstaan.
05.04.2023 - 10:11
![]() Naomi wrote:
Naomi wrote:
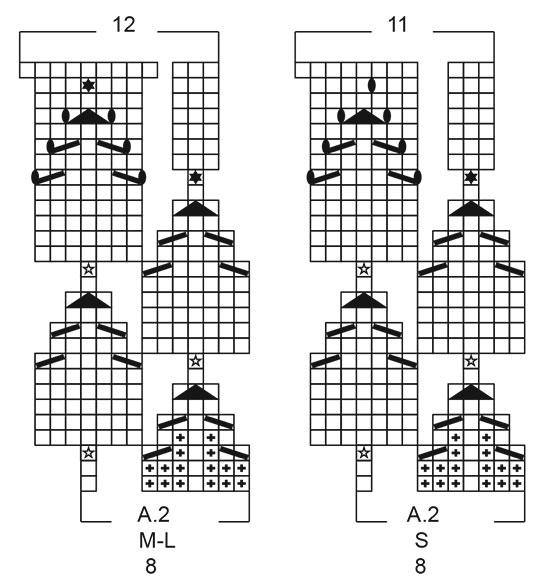
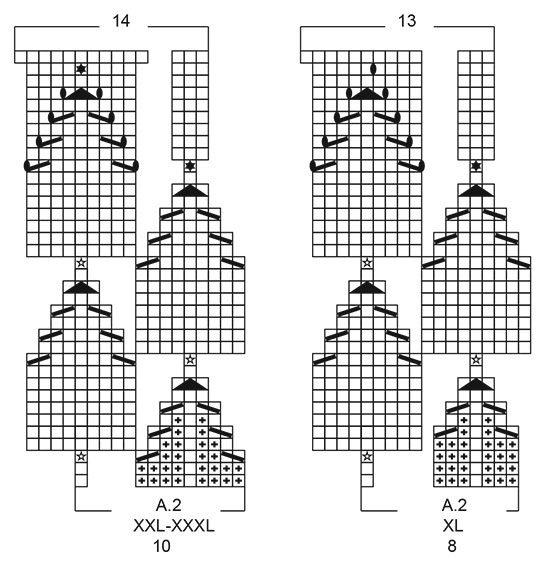
Hi there, Can you explain to me how to knit the A2 graph? I don't understand why there are spaces there and how to do the 3-in-1 knit stitch. Thank you! Best, Naomi
19.03.2023 - 02:08DROPS Design answered:
Dear Naomi, you don't need to pay attention to the spaces, they are there to help make a more 3D representation of the charts, so the spaces correspond to the space occupied by stitches that have been decreased or cast off on previous rows. For the knit 3 in one stitch, knit 1 stitch, but without slipping it to the other needle. Then, work 1 yarn over and knit another stitch in. When knitting this last stitch you will slip it off the needle, alongside the yarn over and the first stitch. You can also check the following video: https://www.garnstudio.com/video.php?id=1639&lang=en. Happy knitting!
19.03.2023 - 18:28
![]() MARCELINE wrote:
MARCELINE wrote:
Bonjour Je veux réaliser ce modèle en faisant des rangs raccourcis au haut du col au dos du pull. Sur combien de mailles fait il travailler pour ces rangs raccourcis ?
24.02.2023 - 08:46DROPS Design answered:
Bonjour Marceline, vous pouvez vous inspirer d'un modèle similaire avec rangs raccourcis pour ajuster en fonction de la hauteur souhaitée. N'hésitez pas à demander conseil à votre magasin si besoin, même par mail ou téléphone on pourra vous aider. Bon tricot!
24.02.2023 - 10:08
![]() Ujwala Ajinkya wrote:
Ujwala Ajinkya wrote:
Still unclear. Ok now please clarify on the following points 1. How many stitches would be there at the end of 7th row? In my opinion there would be 225. Please correct me if I am wrong 2. If 225 stitches remain at the end of 7th row how do I work the 9th row as the pattern is of 8 stitches (8 repeated 28 times would be 224 and 1 stitch would remain Await ur response eagerly to proceed further
11.08.2022 - 19:44DROPS Design answered:
Dear Mrs Ajinkya, at the end of 7th row, there are again 200 sts on the needle (= you decreased 2 sts on row 3 + row 5 + row 7) and increased 6 sts on 3rd row = 8 -2-2-2+6=8 sts x 25 repeats = 200 sts. On 9th row you increase 6 sts and decrease 2 sts in each A.2 = 8+6-2=12 sts x 25 repeats = 300 sts. As said before, the number of stitches will alternately go up and down beacuse of the increases/decreases; Happy knitting!
12.08.2022 - 09:47
![]() Ujwala Ajinkya wrote:
Ujwala Ajinkya wrote:
Thank you for the response but my concern still remains. Agree that at the end of 3rd row of A2 there would be 300 stitches. But at the end of row 9th row won’t there be only 285 stitches considering two decreases each on row 5 and 7 and one decrease on row 9. In that case going further down the number of stitches keeps varying from 300 and on certain rows does not fit into multiples of 12. Hope that I have expressed my concern appropriately.
11.08.2022 - 14:21DROPS Design answered:
Dear Mrs Ajinkya, the number of stitches in A.2 will alternately increase and decrease due to the triangle patterns ( see row 1-9 here and row 10 to 20 here - on row 20 you will get 8 sts in each A.2 again, then you will increase (see black star = 2 sts on row 21 and 2 sts on next to last row A.2 = 8+2+2=12 sts in each repeat). Happy knitting!
11.08.2022 - 16:21
![]() Ujwala Ajinkya wrote:
Ujwala Ajinkya wrote:
Appreciate your quick response. But for the medium size the 25 multiples of 12 stitches = 300 stitches doesn’t seem to be going right till the end of the pattern. I hope you get my concern. As the A2 pattern is worked the number of stitches keeps increasing or decreasing leaving certain rows with stitches which are not exact multiples of 25. Then how do we proceed?
10.08.2022 - 19:35DROPS Design answered:
Dear Mrs Ajinkya, in size M you start working 25 repeats of 8 sts in each A.2 (= 200 sts on the needle), you will increase and decrease in the diagram to shape the triangles and increase also (see black stars) so that there are 12 sts on the last row in each A.2, you then get 12 sts x 25 repeats = 300 sts. And you now work in stocking stitch. Look at the video section above (under the written pattern) you will see 2 videos showing how to work A.2, it might help you. Happy knitting!
11.08.2022 - 10:38
![]() Ujwala Ajinkya wrote:
Ujwala Ajinkya wrote:
For the medium size when A2 has been worked how does it work to 300 stitches as all through until then the number of stitches for the small and medium size was the same. Suddenly when A2 has been worked how does the number of stitches for small and medium differ?
10.08.2022 - 01:17DROPS Design answered:
Dear Mrs Ajinkya, you don't work the same diagram in S and in M, if you start with 8 sts in both sizes, there are 11 sts at the end of A.2 in S and 12 sts at the end of A.2 in M, so that you will have in M 25 repeats of 12 sts = 300 sts (while you get in size S 25repeats of 11 sts = 275 sts). Happy knitting!
10.08.2022 - 09:11
![]() Sisse Soelberg Tiedt Vestergaard wrote:
Sisse Soelberg Tiedt Vestergaard wrote:
Jeg vil gerne strikke denne fine top, men jeg er i tvivl om, hvilket bevægelsesrum, I anbefaler? Skal jeg gå efter det reelle brystmål, eller skal der helst være lidt plads?
18.07.2022 - 19:30DROPS Design answered:
Hej Sisse, det er en smagssag... jeg havde nok selv valgt lidt plads :)
02.08.2022 - 15:39
![]() Rosario Elias Liñero wrote:
Rosario Elias Liñero wrote:
Hola Quisiera preguntarte cómo coloco los hilos marcadores por ejemplo cada 25 puntos un hilo marcador? O cuantos pts son para manga espalda manga y delantero para colocar los marcadores ya hice el resorte, hago una vuelta de derecho para poner los hilos y empezar con los aumentos? Muchas gracias
03.05.2022 - 05:21DROPS Design answered:
Hola Rosario, en el patrón solo ponen marcador para el inicio de la vuelta. Si quieres insertar marcadores para facilitar trabajar A.1, puedes insertar marcadores cada 16 puntos (o cualquier múltiplo de 4, que es el número de puntos en A.1). No tienes que trabajar ninguna fila extra después del resorte para insertar los marcadores, comienzas directamente con el diagrama y los aumentos. La división para la manga, espalda, manga y delantero se hace al final del canesú, después de los aumentos.
05.05.2022 - 22:16
|
|||||||||||||||||||||||||
Swing by Spring Top#swingbyspringtop |
|||||||||||||||||||||||||
 |
 |
||||||||||||||||||||||||
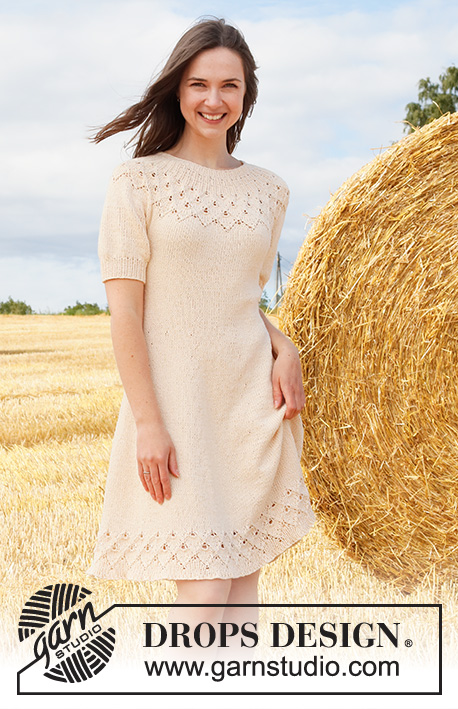
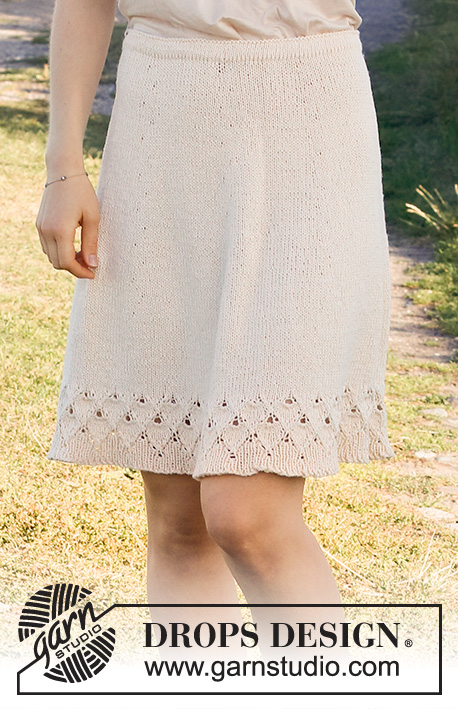
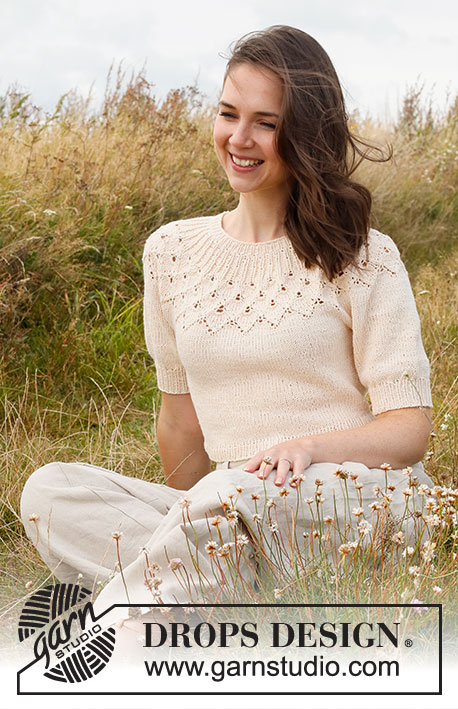
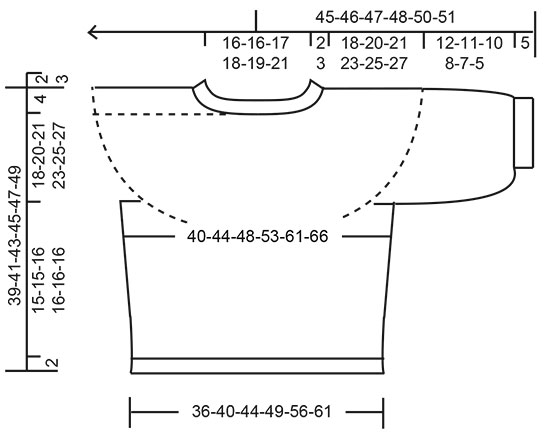
Knitted jumper in DROPS Belle. Piece is knitted top down with round yoke, lace pattern, leaf pattern and short balloon sleeves. Size: S - XXXL
DROPS 222-32 |
|||||||||||||||||||||||||
|
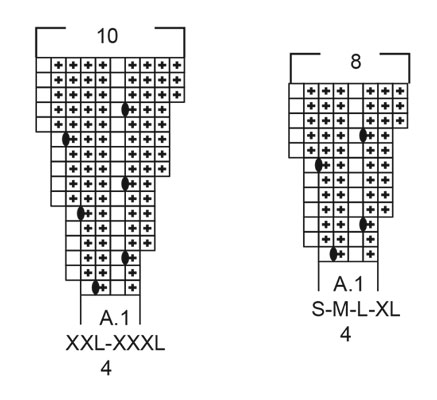
------------------------------------------------------- EXPLANATION FOR THE PATTERN: ------------------------------------------------------- PATTERN: See diagrams A.1 and A.2. Choose diagram for your size. DECREASE TIP (applies to side of body): Decrease 1 stitch on each side of marker thread as follows: Work until 3 stitches remain before marker thread and knit 2 together, knit 2 (marker thread is between these 2 stitches), slip 1 stitch knitwise, knit 1, pass slipped stitch over stitch worked. CAST-OFF TIP: To avoid a tight cast-off edge you may use a larger needle size. If this also is too tight, work a 1 yarn over after approx. every 4th stitch while casting off (cast off yarn overs as regular stitches). ------------------------------------------------------- START THE PIECE HERE: ------------------------------------------------------- JUMPER - SHORT OVERVIEW OF THE PIECE: Work neck edge and yoke in the round from mid back, top down. Now divide yoke for body and sleeves. Body is worked in the round on circular needle, top down. Work sleeves in the round on double pointed needles/short circular needle, top down. NECK EDGE: Cast on 100-100-104-108-112-120 stitches on circular needle size 3 mm with Belle. Knit 1 round. Then work rib = knit 1/purl 1. When rib measures 2-2-3-3-3-3 cm, switch to circular needle size 4 mm. Insert 1 marker at the beginning of round mid back, measure yoke from this marker! YOKE: Work A.1 in the round (= 25-25-26-27-28-30 repetitions of 4 stitches). When A.1 has been worked, there are 200-200-208-216-280-300 stitches on needle. Piece now measures 4-4-4-4-6-6 cm from marker. Then work A.2 in the round (= 25-25-26-27-28-30 repetitions of 8-8-8-8-10-10 stitches). REMEMBER THE KNITTING TENSION! When A.2 has been worked, there are 275-300-312-351-392-420 stitches on needle. Piece measures approx. 14-14-14-17-19-19 cm from marker (i.e. 16-16-17-20-22-22 cm from cast-on edge). Work in stocking stitch until piece measures 18-20-21-23-25-27 cm from marker. Now divide piece for body and sleeves. Work next round as follows: Knit 38-42-44-50-58-63 (= ½ back piece), slip the next 62-66-68-76-80-84 stitches on a stitch holder for sleeve, cast on 8-8-12-12-12-12 new stitches on needle (= in the side under sleeve), knit 75-84-88-99-116-126 (= front piece), slip the next 62-66-68-76-80-84 stitches on a stitch holder for sleeve, cast on 8-8-12-12-12-12 new stitches on needle (= in the side under sleeve), knit the last 38-42-44-50-58-63 stitches (= ½ back piece). Finish body and sleeves separately. NOW MEASURE PIECE FROM HERE! BODY: = 167-184-200-223-256-276 stitches. Insert 1 marker thread in the middle of the 8-8-12-12-12-12 new stitches under each sleeve (= in the side of body). There are now 83-92-100-111-128-138 stitches on front piece and 84-92-100-112-128-138 stitches on back piece. Move the marker threads upwards when working; they are used when decreasing in the sides later. Work in stocking stitch in the round. When piece measures 3 cm from division, decrease 1 stitch on each side of every marker thread - read DECREASE TIP (= 4 stitches decreased). Decrease like this every 2 cm 4-4-4-4-5-5 times in total = 151-168-184-207-236-256 stitches. Work in stocking stitch in the round until piece measures 15-15-16-16-16-16 cm from division – or desired length (approx. 2 cm remain until finished measurements). Knit 1 round while increasing 23-26-28-31-36-38 stitches evenly = 174-194-212-238-272-294 stitches. Switch to circular needle size 3 mm. Work rib (knit 1/purl 1) in the round for 2 cm. Cast off with knit over knit and purl over purl - read CAST-OFF TIP. Jumper measures approx. 39-41-43-45-47-49 cm from shoulder and down. SLEEVES: Slip the 62-66-68-76-80-84 stitches from stitch holder in one side of piece on double pointed needles/a short circular needle size 4 mm, and pick up 1 stitch in each of the 8-8-12-12-12-12 new stitches cast on in the side under sleeve = 70-74-80-88-92-96 stitches. Work in stocking stitch in the round until sleeve measures 12-11-10-8-7-5 cm from division (approx. 5 cm remain until finished measurements, try the jumper on and work to desired length. Knit 1 round while decreasing 16-16-14-14-14-14 stitches evenly = 54-58-66-74-78-82 stitches. Switch to double pointed needles size 3 mm. Work rib in the round = knit 1/purl 1 for 5 cm. Cast off with knit over knit and purl over purl - remember CAST-OFF TIP! Sleeve measures approx. 17-16-15-13-12-10 cm from division. Work the other sleeve the same way. |
|||||||||||||||||||||||||
Diagram explanations |
|||||||||||||||||||||||||
|
|||||||||||||||||||||||||
 |
|||||||||||||||||||||||||
 |
|||||||||||||||||||||||||
 |
|||||||||||||||||||||||||
 |
|||||||||||||||||||||||||
Have you finished this pattern?Tag your pictures with #dropspattern #swingbyspringtop or submit them to the #dropsfan gallery. Do you need help with this pattern?You'll find 31 tutorial videos, a Comments/Questions area and more by visiting the pattern on garnstudio.com. © 1982-2026 DROPS Design A/S. We reserve all rights. This document, including all its sub-sections, has copyrights. Read more about what you can do with our patterns at the bottom of each pattern on our site. |
|||||||||||||||||||||||||


With over 40 years in knitting and crochet design, DROPS Design offers one of the most extensive collections of free patterns on the internet - translated to 17 languages. As of today we count 324 catalogues and 12290 patterns translated into English (UK/cm).
We work hard to bring you the best knitting and crochet have to offer, inspiration and advice as well as great quality yarns at incredible prices! Would you like to use our patterns for other than personal use? You can read what you are allowed to do in the Copyright text at the bottom of all our patterns. Happy crafting!
Post a comment to pattern DROPS 222-32
We would love to hear what you have to say about this pattern!
If you want to leave a question, please make sure you select the correct category in the form below, to speed up the answering process. Required fields are marked *.