
Popular categories
Looking for a yarn?


Comments / Questions (35)
![]() Dalia wrote:
Dalia wrote:
Hello! 2 strands DROPS Brushed Alpaca Silk means that I need to buy 400 g yarn for M size? Thank you!
23.11.2025 - 22:42DROPS Design answered:
Hi Dalia, No, the yarn amounts quoted are for knitting the garment with 2 strands (you only need 200g). Regards, Drops Team.
24.11.2025 - 06:55
![]() Barbara wrote:
Barbara wrote:
Il modello è stupendo, ma vorrei adattarlo a cardigan. Quante maglie dovrei avviare per il davanti. Grazie in anticipo per la risposta.
10.09.2025 - 15:53DROPS Design answered:
Buongiorno Barbara, per un'assistenza così personalizzata può rivolgersi al suo rivenditore DROPS di fiducia. Buon lavoro!
10.09.2025 - 16:27
![]() Vanessa wrote:
Vanessa wrote:
You said for sleeve; “the increased stitches are worked in stocking stitches until you have enough stitches for a new repeat A1 on each side “ . But I can’t understand. For example, when ı have enough stitches for a new repeat, already ı had 5 or 6 stocking stitches. So it is very thick border, without lace.Can you help me please.
14.06.2025 - 07:29DROPS Design answered:
Dear Vanessa, yes, that's correct, you will have quite a few stitches in stocking stitch before starting the lace pattern again. This edge is located under the sleeve so it will be barely visible later on. Happy knitting!
15.06.2025 - 23:37
![]() Anna Paola Majer wrote:
Anna Paola Majer wrote:
Buongiorno, vorrei usare il filato Melody: devo avviare i punti con 2 capi di filato Melody? Grazie!
19.08.2023 - 15:19DROPS Design answered:
Buonasera Anna Paola, DROPS Brushed Alpaca appartiene al gruppo filati C e DROPS Melody al gruppo filati D, quindi hanno spessore e tensione diversa: può provare a lavorare un campione e vedere se corrisponde a quello indicato. Buon lavoro!
19.08.2023 - 22:00
![]() Miruma wrote:
Miruma wrote:
Hello, I'm a bit confused at the back piece. I've got lost at the "cast off the middle stitches for the neck" and "each shoulder is finished separately". Thank youu
20.03.2023 - 09:29DROPS Design answered:
Dear Miruna, work from right side the first stitch for the right shoulder and slip them on a thread (or leave them on needle), then cast off the middle stithces for neck, and finish row from right side (= stitches for the left shoulder). Work 1 row back and at the beg of next row from neck cast off the first stitch, then continue working back and forth over remaining stitches to the finished measurement, cast off. Cut the yarn. Join yarn for the 2nd shoulder and work the same way. Happy knitting!
20.03.2023 - 09:34
![]() Mirjami Jaakkola wrote:
Mirjami Jaakkola wrote:
Mitkä ruudukon silmukat kuuluvat B-kuvioon? Ensimmäinen kuviorivi on selkeä, mutta kolme muuta eivät. Esimerkiksi toisen kuviorivin (3. rivi) kuvio alkaa jo A:n ruudukolta ja vastaavasti C alkaa B:n puolelta. Entä kaksi muuta kuvioriviä (rivit 5. ja 7.) - mistä B alkaa ja mihin loppuu (mitä siis toistetaan)?
31.01.2023 - 12:33DROPS Design answered:
Hei, piirroksen kuviot toistetaan koko kerroksen ajan. Eli aluksi neulotaan kuvion A silmukat, sitten kavennukset (nosta 1 silmukka oikein neulomatta, neulo 2 silmukkaa oikein yhteen ja vedä nostettu silmukka kavennuksen yli) ja lisäykset (langankierrot) toistetaan, kunnes jäljellä on kuvion C silmukat, lopuksi neulotaan kuvio C. Eli kerroksen kuviot toistetaan koko ajan samalla tavalla.
02.02.2023 - 13:12
![]() Brenda K wrote:
Brenda K wrote:
Vraag bij: “Zet 57-63-63-69-75-81 steken op met rondbreinaald 8 mm en 4 draden Brushed Alpaca Silk. Verwijder 2 van de draden en ga verder met 2 draden.” Kunt u dat toelichten? Ik begrijp niet hoe ik van 4 naar 2 draden moet komen. Door de andere 2 ‘te verwijderen’? Hoe doe je dat?
09.05.2022 - 18:56DROPS Design answered:
Dag Brenda,
Er wordt bedoeld dat je met 2 draden verder breit, de andere twee knip je af. Ze blijven wel in de opzetnaald zitten, zodat je een stevigere opzetrand hebt.
10.05.2022 - 08:25
![]() Katia wrote:
Katia wrote:
Buongiorno per prima cosa grazie del modello è bellissimo volevo chiedervi se secondo voi è possibile lavorarlo in tondo fino agli scalfi grazie in anticipo
21.03.2022 - 00:24DROPS Design answered:
Buonasera Katia, può lavorarlo in tondo adattando la lavorazione. Buon lavoro!
24.03.2022 - 22:53
![]() Romy wrote:
Romy wrote:
Ihr habt mir eine antwort per email auf meine frage geschickt, den LINK den ihr mir dort geschickt habt lässt sich nicht öffnen es kommt eine fehlermeldung. gibt doch die antwort auf diese seite!!! danke
31.01.2022 - 13:33
![]() Tilleul wrote:
Tilleul wrote:
Bonjour, Je souhaite réaliser ce modèle, mais je ne vois pas les diagrammes, ni sur le site, ni dans les explications lorsque je souhaite les imprimer. Pouvez-vous m'aider ?
11.10.2021 - 09:22DROPS Design answered:
Bonjour Mme Tilleul, nous avons actuellement et ponctuellement quelques soucis d'affichage des images, essayez d'actualiser la page / de vider votre cache pour voir si les diagrammes et schéma s'affichent sur le site, alors vous pourrez les imprimer. Bon tricot!
11.10.2021 - 11:25
|
|||||||||||||||||||
Life’s Stream#lifesstreamsweater |
|||||||||||||||||||
 |
 |
||||||||||||||||||
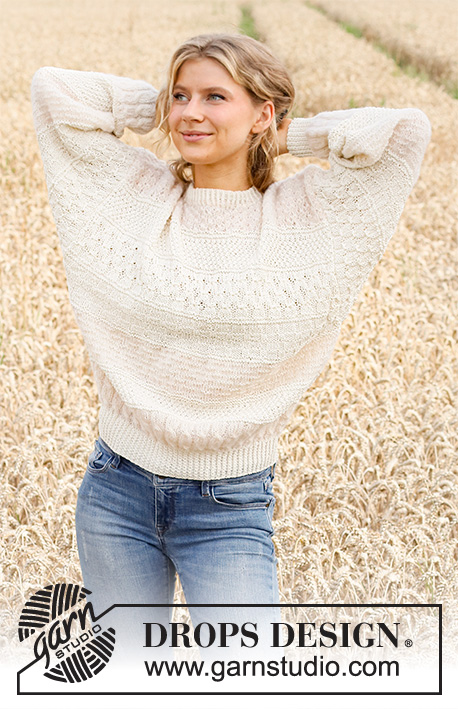
Knitted jumper in 2 strands DROPS Brushed Alpaca Silk. The piece is worked bottom up with lace pattern. Sizes S - XXXL.
DROPS 220-6 |
|||||||||||||||||||
|
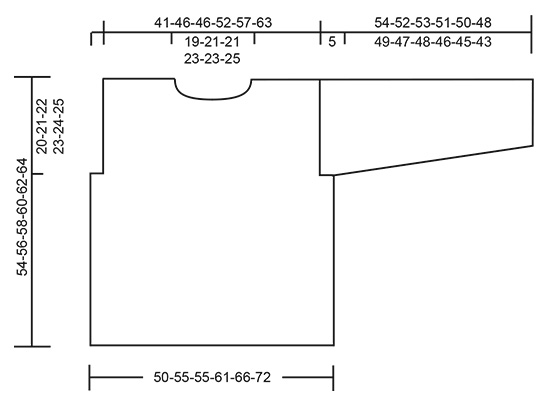
------------------------------------------------------- EXPLANATIONS FOR THE PATTERN: ------------------------------------------------------- RIDGE/GARTER STITCH (worked back and forth): Knit all rows. 1 ridge in height = Knit 2 rows. PATTERN: See diagram A.1. The diagram shows all rows in the pattern from the right side. INCREASE TIP (for sleeves): Increase 1 stitch on the inside of the 1 edge stitch by making 1 yarn over. On the next row, work the yarn over twisted to avoid a hole. ------------------------------------------------------- START THE PIECE HERE: ------------------------------------------------------- JUMPER – SHORT OVERVIEW OF THE PIECE: The jumper is worked back and forth in sections, which are sewn together. The neck is worked to finish. The whole garment is worked with 2 strands Brushed Alpaca Silk. BACK PIECE: Cast on 57-63-63-69-75-81 stitches with circular needle size 8 mm and 4 strands Brushed Alpaca Silk. Remove 2 of the strands and continue with 2 strands. Work 1 RIDGE – see description above. Then work pattern starting from the right side as follows: 1 edge stitch in garter stitch, A.1A (= 6 stitches), A.1B over the next 42-48-48-54-60-66 stitches (= 7-8-8-9-10-11 repeats of 6 stitches), A.1C (= 7 stitches) and 1 edge stitch in garter stitch. Continue this pattern back and forth. REMEMBER THE KNITTING TENSION! When the piece measures 34-35-36-37-38-39 cm, cast off for the armholes as follows: Cast off the first 6 stitches and work to the end of the row. Turn, cast off the first 6 stitches and work to the end of the row = 45-51-51-57-63-69 stitches. Continue as follows from the right side: 1 edge stitch in garter stitch, A.1A (= 6 stitches), A.1B over the next 30-36-36-42-48-54 stitches (= 5-6-6-7-8-9 repeats of 6 stitches), A.1C (= 7 stitches) and 1 edge stitch in garter stitch. When the piece measures 44-46-48-49-51-53 cm, continue with stocking stitch (edge stitches worked in garter stitch). When the piece measures 52-54-56-58-60-62 cm, cast off the middle 19-21-21-23-23-25 stitches for the neck, and each shoulder is finished separately. AT THE SAME TIME cast off 1 stitch on the next row from the neck = 12-14-14-16-19-21 stitches on the shoulder. Continue working until the piece measures 54-56-58-60-62-64 cm. Cast off. Work the other shoulder in the same way. FRONT PIECE: Cast on 57-63-63-69-75-81 stitches with circular needle size 8 mm and 4 strands Brushed Alpaca Silk. Remove 2 of the strands and continue with 2 strands. Work 1 ridge. Then work pattern starting from the right side as follows: 1 edge stitch in garter stitch, A.1A (= 6 stitches), A.1B over the next 42-48-48-54-60-66 stitches (= 7-8-8-9-10-11 repeats of 6 stitches), A.1C (= 7 stitches) and 1 edge stitch in garter stitch. Continue this pattern back and forth. When the piece measures 34-35-36-37-38-39 cm, cast off for the armholes as follows: Cast off the first 6 stitches and work to the end of the row. Turn, cast off the first 6 stitches and work to the end of the row = 45-51-51-57-63-69 stitches. Then work as follows from the right side: 1 edge stitch in garter stitch, A.1A (= 6 stitches), A.1B over the next 30-36-36-42-48-54 stitches (= 5-6-6-7-8-9 reports of 6 stitches), A.1C (= 7 stitches) and 1 edge stitch in garter stitch. When the piece measures 44-46-48-49-51-53 cm, continue with stocking stitch (edge stitches worked in garter stitch). When the piece measures 50-52-54-56-58-60 cm, place the middle 13-15-15-17-17-19 stitches on a thread for the neck, and each shoulder is finished separately. Then cast off for the neck at the beginning of every row from the neck as follows: Cast off 2 stitches 1 time and 1 stitch 2 times = 12-14-14-16-19-21 stitches on the shoulder. Continue working until the piece measures 54-56-58-60-62-64 cm. Cast off. Work the other shoulder in the same way. SLEEVES: Cast on 33-33-33-39-39-39 stitches with circular needle size 8 mm and 4 strands Brushed Alpaca Silk. Remove 2 of the strands and continue with 2 strands. Work 1 ridge. Then work pattern starting from the right side as follows: 1 edge stitch in garter stitch, A.1A (= 6 stitches), A.1B over the next 18-18-18-24-24-24 stitches (= 3-3-3-4-4-4 repeats of 6 stitches), A.1C (= 7 stitches) and 1 edge stitch in garter stitch. Continue this pattern back and forth. AT THE SAME TIME when the piece measures 8 cm, increase 1 stitch on each side – read INCREASE TIP. Increase like this every 7-6-5-7-5½-4½ cm a total of 6-7-8-6-7-8 times on each side = 45-47-49-51-53-55 stitches. The increased stitches are worked in stocking stitch until you have enough stitches for a new repeat of A.1 on each side. Continue working until the sleeve measures 49-47-48-46-45-43 cm. Insert 1 marker in each side – they mark the bottom of the armhole. Continue working until the sleeve measures 54-52-53-51-50-48 cm. Cast off. Work the other sleeve in the same way. ASSEMBLY: The piece is assembled using 1 strand. Sew the shoulder seams edge to edge, so the seam is flat. Sew the cast-off edge on the sleeves to the armholes – see sketch. Sew the bottoms of the armholes – the markers on the sleeves should match the sides of the body. Sew the sleeve and side seams in one go – start at the bottom of the sleeve, sew up to the armhole and then down the side seam. NECK: Knit up 46 to 60 stitches around the neck (including the stitches on the thread in front) with short circular needle size 8 mm and 2 strands Brushed Alpaca Silk. Work stocking stitch for 8-9 cm, cast off with 4 strands. |
|||||||||||||||||||
Diagram explanations |
|||||||||||||||||||
|
|||||||||||||||||||
 |
|||||||||||||||||||
 |
|||||||||||||||||||
Have you finished this pattern?Tag your pictures with #dropspattern #lifesstreamsweater or submit them to the #dropsfan gallery. Do you need help with this pattern?You'll find 27 tutorial videos, a Comments/Questions area and more by visiting the pattern on garnstudio.com. © 1982-2026 DROPS Design A/S. We reserve all rights. This document, including all its sub-sections, has copyrights. Read more about what you can do with our patterns at the bottom of each pattern on our site. |
|||||||||||||||||||


With over 40 years in knitting and crochet design, DROPS Design offers one of the most extensive collections of free patterns on the internet - translated to 17 languages. As of today we count 324 catalogues and 12245 patterns translated into English (UK/cm).
We work hard to bring you the best knitting and crochet have to offer, inspiration and advice as well as great quality yarns at incredible prices! Would you like to use our patterns for other than personal use? You can read what you are allowed to do in the Copyright text at the bottom of all our patterns. Happy crafting!
Post a comment to pattern DROPS 220-6
We would love to hear what you have to say about this pattern!
If you want to leave a question, please make sure you select the correct category in the form below, to speed up the answering process. Required fields are marked *.