Comments / Questions (31)
![]() Marie-Jose wrote:
Marie-Jose wrote:
Naar aanleiding van de vraag van Riet; je kunt het patroon op ruitjespapier van 0,5 mm overtekenen en iedere keer als je een naald gebreid hebt een vinkje zetten. Ik doe dit al jaren en het bevalt prima.
29.04.2021 - 19:21
![]() Marie-Jose Werba wrote:
Marie-Jose Werba wrote:
Als je de voorbiezen gebreid hebt, trekt de onderrand iets naar boven. Ik vind dat niet echt mooi, hoe kan ik dat veranderen?
29.04.2021 - 19:20DROPS Design answered:
Dag Marie-Jose,
Dit zou je kunnen doen door een natte (thee)doek op het werk te leggen (je kunt eerst het werk op de strijkplank vast spelden in de juist vorm) en daar heel voorzichtig met een heet strijkijzer op te deppen. Denk erom dit heel voorzichtig te doen, anders kun je de breistructuur vernielen.
04.05.2021 - 20:08
![]() Jyotsna wrote:
Jyotsna wrote:
Please explain preferably with video the following "Purl stitch with marker, work A.9 until 1 stitch remains on round, and work last stitch as first stitch in A.9 (so that pattern begins and ends the same way on each side of stitch with marker). Continue pattern like this."
07.03.2021 - 18:51DROPS Design answered:
Dear Jyotsna, unfortunately we do not have the video you requested, butthe sentence means, that you purl the stitch that has the marker in, then repeat the pattern unit that is in the A.9 diagram, until you have only one stitches left, then knit this one stitch as you knitted the first stitch of the pattern-repeat. Happy Knitting!
07.03.2021 - 21:57
![]() Claudine Charette wrote:
Claudine Charette wrote:
Augmentations (milieu sous la manche) Il est indiqué de tricoter jusqu'à la maille avec le marqueur ? Mais celle-ci est la première maille du rang. On fait une jeté avant la maille avec le marqueur et après . Est ce que le début et la fin du rang va encore devoir commencer par une maille envers, doit-on déplacer le marqueur après les augmentations?
22.12.2020 - 02:50DROPS Design answered:
Bonjour Mme Charette, pour les manches, vous augmentez comme expliqué sous AUGMENTATIONS-1 (milieu sous les manches): , autrement dit, vous augmentez de chaque côté de la maille envers du milieu sous la manche, on augmente au début du tour pour pouvoir tricoter toutes les mailles en A.9, lorsque vous diviserez la manche, veillez à bien le faire au milieu sous la manche, la maille avec le marqueur sera alors la 1ère maille des rangs sur l'endroit. Bon tricot!
22.12.2020 - 09:49
![]() Leny Van Der Wal wrote:
Leny Van Der Wal wrote:
Bedankt voor de reactie. Als ik met mijn beperkte kennis van de franse taal kijk naar de opmerking van Claudine Charette, 14 nov, en het antwoord, denk ik toch dat er een (averechtse) tricot baan aan beide kanten van het achterpand ontstaat na de mindering voor de armsgaten. Bij de grotere maten. Ik heb meerdere patronen van Drops gebreid, maar dit is wel erg onduidelijk. Jammer want het is zo’n mooi vest!
21.11.2020 - 16:29DROPS Design answered:
Dag Leny,
De vraag is neergelegd bij de ontwerpafdeling van DROPS zodat er eventueel een correctie kan komen of een verbeterde omschrijving. Het patroon moet even grondig nagekeken worden, dus even geduld...
24.11.2020 - 13:41
![]() Claudine Charette wrote:
Claudine Charette wrote:
Désolée mais il faut vraiment faire 2 mailles lisières au début et à la fin du rang après les diminutions du dos en grandeur M car: A2-A3-A4-A5-A6-A1-A2 16 mailles +8 mailles +14 mailles +24 mailles +14 mailles +8 mailles + 16 mailles = 100 mailles Nous avons 104 mailles donc il en reste 4 à tricoter en dehors des diagrammes. Merci à l'avance.
19.11.2020 - 17:47DROPS Design answered:
Bonjour Mme Charette, en début de rang vous avez: 2 m point mousse, 4 m env, A.1 (= 8 m) et en fin de rang: A.3 (= 8 m), 4 m env, 2 m point mousse. On doit d'abord diminuer 2 m dans A.1 et A.3 = il reste: 2 m point mousse, 4 m env, 2 m end, 4 m env / 4 m env, 2 m end, 4 m env, 2 m point mousse, vous rabattez 10 m pour l'emmanchure = restent: 2 m env en début de rang avant A.2 et 2 m env après A.2 en fin de rang, tricotez ces mailles: 1 m lis au point mousse, 1 m env et en fin de rang: 1 m env et 1 m lis au point mousse. Bon tricot!
20.11.2020 - 08:27
![]() Leny Van Der Wal wrote:
Leny Van Der Wal wrote:
Klopt het dat in het achterpand, en ook in de beide voorpanden na het minderen voor de armsgaten een strook van in mijn geval, maat xxl, 17 steken tricotsteek ontstaat? De buitenste kabels zijn na het minderen verdwenen. Bij het achterpand gebeurt dit 1 naald voor de 41 cm is bereikt en bij de beide voorpanden 2 naalden voor de 41 cm is bereikt. Klopt dit? Komt mij verwarrend over...
16.11.2020 - 16:42DROPS Design answered:
Dag Leny,
Heb het patroon nagekeken en ik den inderdaad dat er ergens een foutje in zit en dat waarschijnlijk alleen de buitenste kabels aan elke kant geminderd moeten worden (waar afgekant wordt voor het armsgat), zodat de andere kabels doorlopen. Over deze kabels zou dan afgekant moeten worden vlak voor het afkanten van de schouder. Ik heb het doorgegeven aan de ontwerpafdeling om na te kijken en evt. te corrigeren.
21.11.2020 - 14:56
![]() Claudine Charette wrote:
Claudine Charette wrote:
Est-il possible de voir une photo du modèle de dos?
16.11.2020 - 02:21DROPS Design answered:
Bonjour Mme Charette, nous n'avons pas de photos de dos de ce modèle, toutefois, vous trouverez réponse à votre question ci-dessous, cela vous aidera peut-être. Bon tricot!
16.11.2020 - 09:57
![]() Claudine Charette wrote:
Claudine Charette wrote:
Bonjour, je fais la grandeur M, et je suis rendu aux diminutions du dos. Après celles-ci il nous reste 104 mailles. Vous indiquez de continuer avec 1 maille lisière de chaque côté. Selon mes calculs ce serait plutôt encore avec 2 mailles lisières de chaque côté? 2+ A2 (16)+A3(8)+A4(14)+A5(24)+A6(14)+A1(8)+A2(16)+2=104 Merci à l'avance.
14.11.2020 - 16:03DROPS Design answered:
Bonjour Mme Charette, après avoir rabattu les mailles des emmanchures, vous continuez avec seulement 1 maille lisière au point mousse de chaque côté, autrement dit, tricotez la maille avant A.2 au début du rang et après A.2 à la fin du rang comme avant (= à l'envers sur l'endroit et à l'endroit sur l'envers). Bon tricot!
16.11.2020 - 08:18
![]() Micheline PAPILLON wrote:
Micheline PAPILLON wrote:
Bonjour, je viens de commencer ce gilet 216-38 (Cabled Concerto) mais je pense qu'il y a erreur. Il n'est pas tricoté de haut en bas mais de bas en haut. Est-ce que j'ai bien comlpris et ai-je raison ? Dans l'affirmative, il serait nessessaire de corriger pour les autres tricoteuses. Cependant, le modèle est magniique !!!!!!!!!!!!! Merci pour votre compréhension, Bien cordialement, Micheline
04.11.2020 - 14:10DROPS Design answered:
Bonjour Micheline et merci pour votre retour, la correction a été faite. Bon tricot!
04.11.2020 - 17:01
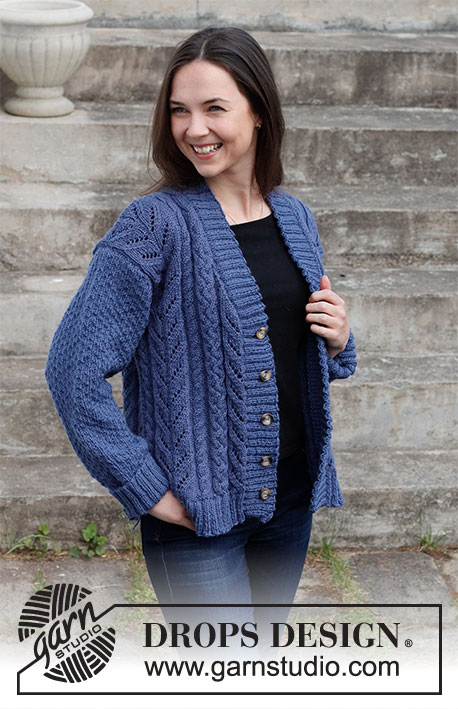
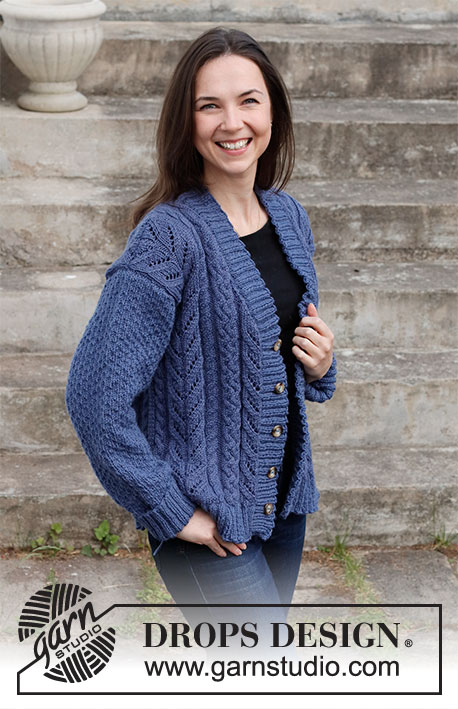
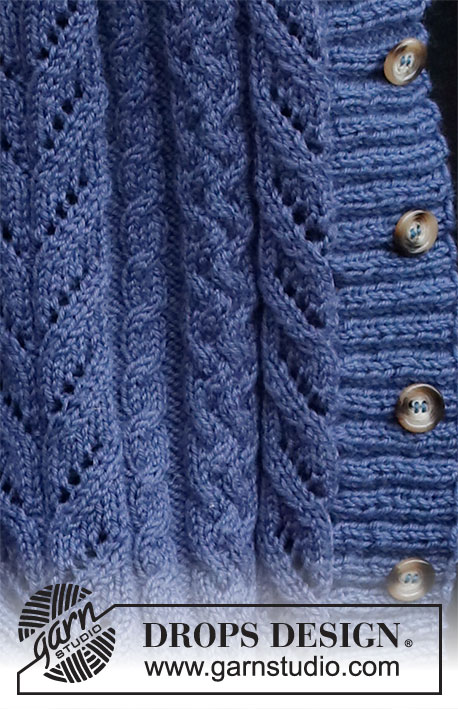
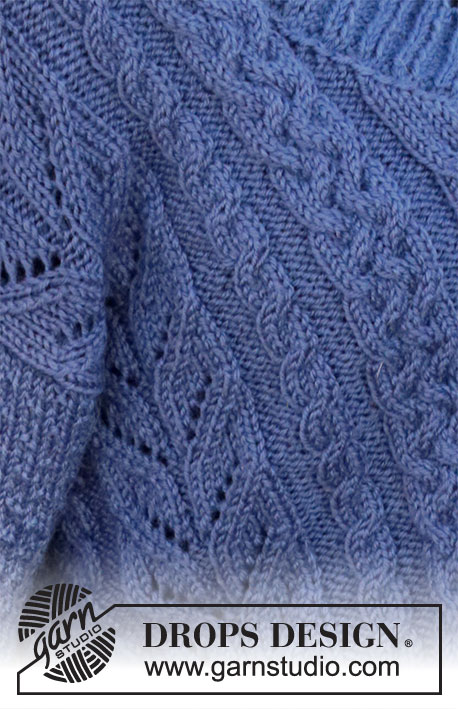
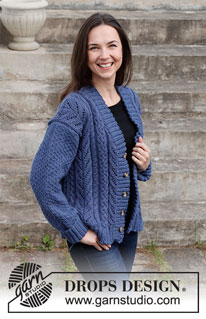
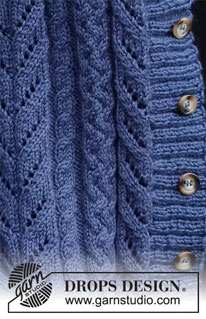
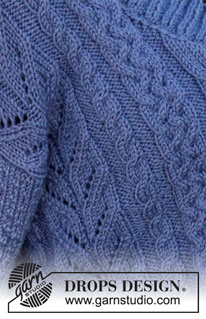
Cabled Concerto#cabledconcertocardigan |
|||||||||||||||||||||||||
 |
 |
||||||||||||||||||||||||
Knitted jacket in DROPS Karisma. Piece is knitted with cables, lace pattern, textured pattern and V-neck. Size: S - XXXL
DROPS 216-38 |
|||||||||||||||||||||||||
|
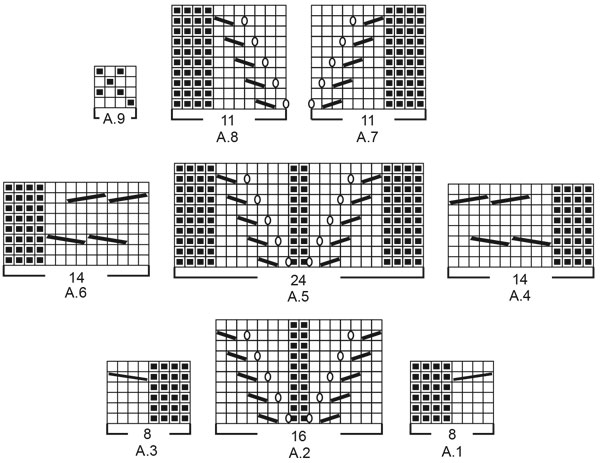
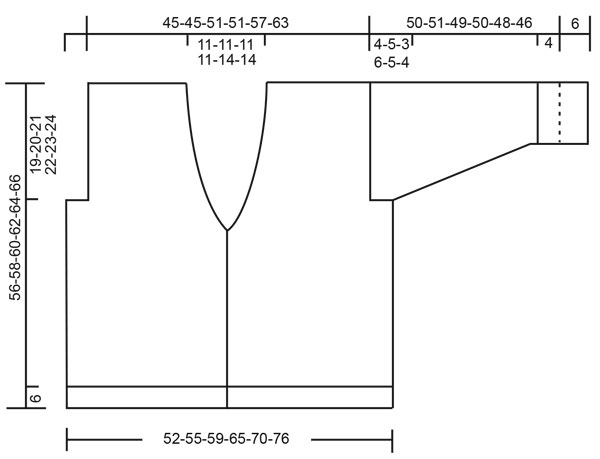
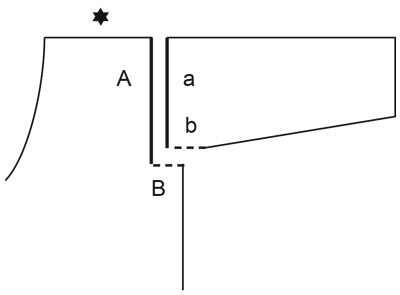
------------------------------------------------------- EXPLANATION FOR THE PATTERN: ------------------------------------------------------- GARTER STITCH (back and forth): Knit all rows. 1 ridge vertically = knit 2 rows. PATTERN: See diagrams A.1 to A.9. Diagrams show all rows in pattern seen from the right side. DECREASE TIP (applies to V-neck): All decreases are done from the right side, and decreases are done inside 1 edge stitch in garter stitch towards mid front! DECREASE AS FOLLOWS AFTER 1 EDGE STITCH IN GARTER STITCH: Slip 1 stitch knitwise, knit 1, pass slipped stitch over stitch worked (= 1 stitch decreased). DECREASE AS FOLLOWS BEFORE 1 EDGE STITCH IN GARTER STITCH: Begin 2 stitches before edge stitch and knit these 2 together (= 1 stitch decreased). INCREASE TIP-1 (applies to mid under sleeves): Increase 1 stitch on each side of marker as follows: Work until stitch with marker mid under sleeve, make 1 yarn over, purl stitch with marker as before, make 1 yarn over (= 2 stitches increased). On next round work yarn over twisted to avoid holes. Then work the new stitches in A.9. INCREASE TIP-2 (applies to increase on collar): Increase 1 stitch by making 1 yarn over between 2 purl stitches (seen from right side). On next row work yarn over twisted to avoid holes CAST-OFF TIP: To avoid a tight cast-off edge you may use a larger needle size. If this also is too tight, work a 1 yarn over after approx. every 8th stitch while casting off (cast off yarn overs as regular stitches). ------------------------------------------------------- START THE PIECE HERE: ------------------------------------------------------- JACKET - SHORT OVERVIEW OF THE PIECE: Work front pieces and back piece back and forth on circular needle in parts, bottom up. Work sleeves in the round on double pointed needles / a short circular needle, from the bottom and up to sleeve cap, then work the rest of sleeve back and forth on circular needle. Sew garment together. Then pick up stitches for band and collar - Work these in rib. BACK PIECE: Cast on 122-130-142-158-170-186 stitches on circular needle size 3.5 mm with Karisma. Purl 1 row (= wrong side). Work next row as follows from right side: 2 edge stitches in GARTER STITCH - read explanation above - * knit 2, purl 2 *, repeat from *-* until 4 stitches remain on needle, knit 2, and finish with 2 edge stitches in garter stitch. Continue rib like this for 6 cm. Purl 1 row from wrong side while decreasing 0-2-2-2-0-0 stitches evenly (work edge stitches in garter stitch) = 122-128-140-156-170-186 stitches. Switch to circular needle size 4.5 mm. Work next row as follows from right side: 2 edge stitches in garter stitch, purl 1-4-2-2-1-1, work A.1 over the next 8-8-16-24-32-40 stitches (= 1-1-2-3-4-5 repetitions of 8 stitches), work A.2 (= 16 stitches), work A.3 (= 8 stitches), work A.4 (= 14 stitches), work A.5 (= 24 stitches), work A.6 (= 14 stitches), work A.1 (= 8 stitches), work A.2 (= 16 stitches), work A.3 over the next 8-8-16-24-32-40 stitches (= 1-1-2-3-4-5 repetitions of 8 stitches), purl 1-4-2-2-1-1 and finish with 2 edge stitches in garter stitch. Continue pattern like this. REMEMBER THE KNITTING TENSION! When 1 row remains before piece measures 37-38-39-40-41-42 cm (and next row is worked from right side), decrease 2-2-2-4-4-4 stitches in each side by working the 4 stitches in each of the outermost 1-1-1-2-2-2 cables in each side knit together 2 by 2 = 118-124-136-148-162-178 stitches remain. On the next 2 rows cast off for armholes by casting off 7-10-8-14-13-13 stitches at the beginning of the next 2 rows = 104-104-120-120-136-152 stitches remain. Continue the pattern as before with 1 purl stitch (sees from right side) and 1 edge stitch in garter stitch in each side. When piece measures 54-56-58-60-62-64 cm, cast off the middle 20-20-20-20-26-26 stitches for neck and finish each shoulder separately. Work and cast off 1 stitch on next row from the neck = 41-41-49-49-54-62 stitches remain. When 2 rows remain before piece measures 56-58-60-62-64-66 cm (and next row is worked from right side), decrease 7-7-9-9-10-12 stitches on shoulder by knitting stitches in each of the cables in A.1/A.3 and A.4/A.6 together 2 by 2 = 34-34-40-40-44-50 stitches remain. Knit 1 row from wrong side. Cast off by knitting from right side - read CAST-OFF TIP! Back piece measures approx. 56-58-60-62-64-66 cm from shoulder and down. Work the other shoulder the same way. LEFT FRONT PIECE (when garment is worn): Cast on 61-65-73-81-89-97 stitches on circular needle size 3.5 mm with Karisma. Purl 1 row (= wrong side). Work next row as follows from the right side (i.e. from the side): 2 edge stitches in garter stitch, * knit 2, purl 2 *, repeat from *-* until 3 stitches remain on needle, knit 2, and finish with 1 edge stitch in garter stitch edge towards mid front. Continue rib like this for 6 cm. Purl 1 row from wrong side while decreasing 0-1-3-3-4-4 stitches evenly (work edge stitches in garter stitch) = 61-64-70-78-85-93 stitches. Switch to circular needle size 4.5 mm. Work next row as follows from the right side (i.e. from the side): 2 edge stitches in garter stitch, purl 1-4-2-2-1-1, work A.1 over the next 8-8-16-24-32-40 stitches (= 1-1-2-3-4-5 repetitions of 8 stitches), work A.2 (= 16 stitches), work A.3 (= 8 stitches), work A.4 (= 14 stitches), work A.7 (= 11 stitches) and finish with 1 edge stitch in garter stitch towards mid front. Continue pattern like this. AT THE SAME TIME decrease for V-neck and armholes as explained below. V-NECK: When piece measures 33-34-35-36-37-38 cm, decrease for V-neck towards mid front - read DECREASE TIP. Decrease for V-neck every 4th row 9-9-9-9-11-11 times in total, and then every 6th row 2-2-2-2-3-3 times in total. ARMHOLE: AT THE SAME TIME when 2 rows before remain piece measures 37-38-39-40-41-42 cm (and next row is worked from right side), decrease 2-2-2-4-4-4 stitches in the side by knitting the 4 stitches in each of the outermost 1-1-1-2-2-2 cables towards the side together 2 by 2. On next row from the side, cast off for armholes by casting off the first 7-10-8-14-13-13 stitches on needle. After all decreases for V-neck and armholes, 41-41-49-49-54-62 stitches remain on needle. Continue the pattern as before with 1 purl stitch (seen from right side) and 1 edge stitch in garter stitch in each side. When 2 rows remain before piece measures 56-58-60-62-64-66 cm (and next row is worked from right side), decrease 7-7-9-9-10-12 stitches on shoulder by knitting stitches in each of the cables in A.1/A.3 and A.4 together 2 by 2 = 34-34-40-40-44-50 stitches remain. Knit 1 row from wrong side. Cast off by knitting from right side - remember CAST-OFF TIP! Front piece measures approx. 56-58-60-62-64-66 cm from shoulder and down. RIGHT FRONT PIECE (when garment is worn): Cast on 61-65-73-81-89-97 stitches on circular needle size 3.5 mm with Karisma. Purl 1 row (= wrong side). Work next row as follows from the right side (i.e. from mid front): 1 edge stitch in garter stitch, * knit 2, purl 2 *, work from *-* until 4 stitches remain on needle, knit 2 and finish with 2 edge stitches in garter stitch. Continue rib like this for 6 cm. Purl 1 row from wrong side while decreasing 0-1-3-3-4-4 stitches evenly (work edge stitches in garter stitch) = 61-64-70-78-85-93 stitches. Switch to circular needle size 4.5 mm. Work next row as follows from the right side (i.e. from mid front): 1 edge stitch in garter stitch, work A.8 (= 11 stitches), work A.6 (= 14 stitches), work A.1 (= 8 stitches), work A.2 (= 16 stitches), work A.3 over the next 8-8-16-24-32-40 stitches (= 1-1-2-3-4-5 repetitions of 8 stitches), purl 1-4-2-2-1-1, and finish with 2 edge stitches in garter stitch towards the side. Continue pattern like this. AT THE SAME TIME decrease for V-neck and armholes as explained below. V-NECK: When piece measures 33-34-35-36-37-38 cm, decrease for V-neck towards mid front - read DECREASE TIP. Decrease for V-neck every 4th row 9-9-9-9-11-11 times in total, and then every 6th row 2-2-2-2-3-3 times in total. ARMHOLE: AT THE SAME TIME when 2 rows before remain piece measures 37-38-39-40-41-42 cm (and next row is worked from right side), decrease 2-2-2-4-4-4 stitches in the side by knitting the 4 stitches in each of the outermost 1-1-1-2-2-2 cables towards the side together 2 by 2. On next row from the side, cast off for armholes by casting off the first 7-10-8-14-13-13 stitches on needle. After all decreases for V-neck and armholes, 41-41-49-49-54-62 stitches remain on needle. Continue the pattern as before with 1 purl stitch (seen from right side) and 1 edge stitch in garter stitch in each side. When 2 rows remain before piece measures 56-58-60-62-64-66 cm (and next row is worked from right side), decrease 7-7-9-9-10-12 stitches on shoulder by knitting stitches in each of the cables in A.1/A.3 and A.6 together 2 by 2 = 34-34-40-40-44-50 stitches remain. Knit 1 row from wrong side. Cast off knitting from right side. SLEEVES: Cast on 40-44-44-48-48-52 stitches on double pointed needles size 3.5 mm with Karisma. Work rib in the round (= knit 2/purl 2). When rib measures 6 cm, insert 1 marker on round. This marks where sleeve should be folded up and measure sleeve from this marker later. When rib measures 10 cm from cast-on edge, knit 1 round while increasing 2 stitches evenly = 42-46-46-50-50-54 stitches. Insert 1 new marker in piece, in the first stitch on round. This marker marks mid under sleeve, and purl stitch with marker on every round onwards. Switch to double pointed needles size 4.5 mm and work first round as follows: Purl stitch with marker, work A.9 until 1 stitch remains on round, and work last stitch as first stitch in A.9 (so that pattern begins and ends the same way on each side of stitch with marker). Continue pattern like this. AT THE SAME TIME when sleeve measures 10-10-8-6-10-10 cm from first marker inserted, increase 2 stitches mid under sleeve – read INCREASE TIP-1. Increase like this every 2-2-2-2-1½-1½ cm 17-17-19-19-21-21 times in total = 76-80-84-88-92-96 stitches. When sleeve measures 46-46-46-44-43-42 cm from first marker, work sleeve cap back and forth on circular needle from mid under sleeve – continue A.9 as before with 1 edge stitch in garter stitch in each side until finished measurements (i.e. work stitch with marker and last stitch on round in garter stitch). Work until sleeve measures 50-51-49-50-48-46 cm from first marker (and approx. 56-57-55-56-54-52 cm from cast-on edge), i.e. There is a vent of approx. 4-5-3-6-5-4 cm at the top of sleeve. Cast off knitting from right side. NOTE! Shorter measurements in the larger sizes because of wider shoulders. Work the other sleeve the same way. ASSEMBLY: Sew shoulder seams inside cast-off edge. Sew side seam on front pieces and back piece from armholes and down to where rib begins, so that there is a vent of approx. 6 cm at the bottom in each side - sew side seams in outer loops of edge stitches , to get a flat seam. Sew sleeve cap to armhole inside 1 edge stitch in garter stitch along armhole. Then sew vent at the top of sleeve to the bottom of armhole – see chart. BAND AND COLLAR ON LEFT FRONT PIECE: Use circular needle size 3.5 mm and Karisma, begin from right side mid back of neck, and pick up approx. 152-156-160-168-172-180 stitches inside 1 edge stitch along neck line in the back of neck and then down along front piece (number of stitches should be divisible by 4). Work first row as follows from wrong side: 1 edge stitch in garter stitch, * purl 2, knit 2 *, repeat from *-* until 3 stitches remain on needle, purl 2, and finish with 1 edge stitch in garter stitch. Continue rib back and forth like with knit over knit, purl over purl and garter stitch over garter stitch. When rib measures 3 cm, insert 1 marker after the first 33-33-33-41-41-41 stitches from mid back. On next row from right side increase every other purl 2 to purl 3 from mid back of neck and down to marker – read INCREASE TIP-2 = 4-4-4-5-5-5 stitches increased. When rib measures 5 cm, increase the remaining purl 2 to purl 3 from mid back and down to marker = 4-4-4-5-5-5 stitches increased. When rib measures 6 cm, cast off with knit over knit and purl over purl - remember CAST-OFF TIP! BAND AND COLLAR ON RIGHT FRONT PIECE: Begin from right side at the bottom of right front piece and pick up the same number of stitches as on left band and collar, from bottom edge to mid back of neck. Work rib the same way as on left front piece, and increase on collar part the same way as on left front piece. AT THE SAME TIME when rib measures 4 cm, decrease for 5-5-5-6-6-6 buttonholes evenly. Place top buttonhole approx. 1 cm below decrease for V-neck began, and bottom buttonhole approx. 6 cm from bottom edge. 1 buttonhole = make 1 yarn over and knit 2 together. NOTE! It will look best if decrease is done in a purl section (seen from right side). When rib is done, cast off with knit over knit and purl over purl. Sew the buttons on to the left band and sew the collar together mid back. |
|||||||||||||||||||||||||
Diagram explanations |
|||||||||||||||||||||||||
|
|||||||||||||||||||||||||
 |
|||||||||||||||||||||||||
 |
|||||||||||||||||||||||||
 |
|||||||||||||||||||||||||
Have you finished this pattern?Tag your pictures with #dropspattern #cabledconcertocardigan or submit them to the #dropsfan gallery. Do you need help with this pattern?You'll find 26 tutorial videos, a Comments/Questions area and more by visiting the pattern on garnstudio.com. © 1982-2026 DROPS Design A/S. We reserve all rights. This document, including all its sub-sections, has copyrights. Read more about what you can do with our patterns at the bottom of each pattern on our site. |
|||||||||||||||||||||||||





Post a comment to pattern DROPS 216-38
We would love to hear what you have to say about this pattern!
If you want to leave a question, please make sure you select the correct category in the form below, to speed up the answering process. Required fields are marked *.