
Popular categories
Looking for a yarn?


Comments / Questions (53)
![]() Kjersti wrote:
Kjersti wrote:
Nå ser jeg feilen jeg gjorde. Jeg la ut på forstykket som på bakstykket - og så la jeg opp 6x3 i hver i hver side. Det var dumt!! Men det er bare å rekke opp og starte på nytt det! Det fine med å rekke opp, er at man har strikketøyet mye lenger😜
19.11.2020 - 13:44
![]() Kjersti wrote:
Kjersti wrote:
Hvorfor er ikke de 36 maskene som er lagt ut i sidene tatt med i tellingen når man har startet på Bolen?
18.11.2020 - 09:56DROPS Design answered:
Hei Kjersti, Du har 50-52-54-60 masker på bakstykket og det samme på forstykket. Dette blir til sammen 100-104-108-120 masker på bolen. God fornøyelse!
18.11.2020 - 10:19
![]() Kim wrote:
Kim wrote:
Je voudrais savoir comment je peux faire pour changer de couleur dans mon tricot ? Car je veux faire les motifs A1-A2-A3 (de chaque coter de l'ouvrage) d'une autre couleur et je ne sais pas comment faire. Pouvez vous m'aider svp ?
15.11.2020 - 11:34DROPS Design answered:
Bonjour Kim, il vous faudra probablement modifier les explications pour les tricoter séparément, car quand on tricote en rond, on ne peut pas tricoter des zones aussi larges d'une seule couleur - vous trouverez ici quelques pistes pour vous aider à adapter ce modèle sur aiguilles droites. Bon tricot!
16.11.2020 - 08:52
![]() Kim wrote:
Kim wrote:
Je ne comprend pas comment je dois commencer le dos & devant. Comment dois-je faire pour faire sa "Continuer à tricoter – le début du tour doit être 8 mailles avant le 1er fil marqueur." ?
14.11.2020 - 16:50DROPS Design answered:
Bonjour Kim, pour que les 2 torsades des côtés évoluent au même rythme, on va commencer le tour avant la torsade du 1er côté (= 8 mailles avant le fil marqueur du début du tour). Coupez le fil à la fin du devant et joignez-le 8 mailles avant le devant pour pouvoir tricoter le 1er A.1 du tour sur les 8 dernières mailles du dos + les 8 premières mailles du devant. Bon tricot!
16.11.2020 - 08:25
![]() Olivia wrote:
Olivia wrote:
Bonjour, Je ne comprend pas comment réaliser le rehausse dos, je suis bloquée dans mon ouvrage 0/3mois a ce niveau. Je débute où? Au départ mon début c’est c’était le début du A1. Je n’arrive pas à exécuter ce qui est écrit en tricot. Dans la vidéo explicative, il y’a un début spécifique. Merci d’avance pour votre réponse.
11.11.2020 - 16:55DROPS Design answered:
Bonjour Olivia, à partir du début des tours (= avant A.1 sur le côté), tricotez 58 m (= les 16 m de A.1 + les 26 m du devant + les 16 m de A.1), Tricotez maintenant jusqu'à ce qu'il reste 5 m avant le A.1 suivant (= 21 m), tournez et tricotez jusqu'à ce qu'il reste 5 m avant le A.1 de l'autre côté (= 16 m), tournez et répétez ces 2 rangs = tricotez 11 m au rang suivant, tournez et tricotez 6 m, tournez et tricotez à l'endroit jusqu'au milieu du 1er A.1 et tricotez 1 tour comme avant sur toutes les mailles en augmentant 1 m entre chaque A.1 (= 86 m au total). Bon tricot!
12.11.2020 - 08:49
![]() Agnieszka wrote:
Agnieszka wrote:
Dziękuję, już sama doszłam do rozwiązania, lecz proponuję dodać wyraźnie informację, że pierwszy marker znajduje się po środku schematu A1 z lewej strony spodenek (początek przerabiania przodu). Ułatwi to znacznie prace :-)
27.10.2020 - 16:59DROPS Design answered:
Witaj Agnieszko! Tak zrobimy. Pozdrawiamy i miłej pracy!
29.10.2020 - 18:48
![]() Agnieszka Pawlak-Cieślak wrote:
Agnieszka Pawlak-Cieślak wrote:
Wydaje mi się, że jest błąd. Przy zmianie na schematy A2, A3 najpierw powinno się przerabiać schemat A3, a potem A2
27.10.2020 - 10:21DROPS Design answered:
Witaj Agnieszko. Schematy są ok. Jak przejdziemy od schematu A.1 do A.2 i A.3, zmieni się początek okrążenia. Po wykonaniu podwyższenia z tyłu, początek okrążenia zostanie przesunięty na środek schematu A.1. Zobacz poprzedni akapit. Powodzenia i miłej pracy :)
27.10.2020 - 16:53
![]() Marion wrote:
Marion wrote:
Bonjour, je fais le patron en taille 6/9 mois, et au niveau de la réhausse du dos j'ai un petit problème : je ne peux pas tricoter la dernière étape, il n'y a que 13 mailles avant le prochain A.1 à l'envers... Après les diminutions, entre chaque A.1 il n'y a que 28 mailles. Est-ce que le nombre de mailles n'a pas été adapté à chaque taille ? Comment puis-je adapter pour la taille 6/9 mois ? Merci d'avance pour votre réponse, j'ai hâte de finir ce joli projet !
27.09.2020 - 01:44DROPS Design answered:
Bonjour Marion, merci pour votre retour, une correction a été faite sur la réhausse (les 2 derniers rangs ont été supprimés). Bon tricot!
05.10.2020 - 11:56
![]() Lene wrote:
Lene wrote:
Ich verstehe leider nicht wie ich die Erhöhung hinten stricken muss.
26.09.2020 - 18:48DROPS Design answered:
Liebe Lene, die Erhöhung besteht aus verkürzten Reihen, die zwischen den beiden A.1 an der hintere Mitte gestrickt werden - dieses Video zeigt, wie man eine Erhöhung strickt. Viel Spaß beim stricken!
28.09.2020 - 09:38
![]() Hanne M wrote:
Hanne M wrote:
Når man lave hulrækken ender man med 18 færre masker. Skal der ikke være et opslag efter man har strikket 2 ret sammen ?
14.09.2020 - 11:31DROPS Design answered:
Hei Hanne. Oppskriften er oversendt design avd. slik at de kan ta en sjekk. mvh DROPS design
14.09.2020 - 14:42
|
|||||||||||||
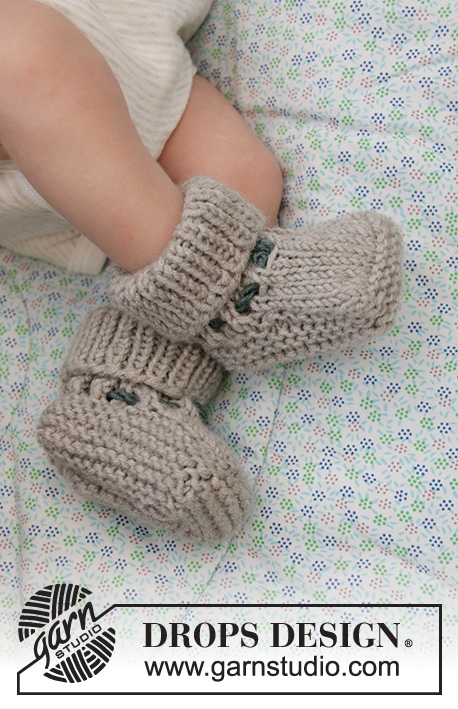
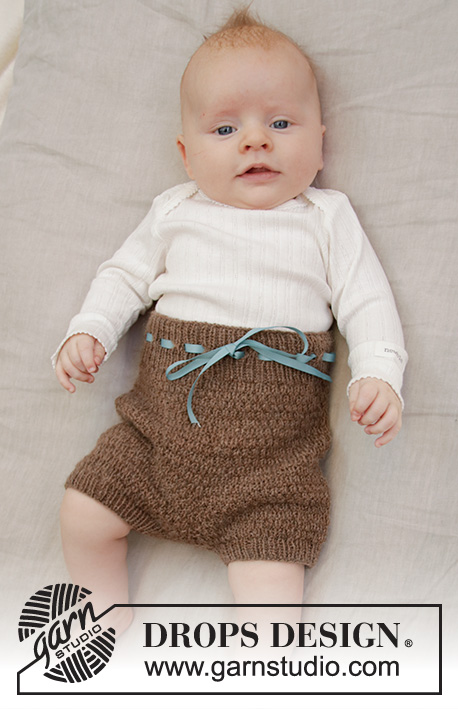
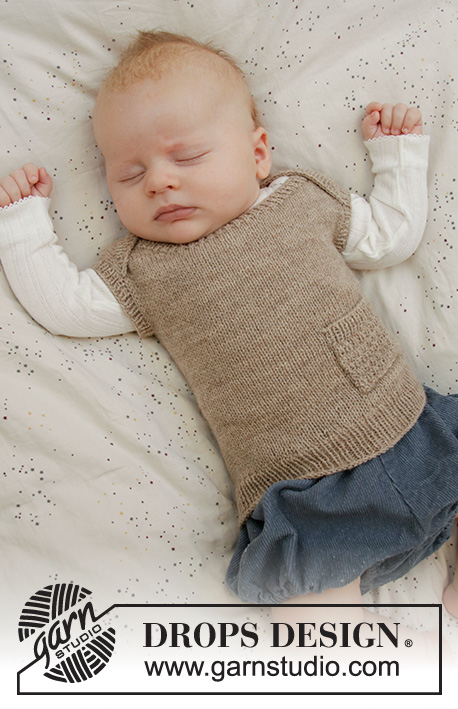
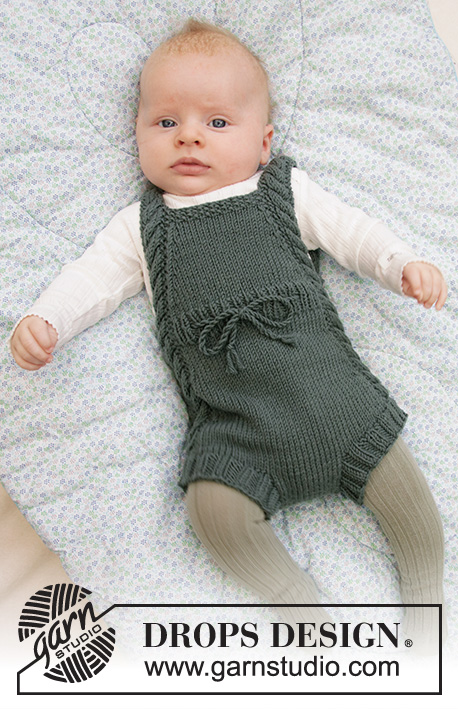
Ready to Play Romper#readytoplayromper |
|||||||||||||
 |
 |
||||||||||||
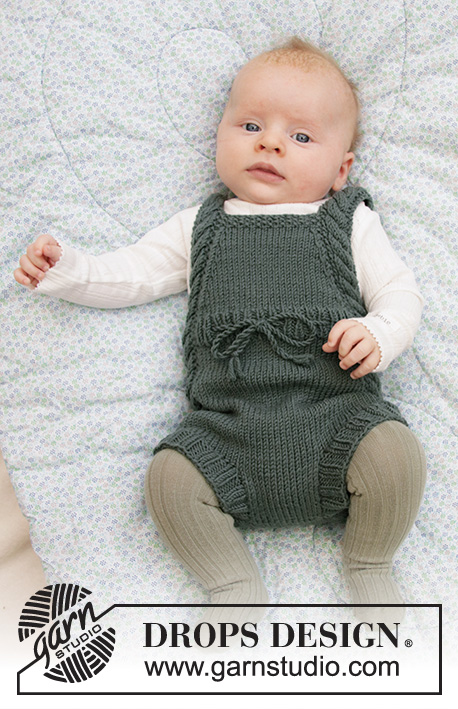
Knitted play suit for baby with cables and moss stitch in DROPS Merino Extra Fine. Size 1 - 24 months.
DROPS Baby 33-21 |
|||||||||||||
|
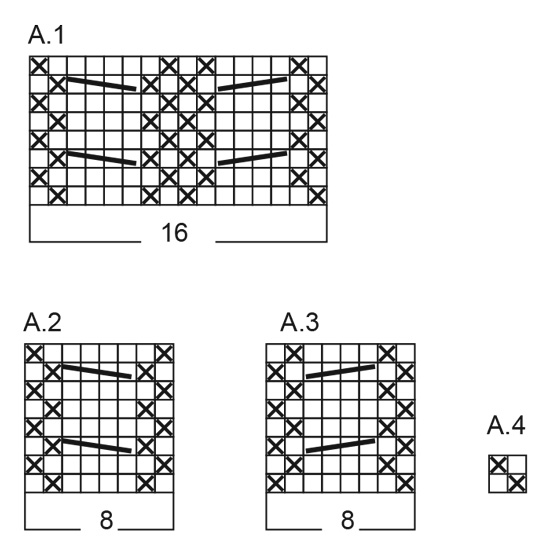
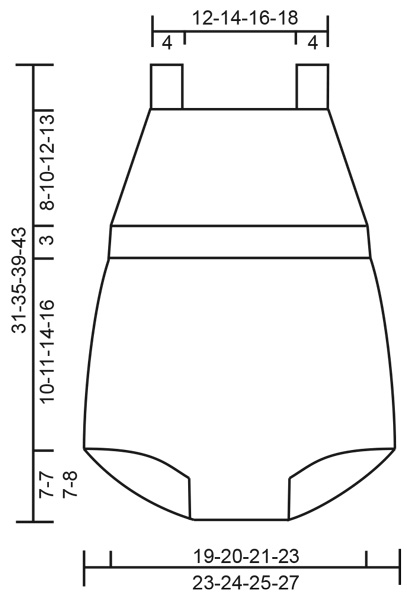
---------------------------------------------------------- EXPLANATION FOR THE PATTERN: ---------------------------------------------------------- GARTER STITCH (worked in the round): 1 ridge = 2 rounds. Knit 1 round and purl 1 round. GARTER STITCH (back and forth): 1 ridge = knit 2 rows. PATTERN: See diagrams A.1 to A.4 DECREASE TIP: Work until 2 stitches remain before A.1, decrease as follows: Knit 2 together, work stitches in A.1, slip 1 stitch knitwise, knit 1, pass slipped stitch over. ---------------------------------------------------------- START THE PIECE HERE: ---------------------------------------------------------- PLAY SUIT – SHORT OVERVIEW OF THE PIECE: Piece is worked back and forth in 2 parts, bottom up to after leg opening. Then work piece in the round before dividing at the waist, and finishing front piece back and forth on needle. BACK PIECE: Cast on 14-16-18-20 stitches on circular needle size 3.5 mm with Merino Extra Fine and work in stocking stitch back and forth. AT THE SAME TIME cast on 2 new stitches at the end of every row 9-9-9-10 times in total in each side = 50-52-54-60 stitches on needle and piece measures approx. 6-6-6-7 cm. Put piece aside and work the front piece. FRONT PIECE: Cast on 14-16-18-20 stitches on circular needle size 3.5 mm with Merino Extra Fine and work in stocking stitch back and forth for 5-5-5-6 cm. SIZE 1/3 months - 6/9 months - 12/18 months: Now cast on 6 new stitches at the end of every row 3 times in total each side. SIZE 24 months: Cast on 6 new stitches in each side at the end of every row 2 times, then 8 new stitches in each side 1 time = 50-52-54-60 stitches on needle and piece measures approx. 7-7-7-8 cm. BODY: Slip stitches from front and back piece on to same circular needle = 100-104-108-120 stitches on needle. Insert 1 marker in each side (= 50-52-54-60 stitches between markers) - NOW MEASURE PIECE FROM HERE. Continue to work - beginning of the round should be 8 stitches before first marker thread. Work A.1 (= 16 stitches), stocking stitch over the next 34-36-38-44 stitches in stocking stitch, A.1 (= 16 stitches), stocking stitch over the next 34-36-38-44 stitches in stocking stitch. Marker threads are in the middle of A.1 in each side. Continue this pattern in the round. When piece measures 2-3-5-7 cm, decrease 1 stitch on each side of both A.1 - READ DECREASE TIP (= 4 stitches decreased). Repeat decrease every 2 cm 4 times in total = 84-88-92-104 stitches on needle. When piece measures 10-11-14-16 cm from markers (piece measures approx. 17-18-21-24 cm from cast-on edge) work an elevation at the back as follows – NOTE: To avoid holes at every turn pick up loop between 2 stitches and knit twisted together with next stitch on needle: work knit over knit and A.1 over A.1 as before over the first 58-60-62-68 stitches, i.e. until after the second repetition of A.1 (= front piece), knit until 5 stitches remain before A.1 at the beginning of round, turn and purl back until 5 stitches remain before A.1 in the other side, turn piece. Knit until 10 stitches remain before A.1, turn piece and purl until 10 stitches remain before A.1 in the other side. Turn piece and knit until the middle of the first A.1. Switch to circular needle size 3 mm and work 1 round as before over all stitches, AT THE SAME TIME increase 1 stitch between every A.1 = 86-90-94-106 stitches. Work next round as follows: Continue with A.2 over the first 8 stitches (= make sure to begin on same row that should have been worked in A.1), work rib purl 1/knit 1 over the next 27-29-31-37 stitches, work A.3 over the next 8 stitches (= make sure to begin on same row that should have been worked in A.1), work rib purl 1/knit 1 over the next 43-45-47-53 stitches. When piece measures 1 ½ cm, work a row eyelet holes as follows: Work as before over the first 8 stitches, purl 1, * knit 1, purl 1, 1 yarn over, knit 2 together*, repeat from *-* over the next 24-28-28-36 stitches, work 10-8-10-8 stitches as before, purl 1, * knit 1, purl 1, 1 yarn over, knit 2 together*, repeat from *-* over the next 40-44-44-52 stitches, work 2-0-2-0 stitches as before. Then continue pattern and rib as before, until 1 round remains before rib measures 3 cm. Work next round as follows: Work over the first 43-45-47-53 stitches (= front piece), LOOSELY cast off the next 43-45-47-53 stitches with knit over knit and purl over purl (= back piece). FRONT PIECE: Insert 1 marker, NOW MEASURE PIECE FROM HERE! Switch to circular needle size 3.5 mm and work first row from right side as follows: Continue A.2 over the first 8 stitches on needle, 27-29-31-37 stitches in stocking stitch, A.3 over the last 8 stitches on needle. Continue like this back and forth. AT THE SAME TIME when piece measures 1-0-0-1 cm, decrease 1 stitch in each side - READ DECREASE TIP. Repeat decrease every 2nd-4th-6th-6th needle 7-7-6-6 times in total = 29-31-35-41 stitches remain on needle. When piece measures 7-9-11-12 cm from marker - adjust so that next row is from right side), work 6 rows with A.4 over stitches between A.2 and A.3 in each side. Work next row as follows from right side: work 8 stitches (= A.2) and slip these stitches on 1 stitch holder for shoulder strap, cast off the next 13-15-19-25 stitches and work the last 8 stitches (= A.3, shoulder strap). SHOULDER STRAP: Continue in A.3 back and forth until shoulder strap measures approx. 18 to 24 cm (or desired length). Cast off. Continue in A.2 back and forth until the other shoulder strap measures approx. 18 to 24 cm (or desired length). Cast off. ASSEMBLY: RIB EDGE: Pick up from right side approx. 50 to 58 stitches along one opening for leg on circular needle size 3 mm with Merino Extra Fine. Purl 1 row from wrong side AT THE SAME TIME increase evenly to 58-62-66-70 stitches. Then work rib = knit 2/purl 2 back and forth with 1 edge stitch in garter stitch in each side. When edge measures 2-4 cm, loosely cast off with knit over knit and purl over purl. Repeat along the other leg. Sew opening between legs inside 1 edge stitch - i.e. sew together one rib edge, then sew seam between leg openings and finally the other rib edge. Fasten a button at the bottom on each shoulder strap. Use holes in eyelet row on rib to button. TIE: Cut 2 lengths Merino Extra Fine yarn of approx. 3 metres. Twine the strands tog until they resist, fold the string double so that it twines again. Make a knot at each end. Begin mid front and thread tie up and down through eyelet row on rib in waist. |
|||||||||||||
Diagram explanations |
|||||||||||||
|
|||||||||||||
 |
|||||||||||||
 |
|||||||||||||
Have you finished this pattern?Tag your pictures with #dropspattern #readytoplayromper or submit them to the #dropsfan gallery. Do you need help with this pattern?You'll find 24 tutorial videos, a Comments/Questions area and more by visiting the pattern on garnstudio.com. © 1982-2026 DROPS Design A/S. We reserve all rights. This document, including all its sub-sections, has copyrights. Read more about what you can do with our patterns at the bottom of each pattern on our site. |
|||||||||||||


With over 40 years in knitting and crochet design, DROPS Design offers one of the most extensive collections of free patterns on the internet - translated to 17 languages. As of today we count 324 catalogues and 12290 patterns translated into English (UK/cm). 12290
We work hard to bring you the best knitting and crochet have to offer, inspiration and advice as well as great quality yarns at incredible prices! Would you like to use our patterns for other than personal use? You can read what you are allowed to do in the Copyright text at the bottom of all our patterns. Happy crafting!
Post a comment to pattern DROPS Baby 33-21
We would love to hear what you have to say about this pattern!
If you want to leave a question, please make sure you select the correct category in the form below, to speed up the answering process. Required fields are marked *.