
Popular categories
Looking for a yarn?


Comments / Questions (189)
![]() Pia Wiingreen wrote:
Pia Wiingreen wrote:
Vest 210-4. Er i tvivl om omslagene og kan ikke se det tydeligt på filmene. Skal tråden ligge bagved ved vrangmaskerne og foran på retmaskerne?
28.09.2023 - 18:56DROPS Design answered:
Hej Pia, du laver bare et almindeligt omslag både til vrangmasken og retmasken :)
11.10.2023 - 07:48
![]() Chabrol wrote:
Chabrol wrote:
Bonjour, Je souhaiterais tricoter le modèle Mountain Moraine à la machine à tricoter, ne pouvant pas tricoter à la main suite à un accident à la main droite. Avez les explications adaptées pour ce modèle? Merci beaucoup Cordialement
21.09.2023 - 16:06DROPS Design answered:
Bonjour Mme Chabrol, nous n'avons pas d'explications spécifiques aux machines à tricoter car les réglages sont différents selon la marque, il va vous falloir les adapter en fonction de la vôtre. Peut-être que votre magasin ou bien un forum spécialisé en machines à tricoter pourra vous aider. Merci pour votre compréhension.
21.09.2023 - 16:59
![]() Margarete Johanna wrote:
Margarete Johanna wrote:
Bitte um die Anleitung in deutsch
13.09.2023 - 11:46
![]() Lisa M wrote:
Lisa M wrote:
Wie viel Mehrweite (positive ease) sollte der Pullunder haben? Reicht bei 1,23 m die Größe XL mit 1,30 m Umfang? Vielen Dank
04.08.2023 - 22:12DROPS Design answered:
Liebe Lisa, damit arbeiten wir nicht, messen Sie eine ähnliche Kleidung, die Sie gerne haben, und vergleichen Sie die Maßnahmen mit den in der Maßskizze, so finden Sie am besten die passende Größe. Viel Spaß beim stricken!
07.08.2023 - 09:32
![]() Britta Lundmark wrote:
Britta Lundmark wrote:
Det är ett svårt, otydligt mönster att följa. Varför inte dela upp mönstret i 1/2 bakstycke- ärm- framstycke-ärm- 1/2 bakstycke. Samt att maskantalen uppges eftersom.? Hoppas jag går i land med detta mönster….?
22.05.2023 - 15:47DROPS Design answered:
Hej Britta, det her er et mønster med sadelskulder og vi har lavet 4 helt specifikke videoer som viser nøjagtig hvordan man gør. Vil du hellere strikke en klassisk vest, så kan vi hjælpe dig med at finde en :)
23.05.2023 - 11:32
![]() Hanneke Nauta wrote:
Hanneke Nauta wrote:
Wat een fijn patroon. En breidde vlot weg; 4 dagen. Heb hem gemaakt in de kleur heide van Air en denk erover om hem nog eens te maken in bv een mooie kleur groen of blauw. Dank!
19.02.2023 - 16:55
![]() Gema wrote:
Gema wrote:
Hola. En el patrón Mountain Moraine se dan las explicaciones para las vueltas del derecho y las del revés no o cómo es? No consigo que me salga. Gracias
17.02.2023 - 19:09DROPS Design answered:
Hola Gema, en el diagrama están representadas todas las filas del patrón (por el lado derecho y por el lado revés) vistas por el lado derecho. Cuando se trabaja en redondo, el diagrama se lee como se presenta, pero si se trabaja de ida y vuelta las filas de revés se leen opuesto a como se presenta (revés como derecho y derecho como revés).
19.02.2023 - 19:45
![]() Grete wrote:
Grete wrote:
Er ferdig med ermhullene og har lagt opp 3 masker under ermene. I oppskriften står det følgende: På første omgang strikkes de 3 maskene som ble lagt opp under ermene i mønster uten kast. Men i instruksjonsvideoen strikkes de med kast på første runde... Hva er riktig?
21.01.2023 - 15:12
![]() Eva wrote:
Eva wrote:
Hej! Har precis stickat klar denna, efter att flera gånger fått börja om. Jag har storlek S normalt, men stickade den i storlek M för att få den oversize. På bilden ser den ju också lite oversize ut. Men till min besvikelse blev den inte alls oversize trots att jag valde en större storlek än jag normalt har. Tror nog att jag repar upp den och väljer ett annat mönster, för som den blev kommer jag inte att använda den. Synd då den på bilden är fin!
18.01.2023 - 13:27
![]() Linda wrote:
Linda wrote:
Jeg strikker i str S. Starter med 52 masker på bæresrtykket. Deretter skal man strikke A2 og A3 en gang dvs jeg har 76 masker, deretter skal jeg strikke A2a og A3a ni ganger, og vil dermed ha (9 x 12 pluss 76) 186 masker. På mønsteret står det st jeg skal ha 140. Jeg skjønner ikke regnestykket her.
08.01.2023 - 22:35DROPS Design answered:
Hej Linda, har du se de 3 videoer vi har lavet til denne vest, du finder dem nederst i opskriften :)
10.01.2023 - 13:50
|
||||||||||||||||||||||||||||
Mountain Moraine#mountainmorainevest |
||||||||||||||||||||||||||||
 |
 |
|||||||||||||||||||||||||||
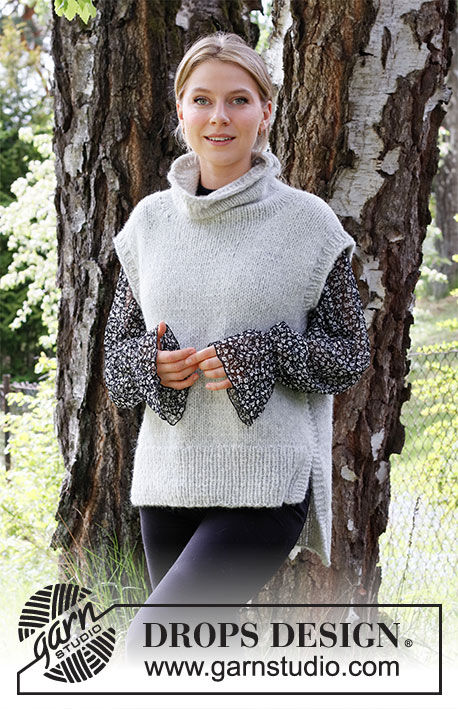
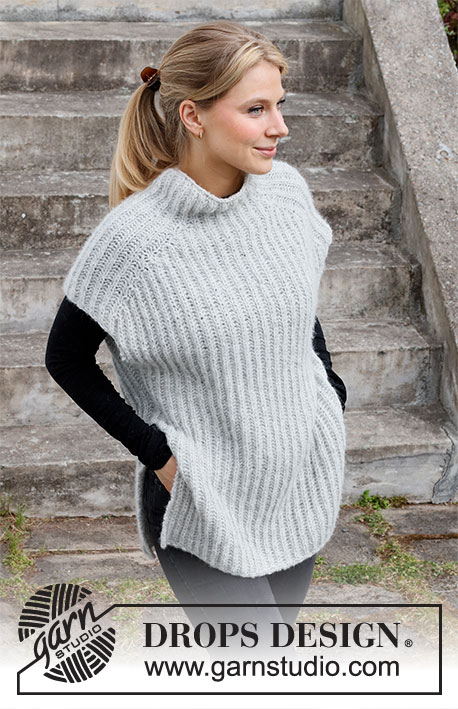
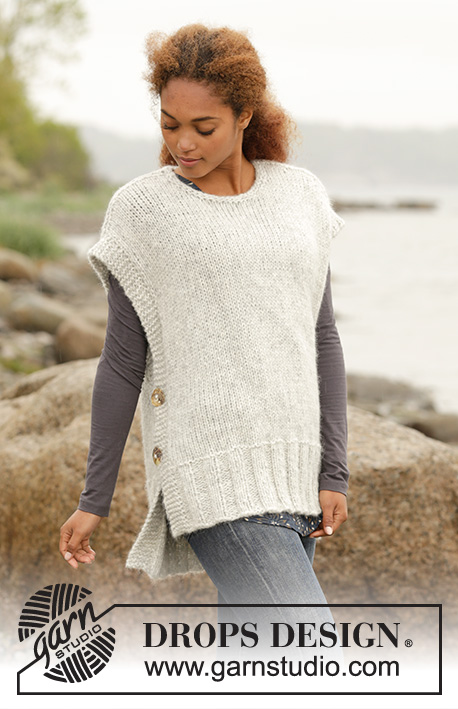
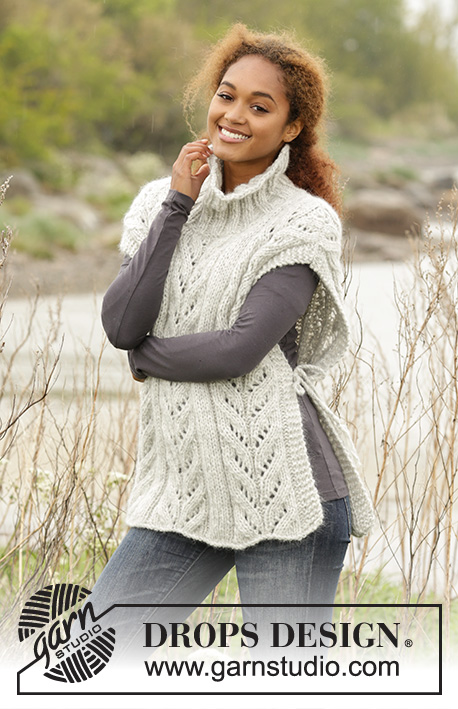
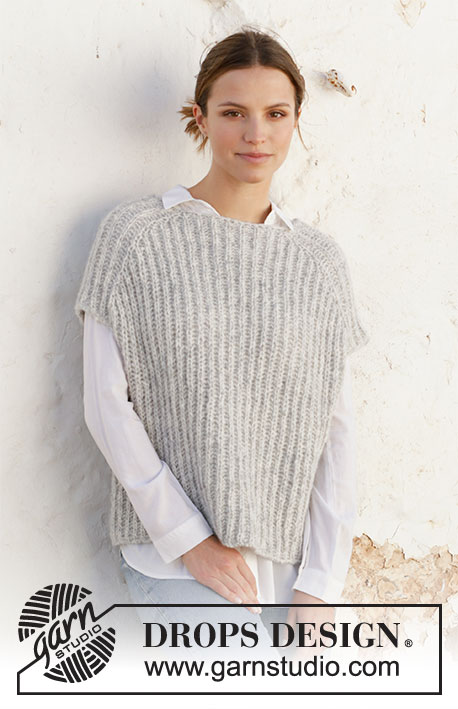
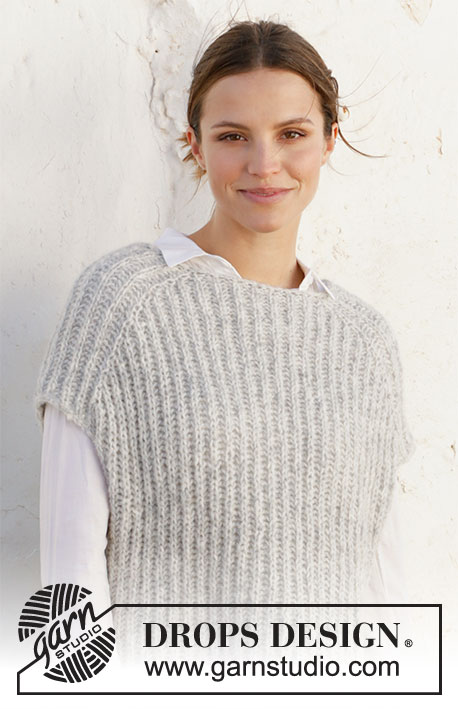
Knitted vest / slipover in DROPS Air. The piece is worked top down with English rib. Sizes XS - XXL.
DROPS 210-4 |
||||||||||||||||||||||||||||
|
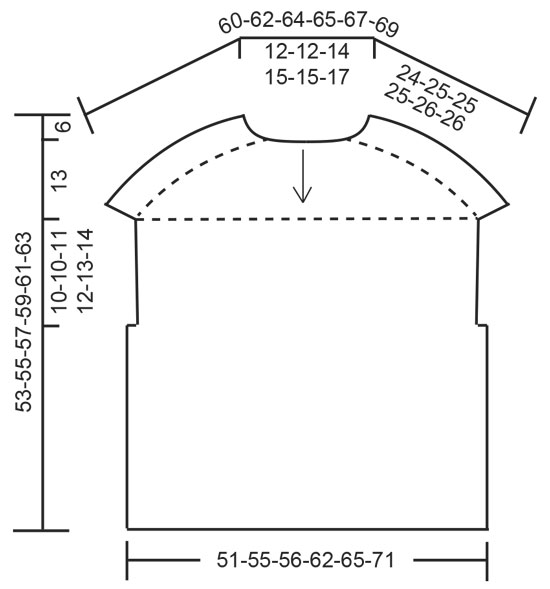
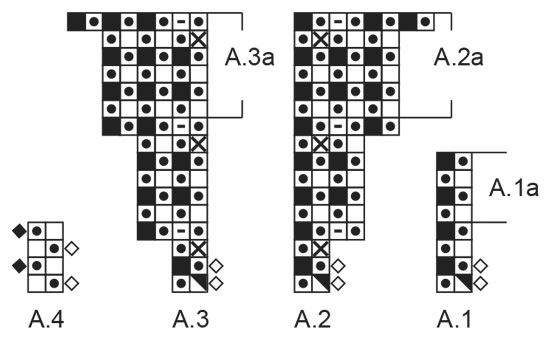
------------------------------------------------------- EXPLANATIONS FOR THE PATTERN: ------------------------------------------------------- RIDGE/GARTER STITCH (worked back and forth): Knit all rows. 1 ridge in height = Knit 2 rows. PATTERN: See diagrams A.1 to A.4 (worked with English rib). DECREASE TIP (evenly spaced): To work out how to decrease evenly, count the total number of stitches on needle (e.g. 62 stitches) and divide by number of decreases to be made (e.g. 10) = 6.2. In this example decrease by purling each 5th and 6th stitch together. ------------------------------------------------------- START THE PIECE HERE: ------------------------------------------------------- VEST – SHORT OVERVIEW OF THE PIECE: The neck and yoke are worked in the round with circular needle from mid back, top down. Stiches are increased for the shoulders before the piece is divided and the front and pieces worked separately as far as the bottom of the armholes. The pieces are rejoined and the body continued in the round. NECK: Cast on 62-62-66-70-70-74 stitches with circular needle size 6 mm and Air. Purl 1 round, purl 1 more round and decrease 10 stitches evenly spaced – read DECREASE TIP = 52-52-56-60-60-64 stitches. Purl 1 round. Change to circular needle size 7 mm. YOKE: Work pattern as follows: A.1 (= 2 stitches) over the first 6-6-6-8-8-8 stitches (= half back piece), A.2 (= 2 stitches), A.1 over 12 stitches, A.3 (= 2 stitches = shoulder), A.1 over 10-10-12-14-14-16 stitches (= front piece), A.2 over 2 stitches, A.1 over 12 stitches, A.3 over 2 stitches (= shoulder) and A.1 over the last 4-4-6-6-6-8 stitches (= half back piece). REMEMBER THE KNITTING TENSION! When A.1 has been completed 1 time in height, repeat A.1a onwards. When A.2 and A.3 have been completed 1 time in height, repeat A.2a and A.3a onwards; i.e. continue to increase every 6th round, the increased stitches are worked in English rib. When A.2a and A.3a have been worked a total of 8-9-9-10-11-12 times in height there are 132-140-144-156-164-176 stitches on the needle. Work A.1a over all stitches until the piece measures 24-25-25-25-26-26 cm at the longest point (i.e. measured along the shoulder); adjust so the next round is purled. Now divide the piece for front and back pieces and the shoulder stitches are cast off as follows: Work 26-28-28-32-34-36 stitches in English rib, 1 stitch in GARTER STITCH – read description above (= half back piece), cast off the next 13 stitches (yarn overs are cast off as separate stitches), 1 stitch in garter stitch, work 51-55-57-63-67-73 stitches in English rib, 1 stitch in garter stitch (= front piece), cast off the next 13 stitches (yarn overs are cast off as separate stitches), work 1 stitch in garter stitch and English rib over the last 25-27-29-31-33-37 stitches. Cut the strand. Now continue the armholes and back piece, working back and forth. Allow the other stitches to remain on the needle. BACK PIECE: = 53-57-59-65-69-75 stitches. Work as follows from the right side: 1 stitch in garter stitch, A.4 (= 2 stitches) until there is 1 stitch left (i.e. the English rib pattern starts and ends with 1 purled English rib stitch) and finish with 1 stitch in garter stitch. Continue this pattern back and forth for 10-10-11-12-13-14 cm, measured along the garter stitch; make sure the last row is from the wrong side. Allow the stitches to remain on the needle and work the front piece. FRONT PIECE: Work the 53-57-59-65-69-75 stitches on the front piece in the same way as the back piece. BODY: Work A.1a over the front piece (i.e. the garter stitches on each side become knitted English rib stitches), cast on 3 stitches, work A.1a over the back piece and cast on 3 stitches at the end of the row = 112-120-124-136-144-156 stitches. Now work A.1a in the round over all the stitches. On the first round work the 3 cast-on stitches under each sleeve without yarn overs. When the piece measures 47-49-51-53-55-57 cm (measured from the neck) cast off with knit; yarn overs are cast off as separate stitches (to avoid the cast-off edge being tight). |
||||||||||||||||||||||||||||
Diagram explanations |
||||||||||||||||||||||||||||
|
||||||||||||||||||||||||||||
 |
||||||||||||||||||||||||||||
 |
||||||||||||||||||||||||||||
Have you finished this pattern?Tag your pictures with #dropspattern #mountainmorainevest or submit them to the #dropsfan gallery. Do you need help with this pattern?You'll find 19 tutorial videos, a Comments/Questions area and more by visiting the pattern on garnstudio.com. © 1982-2026 DROPS Design A/S. We reserve all rights. This document, including all its sub-sections, has copyrights. Read more about what you can do with our patterns at the bottom of each pattern on our site. |
||||||||||||||||||||||||||||


With over 40 years in knitting and crochet design, DROPS Design offers one of the most extensive collections of free patterns on the internet - translated to 17 languages. As of today we count 324 catalogues and 12291 patterns translated into English (UK/cm). 12291
We work hard to bring you the best knitting and crochet have to offer, inspiration and advice as well as great quality yarns at incredible prices! Would you like to use our patterns for other than personal use? You can read what you are allowed to do in the Copyright text at the bottom of all our patterns. Happy crafting!
Post a comment to pattern DROPS 210-4
We would love to hear what you have to say about this pattern!
If you want to leave a question, please make sure you select the correct category in the form below, to speed up the answering process. Required fields are marked *.