
Popular categories
Looking for a yarn?


Comments / Questions (189)
![]() Petra wrote:
Petra wrote:
When I reach the Second A2a I got 3 extra stiches after I knitted the A2a increase row. Shall I kint those 3 remaing stiches as starting from the beggining like :knit yarn over and stitch together, and make 1 yarn over, slip 1 stitch onto the right needle as if to purl?
17.09.2025 - 17:50
![]() Sylvia wrote:
Sylvia wrote:
The patten says at yoke section: contunue to increase every 6th round. When should I start to increase and in which part of the piece?
15.09.2025 - 12:32
![]() Hiie Nagel wrote:
Hiie Nagel wrote:
Tere, olen siiani ära teinud,Nüüd koo mustrit järgmiselt: koo skeemi A.1 (= 2 silmust) esimesed 6-6-6-8-8-8 silmust (= pool seljaosa), skeemi A.2 (= 2 silmust), skeemi A.1 järgmised 12 silmust, skeemi A.3 (= 2 silmust = õlg), skeemi A.1 järgmised 10-10-12-14-14-16 silmust (= esiosa), skeemi A.2 järgmised 2 silmust, skeemi A.1 järgmised 12 silmust, skeemi A.3 järgmised 2 silmust (= õlg) ja koo skeemi A.1 viimasel 4-4-6-6-6-8 silmusel (= pool seljaosa).kuidas ma pahemat rida teen
11.08.2025 - 14:17DROPS Design answered:
Tere Hiie Nagel! Tegemist on patentkoega, mida kootakse mõlemal pool ühtemoodi. Vaata õppevideot: Kuidas kududa patentkude edasi/tagasi. X tingmärgiga on märgitud kasvatused, mis on alati samal soonikujoonel. Soovitan sellesse silmusesse panna silmusemärkija (erinevad), et oleks lihtsam näha, kus kasvatada. Head kudumist!
19.08.2025 - 22:29
![]() Karin wrote:
Karin wrote:
Hi, despite trying three different needle sizes, I can’t make the tension square work. The problem is the row height! With no. 7, I get 7.5 stitches x 14 rows, with no. 6 I get 15 stitches x 16 rows. I’ve zoomed in on the pattern and don’t see 11 stitches x 32 rows, it looks more like 18 rows high. Please can you explain? Many thanks, Karin
20.07.2025 - 16:25DROPS Design answered:
Hi Karin, the swatch is worked in English rib. 2 rows in English rib means 1 knit stitch visible in hight. So if you see 18 knit stitches in hight, it is in fact 36 rows in your swatch. Happy knitting!
21.07.2025 - 13:10
![]() Marja Demper wrote:
Marja Demper wrote:
Ben er uit na het nogmaals bekijken van de video. Elke meerdering is twee steken erbij ipv 1.
05.07.2025 - 17:37
![]() Marja Demper wrote:
Marja Demper wrote:
Of moet ik twee steken meerderen voor de schouders, zowel aan het begin als aan het eind. Dan kom ik nl op 104 steken gemeerderd en totaal op 164. Dit lijkt me logisch maar is niet wat het tel patroon aangeeft.
04.07.2025 - 20:23
![]() Marja Demper wrote:
Marja Demper wrote:
ER worden steeds 4 steken gemeerderd bij elke meerdering in A2 en A3. Dat zijn 12 steken tot de herhaling. Dan nog 10 x 4 steken in A2a en A3a. Zijn 40 steken gemeerderd. Dan kom ik op 112 steken, veel te weinig dus in maat XL. Wat doe ik verkeerd? Help!
04.07.2025 - 20:07DROPS Design answered:
Dag Marja,
Je meerdert in totaal 104 steken. Per telpatroon is dat dus 26 steken. 11 keer 2 steken (A.3a /A.2a 11 keer herhalen) en nog eens 4 steken van het onderste deel van het telpatroon.
08.07.2025 - 21:28
![]() Runi Lunde wrote:
Runi Lunde wrote:
Etter felling skal jeg starte på bak-stykket. Jeg skal klippe tråden. Men hvor skal jeg da begynne? Midt bak er jo delt, dvs. at jeg har strikket vrang til midten og skal strikke rett fra midten. Hva er det jeg ikke forstår her?
04.05.2025 - 16:54DROPS Design answered:
Hej Runi, har du set de 4 videoer vi har lavet specifikt til denne vest? Du finder dem ved at klikke på videoer øverst i opskriften :)
08.05.2025 - 10:47
![]() Murphy-ashton wrote:
Murphy-ashton wrote:
On the first video i thought it was the smaller size, but there is only 36 stitches on it instead of the 52. The yoke starts off with A1(=2stitches) over the first 8 stitches. dosen't that mean you are repeating the A1 pattern 8 times for the extra large pattern?
15.03.2025 - 16:32
![]() Jean Murphy-Ashton wrote:
Jean Murphy-Ashton wrote:
I am not hearing your video on the start of your pattern. I can watch it but no volume. I am not familiar with the English ribbing so it is difficult to start the project.
05.03.2025 - 14:59DROPS Design answered:
Dear Mrs Murphy-Ashton, Our videos do not have sound. We are a worldwide company and our videos are watched by people speaking endless of different languages and many do not understand English. So since there is not a given language for us to use, we instead have written instructions to accompany the video, and then there is no sound to disturb while watching. Remember to follow diagram at the same time as you are watching the video. Happy knitting!
05.03.2025 - 15:47
|
||||||||||||||||||||||||||||
Mountain Moraine#mountainmorainevest |
||||||||||||||||||||||||||||
 |
 |
|||||||||||||||||||||||||||
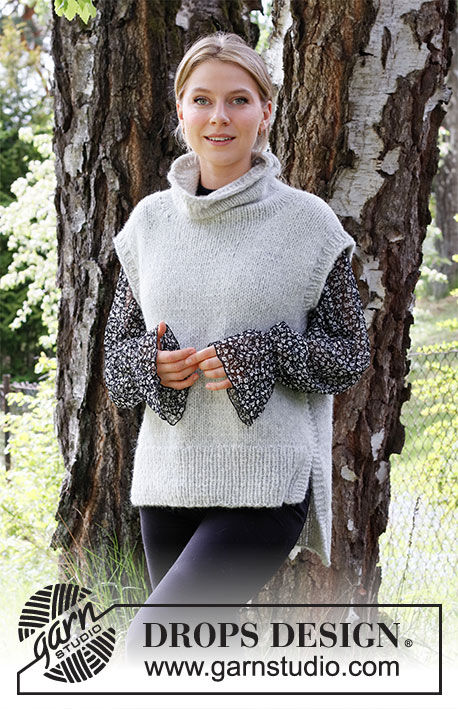
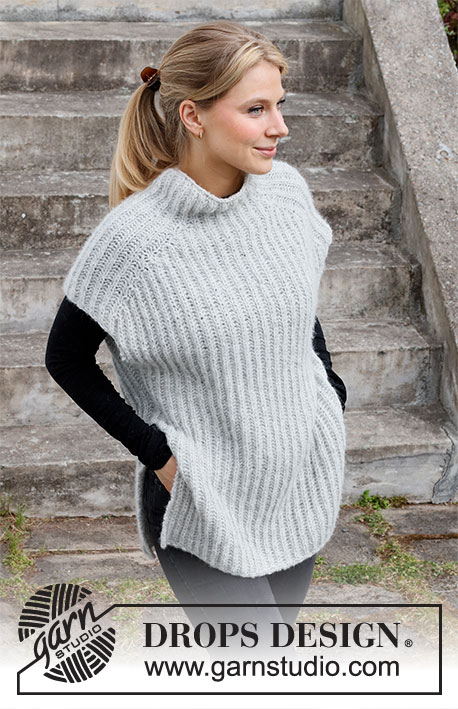
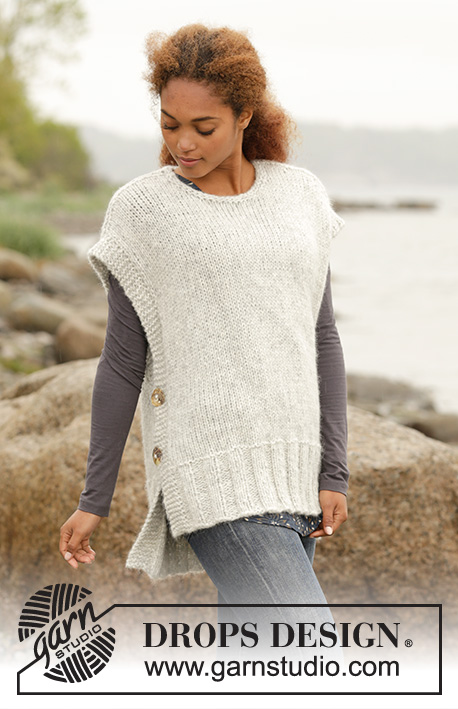
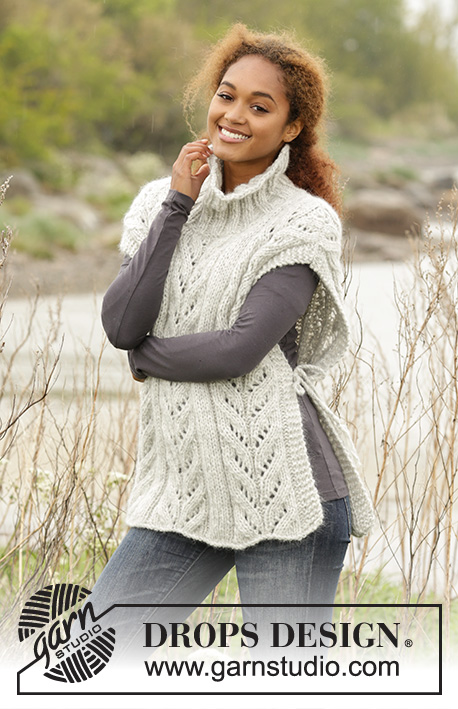
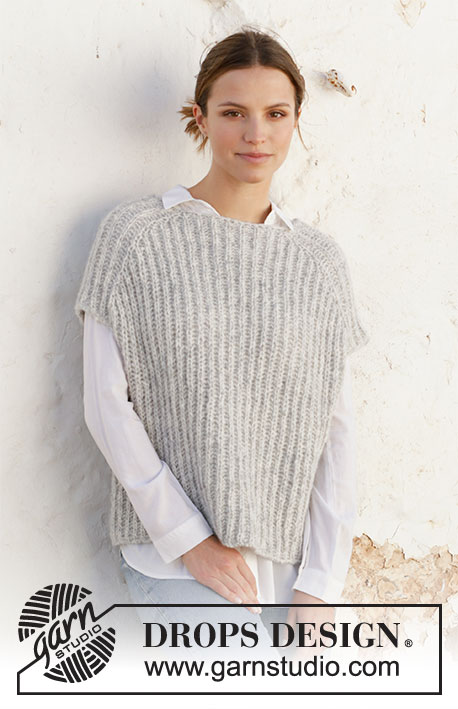
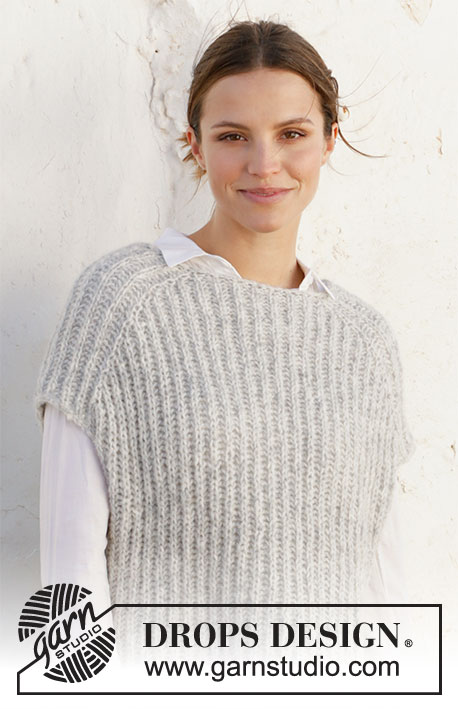
Knitted vest / slipover in DROPS Air. The piece is worked top down with English rib. Sizes XS - XXL.
DROPS 210-4 |
||||||||||||||||||||||||||||
|
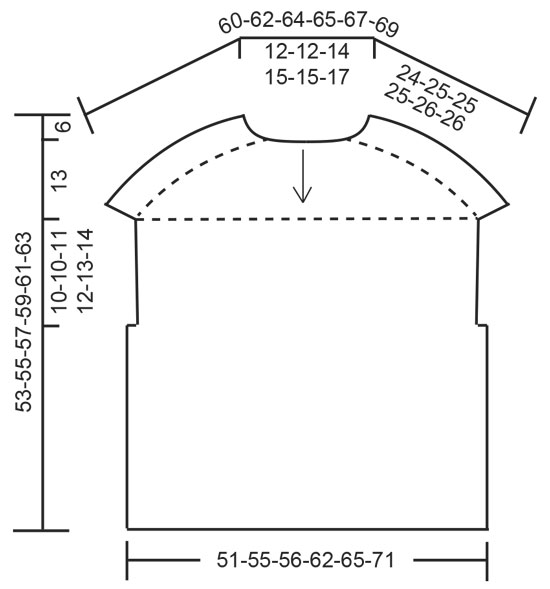
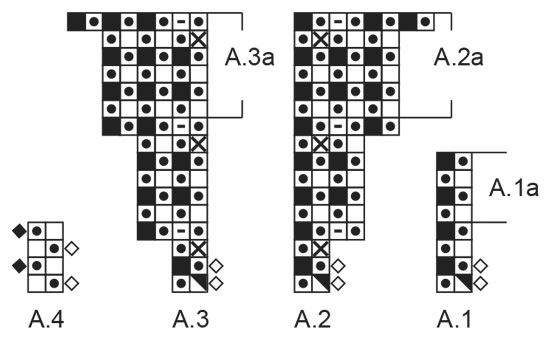
------------------------------------------------------- EXPLANATIONS FOR THE PATTERN: ------------------------------------------------------- RIDGE/GARTER STITCH (worked back and forth): Knit all rows. 1 ridge in height = Knit 2 rows. PATTERN: See diagrams A.1 to A.4 (worked with English rib). DECREASE TIP (evenly spaced): To work out how to decrease evenly, count the total number of stitches on needle (e.g. 62 stitches) and divide by number of decreases to be made (e.g. 10) = 6.2. In this example decrease by purling each 5th and 6th stitch together. ------------------------------------------------------- START THE PIECE HERE: ------------------------------------------------------- VEST – SHORT OVERVIEW OF THE PIECE: The neck and yoke are worked in the round with circular needle from mid back, top down. Stiches are increased for the shoulders before the piece is divided and the front and pieces worked separately as far as the bottom of the armholes. The pieces are rejoined and the body continued in the round. NECK: Cast on 62-62-66-70-70-74 stitches with circular needle size 6 mm and Air. Purl 1 round, purl 1 more round and decrease 10 stitches evenly spaced – read DECREASE TIP = 52-52-56-60-60-64 stitches. Purl 1 round. Change to circular needle size 7 mm. YOKE: Work pattern as follows: A.1 (= 2 stitches) over the first 6-6-6-8-8-8 stitches (= half back piece), A.2 (= 2 stitches), A.1 over 12 stitches, A.3 (= 2 stitches = shoulder), A.1 over 10-10-12-14-14-16 stitches (= front piece), A.2 over 2 stitches, A.1 over 12 stitches, A.3 over 2 stitches (= shoulder) and A.1 over the last 4-4-6-6-6-8 stitches (= half back piece). REMEMBER THE KNITTING TENSION! When A.1 has been completed 1 time in height, repeat A.1a onwards. When A.2 and A.3 have been completed 1 time in height, repeat A.2a and A.3a onwards; i.e. continue to increase every 6th round, the increased stitches are worked in English rib. When A.2a and A.3a have been worked a total of 8-9-9-10-11-12 times in height there are 132-140-144-156-164-176 stitches on the needle. Work A.1a over all stitches until the piece measures 24-25-25-25-26-26 cm at the longest point (i.e. measured along the shoulder); adjust so the next round is purled. Now divide the piece for front and back pieces and the shoulder stitches are cast off as follows: Work 26-28-28-32-34-36 stitches in English rib, 1 stitch in GARTER STITCH – read description above (= half back piece), cast off the next 13 stitches (yarn overs are cast off as separate stitches), 1 stitch in garter stitch, work 51-55-57-63-67-73 stitches in English rib, 1 stitch in garter stitch (= front piece), cast off the next 13 stitches (yarn overs are cast off as separate stitches), work 1 stitch in garter stitch and English rib over the last 25-27-29-31-33-37 stitches. Cut the strand. Now continue the armholes and back piece, working back and forth. Allow the other stitches to remain on the needle. BACK PIECE: = 53-57-59-65-69-75 stitches. Work as follows from the right side: 1 stitch in garter stitch, A.4 (= 2 stitches) until there is 1 stitch left (i.e. the English rib pattern starts and ends with 1 purled English rib stitch) and finish with 1 stitch in garter stitch. Continue this pattern back and forth for 10-10-11-12-13-14 cm, measured along the garter stitch; make sure the last row is from the wrong side. Allow the stitches to remain on the needle and work the front piece. FRONT PIECE: Work the 53-57-59-65-69-75 stitches on the front piece in the same way as the back piece. BODY: Work A.1a over the front piece (i.e. the garter stitches on each side become knitted English rib stitches), cast on 3 stitches, work A.1a over the back piece and cast on 3 stitches at the end of the row = 112-120-124-136-144-156 stitches. Now work A.1a in the round over all the stitches. On the first round work the 3 cast-on stitches under each sleeve without yarn overs. When the piece measures 47-49-51-53-55-57 cm (measured from the neck) cast off with knit; yarn overs are cast off as separate stitches (to avoid the cast-off edge being tight). |
||||||||||||||||||||||||||||
Diagram explanations |
||||||||||||||||||||||||||||
|
||||||||||||||||||||||||||||
 |
||||||||||||||||||||||||||||
 |
||||||||||||||||||||||||||||
Have you finished this pattern?Tag your pictures with #dropspattern #mountainmorainevest or submit them to the #dropsfan gallery. Do you need help with this pattern?You'll find 19 tutorial videos, a Comments/Questions area and more by visiting the pattern on garnstudio.com. © 1982-2026 DROPS Design A/S. We reserve all rights. This document, including all its sub-sections, has copyrights. Read more about what you can do with our patterns at the bottom of each pattern on our site. |
||||||||||||||||||||||||||||


With over 40 years in knitting and crochet design, DROPS Design offers one of the most extensive collections of free patterns on the internet - translated to 17 languages. As of today we count 324 catalogues and 12291 patterns translated into English (UK/cm). 12291
We work hard to bring you the best knitting and crochet have to offer, inspiration and advice as well as great quality yarns at incredible prices! Would you like to use our patterns for other than personal use? You can read what you are allowed to do in the Copyright text at the bottom of all our patterns. Happy crafting!
Post a comment to pattern DROPS 210-4
We would love to hear what you have to say about this pattern!
If you want to leave a question, please make sure you select the correct category in the form below, to speed up the answering process. Required fields are marked *.