
Popular categories
Looking for a yarn?


Comments / Questions (37)
![]() Lucienne wrote:
Lucienne wrote:
Bonjour, J ai fini le a1 Ma question est la suivante. Je dois faire le a2a en entier ensuite a2b en entier puis a2c en entier et terminer par a1 si j ai bien compris ?
16.08.2021 - 19:06DROPS Design answered:
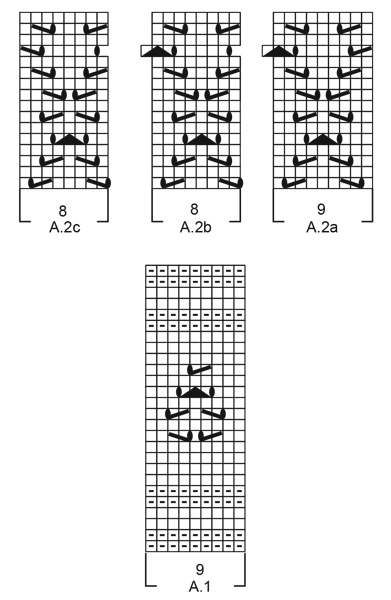
Bonjour Lucienne, apres avoir tricote le diagramme A.1, vous allez tricoter les diagrammes A.2a, A.2b et A.2c dans le meme rang [A.2a au-dessus des 9 mailles suivantes, répéter A.2b au-dessus des 72-104 mailles suivantes (= 9-13 motifs de 8 mailles), A.2c au-dessus des 8 mailles suivantes et 2 mailles de bordure au point mousse... Continuer ainsi jusqu'à ce que l'ouvrage mesure environ 45-73 cm]. Vous terminer par A.1 de nouveau. Bon tricot!
17.08.2021 - 00:25
![]() Francine Bérubé wrote:
Francine Bérubé wrote:
Je comprends bien vos diagrammes lorsqu’il est question du point mousse mais j’ai de la difficulté à bien comprendre les lignes 11/13/15 et 17 du diagramme À.1 Auriez-vous la gentillesse de me l’expliquer, ainsi je saurai lire les autres. Merci de l’attention que vous porterez à ma demande.
26.04.2021 - 00:18DROPS Design answered:
Bonjour Mme Bérubé, le diagramme A.1 ne se tricote pas au point mousse, les 2 rangs avec un - sont 2 rangs jersey envers; les autres mailles (= cases blanches) se tricotent en jersey endroit. Suivez les symboles de la légende pour tricoter le rang 11 par ex ainsi: *2 mailles endroit, 2 mailles ensemble à l'endroit, 1 jeté, 1 m end, glisser 1 maille à l'endroit, tricotez 1 maille endroit et passez la maille glissée par-dessus la maille tricotée, 2 mailles endroit*, répétez de *-*. Retrouvez ici plus d'infos sur les diagrammes. Bon tricot!
26.04.2021 - 09:14
![]() Andrea Hierold-Beck wrote:
Andrea Hierold-Beck wrote:
Ich möchte die Decke in der Größe 75x100cm stricken. Wie viel Wolle brauche ich dafür? Vielen Dank für baldige Antwort. Grüßle Andrea
16.04.2021 - 16:41DROPS Design answered:
Liebe Andrea, leider können wir jeder Anleitung nach jedem individuellen Frage anpassen und einzelne Modelle auf individuellen Wunsch hin umrechnen. Wenn sie Hilfe damit brauchen, wenden Sie sich bitte an Ihrem DROPS Laden, dort hilft man Ihnen gerne weiter - auch telefonisch oder per E-Mail. Viel Spaß beim stricken!
19.04.2021 - 07:28
![]() Aline wrote:
Aline wrote:
Ich habe insgesamt 175 Maschen angeschlagen und habe A.1 fast beendet. Nun muss ich Maschen abnehmen. Wie viele Maschen muss ich abnehmen? 2 oder 10? In beiden Fällen würde das Muster von A.2 passen. Vielen Dank für ihre Hilfe und liebe Grüße, Aline
06.04.2021 - 13:14DROPS Design answered:
Liebe Aline, Ihre neue Maschenanzahm müssen Sie je nach Ihre Maschenprobe/gewünschte Breite so anpassen: 2 Maschen kraus rechts, A.2a über die nächsten 9 Maschen, A.2b über die nächsten Maschen (= verteibar durch 8 Maschen), A.2c über die nächsten 8 Maschen, 2 Maschen kraus rechts. Viel Spaß beim stricken!
06.04.2021 - 14:58
![]() Kari Anne wrote:
Kari Anne wrote:
Vi mener at antall masker er feil. Det skal ikke felles til 93 masker på det minste mønsteret hvis det skal være 2 masker rille og 2 masker rett før hullmønsteret starter. 10x9 masker + 4 kantmasker.
22.02.2021 - 17:56
![]() Line wrote:
Line wrote:
Hallo! Ich hätte eine Frage zum Rand: Werden die Maschen am Rand in der Hin- und Rückreihe einfach normal gestrickt, oder soll es einen Knötchenrand o.ä. geben? Herzlichen Dank!
29.01.2021 - 15:05DROPS Design answered:
Liebe Line, meinen Sie die Randmaschen? In dieses Modell werden die 2 ersten und die 2 letzten maschen kraus rechts gestrickt - und die Maschen daswichen im Muster wie beschrieben. Viel Spaß beim stricken!
29.01.2021 - 15:35
![]() Isabel wrote:
Isabel wrote:
No entiendo el sentido de los agujeros que dejan las lazadas de la vuelta 7. Se podrían hacer las 8 vuelta con revés retorcido en la lazada????? Gracias
19.12.2020 - 22:53DROPS Design answered:
Hola Isabel. Las lazadas de la fila 7 forman el dibujo. Siempre puedes tejer estas lazadas de revés retorcido ( se va a modificar el dibujo, pero no afecta al número total de puntos)
20.12.2020 - 12:16
![]() Claudia wrote:
Claudia wrote:
Hallo, ich muss leider nochmal fragen. Bedeutet das 1 Symbol das ich nur 1 Masche rechts in Hinreihen und 1 Masche links in Rückreihen stricke, oder ist damit jeweils die gesamte Reihe gemeint. Also rechts in Hinreihen und links in Rückreihen? Und beim 2. Symbol einfach umgekehrt, also in Hinreihen links und in Rückreihen rechts. Gruß Claudia Kopydlowski
04.08.2020 - 10:01DROPS Design answered:
Liebe Claudia, je nach den Diagrammen/Reihen dann es unterchiedlich sein, aber wenn die ganze Reihe mit nur weissen Kästchen sind dann werden diese Maschen glatt rechts gestrickt, und bei den 2. Symbol stricken Sie alle Maschen glatt links (= 1. und 2. Reihe in A.1 z.B.). Viel Spaß beim stricken!
04.08.2020 - 10:05
![]() Clauida wrote:
Clauida wrote:
Hallo, ich muss leider nochmal fragen. Bedeutet das 1 Symbol das ich nur 1 Masche rechts in Hinreihen und 1 Masche links in Rückreihen stricke, oder ist damit jeweils die gesamte Reihe gemeint. Also rechts in Hinreihen und links in Rückreihen? Und beim 2. Symbol einfach umgekehrt, also in Hinreihen links und in Rückreihen rechts. Gruß Claudia Kopydlowski
04.08.2020 - 09:59
![]() Claudia Kopydlowski wrote:
Claudia Kopydlowski wrote:
Hallo, ich verstehe leider die Beschreibung im Diagramm nicht richtig. Ist mit "1 Masche rechts in Hin-Reihen, 1 Masche rechts in Rück-Reihen" gemeint, dass die Hinreihe rechts und die Rückreihe links gestrickt werden soll? Danke
03.08.2020 - 20:14DROPS Design answered:
Liebe Frau Kopydlowski, das 1. Symbol steht für 1 Masche glatt rechts (= diese Maschen stricken Sie rechts bei den Hinreihen und links bei den Rückreihen) - das 2. Symbol steht für 1 Masche glatt links (= diese Maschen stricken Sie links bei den Hinreihen und rechts bei den Rückreihen). Viel Spaß beim stricken!
04.08.2020 - 09:33
|
|||||||||||||||||||
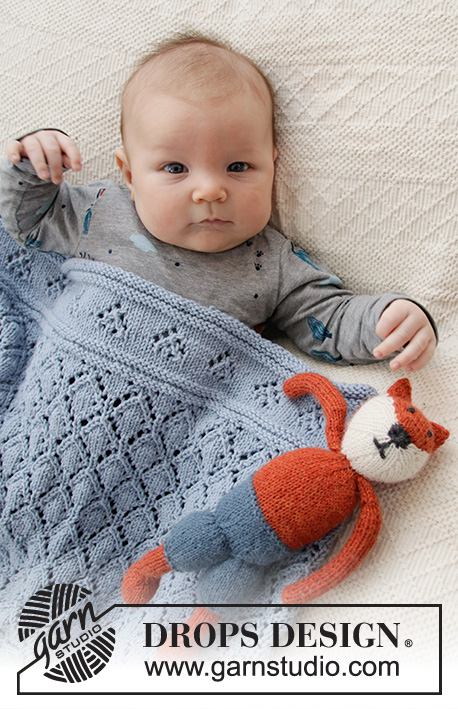
Baby Diamonds#babydiamondsblanket |
|||||||||||||||||||
 |
 |
||||||||||||||||||
Knitted blanket for babies in DROPS Merino Extra Fine. The piece is worked with lace pattern. Theme: Baby blanket
DROPS Baby 36-6 |
|||||||||||||||||||
|
------------------------------------------------------- EXPLANATIONS FOR THE PATTERN: ------------------------------------------------------- RIDGE/GARTER STITCH (worked back and forth): Knit all rows. 1 ridge in height = Knit 2 rows. PATTERN: See diagrams A.1 and A.2. The diagrams show all rows in the pattern from the right side. DECREASE/INCREASE TIP (evenly spaced): To work out how to decrease/increase evenly, count the total number of stitches on needle (e.g. 130 stitches), minus the edge stitches (e.g. 4 stitches) and divide the remaining stitches by the number of decreases/increases to be made (e.g. 5) = 25.2. In this example, decrease by knitting together approx. each 24th and 25th stitch (do not decrease over the edge stitches). When increasing, make 1 yarn over after approx. each 25th stitch (do not increase over the edge stitches). On the next row work the yarn overs twisted to avoid holes. ------------------------------------------------------- START THE PIECE HERE: ------------------------------------------------------- BLANKET – SHORT OVERVIEW OF THE PIECE: The piece is worked back and forth with circular needle. BLANKET: Cast on 94-130 stitches with circular needle size 4.5 mm and Merino Extra Fine. Work pattern as follows: 2 edge stitches in GARTER STITCH – read description above, A.1 until there are 2 stitches left, 2 edge stitches in garter stitch. Continue this pattern back and forth. On the last knitted row from the wrong side, decrease 1-5 stitches evenly spaced – read DECREASE/INCREASE TIP = 93-125 stitches. Now work pattern as follows: 2 edge stitches in garter stitch, A.2a over the next 9 stitches, A.2b over the next 72-104 stitches (= 9-13 repeats of 8 stitches), A.2c over the next 8 stitches, 2 edge stitches in garter stitch. REMEMBER THE KNITTING TENSION! Continue this pattern until the piece measures approx. 45-73 cm – adjust so you finish after row 8 or 16 in the diagrams. Now work pattern as follows: 2 edge stitches in garter stitch, A.1 until there are 2 stitches left, 2 edge stitches in garter stitch; at the same time on row 3 increase 1-5 stitches evenly spaced – remember DECREASE/INCREASE TIP = 94-130 stitches. When A.1 has been completed in height, cast off with purl from the right side. The blanket measures approx. 52-80 cm. |
|||||||||||||||||||
Diagram explanations |
|||||||||||||||||||
|
|||||||||||||||||||
 |
|||||||||||||||||||
Have you finished this pattern?Tag your pictures with #dropspattern #babydiamondsblanket or submit them to the #dropsfan gallery. Do you need help with this pattern?You'll find 17 tutorial videos, a Comments/Questions area and more by visiting the pattern on garnstudio.com. © 1982-2026 DROPS Design A/S. We reserve all rights. This document, including all its sub-sections, has copyrights. Read more about what you can do with our patterns at the bottom of each pattern on our site. |
|||||||||||||||||||


With over 40 years in knitting and crochet design, DROPS Design offers one of the most extensive collections of free patterns on the internet - translated to 17 languages. As of today we count 325 catalogues and 12298 patterns translated into English (UK/cm). 12298
We work hard to bring you the best knitting and crochet have to offer, inspiration and advice as well as great quality yarns at incredible prices! Would you like to use our patterns for other than personal use? You can read what you are allowed to do in the Copyright text at the bottom of all our patterns. Happy crafting!
Post a comment to pattern DROPS Baby 36-6
We would love to hear what you have to say about this pattern!
If you want to leave a question, please make sure you select the correct category in the form below, to speed up the answering process. Required fields are marked *.