
Popular categories
Looking for a yarn?


Comments / Questions (31)
![]() Birgit Büscher wrote:
Birgit Büscher wrote:
Guten Tag, Ich habe schon viele tolle Sachen nach ihren Anleitungen gestrickt, Danke für die tolle Seite! Kann ich aus diesem Pullii einen Rollkragenpullover machen, was muss ich beachten? Vielen Dank
30.10.2021 - 15:12DROPS Design answered:
Liebe Frau Büscher, herzlichen Dank! Wahrscheinlich können Sie einen Rollkragen auch stricken - Sie können z.B. mit Hilfsfaden anschlagen (siehe Video) und dann sofort die Erhöhung stricken, ganz am Ende können Sie die Maschen auffassen und den Rollkragen stricken, so können Sie auch den Pullover anziehen und die Länge vom Kragen anpassen. Ihr DROPS Laden hat sicher noch andere Idée dazu. Viel Spaß beim stricken!
02.11.2021 - 13:51
![]() Cathy wrote:
Cathy wrote:
I bought drops Karisma for this pattern but already after just knitting the collar I found it very itchy. What alternative do I have ? When I look at the yarn exchange they ask about the number of thread, what does it mean ?
14.10.2021 - 13:24DROPS Design answered:
Dear Cathy, click on the yarn converter to see the other alternatives, and contact your DROPS store for any information about exchange or advice for an alternative. Happy knitting!
14.10.2021 - 16:37
![]() Marlene wrote:
Marlene wrote:
Is there a way I can print this pattern off on my computer?
01.05.2021 - 16:53DROPS Design answered:
Dear Marlene, you can easily print our patterns for free whenever you like - see symbol of printer (i.e. printer icon with word "Print") just under the header of pattern. Happy knitting!
02.05.2021 - 11:53
![]() Karin Andersen wrote:
Karin Andersen wrote:
Hej. Kan en opskrift som er beskrevet oppefra og ned, vendes så trøjen strikkes nedefra og op ? (Drops model 207-14) Mh. Karin
21.01.2021 - 10:05DROPS Design answered:
Hej Karin, ja absolut, du starter bare bagfra i opskriften og tager ud i stedet for at tage ind osv. God fornøjelse!
27.01.2021 - 14:21
![]() Christine wrote:
Christine wrote:
Hallo, ich möchte mich für die gut verständliche Anleitung bedanken. Es hat mir große Freude bereitet, dieses Modell nachzuarbeiten.
04.10.2020 - 11:02
![]() Gasparetto wrote:
Gasparetto wrote:
Bonjour pourriez vous me confirmer que les 8 mailles montées de chaque côté sous les manches doivent être tricotées en même temps que le dos et le devant en rond? Du coup quand on commence à tricoter les manches vous nous dites de relever 1 maille dans ces 8 mailles Comment faire et et comment les manches sont raccrochés au dos et devant qui ont éte tricotés ensemble? Merci
03.10.2020 - 08:36DROPS Design answered:
Bonjour Mme Gasparetto, cette leçon montre, à partir des photos 18A et B, comment tricoter les manches (soit en relevant les mailles dans les (8 dans ce modèle) mailles montées sous la manche ou bien en en montant de nouvelles (on assemble ensuite ces mailles - cf photo24) - dans cette vidéo, vous verrez également à partir d'env. 10:50 comment on commence les manches. Vous pouvez relever les mailles comme vous le souhaitez, placez juste le marqueur au milieu des 8 m pour marquer le début du tour. Bon tricot!
05.10.2020 - 09:05
![]() Lara wrote:
Lara wrote:
Buongiorno, una volta riprese le nuove 8 maglie della manica (taglia S) come si fa ad "Iniziare il giro prima delle 8 nuove maglie sotto la manica...."? perchè mi sembra che il lavoro non si unisca , avete un video che lo mostri ? Grazie mille per i vostri consigli!
30.09.2020 - 18:15DROPS Design answered:
Buongiorno Lara. Dopo aver ripreso le maglie, sposta le 8 maglie sul ferro di sinistra e inizia il giro da qui. Ci può essere una piccola discontinuità tra le maglie del davanti/dietro e quelle riprese, ma riuscirà ad aggiustarlo quando i ferma i fili a fine lavoro. Può esserle di aiuto la fig. 18 B di questa lezione. Buon lavoro!
01.10.2020 - 16:28
![]() Isabelle Desbiens wrote:
Isabelle Desbiens wrote:
Si on choisi de faire une réhausse à l'arrière de l'encolure, j'imagine qu'on doit alors utiliser la même grosseur d'aiguilles (soit les plus grosses) que pour le reste du corps, non? Merci pour ce magnifique modèle. Je viens de le débuter avec de la Drops Mérino Extra Fine. Un régal à tricoter!
17.09.2020 - 22:40DROPS Design answered:
Bonjour Mme Desbiens, vous pouvez effectivement utiliser les aiguilles plus grosses pour tricoter la réhausse. Bon tricot!
18.09.2020 - 08:34
![]() Isabelle Desbiens wrote:
Isabelle Desbiens wrote:
Jacquard avec aiguilles circulaires Lorsqu'on introduit un nouveau fil (nouvelle couleur ou nouvelle pelotte), comment s'assurer que le fil "tiendra" bien puisqu'à la toute fin on ne peut rentrer les fils dans une couture????
16.09.2020 - 23:13DROPS Design answered:
Bonjour Mme Desbiens, cette vidéo montre comment changer de couleur au début d'un tour, il vous suffira ensuite de rentrer les fils. Bon tricot!
17.09.2020 - 10:15
![]() GASPARETTO wrote:
GASPARETTO wrote:
Bonjour Pour commencer le col dois je utiliser l’aiguille circulaire 3,5 De 40 cm ou de 80 cm. Est-ce que la technique du magic loop est adaptée pour ce modèle? Merci
09.09.2020 - 18:49DROPS Design answered:
Bonjour Mme Gasparetto, pour le col vous pouvez tricoter avec l'aiguille circulaire de 40 cm ou en magic loop avec la 80 cm, comme vous préférez. Bon tricot!
10.09.2020 - 09:25
|
||||||||||||||||
Crisp Air Sweater#crispairsweater |
||||||||||||||||
 |
 |
|||||||||||||||
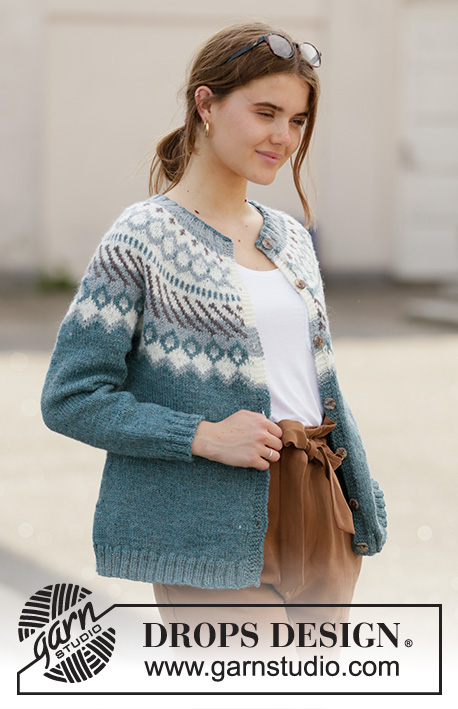
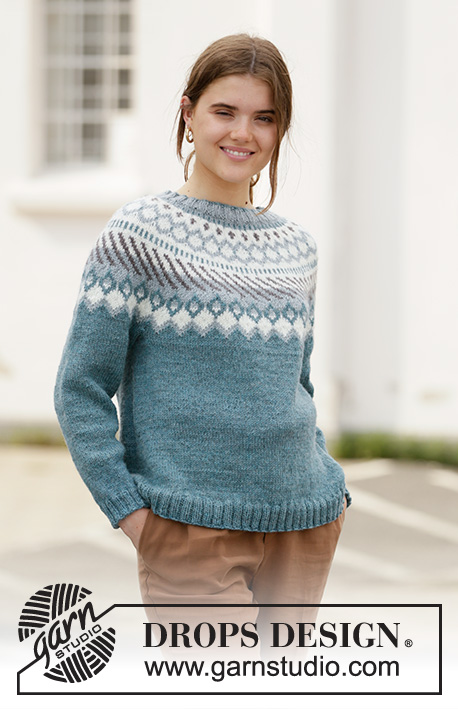
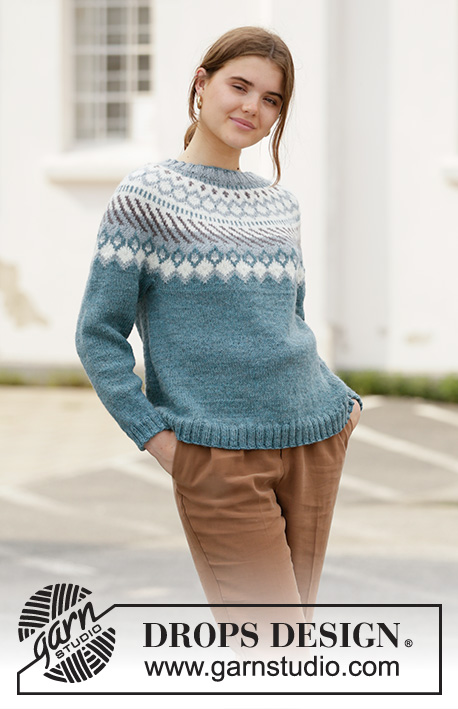
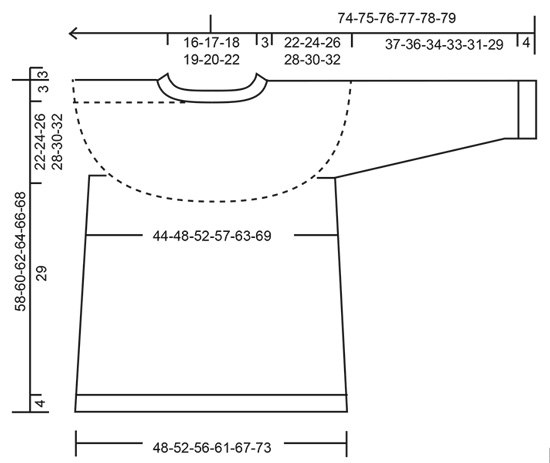
Knitted jumper with round yoke and Nordic pattern in DROPS Karisma. The piece is worked top down. Sizes S - XXXL.
DROPS 207-14 |
||||||||||||||||
|
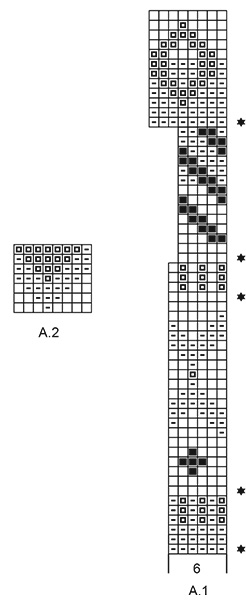
------------------------------------------------------- EXPLANATIONS FOR THE PATTERN: ------------------------------------------------------- PATTERN: See diagrams A.1 and A.2. The diagrams show all rows in the pattern seen from the right side. ELEVATION (back of neck): So the jumper is slightly higher at the back of the neck when working a round yoke, you can work an elevation as described here. Skip this section if you do not want an elevation; the neck will then be the same front and back. Insert 1 marker at the beginning of the round = mid back. Start from the right side and knit 14-15-16-16-17-18 stitches past the marker, turn, tighten strand and purl 28-30-32-32-34-36 stitches back. Turn, tighten strand and knit 42-45-48-48-51-54 stitches, turn, tighten strand and purl 56-60-64-64-68-72 stitches back. Turn, tighten strand and knit back to mid back. Then work YOKE as described in the text. INCREASE TIP-1 (evenly spaced): To work out how to increase evenly, count the total number of stitches on the needle (e.g. 108 stitches) and divide by the number of increases to be made (e.g. 31) = 3.5. In this example, increase by making 1 yarn over after alternately each 3rd and 4th stitch. On the next round knit the yarn overs twisted to avoid holes. INCREASE TIP-2 (for sides of body): Work until there are 2 stitches left before the marker thread, make 1 yarn over, knit 4 (marker thread sits between these 4 stitches) make 1 yarn over (= 2 stitches increased at each marker thread; 4 stitches increased on round). On the next round knit the yarn overs twisted to avoid holes. Then work the new stitches in stocking stitch. DECREASE TIP (for sleeves): Decrease 1 stitch on each side of the marker thread as follows: Work until there are 3 stitches left before the marker thread, knit 2 together, knit 2 (marker thread sits between these 2 stitches), slip 1 stitch as if to knit, knit 1 and pass the slipped stitch over the knitted stitch. ------------------------------------------------------- START THE PIECE HERE: ------------------------------------------------------- JUMPER – SHORT OVERVIEW OF THE PIECE: The piece is worked in the round, top down. The sleeves are worked in the round with short circular needle/ double pointed needles. NECK: Cast on 100-104-108-112-116-124 stitches with circular needle size 3.5 mm and sea green. Knit 1 round. Change to light grey green and work rib (knit 2/ purl 2) for 3 cm. Insert a marker here. THE PIECE IS MEASURED FROM HERE. Change to circular needle size 4.5 mm. Now you can work an ELEVATION in the back of the neck – read description above. If you do not want an elevation go straight to YOKE. YOKE: Work pattern A.1, AT THE SAME TIME, on each round marked with a star increase as follows: STAR-1: Increase 26-28-30-32-34-38 stitches evenly spaced – read INCREASE TIP-1 = 126-132-138-144-150-162 stitches (there is now room for 21-22-23-24-25-27 repeats of A.1 with 6 stitches). REMEMBER THE KNITTING TENSION! STAR-2: Increase 42-42-48-48-48-48 stitches evenly spaced = 168-174-186-192-198-210 stitches (there is now room for 28-29-31-32-33-35 repeats of A.1 with 6 stitches). STAR-3: Increase 48-54-54-60-60-60 stitches evenly spaced = 216-228-240-252-258-270 stitches (there is now room for 36-38-40-42-43-45 repeats of A.1 with 6 stitches). STAR-4: Increase 29-42-45-48-52-60 stitches evenly spaced = 245-270-285-300-310-330 stitches (there is now room for 49-54-57-60-62-66 repeats of A.1 with 5 stitches). STAR-5: Increase 27-34-43-44-50-54 stitches evenly spaced = 272-304-328-344-360-384 stitches (there is now room for 34-38-41-43-45-48 repeats of A.1 with 8 stitches). When there is 1 round left in the diagram the piece measures approx. 22 cm from the marker. Continue as follows in the different sizes: In size S skip the next section and continue from All sizes – below. Sizes M, L, XL, XXL and XXXL: Continue with pattern A.2. When the diagram has been completed in height the piece measures approx. 24 cm from the marker. Size M is now finished (unless it is shorter than 24 cm, in which case continue with stocking stitch and sea green to this measurement). In sizes L, XL, XXL and XXXL continue with stocking stitch and sea green until the piece measures 26-28-30-32 cm from the marker, AT THE SAME TIME when the piece measures 25-27-29-31 cm (from the marker), increase 0-12-20-28 stitches evenly spaced = 328-356-380-412 stitches. All sizes: The last round on the yoke is worked as follows: Work the first 40-44-47-52-57-63 stitches (= half back piece), place the next 56-64-70-74-76-80 stitches on 1 thread for sleeve, cast on 8-8-10-10-12-12 new stitches on the needle (= in side under sleeve), work the next 80-88-94-104-114-126 stitches (= front piece), place the next 56-64-70-74-76-80 stitches on 1 thread for sleeve, cast on 8-8-10-10-12-12 new stitches on the needle (= in side under sleeve), work the remaining 40-44-47-52-57-63 stitches (= half back piece). The body and sleeves are finished separately. THE PIECE IS NOW MEASURED FROM HERE. BODY: There are 176-192-208-228-252-276 stitches on the body. Insert a marker thread in each side in the middle of the 8-8-10-10-12-12 stitches cast on under the sleeves (= 4-4-5-5-6-6 new stitches on each side of the threads). In size S continue as described below, in sizes M, L, XL, XXL and XXXL skip the next section and continue from all sizes below. Size S: Work pattern A.2 in the round over all stitches and until completed in 1 time in height. Then continue as described below. All sizes: Continue in the round with sea green and stocking stitch. When the piece measures 4 cm, increase 1 stitch on each side of both marker threads – read INCREASE TIP-2. Increase like this every 7 cm a total of 4 times = 192-208-224-244-268-292 stitches. When the piece measures 29 cm increase 36-40-44-48-52-56 stitches evenly spaced =228-248-268-292-320-348 stitches. Change to circular needle size 3.5 mm and work rib (= knit 2/ purl 2) for 4 cm. Cast off with knit over knit and purl over purl. Make sure the cast-off edge is not tight; increase a needle size when casting off, if this is a problem. The jumper measures approx. 58-60-62-64-66-68 cm from the shoulder down. SLEEVE: Place the 56-64-70-74-76-80 stitches from the thread on the one side of the piece on short circular needle/double pointed needles size 4.5 mm and knit up 1 stitch in each of the 8-8-10-10-12-12 stitches cast on under the sleeve = 64-72-80-84-88-92 stitches. In size S work pattern as described below; the other sizes are continued from section ALL SIZES below. Size S: Start the round before the 8 new stitches under the sleeve and work A.2 over each repeat of A.1 (from the yoke). When A.2 has been completed in height continue from ALL SIZES below. ALL SIZES: Insert a marker thread in the middle of the 8-8-10-10-12-12 new stitches (= 4-4-5-5-6-6 new stitches on each side of the thread). Work stocking stitch in the round with sea green. When the piece measures 4-4-4-3-3-3 cm, decrease 1 stitch on each side of the marker thread – read DECREASE TIP. Decrease like this every 3-2-1½-1½-1½-1 cm a total of 11-14-17-18-19-20 times = 42-44-46-48-50-52 stitches. When the sleeve measures 37-36-34-33-31-29 cm (shorter measurements in larger sizes due to longer yoke), increase 6-8-10-8-10-8 stitches evenly spaced = 48-52-56-56-60-60 stitches. Change to double pointed needles size 3.5 mm and work rib (= knit 2/ purl 2) for 4 cm. Cast off with knit over knit and purl over purl. Make sure the cast-off edge is not tight; increase a needle size when casting off, if this is a problem. The sleeve measures approx 41-40-38-37-35-33 cm. Work the other sleeve in the same way. |
||||||||||||||||
Diagram explanations |
||||||||||||||||
|
||||||||||||||||
 |
||||||||||||||||
 |
||||||||||||||||
Have you finished this pattern?Tag your pictures with #dropspattern #crispairsweater or submit them to the #dropsfan gallery. Do you need help with this pattern?You'll find 27 tutorial videos, a Comments/Questions area and more by visiting the pattern on garnstudio.com. © 1982-2026 DROPS Design A/S. We reserve all rights. This document, including all its sub-sections, has copyrights. Read more about what you can do with our patterns at the bottom of each pattern on our site. |
||||||||||||||||


With over 40 years in knitting and crochet design, DROPS Design offers one of the most extensive collections of free patterns on the internet - translated to 17 languages. As of today we count 324 catalogues and 12290 patterns translated into English (UK/cm). 12290
We work hard to bring you the best knitting and crochet have to offer, inspiration and advice as well as great quality yarns at incredible prices! Would you like to use our patterns for other than personal use? You can read what you are allowed to do in the Copyright text at the bottom of all our patterns. Happy crafting!
Post a comment to pattern DROPS 207-14
We would love to hear what you have to say about this pattern!
If you want to leave a question, please make sure you select the correct category in the form below, to speed up the answering process. Required fields are marked *.