DROPS Children 49 · Lots of new kid designs!
Product image DROPS Nepal yarn
DROPS Nepal
65% Wool, 35% Alpaca
from 2.60 € /50g
Get the yarn to make this pattern from 5.20€.

The yarn cost is calculated from the pattern’s smallest size and the yarn’s cheapest product type. Looking for an even better price? You might find it on the DROPS Deals!

DROPS AW2425

Sun Spun Socks

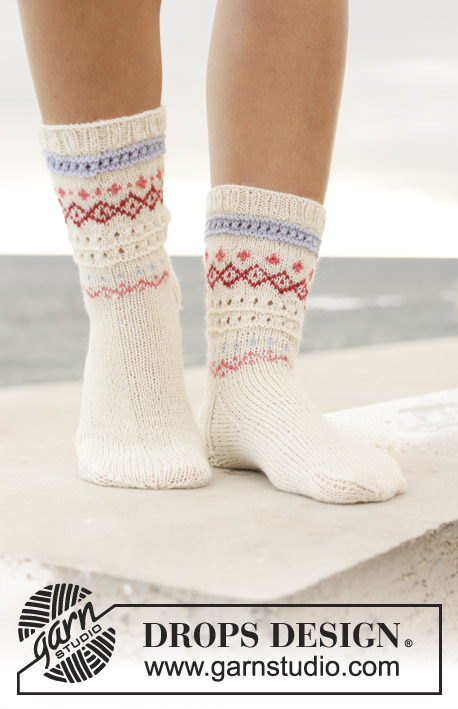
Knitted socks in DROPS Nepal. The piece is worked top down with rib and stocking stitch. Sizes 35-43.

DROPS 198-14

#sunspunsocks

DROPS Design: Pattern no ne-301
Yarn group A + A or C
-------------------------------------------------------

SIZES: 35/37 - 38/40 - 41/43
Foot length: 22 - 24 - 27 cm.
Leg length: 4 - 4 - 4 cm.

MATERIALS:
DROPS NEPAL from Garnstudio (belongs to yarn group C)
100-100-100 g colour 2923, goldenrod

KNITTING TENSION:
18 stitches in width and 23 rows in height with stocking stitch = 10 x 10 cm.

NEEDLES:
DROPS DOUBLE POINTED NEEDLES SIZE 4.5 MM.
The needle size is only a guide. If you get too many stitches on 10 cm, change to a larger needle size. If you get too few stitches on 10 cm, change to a smaller needle size.

-------------------------------------------------------

-------------------------------------------------------

Alternative Yarn – See how to change yarns here
Yarn Groups A to F – Use the same pattern and change the yarn here
Yarn usage using an alternative yarn – Use our yarn converter here

-------------------------------------------------------

You might also like...

Product image DROPS Nepal
DROPS Nepal
65% Wool, 35% Alpaca
from 2.60 € /50g
Get the yarn to make this pattern from 5.20€.

The yarn cost is calculated from the pattern’s smallest size and the yarn’s cheapest product type. Looking for an even better price? You might find it on the DROPS Deals!

Pattern instructions

NOTE: This pattern is written in British English. All measurements in charts are in cm. Convert from cm to inches here. There are different terms for crocheting in British and American English. If this pattern includes crochet, convert "crochet terms" here. See this pattern in American English here..
-------------------------------------------------------

EXPLANATIONS FOR THE PATTERN:

-------------------------------------------------------

HEEL DECREASE (worked in stocking stitch): 
ROW 1 (= right side): Work until there are 6-6-7 stitches left, slip the next stitch as if to knit, knit 1 and pass the slipped stitch over, turn the piece.
ROW 2 (= wrong side): Work until there are 6-6-7 stitches left, slip the next stitch as if to purl, purl 1 and pass the slipped stitch over, turn the piece.
ROW 3 (= right side): Work until there are 5-5-6 stitches left, slip the next stitch as if to knit, knit 1 and pass the slipped stitch over, turn the piece.
ROW 4 (= wrong side): Work until there are 5-5-6 stitches left, slip the next stitch as if to purl, purl 1 and pass the slipped stitch over, turn the piece.
Continue decreasing like this (by working until there is 1 stitch less left before slipping 1 stitch) and until there are 10-11-11 stitches left on needle.
-------------------------------------------------------

START THE PIECE HERE:

-------------------------------------------------------

SOCK - SHORT OVERVIEW OF THE PIECE:
The piece is worked in the round with double pointed needles, from the top of leg down to heel. The heel is worked back and forth before working the foot in the round again.

SOCK: 
Cast on 45-48-51 stitches with double pointed needles size 4.5 mm and Nepal. Knit 2 rounds, then work rib with knit 1, purl 2. Work rib until the piece measures 4 cm in all sizes. REMEMBER THE KNITTING TENSION!
Now keep the first 23-25-28 stitches on the needle for the heel and the last 22-23-23 stitches are placed on 1 thread (= mid top of foot). Work rib as before back and forth over the heel stitches for 5-5½-6 cm. NOTE! On the last row from the wrong side decrease 3-4-5 stitches evenly by knitting 2 stitches together in the purl sections (seen from the right side) = 20-21-23 stitches for the heel. Insert 1 marker in the piece and measure from here onwards.

Now work HEEL DECREASE – see description above!
After the heel decrease knit up 7-9-11 stitches along the one side of the heel, place the 22-23-23 stitches from the thread back on the needles, work these stitches and then knit up 7-9-11 stitches along the other side of the heel = 46-52-56 stitches. Insert 1 marker thread on each side of the middle 21-23-23 stitches on top of foot.
Continue with rib on top of foot and stocking stitch underneath the foot and beside the heel - AT THE SAME TIME decrease in each side as follows: The last 2 stitches before the first marker on top of foot are knitted twisted together (i.e. you work in the back loop of the 2 stitches rather than the front) and the first 2 stitches after the last marker on top of foot are knitted together. Repeat this decrease every 2nd round a total of 5-7-7 times = 36-38-42 stitches. Continue working until the piece measures18-20-22 cm from the marker on the heel (= approx. 4-4-5 cm left to full length).

So that the toe is even decrease as follows on the next round:
Size 35/37: Decrease 2 stitches over the purl sections on top of foot (decrease by purling 2 stitches together).
Sizes 38/40 and 41/43: Decrease 1 stitch in the first purl section and 1 stitch in the last purl section on top of foot (decrease by purling 2 stitches together). There are now 34-36-40 stitches left on needle. Insert 1 marker thread in each side so that there are 17-18-20 stitches under the foot and 17-18-20 stitches on top of foot.
Work stocking stitch and decrease for the toe as follows:
Knit twisted together the 2 stitches after both marker threads and knit together the 2 stitches before each marker thread. Repeat this decrease every 2nd round a total of 4-4-4 times, then every round a total of 3-3-4 times = 6-8-8 stitches left on needle.
Cut the strand, pull it through the remaining stitches, tighten and fasten well.

Work 1 more sock in the same way.

This pattern has been corrected.

Updated online: 26.04.2022
Corrections under size 35/37
Do you have a question? See a list of frequently asked questions (FAQ)

Knitting tension is what determines the final measurements of your work, and is usually measured per 10 x 10 cm. It is provided like so: number of stitches in width x number of rows in height - eg: 19 stitches x 26 rows = 10 x 10 cm.

The knitting tension is very individual; some people knit/crochet loosely while others work tightly. You adjust the knitting tension with the needle size, which is why the suggested needle size is only meant as a guide! You need to adjust this (up or down) to ensure that YOUR knitting tension matches the knitting tension provided in the pattern. If you work with a different knitting tension than provided you will have a different yarn consumption, and your work will have different measurements than what the pattern suggests.

The knitting tension also determines which yarns can replace each other. As long as you achieve the same knitting tension you can replace one yarn with another.

See DROPS lesson: How to measure your tension/gauge

See DROPS video: How to make a gauge tension swatch

The required amount of yarn is provided in grams, eg: 450 g. To calculate how many balls you’ll need you first need to know how many grams are in 1 ball (25g, 50g or 100g). This information is available if you click on the individual yarn quality on our pages. Divide the amount required with the amount of each ball. For example, if each ball is 50g (the most common amount), the calculation will be as follows: 450 / 50 = 9 balls.

The important thing when changing from one yarn to another is that the knitting/crochet tension remains the same. This is so that the measurements of the finished piece will be the same as on the sketch provided. It is easier to achieve the same knitting tension using yarns from the same yarn group. It is also possible to work with multiple strands of a thinner yarn to achieve the knitting tension of a thicker one. Please try our yarn converter. We recommend you to always work a test swatch.

Please NOTE: when changing yarn the garment might have a different look and feel to the garment in the photo, due to individual properties and qualities of each yarn.

See DROPS lesson: Can I use a different yarn than the one mentioned in the pattern?

All our yarns are categorised into yarn groups (from A to F) according to thickness and knitting tension – group A contains the thinnest yarns and group F the thickest. This makes it easier for you to find alternative yarns to our patterns, should you wish to switch yarn. All yarns within the same group have a similar knitting tension and can easily replace each other. However, different yarn qualities have different structures and properties which will give the finished work a unique look and feel.

Click here for an overview of the yarns in each yarn group

At the top of all our patterns you’ll find a link to our yarn calculator, which is a helpful tool should you wish to use a different yarn than suggested. By filling in the yarn quality you wish to replace, the amount (in your size) and number of strands, the calculator will present good alternative yarns with the same knitting tension. Additionally it will tell you how much you’ll require in the new qualities and whether you’ll need to work with multiple strands. Most skeins are 50g (some are 25g or 100g).

If the pattern is worked with multiple colours, every colour will have to be calculated separately. Similarly, if the pattern is worked with several strands of different yarns (for example 1 strand Alpaca and 1 strand Kid-Silk) you will have to find alternatives for each, individually.

Click here to see our yarn calculator

Since different yarns have different qualities and textures we have chosen to keep the original yarn in our patterns. However, you can easily find options among our available qualities by using our yarn calculator, or simply pick a yarn from the same yarn group.

It is possible that some retailers still have discontinued yarns in stock, or that someone has a few skeins at home that they would like to find patterns for.

The yarn calculator will provide both alternative yarn as well as required amount in the new quality.

If you think it's hard to decide what size to make, it can be a good idea to measure a garment you own already and like the size of. Then you can pick the size by comparing those measures with the ones available in the pattern's size chart.

You'll find the size chart at the bottom of the pattern.

See DROPS lesson: How to read size chart

The needle size provided in the pattern serves only as a guide, the important thing is to follow the knitting tension. And since knitting tension is very individual, you will have to adjust the needle size to ensure that YOUR tension is the same as in the pattern – maybe you’ll have to adjust 1, or even 2 needle sizes, up or down to achieve the correct tension. For this, we recommend that you work test swatches.

Should you work with a different knitting tension than the one provided, the measurements of the finished garment might deviate from the measurement sketch.

See DROPS lesson: How to measure your tension/gauge

See DROPS video: How to make a tension/gauge swatch

Working a garment top-down provides more flexibility and room for personal adjustment. For example it is easier to try the garment on while working, as well as making adjustments to length of yoke and shoulder caps.

The instructions are carefully explaining every step, in the correct order. Diagrams are adjusted to the knitting direction and are worked as usual.

The diagram depicts all rows/rounds, and every stitch seen from the right side. It is read from bottom to top, from right to left. 1 square = 1 stitch.

When working back and forth, every other row is worked from the right side and every other row is worked from the wrong side. When working from the wrong side, the diagram will have to be worked reversed: from left to right, knit stitches are purled, purl stitches are knit etc.

When working in the round every round is worked from the right side and the diagram are worked from right to left on all rounds.

See DROPS lesson: How to read knitting diagrams

The diagram depicts all rows/rounds, and every stitch seen from the right side. It is worked from bottom to top, from right to left.

When working back and forth every other row is worked from the right side: from right to left and every other row is worked from the wrong side: from left to right.

When working in the round, every row in the diagram are worked from the right side, from right to left.

When working a circular diagram you start in the middle and work your way outwards, counter clockwise, row by row.

The rows usually start with a given number of chain stitches (equivalent to the height of the following stitch), this will either be depicted in the diagram or explained in the pattern.

See DROPS lesson: How to read crochet diagrams

Instructions for working several diagrams after each other on the same row/round, will often be written like so: “work A.1, A.2, A.3 a total of 0-0-2-3-4 times". This means you work A.1 once, then A.2 is worked once, and A.3 is repeated (in width) the number of times provided for your size – in this case like so: S = 0 times, M = 0 times, L=2 times, XL= 3 times and XXL = 4 times.

The diagrams are worked as usual: begin with the first row in A.1, then work the first row in A.2 etc.

See DROPS lesson: How to read knitting diagrams

See DROPS lesson: How to read crochet diagrams

The total width of the garment (from wrist-to-wrist) will be larger in the larger sizes, despite the actual sleeves being shorter. The larger sizes have longer sleeve caps and wider shoulders, so there will be a good fit in all sizes.

The measurement sketch/schematic drawing provides information regarding the full length of the garment. If it’s a jumper or a jacket the length is measured from the highest point on the shoulder closest to the neckline, and straight down to the bottom of the garment. It is NOT measured from the tip of shoulder. Similarly, the length of yoke is measured from the highest point on the shoulder and down to where yoke is split into body and sleeves.

On a jacket measures are never taken along bands, unless specifically stated. Always measure inside band stitches when measuring the length.

See DROPS lesson: How to read a schematic drawing

Diagrams are often repeated on the round or in height. 1 repeat is the diagram the way it appears in the pattern. If it says to work 5 repeats of A.1 in the round, then you work A.1 a total of 5 times after/next to each other in the round. If it says to work 2 repeats of A.1 vertically/in height you work the entire diagram once, then begin again at the start and work the entire diagram one more time.

Chain stitches are slightly narrower than other stitches and to avoid working the cast-on edge too tight, we simply chain more stitches to begin with. The stitch count will be adjusted on the following row to fit the pattern and measurement sketch.

The rib edge is more elastic and will contract slightly compared to, for example, stocking stitch. By increasing before the rib edge, you avoid a visible difference in width between the rib edge and the rest of the body.

It’s very easy to cast off too tightly, and by making yarn overs while casting off (and simultaneously casting these off) you avoid a too tight cast off edge.

See DROPS video: How to bind off with yarn overs (yo)

To achieve an even increase (or decrease) you can increase on, for example: every 3rd and 4th row alternately, like so: work 2 rows and increase on the 3rd row, work 3 rows and increase on the 4th. Repeat this until the increase is complete.

See DROPS lesson: Increase or decrease 1 st on every 3rd and 4th row alternately

Should you prefer to work in the round instead of back and forth, you may of course adjust the pattern. You’ll need to add steeks mid-front (usually 5 stitches), and follow the instructions. When you would normally turn and work from the wrong side, simply work across the steek and continue in the round. At the end you’ll cut the piece open, pick up stitches to work bands, and cover the cut edges.

See DROPS video: How to knit steeks and cut open

Should you prefer to work back and forth instead of in the round, you may of course adjust the pattern so you work the pieces separately and then assemble them at the end. Divide the stitches for the body in 2, add 1 edge stitch in each side (for sewing) and work the front and back pieces separately.

See DROPS lesson: Can I adapt a pattern for circular needles into straight needles?

Pattern repeats can vary slightly in the different sizes, in order to get the correct proportions. If you’re not working the exact same size as the garment in the photo, yours might deviate slightly. This has been carefully developed and adjusted so that the complete impression of the garment is the same in all sizes.

Make sure to follow instructions and diagrams for your size!

If you have found a pattern you like which is available in women’s size it’s not very difficult to convert it to men’s size. The biggest difference will be the length of sleeves and body. Start working on the women size that you think would fit across the chest. The additional length will be worked right before you cast off for the armhole/sleeve cap. If the pattern is worked top-down you can add the length right after the armhole or before the first decrease on sleeve.

Regarding additional yarn amount, this will depend on how much length you add, but it is better with a skein too many than too few.

All yarns will have excess fibres (from production) that might come off as lint or shedding. Brushed yarns (ie hairier yarns) have more of these loose, excess fibres, causing more shedding.

Shedding also depends on what is worn under or over the garment, and whether this pulls at the yarn fibres. It’s therefore not possible to guarantee that there will be no shedding

Below are some tips on how to get the best result when working with hairier yarns:

1. When the garment is finished (before you wash it) shake it vigorously so the looser hairs come off. NOTE: do NOT use a lint roller, brush or any method that pulls at the yarn.

2. Place the garment in a plastic bag and put it in your freezer - the temperature will cause the fibres to become less attached to each other, and excess fibres will come off easier.

3. Leave in the freezer for a few hours before taking it out and shaking it again.

4. Wash the garment according to the instructions on the yarn label.

Pilling is a natural process that happens to even the most exclusive of fibers. It's a natural sign of wear and tear that is hard to avoid, and that is most visible in high friction areas of your garment like a sweater's arms and cuffs.

You can make your garment look as new by removing the pilling, using a fabric comb or a pill/lint remover.

Still can't find the answer you need? Then scroll down and leave your question so one of our experts can try to help you. This will be done normally within 5 to 10 working days.
In the meantime, you can read the questions and answers that others have left to this pattern or join the DROPS Workshop on Facebook to get help from fellow knitters/crocheters!

Post a comment to pattern DROPS 198-14

We would love to hear what you have to say about this pattern!

If you want to leave a question, please make sure you select the correct category in the form below, to speed up the answering process. Required fields are marked *.

Comments / Questions (21)

country flag Audrey wrote:

Bonjour, je vais commecer ces chaussettes en 35/37. Pensez-vous qu'avec les 200 gr de Népal il y ai assez de laine pour allonger la tige d'1 cm (il me reste toujpurs de la laine quand je termine vos modèles mais je ne sais pas en quelle quantité puisque ça varie selon les modèles 😉)

01.12.2021 - 15:54

DROPS Design answered:

Bonjour Audrey, il est effectivement possible que comme la quantité est la même pour toutes les tailles, vous pouvez rallonger d'un petit cm en taille 35/37, mais sans aucune garantie (nous n'avons plus ces chaussettes pour vérifier). Bon tricot!

02.12.2021 - 08:44

country flag LiseGervais wrote:

Le patron on peut avoir en francais

01.10.2021 - 16:34

DROPS Design answered:

Bonjour Mme Gervais, cliquez sur le menu déroulant sous la photo pour sélectionner "français". B on tricot!

04.10.2021 - 07:41

country flag Susanne Karsberg wrote:

Det finns flera fel i detta mönster. Stickar stl 35-37. Efter hälminskning blir det 10 maskor ej 9 kvar. Stickar upp 7 per sida då blir det 44 ej 45 m. Efter sidominskningarna 2 m vsrtannst varv 4 ggr = 30 maskor ej 37. Stickat många sockor i mina dagar och efter era flera av Drops mönster förut aldrig varit fel förut. Tacksam om ni uppdaterar detta mönster.

26.02.2021 - 11:26

DROPS Design answered:

Hej Susanne, hvis du strikker 1 pind mere med indtagning til hæl, så har du 9 masker. Strikker 7 masker op på hver side = 9+7+7+22=45 m. Sidominskningar - 8 = 37 m.

26.02.2021 - 12:25

country flag Lyna Desbiens wrote:

Bonjour a vous Je suis en tres de tricoter votre modèle de bas J adore le modèle et la couleur wowwww Cependant votre patron est très dure a comprendre 🤔🤔🤔 Je suis déçu car j aime vraiment le modèle Je crois que les nombres de mailles qu'ils doivent rester sur les broches ne sont pas corrects ... Sa m'arrive pas Vous devriez revoir ou corriger votre patron Voilà 🤔🤔🤔

20.12.2020 - 22:27

DROPS Design answered:

Bonjour Mme Desbiens, peut-être pourriez-vous nous indiquer la taille que vous tricotez et l'endroit où vous bloquez, ainsi nous pourrions vous aider à tricoter vos chaussettes?

21.12.2020 - 08:44

country flag Dominique Genelot wrote:

Bonjour, je narrive pas a trouver les explications d un modele enfant realise en laine nepal: vert sapin et sable; je l ai vu sur l instagram de drop qui peux m aider ,je voudrais commander la laine.il s agit d un modele yoke top down je pense merci

09.12.2020 - 10:07

DROPS Design answered:

Bonjour Mme Genelot, si vous pensez à cette publication, ce n'est pas un de nos modèles - (cf description de la photo) - vous pourrez retrouver tous nos pulls enfant réalisables en Nepal = laine du groupe C ici pour vous inspirer. Bon tricot!

09.12.2020 - 15:44

country flag Manon wrote:

Bonjour En taille M Il reste maintenant 36 mailles. Placer 1 fil marqueur de chaque côté, espacés de 18 mailles du dessous du pied et 18 mailles du dessus du pied. Pour que la pointe soit équilibrée, comment répartir équitablement, j'ai 15 mailles pour le dessous du pied et 21 mailles pour le dessus. Merci

01.12.2020 - 00:59

DROPS Design answered:

Bonjour Manon, en 35/37 il vous reste effectivement 36 m: 21 pour le dessus et 15 pour le dessous, placez un marqueur de chaque côté dans une maille pour avoir: 17 m pour le dessus du pied, 17 m pour le dessous et 1 maille avec un marqueur de chaque côté. Bon tricot!

01.12.2020 - 09:40

country flag Janny Hilhorst wrote:

Eerst Hartelijk dank voor De gratis patroon. Ik wou vragen hebben jullie geen patroon als rechte lap Ben niet zomster in haken

04.08.2020 - 22:07

DROPS Design answered:

Dag Janny,

Als je een rechte lap wilt haken, zou j eens kunnen zoeken op haakpatronen voor pannenlappen of dekens.

12.08.2020 - 09:05

country flag Caroline wrote:

Bonjour, je suis rendu à la première diminution de trois mailles répartis également. Est-ce que je diminue au début, au milieu et à la fin du rang? Parce que le nombre de mailles ne sera pas égale. merci beaucoup

08.11.2019 - 14:13

DROPS Design answered:

Bonjour Caroline, vous trouverez ici comment diminuer à intervalles réguliers en règle générale; pour ce modèle, je diminuerai personnellement 1 m en début de rang, 1 au milieu et 1 m en fin de rang. Bon tricot!

08.11.2019 - 14:23

country flag Fernanda wrote:

Can I knit these using the magic loop method instead of the DPNs?

09.07.2019 - 09:25

DROPS Design answered:

Dear Fernanda, yes, you can. Happy knitting!

09.07.2019 - 10:06

country flag Marie-claire wrote:

Très beau! Est-ce que le patron est disponible? Merci

25.01.2019 - 18:42