DROPS Super Sale - SAVE 30% on 6 yarns all June!
Product image DROPS Alpaca yarn
DROPS Alpaca
100% Alpaca
from 3.65 € /50g
Product image DROPS Kid-Silk yarn
DROPS Kid-Silk
75% Mohair, 25% Silk
from 5.05 € /25g
Get the yarn to make this pattern from 36.20€.

The yarn cost is calculated from the pattern’s smallest size and the yarn’s cheapest product type. Looking for an even better price? You might find it on the DROPS Deals!

DROPS AW2425

Le Conquet Jumper

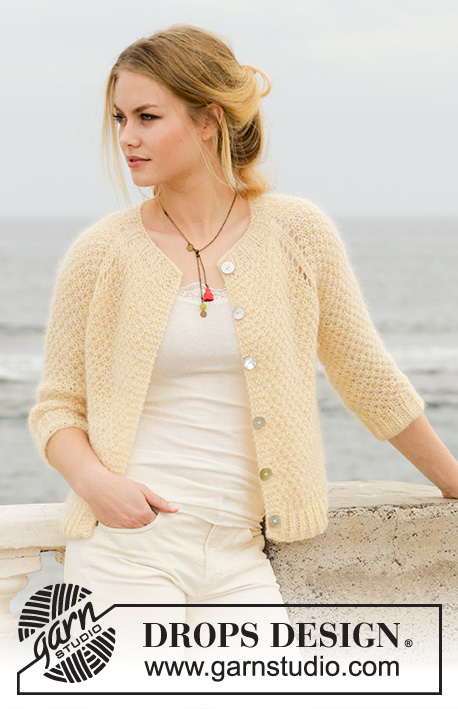
Jumper with raglan, moss stitch and ¾ sleeves, knitted top down. Size: S - XXXL Piece is knitted in 1 strand DROPS Alpaca and 2 strands DROPS Kid-Silk.

Highlight Size:
DROPS 191-14

#leconquetjumper

DROPS design: Pattern z-818
Yarn group A + A + A or D
----------------------------------------------------------
Size: XS/S - M - L - XL - XXL - XXXL
Materials:
DROPS ALPACA from Garnstudio (belongs to yarn group A)
150-150-200-200-200-250 g colour no 2110, wheat
and use:
DROPS KID-SILK from Garnstudio (belongs to yarn group A)
125-125-125-150-150-175 g colour 01, off white

Piece can also be knitted with yarn from:
“Alternative yarn (yarn group A)” - see link below.

DROPS DOUBLE POINTED NEEDLES AND CIRCULAR NEEDLE (60 and 80 cm) SIZE 7 mm – or size needed to get 13 stitches and 15 rows in moss stitch with 3 strands = width 10 cm and 10 cm vertically.

DROPS DOUBLE POINTED NEEDLES and CIRCULAR NEEDLE (60 cm) SIZE 6 mm - for rib
----------------------------------------------------------

-------------------------------------------------------

Alternative Yarn – See how to change yarns here
Yarn Groups A to F – Use the same pattern and change the yarn here
Yarn usage using an alternative yarn – Use our yarn converter here

-------------------------------------------------------

You might also like...

Product image DROPS Alpaca
DROPS Alpaca
100% Alpaca
from 3.65 € /50g
Product image DROPS Kid-Silk yarn
DROPS Kid-Silk
75% Mohair, 25% Silk
from 5.05 € /25g
Get the yarn to make this pattern from 36.20€.

The yarn cost is calculated from the pattern’s smallest size and the yarn’s cheapest product type. Looking for an even better price? You might find it on the DROPS Deals!

Pattern instructions

NOTE: This pattern is written in British English. All measurements in charts are in cm. Convert from cm to inches here. There are different terms for crocheting in British and American English. If this pattern includes crochet, convert "crochet terms" here. See this pattern in American English here..
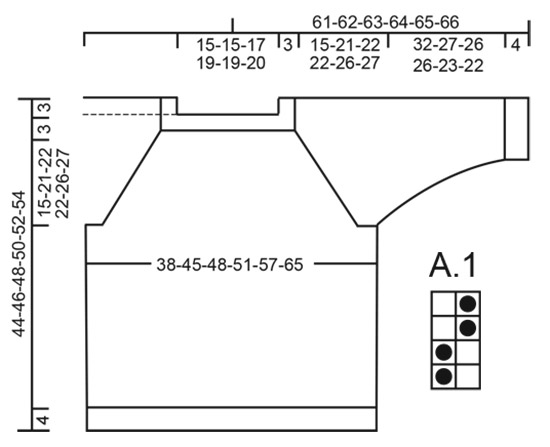
INFORMATION FOR PATTERN:

INCREASE TIP:
To calculate how to increase evenly, use the total number of stitches on row (e.g. 54 stitches) and divide stitches by number of increases to be done (e.g. 12) = 4.5.
In this example increase after alternately every 4th and 5th stitch.
Increase 1 stitch by making 1 yarn over, on next row work yarn over twisted to avoid holes.

PATTERN:
See diagram A.1 (moss stitch).

RAGLAN:
Increase for raglan on each side of the 4 marker threads as follows: Work until 1 stitch remains before marker, make 1 yarn over, knit 2 (marker thread is in the middle of these two stitches), make 1 yarn over (= 2 stitches increased). On next round knit the yarn overs to make holes. Then work the increased stitches in pattern. The 2 stitches in each raglan line are worked in stocking stitch until yoke is done.

DECREASE TIP (applies to mid under sleeves):
Work until 1 stitch remains before stitch with marker thread, slip 2 stitches as if to knit together, work next stitch as shown in A.1 and pass the 2 slipped stitches over. This way A.1 will continue nicely over decrease on next round.
----------------------------------------------------------

JUMPER:
Worked in the round on circular needle from top down. Sleeves are worked in the round on a short circular needle top down, switch to double pointed needles when needed.

NECK EDGE:
Cast on 54-54-60-66-69-72 stitches on circular needle size 6 mm with 1 strand Alpaca and 2 strands Kid-Silk (= 3 strands). Knit 1 round. Then work rib in the round = knit 1/purl 2 for 3 cm.
After rib knit 1 round while increasing 14-14-16-14-11-12 stitches evenly - read INCREASE TIP = 68-68-76-80-80-84 stitches.
Now insert 4 marker threads in the piece, this is done without working the stitches and insert marker threads between 2 stitches as follows: Insert first marker thread after first stitch at beginning of round, insert 2nd marker thread after the next 9 stitches (= sleeve), insert 3rd marker thread after the next 25-25-29-31-31-33 stitches (= front piece), and insert 4th marker thread after the next 9 stitches (= sleeve). There are 24-24-28-30-30-32 stitches after last marker thread on back piece. Then work yoke as explained below.

YOKE:
Switch to circular needle size 7 mm, work first round as follows: Knit 2 (first marker thread is in the middle of these 2 stitches), work A.1 over the next 7 stitches (begin and end with knit 1), knit 2, A.1 over the next 23-23-27-29-29-31 stitches (begin and end with knit 1), knit 2, A.1 over the next 7 stitches (begin and end with knit 1), knit 2 and A.1 over the remaining 23-23-27-29-29-31 stitches (begin and end with knit 1). Continue pattern like this. AT THE SAME TIME on first round increase for RAGLAN on each side of the 4 marker threads - see explanation above (= 8 stitches increased). Increase for raglan every other round 11-15-16-16-19-20 times in total. REMEMBER THE KNITTING TENSION! After last increase there are 156-188-204-208-232-244 stitches on needle. Continue A.1 with 2 stitches in stocking stitch along each raglan line until piece measures 18-24-25-25-29-30 cm from cast-on edge mid front. Work next round as follows: start 1-1-2-2-1-1 stitches before the first marker thread, slip the first 33-41-45-45-49-49 stitches on 1 stitch holder for sleeve, cast on 5-5-5-7-7-11 new stitches on needle (= in the side under sleeve), work the next 45-53-57-59-67-73 stitches as before (= front piece), slip the next 33-41-45-45-49-49 stitches on a stitch holder for sleeve, cast on 5-5-5-7-7-11 new stitches on needle (= in the side under sleeve) and work the remaining 44-52-56-58-66-72 stitches as before. Cut the yarn. Finish body and sleeves separately. NOW MEASURE THE PIECE FROM HERE!

BODY:
= 100-116-124-132-148-168 stitches. Insert 1 marker thread in the middle of the 5-5-5-7-7-11 stitches that were cast on under sleeve in each side. Begin round at one of the marker threads and continue with A.1 in the round. When piece measures 19-15-16-18-16-17 cm from division, knit 1 round while increasing 14-13-14-15-14-15 stitches evenly = 114-129-138-147-162-183 stitches. Switch to circular needle size 6 mm and work rib in the round = knit 1/purl 2 for 4 cm. Switch back to circular needle size 7 mm and cast off with knit over knit and purl over purl - make sure to avoid a tight cast-off edge. Jumper measures approx. 44-46-48-50-52-54 cm from shoulder and down.

SLEEVE:
Slip the 33-41-45-45-49-49 stitches from stitch holder in one side of piece on a short circular needle size 7 mm and pick in addition up 1 stitch in each of the 5-5-5-7-7-11 stitches cast on under sleeve = 38-46-50-52-56-60 stitches. Insert 1 marker thread in the middle stitch of the 5-5-5-7-7-11 stitches under sleeve. Continue A.1 in the round. When piece measures 3 cm from division, decrease 2 stitches mid under sleeve - read DECREASE TIP. Decrease like this every 10-3½-3-3-2-1½cm 3-7-8-8-10-11 times in total = 32-32-34-36-36-38 stitches. Continue until sleeve measures 36-31-30-30-27-26 cm from division (shorter measurements in the larger sizes because of wider neck and longer yoke). Knit 1 round while increasing 4-4-5-3-3-4 stitches evenly = 36-36-39-39-39-42 stitches.
Switch to double pointed needles size 6 mm and work rib in the round = knit 1/purl 2 for 4 cm. Cast off with knit over knit and purl over purl but to avoid at tight cast-off edge make 1 yarn over after every 6th stitch at the same time cast off (cast off yarn overs as stitches). Sleeve measures approx. 36-31-30-30-27-26 cm from division. Work the other sleeve the same way.

This pattern has been corrected.

Updated online: 09.03.2022
YOKE:.. Work next round as follows: start 1-1-2-2-1-1 stitches before the first marker thread, slip the first 33-41-45-45-49-49 stitches on 1 stitch holder for sleeve, ...

Diagram

knit = knit
purl = purl
Diagram for DROPS 191-14
Do you have a question? See a list of frequently asked questions (FAQ)

Knitting tension is what determines the final measurements of your work, and is usually measured per 10 x 10 cm. It is provided like so: number of stitches in width x number of rows in height - eg: 19 stitches x 26 rows = 10 x 10 cm.

The knitting tension is very individual; some people knit/crochet loosely while others work tightly. You adjust the knitting tension with the needle size, which is why the suggested needle size is only meant as a guide! You need to adjust this (up or down) to ensure that YOUR knitting tension matches the knitting tension provided in the pattern. If you work with a different knitting tension than provided you will have a different yarn consumption, and your work will have different measurements than what the pattern suggests.

The knitting tension also determines which yarns can replace each other. As long as you achieve the same knitting tension you can replace one yarn with another.

See DROPS lesson: How to measure your tension/gauge

See DROPS video: How to make a gauge tension swatch

The required amount of yarn is provided in grams, eg: 450 g. To calculate how many balls you’ll need you first need to know how many grams are in 1 ball (25g, 50g or 100g). This information is available if you click on the individual yarn quality on our pages. Divide the amount required with the amount of each ball. For example, if each ball is 50g (the most common amount), the calculation will be as follows: 450 / 50 = 9 balls.

The important thing when changing from one yarn to another is that the knitting/crochet tension remains the same. This is so that the measurements of the finished piece will be the same as on the sketch provided. It is easier to achieve the same knitting tension using yarns from the same yarn group. It is also possible to work with multiple strands of a thinner yarn to achieve the knitting tension of a thicker one. Please try our yarn converter. We recommend you to always work a test swatch.

Please NOTE: when changing yarn the garment might have a different look and feel to the garment in the photo, due to individual properties and qualities of each yarn.

See DROPS lesson: Can I use a different yarn than the one mentioned in the pattern?

All our yarns are categorised into yarn groups (from A to F) according to thickness and knitting tension – group A contains the thinnest yarns and group F the thickest. This makes it easier for you to find alternative yarns to our patterns, should you wish to switch yarn. All yarns within the same group have a similar knitting tension and can easily replace each other. However, different yarn qualities have different structures and properties which will give the finished work a unique look and feel.

Click here for an overview of the yarns in each yarn group

At the top of all our patterns you’ll find a link to our yarn calculator, which is a helpful tool should you wish to use a different yarn than suggested. By filling in the yarn quality you wish to replace, the amount (in your size) and number of strands, the calculator will present good alternative yarns with the same knitting tension. Additionally it will tell you how much you’ll require in the new qualities and whether you’ll need to work with multiple strands. Most skeins are 50g (some are 25g or 100g).

If the pattern is worked with multiple colours, every colour will have to be calculated separately. Similarly, if the pattern is worked with several strands of different yarns (for example 1 strand Alpaca and 1 strand Kid-Silk) you will have to find alternatives for each, individually.

Click here to see our yarn calculator

Since different yarns have different qualities and textures we have chosen to keep the original yarn in our patterns. However, you can easily find options among our available qualities by using our yarn calculator, or simply pick a yarn from the same yarn group.

It is possible that some retailers still have discontinued yarns in stock, or that someone has a few skeins at home that they would like to find patterns for.

The yarn calculator will provide both alternative yarn as well as required amount in the new quality.

If you think it's hard to decide what size to make, it can be a good idea to measure a garment you own already and like the size of. Then you can pick the size by comparing those measures with the ones available in the pattern's size chart.

You'll find the size chart at the bottom of the pattern.

See DROPS lesson: How to read size chart

The needle size provided in the pattern serves only as a guide, the important thing is to follow the knitting tension. And since knitting tension is very individual, you will have to adjust the needle size to ensure that YOUR tension is the same as in the pattern – maybe you’ll have to adjust 1, or even 2 needle sizes, up or down to achieve the correct tension. For this, we recommend that you work test swatches.

Should you work with a different knitting tension than the one provided, the measurements of the finished garment might deviate from the measurement sketch.

See DROPS lesson: How to measure your tension/gauge

See DROPS video: How to make a tension/gauge swatch

Working a garment top-down provides more flexibility and room for personal adjustment. For example it is easier to try the garment on while working, as well as making adjustments to length of yoke and shoulder caps.

The instructions are carefully explaining every step, in the correct order. Diagrams are adjusted to the knitting direction and are worked as usual.

The diagram depicts all rows/rounds, and every stitch seen from the right side. It is read from bottom to top, from right to left. 1 square = 1 stitch.

When working back and forth, every other row is worked from the right side and every other row is worked from the wrong side. When working from the wrong side, the diagram will have to be worked reversed: from left to right, knit stitches are purled, purl stitches are knit etc.

When working in the round every round is worked from the right side and the diagram are worked from right to left on all rounds.

See DROPS lesson: How to read knitting diagrams

The diagram depicts all rows/rounds, and every stitch seen from the right side. It is worked from bottom to top, from right to left.

When working back and forth every other row is worked from the right side: from right to left and every other row is worked from the wrong side: from left to right.

When working in the round, every row in the diagram are worked from the right side, from right to left.

When working a circular diagram you start in the middle and work your way outwards, counter clockwise, row by row.

The rows usually start with a given number of chain stitches (equivalent to the height of the following stitch), this will either be depicted in the diagram or explained in the pattern.

See DROPS lesson: How to read crochet diagrams

Instructions for working several diagrams after each other on the same row/round, will often be written like so: “work A.1, A.2, A.3 a total of 0-0-2-3-4 times". This means you work A.1 once, then A.2 is worked once, and A.3 is repeated (in width) the number of times provided for your size – in this case like so: S = 0 times, M = 0 times, L=2 times, XL= 3 times and XXL = 4 times.

The diagrams are worked as usual: begin with the first row in A.1, then work the first row in A.2 etc.

See DROPS lesson: How to read knitting diagrams

See DROPS lesson: How to read crochet diagrams

The total width of the garment (from wrist-to-wrist) will be larger in the larger sizes, despite the actual sleeves being shorter. The larger sizes have longer sleeve caps and wider shoulders, so there will be a good fit in all sizes.

The measurement sketch/schematic drawing provides information regarding the full length of the garment. If it’s a jumper or a jacket the length is measured from the highest point on the shoulder closest to the neckline, and straight down to the bottom of the garment. It is NOT measured from the tip of shoulder. Similarly, the length of yoke is measured from the highest point on the shoulder and down to where yoke is split into body and sleeves.

On a jacket measures are never taken along bands, unless specifically stated. Always measure inside band stitches when measuring the length.

See DROPS lesson: How to read a schematic drawing

Diagrams are often repeated on the round or in height. 1 repeat is the diagram the way it appears in the pattern. If it says to work 5 repeats of A.1 in the round, then you work A.1 a total of 5 times after/next to each other in the round. If it says to work 2 repeats of A.1 vertically/in height you work the entire diagram once, then begin again at the start and work the entire diagram one more time.

Chain stitches are slightly narrower than other stitches and to avoid working the cast-on edge too tight, we simply chain more stitches to begin with. The stitch count will be adjusted on the following row to fit the pattern and measurement sketch.

The rib edge is more elastic and will contract slightly compared to, for example, stocking stitch. By increasing before the rib edge, you avoid a visible difference in width between the rib edge and the rest of the body.

It’s very easy to cast off too tightly, and by making yarn overs while casting off (and simultaneously casting these off) you avoid a too tight cast off edge.

See DROPS video: How to bind off with yarn overs (yo)

To achieve an even increase (or decrease) you can increase on, for example: every 3rd and 4th row alternately, like so: work 2 rows and increase on the 3rd row, work 3 rows and increase on the 4th. Repeat this until the increase is complete.

See DROPS lesson: Increase or decrease 1 st on every 3rd and 4th row alternately

Should you prefer to work in the round instead of back and forth, you may of course adjust the pattern. You’ll need to add steeks mid-front (usually 5 stitches), and follow the instructions. When you would normally turn and work from the wrong side, simply work across the steek and continue in the round. At the end you’ll cut the piece open, pick up stitches to work bands, and cover the cut edges.

See DROPS video: How to knit steeks and cut open

Should you prefer to work back and forth instead of in the round, you may of course adjust the pattern so you work the pieces separately and then assemble them at the end. Divide the stitches for the body in 2, add 1 edge stitch in each side (for sewing) and work the front and back pieces separately.

See DROPS lesson: Can I adapt a pattern for circular needles into straight needles?

Pattern repeats can vary slightly in the different sizes, in order to get the correct proportions. If you’re not working the exact same size as the garment in the photo, yours might deviate slightly. This has been carefully developed and adjusted so that the complete impression of the garment is the same in all sizes.

Make sure to follow instructions and diagrams for your size!

If you have found a pattern you like which is available in women’s size it’s not very difficult to convert it to men’s size. The biggest difference will be the length of sleeves and body. Start working on the women size that you think would fit across the chest. The additional length will be worked right before you cast off for the armhole/sleeve cap. If the pattern is worked top-down you can add the length right after the armhole or before the first decrease on sleeve.

Regarding additional yarn amount, this will depend on how much length you add, but it is better with a skein too many than too few.

All yarns will have excess fibres (from production) that might come off as lint or shedding. Brushed yarns (ie hairier yarns) have more of these loose, excess fibres, causing more shedding.

Shedding also depends on what is worn under or over the garment, and whether this pulls at the yarn fibres. It’s therefore not possible to guarantee that there will be no shedding

Below are some tips on how to get the best result when working with hairier yarns:

1. When the garment is finished (before you wash it) shake it vigorously so the looser hairs come off. NOTE: do NOT use a lint roller, brush or any method that pulls at the yarn.

2. Place the garment in a plastic bag and put it in your freezer - the temperature will cause the fibres to become less attached to each other, and excess fibres will come off easier.

3. Leave in the freezer for a few hours before taking it out and shaking it again.

4. Wash the garment according to the instructions on the yarn label.

Pilling is a natural process that happens to even the most exclusive of fibers. It's a natural sign of wear and tear that is hard to avoid, and that is most visible in high friction areas of your garment like a sweater's arms and cuffs.

You can make your garment look as new by removing the pilling, using a fabric comb or a pill/lint remover.

Still can't find the answer you need? Then scroll down and leave your question so one of our experts can try to help you. This will be done normally within 5 to 10 working days.
In the meantime, you can read the questions and answers that others have left to this pattern or join the DROPS Workshop on Facebook to get help from fellow knitters/crocheters!
Have you finished this pattern?
Tag your pictures with #dropspattern #leconquetjumper or submit them to the #dropsfan gallery.

Post a comment to pattern DROPS 191-14

We would love to hear what you have to say about this pattern!

If you want to leave a question, please make sure you select the correct category in the form below, to speed up the answering process. Required fields are marked *.

Comments / Questions (19)

country flag Barbara wrote:

Ist das in der Zeichnung angegebene Maß für den Umfang richtig? Es scheint mir etwas eng für die Größen. LG

09.10.2018 - 07:15

DROPS Design answered:

Liebe Barbara, die cm in die Maßskizze stimmen alle, aber die geben die Breite wenn die Arbeit/der Pullover flach liegt, und nicht den Umfang - mehr lesen Sie hier. Viel Spaß beim stricken!

09.10.2018 - 09:53

country flag Sandra wrote:

Autre question : Le pull se tricote au point de blé mais l'échantillon est fait à partir du point de riz. Est-ce une erreur ? Faut-il faire l'échantillon au point de blé ou au point de riz ?

18.09.2018 - 13:39

DROPS Design answered:

Bonjour Sandra, l'échantillon se fait au point de blé (correction faite, merci). Bon tricot!

18.09.2018 - 15:06

country flag Sandra wrote:

Bonjour, j'aime beaucoup ce modèle mais je ne suis pas fan des manches 3/4. Est-il possible de le tricoter avec des manches de longueur normale et si oui quelles modifications apporter ? Merci. Cordialement. Sandra

18.09.2018 - 13:23

DROPS Design answered:

Bonjour Sandra, vous pouvez vous aider d'un modèle de même tension avec des manches longues pour ajuster les modifications nécessaire pour votre taille et la longueur souhaitée. Bon tricot!

18.09.2018 - 15:05

country flag Sara wrote:

Ciao! Vorrei realizzare questo modello il filato Drops loves you #9. Che è un filato del gruppo A ma il convertitore di filati non me lo ha inserito tra le possibilità. Magari, ho pensato, potrei lavorare con due gomitoli contemporaneamente di Drops love you #9 e ferri numero 6. Posso farlo? E nel caso ci sono modifiche da apportare? Cosa mi consigliate? Grazie

19.04.2018 - 08:57

DROPS Design answered:

Buongiorno Sara. A questa pagina trova le indicazioni per calcolare la quantità necessaria del filato da lei scelto. Le consigliamo di lavorare con il numero di ferri che le consentono di ottenere lo stesso campione indicato nel modello. In caso contrario potrebbe essere necessario riproporzionare il numero delle maglie. Per un aiuto più personalizzato, può contattare il suo rivenditore Drops di fiducia. Buon lavoro!

19.04.2018 - 12:15

country flag Anne Stendys wrote:

Er det korrekt, at der skal tages masker ud før ribkanten nederst på trøjen?

08.04.2018 - 22:07

DROPS Design answered:

Hej Anne, ja det stemmer du tager ud inden du strikker ribkanten på pinde 6. God fornøjelse!

09.04.2018 - 12:17

country flag Pascale wrote:

Bonjour Pour faire le pull Le Conquet , si je prends la couleur Alpaca Gris Aqua ref 8120 quelle couleur puis je associer en kid Silk ? Bien cordialement Pascale

26.03.2018 - 22:38

DROPS Design answered:

Bonjour Pascale, pour toute aide dans le choix des couleurs, vous pouvez volontiers contacter votre magasin DROPS, même par mail ou téléphone. Bon tricot!

28.03.2018 - 14:58

country flag Lisa wrote:

The three quarter sleeves and light color are perfect for spring!

19.12.2017 - 22:16

country flag AnniePBleau wrote:

Mon préféré qui est 1/2 saison. Il est bien dans l'air du temps et facile à enfiler sur une chemise ou un sous pull. Vivement qu'il soit disponible.

14.12.2017 - 17:54

country flag Véronique wrote:

Sensualité de la maille et du point . J'aime les modèles aux manches 3/4 et aux emmanchures raglan (fantaisies ) .

11.12.2017 - 16:38