
Popular categories
Looking for a yarn?


Comments / Questions (16)
![]() Emmi wrote:
Emmi wrote:
Ohjeen ensimmäisessä lisäysvinkissä sanotaan "Lisää silmukat vuorotellen ennen piirroksen A.1 viimeistä oikeaa silmukkaa ja piirroksen A.1 viimeisen oikean silmukan jälkeen" Tarkoittaako tämä saman lisäyskierroksen aikana vai niin että ekalla lisäyskierroksella lisätään ensimmäisen silmukan jälkeen ja seuraavalla lisäyskierroksella ennen oikean ouoleista silmukkaa?
09.07.2018 - 11:46DROPS Design answered:
Hei, ensimmäisellä lisäyskerroksella lisäykset tehdään ennen piirroksen A.1 viimeistä oikeaa silmukkaa, seuraavalla lisäyskerroksella lisäykset tehdään viimeisen oikean silmukan jälkeen, jne.
09.07.2018 - 17:52
![]() Kristiina wrote:
Kristiina wrote:
Monesta kielestä puuttuu piirrokset (A1 ja mittapiirros), katsoin monta kieltä ennen kuin norjankielisestä löytyi.
24.04.2018 - 15:12Kathy Swan wrote:
How can I access diagrams for this pattern please? There is no link.
20.04.2018 - 21:16DROPS Design answered:
Dear Kathy, the diagrams are below the pattern instructions toward the bottom of the page. If for some reason, you cannot acces, it is probably a remporary or a local problem. In this case, try the same pattern in another language, the charts and the scahematics are the same, and rather self explanatory.
22.04.2018 - 11:04
![]() Poffé Chantal wrote:
Poffé Chantal wrote:
Super je trouve des explications pour tricoter merveilleux et vos modèle super
23.03.2018 - 19:57
![]() Birgit wrote:
Birgit wrote:
Eine wunderbare Sommerabendjacke. Kommt die Anleitung noch? ich kann sie leider nicht abrufen...
18.02.2018 - 13:05
![]() Beti wrote:
Beti wrote:
Dies ist auch sehr schön.
26.12.2017 - 18:55
|
||||||||||
Francine#francinecardigan |
||||||||||
 |
 |
|||||||||
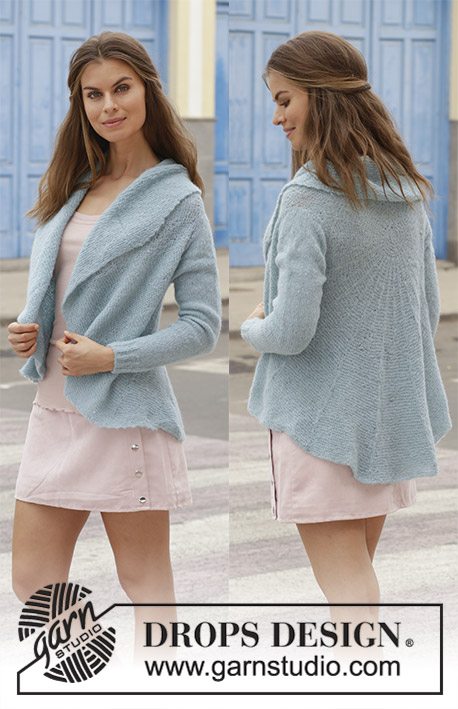
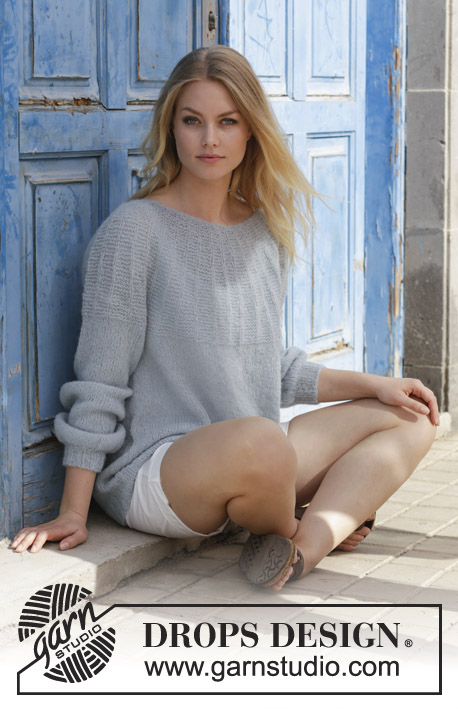
Knitted jacket with garter stitch and round yoke, worked top down. Sizes S - XXXL. The piece is worked in DROPS Brushed Alpaca Silk.
DROPS 188-12 |
||||||||||
|
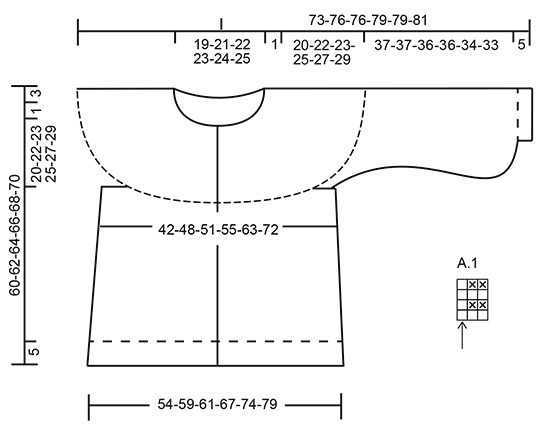
INFORMATION FOR THE PATTERN: RIDGE/GARTER STITCH (worked back and forth): 1 ridge = Knit 2 rows. PATTERN: See diagram A.1. INCREASE TIP-1 (for yoke): Increase stitches alternately before and after the last knitted stitch in A.1 – See arrow in diagram. i.e. the first increase is after the last knitted stitch and the second is increased before the last knitted stitch. Increase as follows: Make 1 yarn over between 2 stitches, the yarn over is worked twisted on the next row. Then the increased stitch is worked in garter stitch. In other words, each time you increase there will be 1 more stitch in garter stitch in the A.1 you increased in. INCREASE TIP-2 (for increases in sides of body and on sleeves): Work until there are 2 stitches left before the marker thread, make 1 yarn over, knit 4 stitches (the marker thread sits in the middle of these 4 stitches), make 1 yarn over (= 2 stitches increased). Increase like this at both marker threads on the body. The yarn overs are worked twisted on the next row/round to avoid holes. DECREASE TIP (for sleeves): Work until there are 3 stitches left before the marker thread, slip 1 stitch as if to knit, knit 1, pass the slipped stitch over the knitted stitch, knit 2 stitches (the marker thread sits in the middle of these 2 stitches), knit the next 2 stitches together (= 2 stitches decreased). BUTTONHOLES: Work buttonholes on the right band (when the garment is worn). Work from the right side, when there are 3 stitches left on the row as follows: Make 1 yarn over, knit the next 2 stitches together and knit the last stitch. On the next row knit the yarn over to leave a hole. The first buttonhole is worked when the rib in the neck measures approx. 1½-2 cm. The next 6 buttonholes are then worked with approx. 7-7½-7½-8-8-8 cm between each one. ---------------------------------------------------------- JACKET: The piece is worked back and forth, top down. The yoke is worked, then you divide the piece and the sleeves and body are finished separately. The sleeves are worked in the round with double pointed needles /short circular needle. YOKE: Cast on 94-98-104-108-112-114 stitches (including 5 band stitches in each side of the piece) with circular needle size 4 mm. Work 2 RIDGES – see description above. The next row is worked as follows from the right side: Work 5 band stitches in garter stitch, knit 16-17-18-19-20-21 stitches and increase 4-5-4-5-4-6 stitches evenly over these stitches (= left front piece), * knit 1, 1 yarn over *, work from *-* over the next 10 stitches (= left sleeve = 10 stitches increased), knit 32-34-37-39-41-42 stitches and increase 6-9-6-8-6-10 stitches evenly over these stitches (= back piece), * knit 1, 1 yarn over *, work from *-* over the next 10 stitches (= right sleeve = 10 stitches increases), knit 16-17-19-20-21-21 stitches and increase 4-5-3-5-4-5 stitches evenly over these stitches and finish with 5 band stitches in garter stitch (= right front piece) = 128-137-137-146-146-155 stitches. Knit 1 row from the wrong side, the yarn overs are worked twisted to avoid holes. Change to circular needle size 5 mm. Then work the next row from the right side as follows: Work 5 band stitches in garter stitch, 1 stitch in stocking stitch, A.1 (= 3 stitches) until there are 5 stitches left (= 39-42-42-45-45-48 times in width), finish with 5 band stitches in garter stitch. Continue the pattern like this AT THE SAME TIME as you increase as follows: YOKE SHAPING: Increase alternately in every 3rd repeat of A.1 in width every 4th row (= from the right side) as follows: INCREASE 1: Work 5 band stitches in garter stitch, 1 stitch in stocking stitch, * increase 1 stitch – read INCREASE TIP-1, in first A.1, then work the next 2 repeats of A.1 in width as before *, work from *-* until there are 5 stitches left, finish with 5 band stitches in garter stitch = 13-14-14-15-15-16 stitches increased. Work 3 rows of pattern. REMEMBER THE KNITTING TENSION! INCREASE 2: Work 5 band stitches in garter stitch, 1 stitch in stocking stitch, * work 1 repeat of A.1 as before, increase 1 stitch in the next A.1, work the next repeat of A.1 as before *, work from *-* until there are 5 stitches left, finish with 5 band stitches in garter stitch = 13-14-14-15-15-16 stitches increased. Work 3 rows of pattern. INCREASE 3: Work 5 band stitches in garter stitch, 1 stitch in stocking stitch, * work 2 repeats of A.1 as before, increase 1 stitch in the next A.1 *, work from *-* until there are 5 stitches left, finish with 5 band stitches in garter stitch = 13-14-14-15-15-16 stitches increased. Work 3 rows of pattern. Repeat increases 1 to 3 a total of 3-3-3-3-4-4 times (= a total of 9-9-9-9-12-12 increase-rows), then increase 1is repeated 0-1-1-1-1-1 more time (= a total of 9-10-10-10-13-13 increase-rows), then increase 2 is repeated 0-0-1-1-0-1 more time (= a total of 9-10-11-11-13-14 increase-rows) = 245-277-291-311-341-379 stitches. Continue with pattern until the piece measures 21-23-24-26-28-30 cm from the cast-on edge. The next row from the right side is worked as follows: Work 5 band stitches in garter stitch, knit 32-37-39-43-48-56 stitches (= front piece), place the next 54-60-64-66-70-74 stitches on 1 thread (= sleeve), cast on 8-8-10-10-12-12 new stitches on the needle, insert 1 marker thread in the middle of these new stitches (= in side under sleeve), knit the next 63-73-76-84-95-110 stitches (= back piece), place the next 54-60-64-66-70-74 stitches on 1 thread (= sleeve), cast on 8-8-10-10-12-12 new stitches on the needle, insert 1 marker thread in the middle of these new stitches (= in side under sleeve), knit 32-37-38-42-48-55 stitches and finish with 5 band stitches in garter stitch (= front piece). Body and sleeves are finished separately. THE PIECE IS NOW MEASURED FROM HERE! BODY: = 153-173-183-199-225-255 stitches. Continue working in stocking stitch with 5 band stitches in garter stitch in each side of the piece. When the piece measures 3 cm from where the sleeves were placed on 1 thread, increase 1 stitch on each side of the marker threads (= 4 stitches increased) – read INCREASE TIP-2! Increase like this every 2½-3-3-2½-3-5 cm a total of 10-9-9-10-9-6 times = 193-209-219-239-261-279 stitches. When the piece measures 31-31-32-32-32-32 cm from where the sleeves were placed on the thread, work the next row from the wrong side as before AT THE SAME TIME as you increase 3-3-1-1-3-1 stitches evenly on row = 196-212-220-240-264-280 stitches. Change to circular needle size 4 mm.Then work rib on the next row from the right side as follows: Work 5 band stitches in garter stitch, knit 2 stitches, rib (purl 2 / knit 2) until there are 5 stitches left, finish with 5 band stitches in garter stitch. Work like this for 5 cm. Cast off with knit over knit and purl over purl. Make sure that the cast-off edge is not tight; you can cast off with a needle 1 size larger if necessary. The piece measures approx. 36-36-37-37-37-37 cm from where the sleeves were separated from the body and a total of 60-62-64-66-68-70 cm from the shoulder. SLEEVE: The piece is worked in the round with double pointed needles / short circular needle. Place the 54-60-64-66-70-74 stitches from the thread in the one side of the piece on double pointed needles size 5 mm and knit up 1 stitch in each of the 8-8-10-10-12-12 stitches cast on under the sleeve, insert 1 marker thread in the middle of these new stitches = 62-68-74-76-82-86 stitches. Work stocking stitch. When the piece measures 3 cm from where the sleeves were separated from the body, decrease 1 stitch on each side of the marker thread (= 2 stitches decreased) – read DECREASE TIP! Decrease like this every 3 cm a total of 4-4-5-5-6-6 times = 54-60-64-66-70-74 stitches. Then increase 1 stitch on each side of the marker thread (= 2 stitches increased). Increase like this every 3-3-3-3-2-2 cm a total of 7-6-6-7-7-7 times = 68-72-76-80-84-88 stitches. Change to short circular needle when necessary. When the piece measures 37-37-36-36-34-33 cm from where the sleeve was separated from the body, change to double pointed needles size 4 mm and work 1 round where all stitches are knitted together 2 and 2 = 34-36-38-40-42-44 stitches. Then work rib (= purl 2 / knit 2) AT THE SAME TIME as you increase 2-0-2-0-2-0 stitches evenly on round = 36-36-40-40-44-44 stitches. Cast off with knit over knit and purl over purl when the piece measures 42-42-41-41-39-38 cm from where the sleeve was separated from the body and a total of 63-65-65-67-67-68 cm from the neck. Work the other sleeve in the same way. |
||||||||||
Diagram explanations |
||||||||||
|
||||||||||
 |
||||||||||
Have you finished this pattern?Tag your pictures with #dropspattern #francinecardigan or submit them to the #dropsfan gallery. Do you need help with this pattern?You'll find 21 tutorial videos, a Comments/Questions area and more by visiting the pattern on garnstudio.com. © 1982-2026 DROPS Design A/S. We reserve all rights. This document, including all its sub-sections, has copyrights. Read more about what you can do with our patterns at the bottom of each pattern on our site. |
||||||||||


With over 40 years in knitting and crochet design, DROPS Design offers one of the most extensive collections of free patterns on the internet - translated to 17 languages. As of today we count 324 catalogues and 12290 patterns translated into English (UK/cm). 12290
We work hard to bring you the best knitting and crochet have to offer, inspiration and advice as well as great quality yarns at incredible prices! Would you like to use our patterns for other than personal use? You can read what you are allowed to do in the Copyright text at the bottom of all our patterns. Happy crafting!
Post a comment to pattern DROPS 188-12
We would love to hear what you have to say about this pattern!
If you want to leave a question, please make sure you select the correct category in the form below, to speed up the answering process. Required fields are marked *.