
Popular categories
Looking for a yarn?


Comments / Questions (20)
![]() Isabelle wrote:
Isabelle wrote:
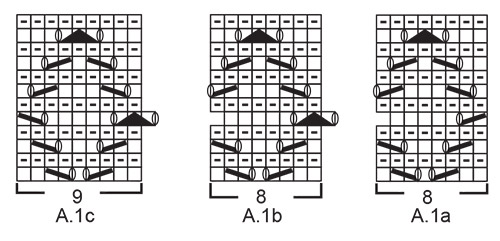
Merci mais les 3 diagrammes n'arrivent pas exact avec mon total de mailles sur les rangs #3,5,7,9 & 11. Je tricote le XXXL donc 159 mailles totales. Pouvez-vous expliquer en details comment dois-je tricoter les 3 diagrammes sur tous les rangs ci-haut-mentionnes en commencant par le rang#3 s.v.p.? Merci.
08.07.2020 - 20:33DROPS Design answered:
Bonjour Isabelle, si le 1er rang passe, les autres doivent passer car ils se tricotent sur le même nombre de mailes. La seule "subtilité" se trouve au 5ème rang, car on va tricoter A.1a sur 7 m, le 1er jeté de A.1a= dernière m de A.1a et idem pour A.1b: la dernière m de chaque A.1b se tricote avec les 2 premières du b suivant/de c. Tricotez ainsi: 3 m point mousse, A.1a, 17xA.1b, A.1c, 3 m point mousse soit: 3+8+ 136+9+3=159 m. Suivez bien le conseil des marqueurs, c'est le meilleur moyen de bien suivre les diagrammes. Bon tricot!
09.07.2020 - 09:13
![]() Isabelle wrote:
Isabelle wrote:
Je fais ce modele dans le XXXL mais les motifs ne s'agencent pas apres avoir termine les 12 rangs 1 fois des 3 diagrammes. Rendu au 3ie rang du diagramme A.1c, il me reste 5 mailles au lieu de 9 + les 3 m au point mousse. Comment puis-je arriver au meme nombre de mailles pour cette taille (XXXL)? Merci.
07.07.2020 - 22:52DROPS Design answered:
Bonjour Isabelle, les diagrammes se tricotent toujours sur le même nombre de mailles: 8 pour A.1a et A.1b et 9 pour A.1c (pour que le motif soit symétrique de chaque côté). Pour vous aider, vous pouvez ajouter un marqueur/un fil marqueur entre chaque diagramme que vous tricotez, ainsi, vous pourrez vérifier votre nombre de mailles à chaque rang. Bon tricot!
08.07.2020 - 08:26
![]() Bente Neverdal wrote:
Bente Neverdal wrote:
Hei, strikker denne. Når man kommer opp til nakken, blir arbeidet delt, og strikkes nedover på hver side? Eller blir det delt ved armene? Skjønner ikke helt hvordan det blir en vest/jakke om det blir strikket i et stykke? Takk for svar!
13.05.2020 - 11:54DROPS Design answered:
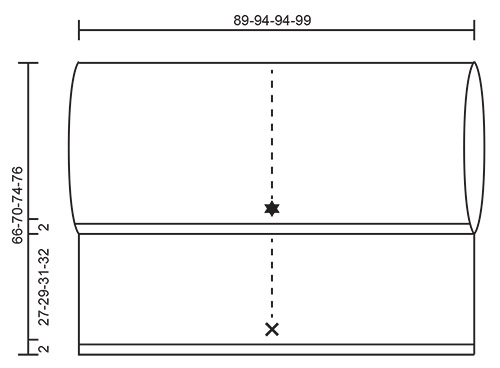
Hei Bente. Arbeidet blir ikke delt, men strikkes i et helt stykke. Når du monterer vesten sys hvert hjøre i avfellingskanten til hvert sitt merke som ble satt når arbeidet målte 29-31-33-34 cm. Nå kan du stikke ermene inn i hver side og nakken vil få ekstra folder av plagget som lager den flotte kraven. mvh DROPS design
18.05.2020 - 13:10Ana wrote:
After the first row from the right side how do I continue (when making the 2 cm rib)? You say in the pattern 'Continue like this until the rib measures 2 cm'. I believe the next row (wrong side) I have to knit like this: 1 stitch GARTER STITCH, * purl 1, knit 1 *, work from *-* until there are 2 stitches left, purl 1, 1 stitch garter stitch. Is this correct? Thank you!
04.06.2018 - 14:53DROPS Design answered:
Dear Ana, when working rib K1/P1 for 2 cm, work from the wrong side K over K and P over P, ie start with 1 st in garter st, then P1, (K1,P1), repeat from (to) and finish with 1 st in garter st. Happy knitting!
04.06.2018 - 14:57
![]() Beatrix wrote:
Beatrix wrote:
Jeg forstår ikke hvordan jeg skal brette plagget. Uansett hvor jeg fester det blir det ikke bra, vri seg liksom innover. Klarer ikke å lese/tolke tegningen.hjelp😇😇
21.05.2018 - 07:43DROPS Design answered:
Hei Beatrix. Hvis du legger plagget flatt foran deg, med oppleggskanten nederst og avfellingskanten øvers, skal du ta de to øverste hjørnene og brette plagget ned til det ligger kant-i-kant med de to merke du satte i sidene. Der skal de to delene sys sammen i 3 cm – dette er ermhullene. Om plagget vrir seg innover som du sier, kan det være at avfellingskanten er litt for stram – det er veldig fort gjor å felle av litt strammere enn resten av arbeidet, og det kan gjøre at det trekker seg innover mot midten der du har sydd sammen i sidene. Et tips er å bruke større pinner når du feller av. God fornøyelse.
25.05.2018 - 13:17
![]() Birthe wrote:
Birthe wrote:
Kan det passe at der skal være lige mange masker til størrelse L/XL og XXL?
14.03.2018 - 08:39DROPS Design answered:
Hej Birthe, i de to midterste størrelser skal der slås lige mange masker op, målene er dog lidt forskellige, så følg opskriften. God fornøjelse!
14.03.2018 - 15:46
![]() Birthe wrote:
Birthe wrote:
Der er vist en fejl i den danske version i diagram forklaring ved symbol 6. I originalopskriften står der at man skal strikke 2 ret sammen, og i den danske at man skal strikke 1 ret.
14.03.2018 - 08:32DROPS Design answered:
Hej Birthe, så er den blevet opdateret. Tak for info og rigtig god fornøjelse! :)
14.03.2018 - 15:49
![]() Mariagiovanna wrote:
Mariagiovanna wrote:
Chiedo per favore se questo modello si può lavorare con i ferri diritti e se il filato si può sostituire con il cotone Drops You hastag 8 e con che quantità. In generale se il lavoro è fatto con i ferri circolari non puoè essere eseguito con i ferri diritti? Se si, come seguire lo schema? Grazie!
27.01.2018 - 14:42DROPS Design answered:
Buonasera Mariagiovanna, se il modello è lavorato come in questo caso in ferri di andata e ritorno può essere lavorato con i ferri dritti seguendo le stesse istruzioni. Per il filato può utilizzare DROPS loves you 8 verificando che il suo campione corrisponda a quello indicato. Per la quantità di filato necessaria può fare riferimento a questo link.
27.01.2018 - 20:09
![]() Marit Idland wrote:
Marit Idland wrote:
Hei, denne var veldig fin og med et moderne snitt. Henger den lengre ned bak ? Tenker den er kjedelig og ordinær hvis den ikke gjør det..
19.01.2018 - 17:41
![]() Martina wrote:
Martina wrote:
Wunderschön, das möchte ich gerne haben
11.01.2018 - 10:05
|
||||||||||||||||||||||||||||
Comfort Wrap#comfortwrap |
||||||||||||||||||||||||||||
 |
 |
|||||||||||||||||||||||||||
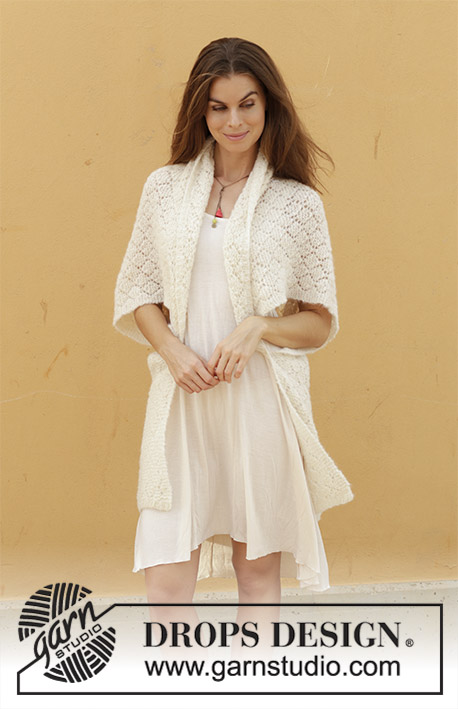
Knitted vest with lace pattern. Sizes S - XXXL. The piece is worked in DROPS Brushed Alpaca Silk.
DROPS 187-27 |
||||||||||||||||||||||||||||
|
INFORMATION FOR THE PATTERN: RIDGE/GARTER STITCH (worked back and forth): 1 ridge = Knit 2 rows. PATTERN: See diagram A.1. The diagram shows all the rows in the pattern seen from the right side. CASTING OFF TIP: To avoid the cast-off edge being tight, you can cast off with ½ size larger needle. ---------------------------------------------------------- VEST: The piece is worked back and forth with circular needle. Start at the bottom of the back piece and knit to the neck. Then the piece is folded double and sewn in each side for the armholes. Loosely cast on 143-151-151-159 stitches with circular needle size 5.5 mm and Brushed Alpaca Silk – it is important that the cast-on edge is not tight. Purl 1 row from the wrong side. The next row is worked as follows – from the right side: 1 stitch GARTER STITCH – see description above, * knit 1, purl 1 *, work from *-* until there are 2 stitches left, knit 1, 1 stitch garter stitch. Continue like this until the rib measures 2 cm. The next row is worked as follows – from the right side: 3 stitches garter stitch, A.1a (= 8 stitches), A.1b (= 8 stitches) a total of 15-16-16-17 times in width, A.1c (= 9 stitches) and 3 stitches garter stitch. Continue with this pattern. REMEMBER THE KNITTING TENSION! When the piece measures 29-31-33-34 cm insert 1 marker in each side, the markers mark where the armholes start. When the piece measures approx. 101-107-112-115 cm (adjust so that you finish after either the 6th or the 12th row in the diagram) work the next row as follows – from the right side: 1 stitch garter stitch, * knit 1, purl 1 *, work from *-* until there are 2 stitches left, knit 1, 1 stitch garter stitch. Continue like this until the rib measures 2 cm. Loosely cast off with knit over knit and purl over purl – it is important that the cast-off edge is not tight – read CASTING OFF TIP. ASSEMBLY: See the sketch for how to assemble the garment. Fold the cast-off edge down towards the bottom edge with wrong side to wrong side. The corners should stop exactly by each marker. Sew each corner approx. 3 cm in the side so they stay in place. |
||||||||||||||||||||||||||||
Diagram explanations |
||||||||||||||||||||||||||||
|
||||||||||||||||||||||||||||
 |
||||||||||||||||||||||||||||
 |
||||||||||||||||||||||||||||
Have you finished this pattern?Tag your pictures with #dropspattern #comfortwrap or submit them to the #dropsfan gallery. Do you need help with this pattern?You'll find 19 tutorial videos, a Comments/Questions area and more by visiting the pattern on garnstudio.com. © 1982-2026 DROPS Design A/S. We reserve all rights. This document, including all its sub-sections, has copyrights. Read more about what you can do with our patterns at the bottom of each pattern on our site. |
||||||||||||||||||||||||||||


With over 40 years in knitting and crochet design, DROPS Design offers one of the most extensive collections of free patterns on the internet - translated to 17 languages. As of today we count 324 catalogues and 12290 patterns translated into English (UK/cm). 12290
We work hard to bring you the best knitting and crochet have to offer, inspiration and advice as well as great quality yarns at incredible prices! Would you like to use our patterns for other than personal use? You can read what you are allowed to do in the Copyright text at the bottom of all our patterns. Happy crafting!
Post a comment to pattern DROPS 187-27
We would love to hear what you have to say about this pattern!
If you want to leave a question, please make sure you select the correct category in the form below, to speed up the answering process. Required fields are marked *.