
Popular categories
Looking for a yarn?


Comments / Questions (28)
![]() Anette Ericson wrote:
Anette Ericson wrote:
Hur monterar jag ärmen mot kroppen? Det läggs ju bara upp maskor på ärmen? Det måste ju bli ett stort hål? I andra jag stickat motsvaras upplägg eller avmaskningar på både ärm och kropp och sys sedan mot varandra. Frågar precis innan jag kommit till delning.
22.02.2020 - 15:54DROPS Design answered:
Hei Anette. Denne genseren strikkes ovenifra og ned, altså først strikkes halsen, så bærestykket, så settes maskene til ermene på en tråd og bolen strikkes så ferdig. Deretter strikkes ermene. Når du strikker første omgang på ermene, strikkes det opp 1 ny maske i hver av de maskene det ble lagt opp under erme når du strikket bolen (da slipper du å sy det "lille" hullet under ermene og genseren er ferdig montert). God Fornøyelse!
24.02.2020 - 10:14
![]() Simonne Van Frachem wrote:
Simonne Van Frachem wrote:
Is dit patroon ook te verkrijgen om te breien op de breimachine ? En welke wol voor naalden nr 2 raad u mij aan voor dit werk ? Alvast bedankt voor het antwoord. groetjes, Simonne
23.05.2019 - 21:03DROPS Design answered:
Simone,
Helaas is dit patroon er alleen voor breien met de hand. Wij maken geen patronen voor de breimachine. Als je met naald 2 wilt breien, zou je een garen uit groep A kunnen kiezen, bijvoorbeeld DROPS Alpaca of DROPS Nord. Let er wel op of de stekenverhouding klopt, want dit patroon is met garen uit garengroep B.
23.05.2019 - 21:32
![]() Liza wrote:
Liza wrote:
Hi :) Where is the A.1A and A.2A diagrams?
06.11.2018 - 14:50DROPS Design answered:
Dear Liza, thanks for your feedback, we'll check again. Thank you in advance for your patience.
07.11.2018 - 08:10
![]() Elin wrote:
Elin wrote:
Stemmer det at livvidden i str. S er 86 cm, og neste størrelse er 100 cm? Det var et voldsomt sprang mellom to størrelser?
15.10.2018 - 22:46DROPS Design answered:
Hei Elin. Ja, det stemmer. Det er et like stort sprang mellom den nest største og den største størrelsen også. Dette skyldes at mønsteret skal gå opp i alle størrelser, og da blir målene noe større/mindre enn om det ikke er mønster. Det er ikke noe i veien for at du strikker etter den ene størrelsen i vidden, og etter en større størrelse i lengden om det passer deg bedre. God fornøyelse.
22.10.2018 - 09:28
![]() Dea wrote:
Dea wrote:
Il diagramma A1A indicato nelle spiegazioni per le maniche dove è?
04.10.2018 - 13:27DROPS Design answered:
Buonasera Dea. Segnaleremo l’errore. Deve seguire i diagrammi che trova, senza la A finale, quindi diagramma A.1 è così via. Buon lavoro!
04.10.2018 - 20:20
![]() Dea wrote:
Dea wrote:
Quando si misura la lunghezza per fare la divisione tra le maniche e il corpo bisogna farla sul davanti del maglione? Sul dietro c'è l'alzata per la migliore vestibilità che falserebbe le misure o no?
28.09.2018 - 20:40DROPS Design answered:
Buongiorno Dea. Sì, è corretto prendere le misure sul davanti. Buon lavoro!
29.09.2018 - 06:35
![]() Dea wrote:
Dea wrote:
Buonasera. Mi trovo alla fine dell'alzata , quindi alla fine del ferro a maglie rovesce nel punto col segnapunti. Ora devo iniziare i due giri a m rasata e devo per forza tornare indietro, come faccio ad evitare il buco che si forma tra le due maglie del giro? Grazie.
21.09.2018 - 17:56DROPS Design answered:
Buonasera Dea. Può provare a sollevare il filo del giro precedente, dove si formerebbe il buco e lavorarlo ritorto insieme alla prima maglia sul ferro. Buon lavoro!
21.09.2018 - 21:05
![]() Cindy wrote:
Cindy wrote:
Waar vind ik patroon A1.A en A2.A?
01.06.2018 - 22:55DROPS Design answered:
Dag Cindy, Deze teltekeningen staan helemaal onderaan bij het patroon.
03.06.2018 - 19:52
![]() Conny wrote:
Conny wrote:
Vraag 1: Bij het breien van de mouwen is er aan beide kanten van de 8 opgezetten steken een gat ontstaan, klopt dat en hoe los ik het op. Vraag 2: bij de mouwen moet er 2 steken geminderd worden om de 3 toeren, moet dat in een keer of aan beide zijde van de markeerdraad? Met vriendelijke groet, Conny
09.01.2018 - 08:24DROPS Design answered:
Hoi Conny, Antwoord 1: Er hoort niet een gaat te ontstaan naast de 8 steken, maar natuurlijk wel op de acht steken van de mouw en de 8 steken van het pand. Dit gat naai je later dicht. Door het opzetten van de 8 steken kan het soms wel lijken of er een gat ontstaat, maar dit trekt vaak na een paar naalden breien wel weer bij en kun je evt. bij het dichtnaaien van het gat ook bijwerken. Vraag 2: Je mindert aan beide kanten van de markeerdraad, dus aan de ene kant 1 steek en aan de andere kant 1 steek.
09.01.2018 - 21:41
![]() Sandra Ferber wrote:
Sandra Ferber wrote:
Meine Halsblende liegt nicht wie auf dem Bild unten am Hals, sondern gleicht eher einem Stehkragen, obwohl ich aufgrund der Maschenprobe ihn bereits mit 4,5 Nadeln gestrickt habe. Ansonsten liegt der Musterteil wunderbar. Woran kann dies liegen?
28.10.2017 - 16:56DROPS Design answered:
Liebe Frau Ferber, vielleicht können Sie Ihr Laden den Strickstück zeigen (ein Foto können Sie auch ihnen senden), damit können sie Ihnnen sicher besser helfen. Viel Spaß beim stricken!
30.10.2017 - 09:10
|
|||||||||||||||||||
Telemark#telemarksweater |
|||||||||||||||||||
 |
 |
||||||||||||||||||
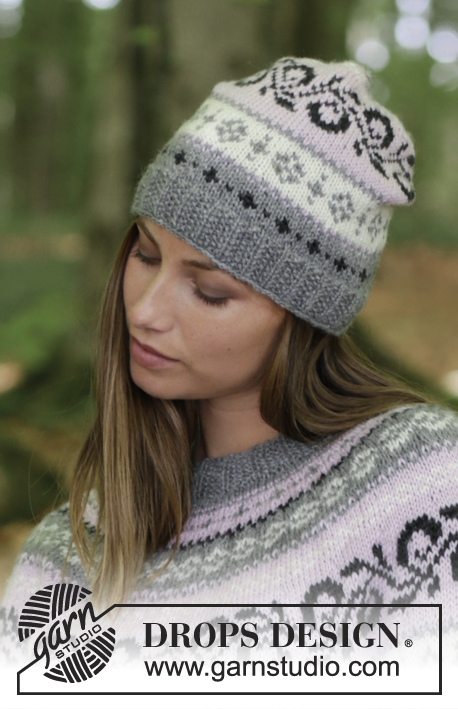
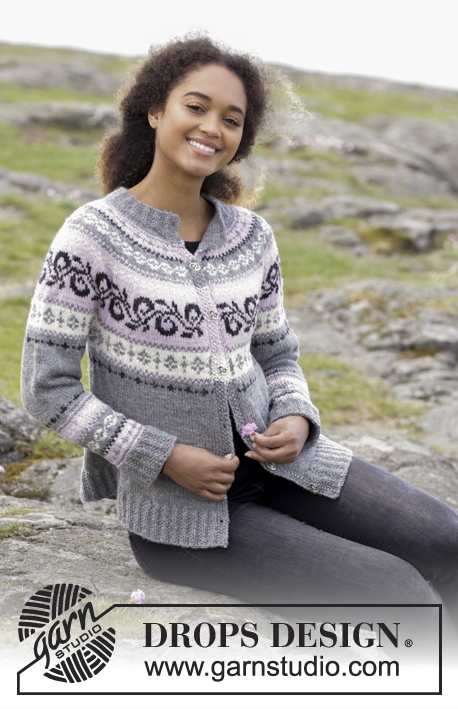
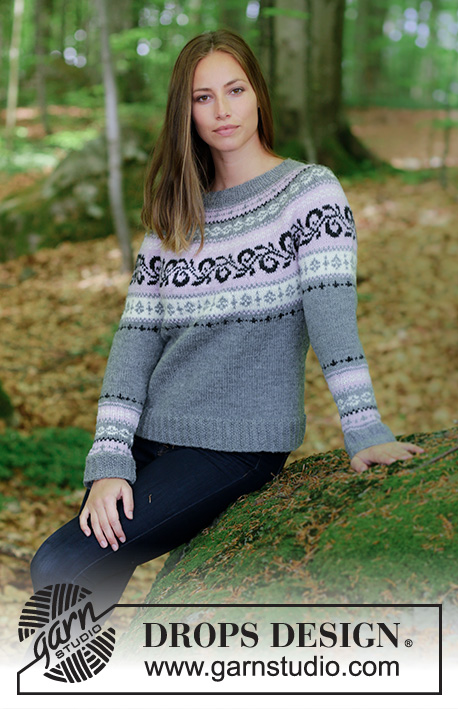
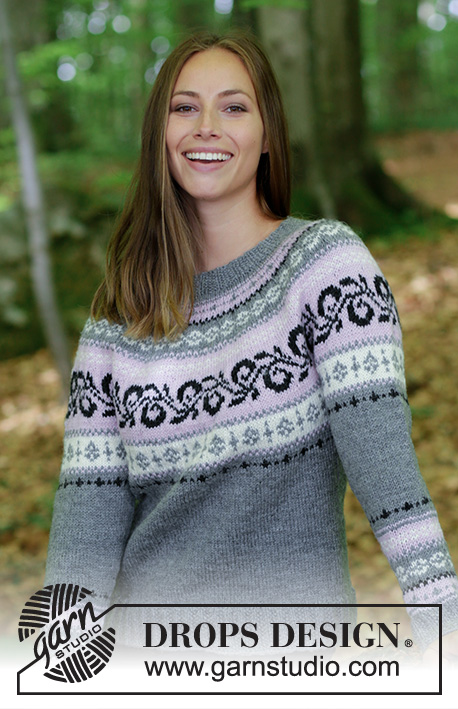
Knitted jumper with round yoke and multi-coloured Norwegian pattern, worked top down. Sizes S - XXXL. The piece is worked in DROPS Merino Extra Fine.
DROPS 179-9 |
|||||||||||||||||||
|
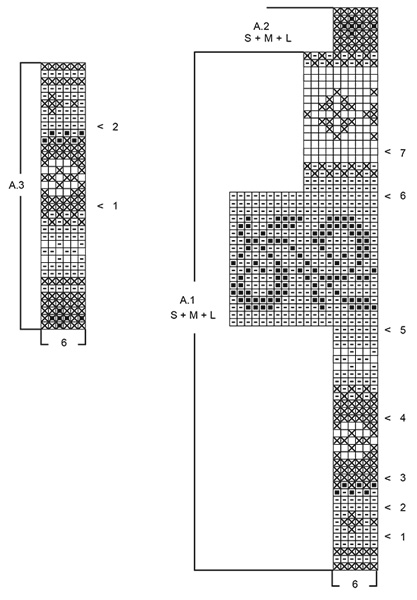
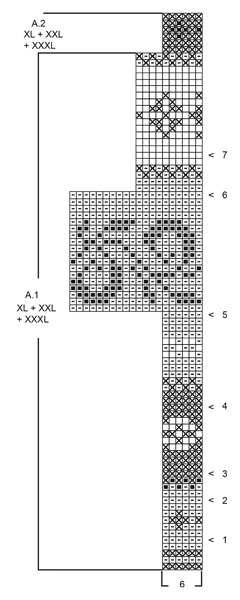
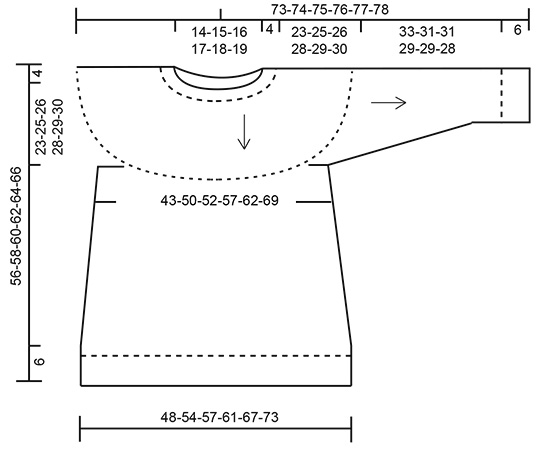
INFORMATION FOR THE PATTERN: MOSS STITCH: ROUND 1: * Knit 1, purl 1 *, work from *-*. ROUND 2: Knit over purl and purl over knit. Repeat round 2. INCREASE TIP-1 (evenly spaced): To work out how to increase evenly on round, count the total number of stitches on the needle (e.g. 88 stitches), and divide by the number of increases to be made (e.g. 8) = 11. In this example, increase after approx. every 11th stitch. Increase 1 stitch by making 1 yarn over. On the next round, knit the yarn overs twisted to prevent holes. INCREASE TIP-2 (for sides on body): Start 4 stitches before the marker thread, make 1 yarn over, knit 8 (the marker thread sits in the middle of these 8 stitches), make 1 yarn over (= 2 stitches increased). On the next round, knit the yarn overs twisted to prevent holes. ELEVATION: Work an elevation from mid back (= the start of the round). Start from the right side and knit 12-13-14-14-15-15 stitches, turn, tighten the strand and purl 24-26-28-28-30-30 stitches. Turn, tighten the strand and knit 36-39-42-42-45-45 stitches, turn, tighten the strand and purl 48-52-56-56-60-60 stitches. Turn, tighten the strand and knit 60-65-70-70-75-75 stitches, turn, tighten the strand and purl 72-78-84-84-90-90 stitches. Turn, tighten the strand and knit back to beginning of round. PATTERN: See diagrams A.1 to A.3. (Choose diagram for your size – applies to A.1 and A.2). The whole pattern is worked in stocking stitch. All the rows in the diagram show the pattern seen from the right side. KNITTING TIP: To prevent the knitting tension becoming tighter when working pattern, it is important that the strands at the back of the piece are not tight. You can increase a needle size when working pattern if this is a problem. DECREASE TIP-1 (for mid under sleeve): Start 3 stitches before the marker thread, knit 2 together, knit 2 (the marker thread sits in the middle of these 2 stitches), slip 1 stitch as if to knit, knit 1, pass the slipped stitch over the knitted stitch (= 2 stitches decreased). DECREASE TIP-2 (evenly spaced): To work out how to decrease evenly, count the total number of stitches on the needle (e.g. 60 stitches) and divide by the number of decreases to be made (e.g. 6) = 10. In this example knit every 9th and 10th stitch together. ---------------------------------------------------------- JUMPER: The piece is worked with circular needle, top down. The round begins mid back. The sleeves are worked in the round with double pointed needles. NECKLINE: Cast on 88-96-100-104-108-112 stitches with short circular needle size 3.5 mm and medium grey. Knit 1 round. Now work rib as follows: * Knit 1, 3 stitches MOSS STITCH – see description above *, work from *-* to end of round. Continue the rib in this way for 4 cm. After the rib, knit 1 round where you increase 8-6-8-10-12-14 stitches evenly on round – read INCREASE TIP-1 (evenly spaced) = 96-102-108-114-120-126 stitches. Knit 1 round. For a better fit, work a small ELEVATION in the back of the neck – see description above. YOKE: Change to circular needle size 4 mm. Continue with 2-2-4-4-6-6 rounds stocking stitch. Now work PATTERN and increase stitches – read KNITTING TIP! The first round is worked as follows: work A.1 (= 16-17-18-19-20-21 repeats of 6 stitches on the first round in diagram). Continue pattern in this way. REMEMBER THE KNITTING TENSION! AT THE SAME TIME on each round marked with an arrow in the diagram increase evenly on round as follows – remember INCREASE TIP-1 (evenly spaced): Arrow-1: Increase 30-36-42-42-48-48 stitches evenly on round = 126-138-150-156-168-174 stitches. Arrow-2: Increase 30-36-42-42-48-48 stitches evenly on round = 156-174-192-198-216-222 stitches. Arrow-3: Increase 30-36-36-42-42-48 stitches evenly on round = 186-210-228-240-258-270 stitches. Arrow-4: Increase 30-36-36-42-42-48 stitches evenly on round = 216-246-264-282-300-318 stitches. Arrow-5: Increase 24-34-36-38-40-42 stitches evenly on round = 240-280-300-320-340-360 stitches. Arrow-6: Increase 30 evenly on round in all sizes = 270-310-330-350-370-390 stitches. Arrow-7: Increase 20-20-20-30-30-40 stitches evenly on round = 290-330-350-380-400-430 stitches. When the piece measures 27-29-30-32-33-34 cm from the cast-on edge, divide the stitches for body and sleeves as follows (A.1 has not been finished and is continued as before): Work 41-48-50-55-59-65 stitches as before (= half the back piece), place the next 63-68-75-80-82-84 stitches on a thread (= sleeve), cast on 8-8-10-10-12-14 new stitches (= in side under sleeve), work 82-97-100-110-118-131 stitches as before (= front piece), place the next 63-68-75-80-82-84 stitches on a thread (= sleeve), cast on 8-8-10-10-12-14 new stitches (= in side under sleeve) and work the remaining 41-49-50-55-59-66 stitches as before (= half the back piece). Body and sleeves are now finished separately. THE PIECE IS NOW MEASURED FROM HERE! BODY: = 180-210-220-240-260-290 stitches. Continue with A.1 as before. When A.1 has been completed in height, continue with A.2 over A.1, BUT on the first round in A.2 increase 0-0-2-0-4-4 stitches evenly on round = 180-210-222-240-264-294 stitches. When A.2 has been completed in height, insert 1 marker thread in each side. Insert first marker thread after 45-52-55-60-66-73 stitches and second marker thread after 90-106-112-120-132-148 new stitches. There is now 45-52-55-60-66-73 stitches left on round after last marker thread. Continue working with medium grey and stocking stitch to finished length. On the next round increase 2 stitches in each side – read INCREASE TIP-2 (for sides on body)! Increase in this way every 4-5-5-5-5-5 cm a total of 5-4-4-4-4-3 times = 200-226-238-256-280-306 stitches. When the piece measures 23-23-24-24-25-26 cm increase 32-34-38-40-40-42 stitches evenly on next round = 232-260-276-296-320-348 stitches. Knit 1 round (all yarn overs are knitted twisted to prevent holes). Change to circular needle size 3.5 mm. Work rib * knit 1, 3 stitches moss stitch *, work from *-* to end of round. Continue in this way until the rib measures 6 cm. Cast off with knit over knit and purl over purl. To avoid the cast-off edge being tight, you can cast off with a larger needle size. The jumper measures approx. 56-58-60-62-64-66 cm from the shoulder down. SLEEVE: Place the 63-68-75-80-82-84 stitches from the thread in the one side of the piece on double pointed needles size 4 mm and, in addition, knit up 1 stitch in each of the 8-8-10-10-12-14 new stitches cast on under the sleeve (knit up stitches with background colour in the next round in the pattern) = 71-76-85-90-94-98 stitches. Continue A.1A in the round on the sleeve (pattern on the sleeve should match pattern on the yoke) – NOTE: In sizes S, M, L, XXL and XXXL the pattern will not fit the number of stitches mid under the sleeve, but to avoid too large a gap, it is recommended that you work as many stitches of A.1A as possible on the round. When A.1A has been completed in height, work A.2A over A.1A in the round, AT THE SAME TIME on the first round adjust the number of stitches to 72-78-84-90-96-96 stitches (so that pattern A.2A will fit the number of stitches). When A.2A has been completed in height, insert a marker thread in the middle of the 8-8-10-10-12-14 new stitches cast on under the sleeve (= 4-4-5-5-6-7 new stitches on each side of the marker thread). THE PIECE IS NOW MEASURED FROM HERE! Continue working with medium grey. On the next round decrease 2 stitches mid under the sleeve – read DECREASE TIP-1! Decrease in this way approx. every 6th-3rd-3rd-2nd-2nd-2nd round a total of 6-9-9-12-12-12 times = 60-60-66-66-72-72 stitches. When the piece measures 14-12-12-10-10-9 cm work pattern A.3 (= 6 stitches) in the round, AT THE SAME TIME on the rounds marked with an arrow in the diagram decrease evenly as follows – read DECREASE TIP-2 (evenly spaced): Arrow-1: Decrease 6 stitches evenly on round = 54-54-60-60-66-66 stitches. Arrow-2: Decrease 6-6-12-12-12-12 stitches evenly on round = 48-48-48-48-54-54 stitches. When A.3 has been completed in height, the piece measures 33-31-31-29-29-28 cm from the separation. Continue with medium grey. Work 1 round where you increase 4-4-8-8-8-8 stitches evenly on round = 52-52-56-56-62-62 stitches. Change to double pointed needles size 3.5 mm. Work rib in the round (= knit 1 /3 stitches moss stitch) for 6 cm. Cast off with knit over knit and purl over purl. The sleeve measures approx. 39-37-37-35-35-34 cm from the separation. Work the other sleeve in the same way. |
|||||||||||||||||||
Diagram explanations |
|||||||||||||||||||
|
|||||||||||||||||||
 |
|||||||||||||||||||
 |
|||||||||||||||||||
 |
|||||||||||||||||||
Have you finished this pattern?Tag your pictures with #dropspattern #telemarksweater or submit them to the #dropsfan gallery. Do you need help with this pattern?You'll find 30 tutorial videos, a Comments/Questions area and more by visiting the pattern on garnstudio.com. © 1982-2026 DROPS Design A/S. We reserve all rights. This document, including all its sub-sections, has copyrights. Read more about what you can do with our patterns at the bottom of each pattern on our site. |
|||||||||||||||||||


With over 40 years in knitting and crochet design, DROPS Design offers one of the most extensive collections of free patterns on the internet - translated to 17 languages. As of today we count 324 catalogues and 12290 patterns translated into English (UK/cm). 12290
We work hard to bring you the best knitting and crochet have to offer, inspiration and advice as well as great quality yarns at incredible prices! Would you like to use our patterns for other than personal use? You can read what you are allowed to do in the Copyright text at the bottom of all our patterns. Happy crafting!
Post a comment to pattern DROPS 179-9
We would love to hear what you have to say about this pattern!
If you want to leave a question, please make sure you select the correct category in the form below, to speed up the answering process. Required fields are marked *.