
Popular categories
Looking for a yarn?


Comments / Questions (169)
![]() Laura Menegatti wrote:
Laura Menegatti wrote:
Grazie. Ricontrollo... penso che il mio errore stia nel fatto che ho aumentato sempre accanto alle 2 maglie di partenza e non sulle parti esterne del totale ottenuto con gli aumenti. Sbagliando si impara...e voglio regalarlo ad una carissima amica. E' troppo bello!!! Complimenti
18.09.2017 - 12:29
![]() Laura Menegatti wrote:
Laura Menegatti wrote:
Perdonatemi se insisto. A inizio istruz. sul f. di impostazione lavoro (e qui si arriva a 102 m. taglia M) per la manica (dopo A2 e prima di A3) ci sono 2 m. a dir. precedute e seguite da 1 gett. per gli aumenti. Sul ferro seg. i 2 aumenti si lav. a dir. per fare buchi. Mi pare che le 2 m. a dir. cui mi riferisco, formano una "colonnina centrale" .... Grazie per la pazienza.
18.09.2017 - 11:47DROPS Design answered:
Buongiorno Laura. Sul f di impostazione, ci sono 2 maglie per la manica. Le m che aumenta dopo A2 e prima di A3, sono le maglie a maglia rasata che andranno a formare la manica. Quindi dopo il primo giro con aumenti, per la manica avrà 4 m. E così via. Può aiutarla guardare la fotografia: gli aumenti per le maniche sono tra le trecce che delimitano le maniche stesse. Buon lavoro!
18.09.2017 - 12:16
![]() Laura Menegatti wrote:
Laura Menegatti wrote:
Grazie, avete ragione. Questo significa, allora, che continuo anche a fare 1 gettato ad ogni lato della "costa" (2 m. a diritto) che si trova al centro della manica? Ringrazio molto.
17.09.2017 - 18:14DROPS Design answered:
Buongiorno Laura. Chiediamo scusa, non troviamo le 2 maglie diritto a cui fa riferimento. Sulle maniche, i gettati vanno fatti dopo il diagramma A2 e prima del diagramma A3. Ci riscriva se ancora in difficoltà. Buon lavoro!
18.09.2017 - 09:03
![]() Laura Menegatti wrote:
Laura Menegatti wrote:
Buongiorno. Bloccata al 27^ giro taglia M (246 maglie) per fare la treccia e aument. solo sul centro dav/dietro e non sulle maniche (ho letto i suggerimenti aument. ogni 4 giri e non 2, ma non capisco). Su questo 27^ giro non aumento le maniche, come posso avere il forellino senza il gettato? Poi, se non sbaglio, dal 29^ giro gli aum. continuano con 4 m. totali per maniche + 4 per centro dav/dietro. Mi sono spiegata? Grazie mille
17.09.2017 - 08:37DROPS Design answered:
Buongiorno Laura. Quando gli aumenti sulle maniche sono ogni 4 giri e non ogni 2 giri, sul giro senza aumenti segue le indicazioni riportate nel paragrafo SUGGERIMENTO PER IL LAVORO-1. Viene fatto un gettato e diminuita una maglia in modo che il numero di maglie non cambia e al tempo stesso si forma il buco. Buon lavoro!
17.09.2017 - 12:24
![]() Laura Menegatti wrote:
Laura Menegatti wrote:
Buongiorno, ho letto diverse domande sulle istruzioni SPRONE e forse sarebbe opportuno chiarire le ultime righe: "Poi lavorare a m rasata in tondo con A.2 e A.3 in ogni punto di passaggio tra il corpo e le maniche. ALLO STESSO TEMPO..." Ossia, specificando che il giro inizia con A2A e finisce con A2B. Grazie
11.09.2017 - 09:08
![]() Laura Menegatti wrote:
Laura Menegatti wrote:
Buongiorno. Per favore vorrei un chiarimento sulla Sezione istruzioni Sprone, alle ultime 3 righe (nel mio caso taglia M ho 102 maglie). "Poi lavorare a m. rasata in tondo con A2 e A3 in ogni punto di passaggio tra corpo e maniche". Con diagramma A2 si intende tutto, cioè A2B+A2A? Mi pare di capire che A2B serva per ottenere una diminuzione (seguita da 1 gettato) con direzione verso destra, prima di proseguire con A2A. Grazie per la risposta e la pazienza.
10.09.2017 - 10:33DROPS Design answered:
Buongiorno Laura. Sì, si devono lavorare sia il diagramma A2a che il diagramma A2b. Buon lavoro!
10.09.2017 - 11:26
![]() Dana wrote:
Dana wrote:
Nezobrazují se mi schémata A1 a A2. Jak se k nim dostat?
09.09.2017 - 20:19DROPS Design answered:
Dobrý den, Dano, díky za upozornění - opraveno, schémata už jsou v pořádku. Ať se vám hezky plete! Hana
11.09.2017 - 11:28
![]() Laura Menegatti wrote:
Laura Menegatti wrote:
Buon pomeriggio. Per favore, nelle istruzioni, Sezione "Aumenti per le maniche" si legge "aumentare 1 maglia facendo 1 gettato, sul giro successivo lavorare i gettati a diritto per evitare buchi". Non dovrebbe essere invece "lavorare i gettati a diritto RITORTO per evitare buchi"? Grazie
06.09.2017 - 18:11DROPS Design answered:
Buonasera Laura. Abbiamo corretto il testo: si lavora a diritto per formare i buchi. Grazie e buon lavoro!
06.09.2017 - 18:38
![]() Marlies wrote:
Marlies wrote:
Hallo! Ich möchte dieses Modell für eine Schwangere stricken. Wenn ich zusätzliche Maschen für mehr Bauch einfügen möchte, mache ich das besser an den Seiten, in der Mitte oder doch gleichmäßig verteilt? Oder ist der Schnitt schon unverändert recht weit?
02.08.2017 - 15:30DROPS Design answered:
Liebe Marlies, wir können leider nicht jede unsere Anleitung nach jedem Geschmack anpassen, aber gerne können Sie Ihrem DROPS Laden darüber besprechen, dort bekommen Sie Hilfe (auch per mail oder Telefon). Viel Spaß beim stricken!
02.08.2017 - 16:08
![]() Alex wrote:
Alex wrote:
NEMOHU OTEVŘÍT SCHÉMA K TOMUTO NÁVODU. DĚKUJI ZA RADU JAK NA TO
08.07.2017 - 18:52DROPS Design answered:
Dobrý den, Alex, schéma je zobrazeno v dolní části stránky, pod návodem. Hezký den!
20.09.2017 - 09:23
|
|||||||||||||||||||||||||
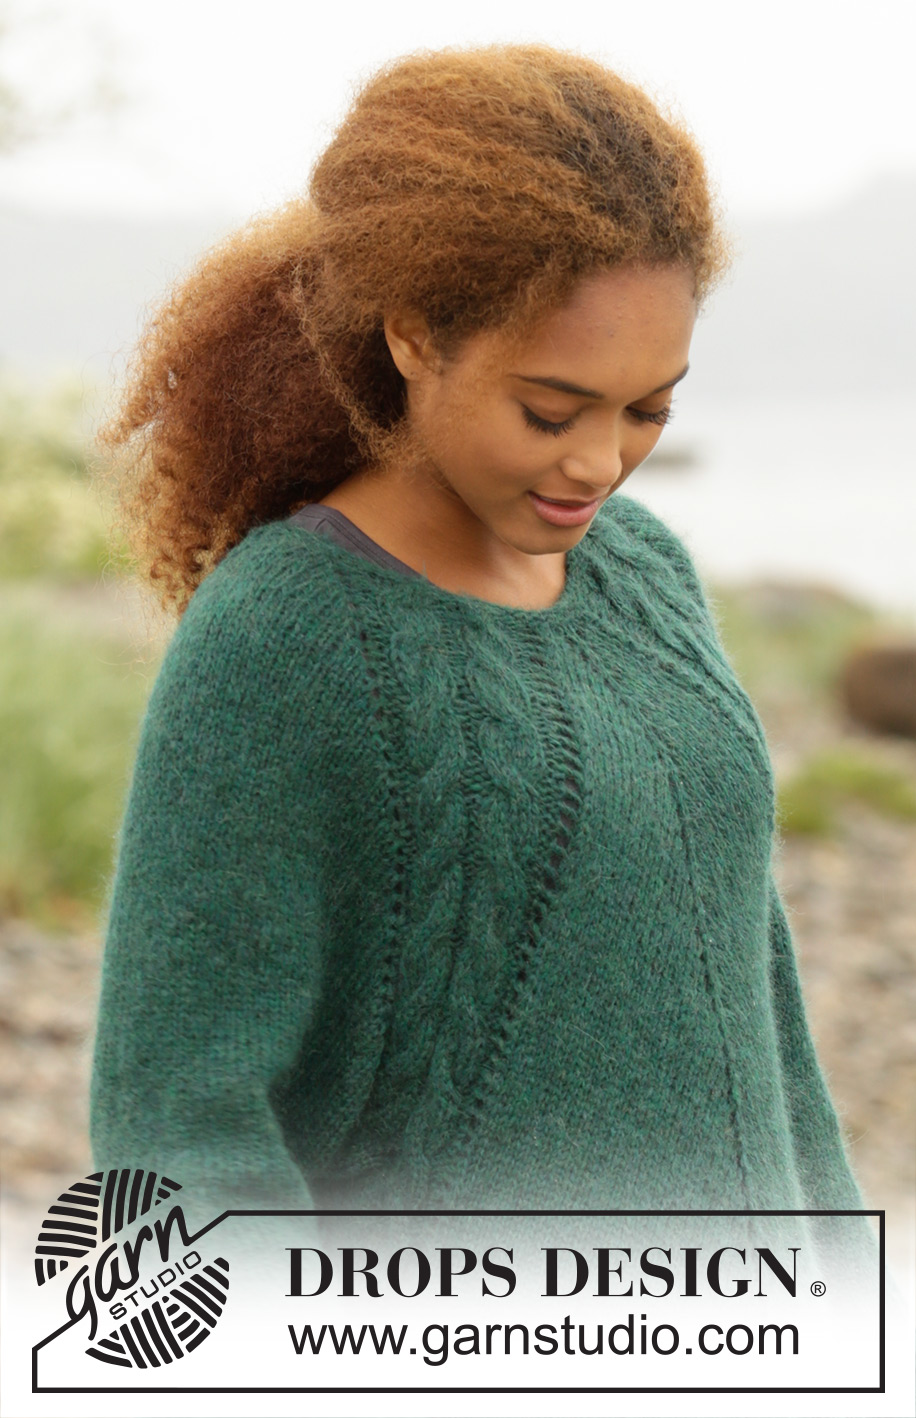
Emerald Queen#emeraldqueensweater |
|||||||||||||||||||||||||
 |
 |
||||||||||||||||||||||||
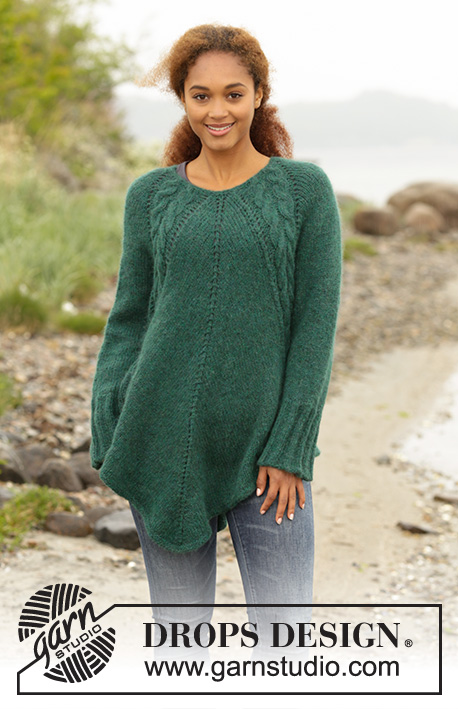
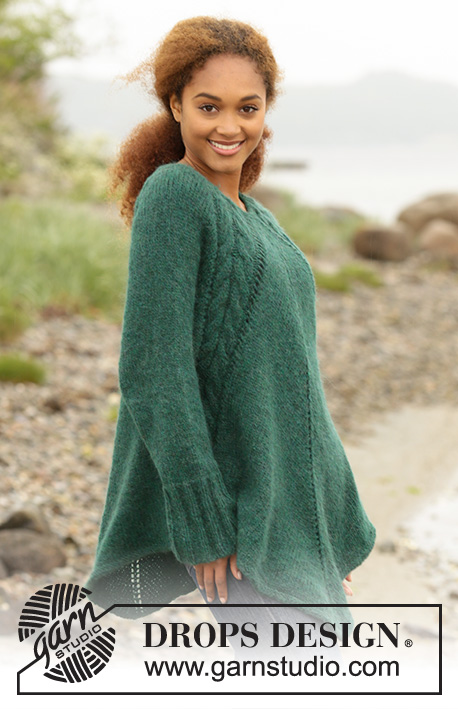
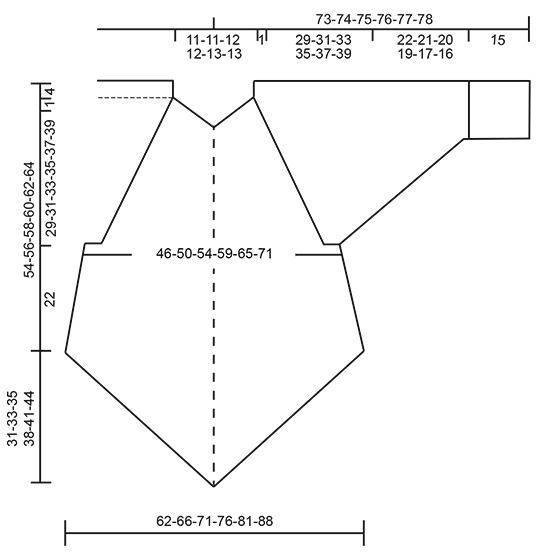
Knitted DROPS tunic with deep raglan and cables, worked top down in ”Air”. Size: S - XXXL.
DROPS 171-1 |
|||||||||||||||||||||||||
|
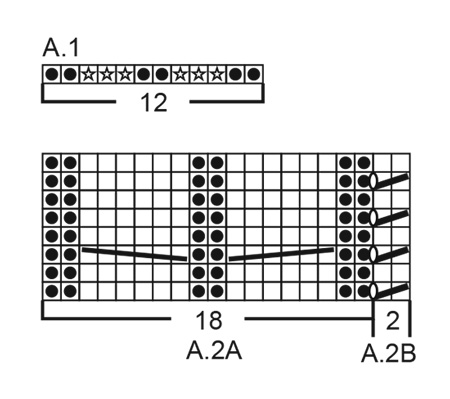
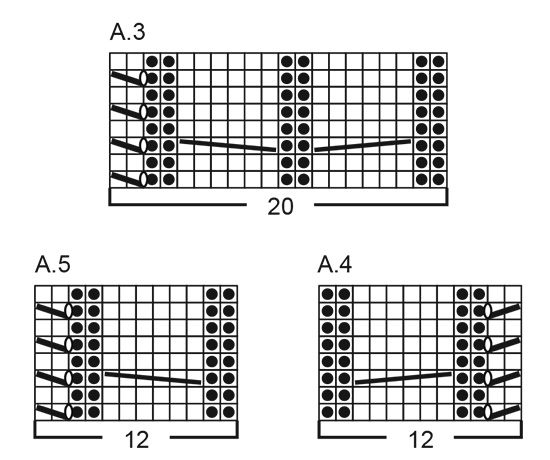
GARTER ST (worked in the round): 1 ridge = 2 rounds. * K 1 round and P 1 round *, repeat from *-*. PATTERN: See diagrams A.1 to A.5. INCREASE FOR SLEEVES: Increase 1 st in each side on each sleeve by increasing after A.2 and before A.3 (= 2 st inc on each sleeve and 4 sts in total on round). Inc 1 st by making 1 yarn over, on next round knit yarn over to make holes. INCREASE MID FRONT AND MID BACK: Increase 2 sts on each side of st with marker thread on mid front and mid back as follows: Knit until 1 st before st with marker thread, make 1 yarn over, knit 1, make 1 yarn over, knit st with marker thread, make 1 yarn over, knit 1, make 1 yarn over (= 4 sts inc mid front/mid back and 8 sts in total on round). On next round knit the 2 yarn overs closest to the st with mid-st to make holes, the outermoste 2 sts should be knit twisted to avoid holes. Increase 1 st on each side of st with marker thread on mid front and mid back as follows: Work until st with maker thread, make 1 yarn over, knit st with maker thread (mid-st), make 1 yarn over (= 2 sts inc mid front/mid back and 4 sts in total on round).On next round knit yarn overs to make holes. KNITTING TIP-1: To avoid the eye let row being interrupted while increasing for sleeves on every 4th row and not on every 2nd row as before, work as follows on the rows that previously had increases: After A.2: Make 1 yarn over, slip 1 st knitvise, knit 1 and pass slipped st over the knit st. Before A.3: Knit until 2 sts before A.3, knit 2 st tog and make 1 yarn over. KNITTING TIP-2: If you want a little less volume on body, it is possible to make some adjustments after dividing for sleeves. Decrease 2 sts mid front and mid back on i.e every 8th round as follows (decrease on a round with increases): Knit until 2 sts before st with marker (= mid-st), knit 2 tog, make 1 yarn over, knit 1 (= mid-st), make 1 yarn over, slip 1 st knitvise, knit 1 and pass slipped st over the knit st (this decrease vil give approx 8 cm less width in total at the end of body). DECREASE TIP (applies to sleeves): Beg 3 sts before marker and dec as follows: K 2 tog, K 2 (marker is in the middle of these 2 sts), slip 1 st as if to K, K 1, psso. ---------------------------------------------------------- TUNIC: Worked in the round on circular needle, top down. YOKE: Cast on 66-66-70-70-74-74 sts on a short circular needle size 4 mm with 2 strands Air. Remove 1 strand and continue with 1 strand Air as follows: Work 2 ridges in GARTER ST - see explanation above. Switch to a short circular needle size 5 mm, work next round as follows: Work A.1 (= 12 sts inc to 18 sts), 2 sts in stocking st (= sleeve), A.1 (= 12 sts inc to 18 sts), 7-7-9-9-11-11 sts in stocking st (insert 1 marker in the middle of these sts = mid front), A.1 (= 12 sts inc to 18 sts), 2 sts in stocking st (= sleeve), A.1 (= 12 sts inc to 18 sts) and 7-7-9-9-11-11 sts in stocking st (insert 1 marker in the middle of these sts = mid back) = 90-90-94-94-98-98 sts on needle. Next round work as follows: Work A.2A (= 18 sts), inc 1 st – READ INCREASE FOR SLEEVES, knit 2, inc 1 st for sleeve, work A.3 (= 20 sts), knit 0-0-1-1-2-2 s, inc 2 sts on each side of st with marker thread – READ INCREASE MID FRONT AND MID BACK, knit 0-0-1-1-2-2 sts, work A.2B (= 2 sts), work A.2A (=18 sts), inc 1 st for sleeve, knit 2 sts, inc 1 st for sleeve, work A.3 (= 20 sts), knit 0-0-1-1-2-2 sts, inc 2 sts on each side of st with marker thread (= mid back) and knit 0-0-1-1-2-2 sts and work A.2B (= 2 sts) = 102-102-106-106-110-110 sts on needle. Then work stocking st in the round with A.2 and A.3 in every transition between body and sleeves. AT THE SAME TIME continue increase for sleeves and increase mid front and mid back as follows: SLEEVES: Increase on every 2nd round 10-13-15-21-23-27 times in total (including the increase explained on firste round), then increase on every 4th round 11-11-11-9-9-8 times in total - READ KNITTING TIP-1. MID FRONT AND MID BACK : Inc 2 sts on every side of st with marker in it on every 2nd round 11-14-15-18-21-25 times in total (including the increases explained on first round). Then increase 1 st on each side of st with marker in it on every 2nd round 21-20-21-21-20-18 times in total. REMEMBER THE KNITTING TENSION! After last increase on body and sleeves there are 346-378-402-442-474-510 sts on needle. Work next round as follows: Work as before over the first 11 sts (= until middle of 2 P sts in A.2), slip the next 62-68-72-80-84-90 sts on a stitch holder (= sleeve), cast on 6-6-8-8-10-12 new sts under sleeve, work as before over the next 111-121-129-141-153-165 sts on front piece(i.e 11 st in A.3, 89-99-107-119-131-143 knit sts, 11 sts in A.2)slip the next 62-68-72-80-84-90 sts on a stitch holder (= sleeve), cast on 6-6-8-8-10-12 new sts under sleeve and work the remaining 100-110-118-130-142-154 sts on back piece as before (i.e 11 sts in A.3 and 89-99-107-119-131-143 knit sts). Finish body and sleeves separately. BODY: = 234-254-274-298-326-354 sts. Insert 1 marker in the piece. Work next round as follows: Work A.4 (12 sts), knit 4-4-6-6-8-10 sts, A.5 (=11 sts), knit until mid-st, make 1 yarn over, knit 1 (= mid-st), make 1 yarn over, knit until A.2, work A.4 (= 12 sts), knit 4-4-6-6-8-10 sts, A.5 (= 12 sts), knit until mid-st, make 1 yarn over, knit 1 (= mid-st), make 1 yarn over and knit the rest of round (= 4 sts increased). Continue pattern like this while AT THE SAME TIME continuing to increase mid front and mid back on every 2nd round until inc has been done 20 times on each side of mid front/mid back from marker - READ KNITTING TIP-2 = 314-334-354-378-406-434 sts on needle (or work until desired length). On next round work sts in each cable K tog 2 by 2 (= 12 sts dec) = 302-322-342-366-394-422 sts. Switch to circular needle size 4 mm and work 2 ridges in garter st in the round over all sts. Switch back to circular needle size 5 mm and cast off (this is done to avoid a tight cast-off edge). SLEEVE: Worked in the round on a short circular needle, switch to double pointed needles when needed. Slip the sts from stitch holder in one side of piece on a short circular needle size 5 mm and pick up 1 st in each of the 6-6-8-8-10-12 sts cast on under sleeve on body = 68-74-80-88-94-102 sts on needle. Insert 1 marker at beg of round (= mid under sleeve) - NOW MEASURE PIECE FROM HERE. Work in stocking st in the round over all sts AT THE SAME TIME on first round dec over the two cables by working sts in each cable K tog 2 by 2 (= 6 sts dec) = 62-68-74-82-88-96 sts. When piece measures 2 cm, dec 2 sts mid under sleeve - READ DECREASE TIP. Dec a total of 12-14-17-20-22-25 times in Size S: On every 4th round, in size M: On every 3rd round, in size L: Alternately on every 2nd and 3rd round, in size XL: On every other round, in size XXL: Alternately on every and every other round and size XXXL. On every round = 38-40-40-42-44-46 sts on needle. Continue to work until piece measures 22-21-20-19-17-16 cm (NOTE: Shorter measurements in the larger sizes because of wider shoulders). K 1 round while AT THE SAME TIME inc 7-10-10-8-11-9 sts evenly = 45-50-50-50-55-55 sts. Switch to double pointed needles size 4 mm and work rib in the round = K 2/P 3. When rib measures 15 cm, switch back to double pointed needles size 5 mm before casting off with K over K and P over P (this is done to avoid a tight cast-off edge). Work the other sleeve the same way. |
|||||||||||||||||||||||||
Diagram explanations |
|||||||||||||||||||||||||
|
|||||||||||||||||||||||||
 |
|||||||||||||||||||||||||
 |
|||||||||||||||||||||||||
 |
|||||||||||||||||||||||||
Have you finished this pattern?Tag your pictures with #dropspattern #emeraldqueensweater or submit them to the #dropsfan gallery. Do you need help with this pattern?You'll find 26 tutorial videos, a Comments/Questions area and more by visiting the pattern on garnstudio.com. © 1982-2026 DROPS Design A/S. We reserve all rights. This document, including all its sub-sections, has copyrights. Read more about what you can do with our patterns at the bottom of each pattern on our site. |
|||||||||||||||||||||||||


With over 40 years in knitting and crochet design, DROPS Design offers one of the most extensive collections of free patterns on the internet - translated to 17 languages. As of today we count 324 catalogues and 12290 patterns translated into English (UK/cm). 12290
We work hard to bring you the best knitting and crochet have to offer, inspiration and advice as well as great quality yarns at incredible prices! Would you like to use our patterns for other than personal use? You can read what you are allowed to do in the Copyright text at the bottom of all our patterns. Happy crafting!
Post a comment to pattern DROPS 171-1
We would love to hear what you have to say about this pattern!
If you want to leave a question, please make sure you select the correct category in the form below, to speed up the answering process. Required fields are marked *.