
Popular categories
Looking for a yarn?


Comments / Questions (91)
![]() Cindi wrote:
Cindi wrote:
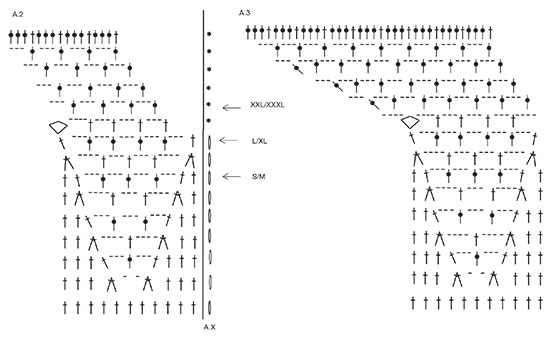
How do you go from a1 to a2? Do you just dc in each dc? Won't that create a pucker?
11.09.2017 - 09:54DROPS Design answered:
Dear Cindy, on first round in A.2 and A.3 as shown in diagram, ie on 1st row, work 1 dc in each dc. Happy crocheting!
11.09.2017 - 11:20
![]() Roberta wrote:
Roberta wrote:
Buonasera,nella spiegazione ed anche nel diagramma del cardigan 168-12 c'è qualcosa che non quadra perché il cerchio non è piatto eppure i punti sono giusti,inoltre nella spiegazione scritta parla di ferri accorciati ma il cardigan è fatto ad uncinetto. È possibile avere una spiegazione corretta ? Grazie
01.09.2017 - 19:35DROPS Design answered:
Buonasera Roberta. Le spiegazioni del modello sono corrette. Per ulteriore aiuto può scrivere qui specificando il problema oppure rivolgersi al suo rivenditore Drops di fiducia (n quest'ultimo caso allegando eventualmente una foto del suo lavoro). Buon lavoro!
01.09.2017 - 21:13
![]() LOREDANA CECCHINATO wrote:
LOREDANA CECCHINATO wrote:
Buongiorno, in relazione al modello 168-12, avrei bisogno di alcuni chiarimenti: nel diagramma il simbolo * come si deve lavorare ? sarebbe utile vedere una fotografia del lavoro in quella zona, dietro il collo. spero sia possibile . Grazie.Loredana
29.08.2017 - 18:00DROPS Design answered:
Buonasera Loredana, i giri che iniziano con * si lavorano in questo modo: deve lavorare a maglie bassissime fino alla 1° catenella/arco di catenelle, sostituendo la 1° maglia alta su questo giro con 3 catenelle. Finire il giro con 1 maglia bassissima nella 3° catenella dall’inizio del giro. Le foto disponibili sono quelle sul sito, provi eventualmente a guardare tra i progetti di ravelry se qualcuna ha fatto foto più ravvicinate. Buon lavoro!
29.08.2017 - 21:45
![]() Marian Hoffensetz wrote:
Marian Hoffensetz wrote:
Hej jeg kan ikke få den omgang til at passe, hvor man laver luftmaske til ærmegab. Laver den i en str sm. Er der ikke en fejl i opskriften? Mvh Marianne
29.08.2017 - 13:54DROPS Design answered:
Hej Marianne, du hopper over samme antal masker som du hækler luftmasker til ærmegab, det vil sige at når du hækler næste omgang, så hækler du nøjagtig som du havde gjort i maskerne du hoppede over, men i luftmaskerne du hæklede istedet for. God fornøjelse!
12.09.2017 - 15:24
![]() Doussain wrote:
Doussain wrote:
Bonjour, après avoir difficilement répartis mes mailles pour mes emmanchures mes 40 mailles tombant sur des mailles en l'air (j'avais pourtant bien les 252 mailles demandés), je n'obtiens pas 312 B a la fin de A2/A3 mais 240 mailles dois je rajouter des mailles autour de ma chainette des emmanchures? Merci de votre réponse
18.08.2017 - 09:24DROPS Design answered:
Bonjour Doussain! Au tour suivant (10-eme dans le schemat dans la latlle M/L), continuer en suivant les diagrammes A.2 et A.3, crocheter aussi autour des chaînettes de chaque côté (emmanchures). Bon crochet!
23.08.2017 - 10:13
![]() Sonia wrote:
Sonia wrote:
Hola, en la vuelta que tengo que comenzar el gráfico A5 y A6, dice que repita seis veces. Pero entonces no salen los doce "picos de la estrella". Hay un fallo quizá?
17.08.2017 - 21:06DROPS Design answered:
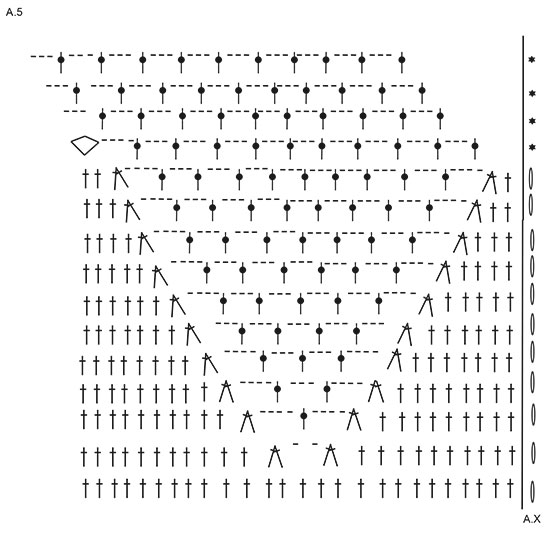
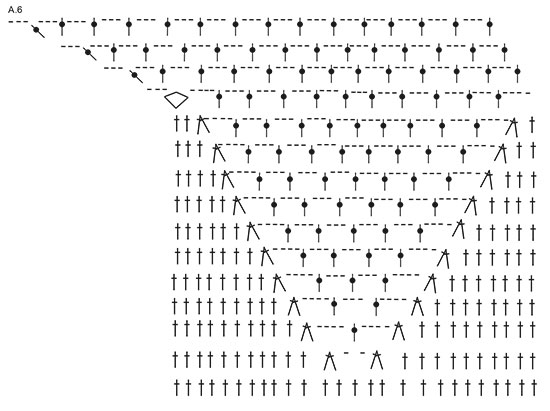
Hola Sonia. Los diagramas A.5 y A.6 juntos forman dos picos de estrella, si los repetimos 6 veces = 12 picos.
18.08.2017 - 20:29
![]() Victoria wrote:
Victoria wrote:
Hola estoy en la vuelta que tengo que tengo que hacer mi talla que son 264 .. la vuelta anterior me salen esos puntos pero en la siguiente que es la de talla no que hay que hacer? Gracias
15.08.2017 - 18:12DROPS Design answered:
Hola Victoria. En la siguiente vuelta tienes que trabajar las aberturas para las sisas ( según las explicaciones en el patrón) sobre los 264 puntos de la vuelta anterior y después continuar con los diagramas A.2 y A.3.
20.08.2017 - 13:09
![]() Sonia wrote:
Sonia wrote:
Hola, estoy en la vuelta después de las sisas. Según el patrón tengo que hacer puntos rasos hasta el primer arco de CD. Después seguir con A2 y A3, pero cuántas veces hay que repetir? Y en el lado después del segundo arco de las sisas, tengo que volver a hacer puntos rasos hasta el final?
13.08.2017 - 21:12DROPS Design answered:
Hola Sonia, para las sisas trabajar los primeros 34-36-38 puntos como antes según los diagramas, luego trabajar 36-40-44 puntos de cadeneta, saltar 36-40-44 puntos, trabajar con los diagramas A2 y A3 hasta que queden 70-76-82 en la vuelta, trabajar 36-40-44 puntos de cadeneta, saltar 36-40-44 puntos y los últimos 34-36-38 puntos según los diagramas A2 y A3.
23.08.2017 - 17:27
![]() Gea Rath wrote:
Gea Rath wrote:
Nogmaals een vraag. Ik heb de patronen A2 en A3 gehaakt en kom op 264 st. Moet ik bij de nieuwe toer weer beginnen met 3 lossen? Dan staat er dat ik moet haken over 38 steken, dan kom ik uit tussen 2 stokjes, klopt dit? Vind het vervelend dat er op mijn vorige vraag niet is gereageerd...
11.08.2017 - 21:33DROPS Design answered:
Hoi Gea, Ik heb het even voor je nageteld. Als je haakt tot en met waar de pijl staat en dan in de volgende toer 38 steken haakt, dan is de laatste van die 38 steken een stokje. De steek van A.x tel je namelijk ook mee als steek.
15.08.2017 - 17:22
![]() Gea Rath wrote:
Gea Rath wrote:
Hallo. U geeft in patroondeel A2 tot maat L/XL aan dat de nieuwe toer met 3 lossen begint. Maar hoe ga ik hierna verder? Daar kom ik even niet uit.
09.08.2017 - 15:56DROPS Design answered:
Hoi Gea, Na de 3 lossen begin ga je verder met gedeelte van het telpatroon dat na de doorgetrokken streep staat, bij A.1 staat daar dus een stjokje
15.08.2017 - 16:07
|
||||||||||||||||||||||||||||
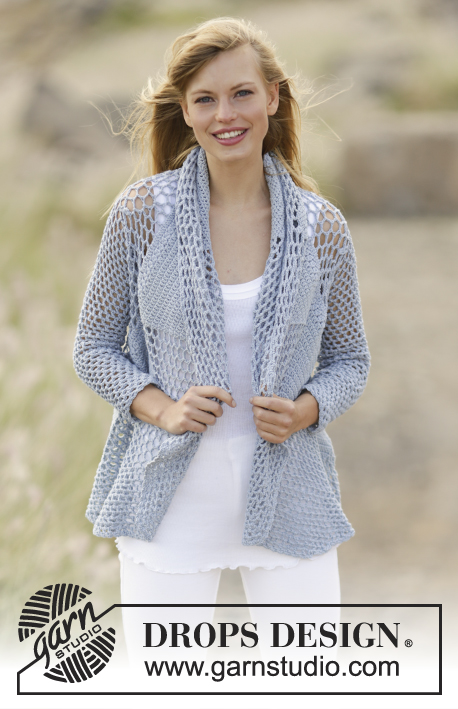
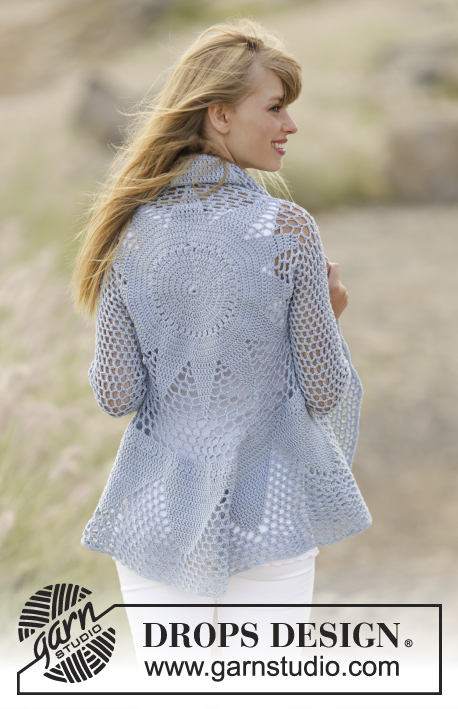
Endless Love#endlesslovecardigan |
||||||||||||||||||||||||||||
 |
 |
|||||||||||||||||||||||||||
Crochet DROPS jacket worked in a circle with trebles and lace pattern in ”Cotton Merino”. Size S - XXXL.
DROPS 168-12 |
||||||||||||||||||||||||||||
|
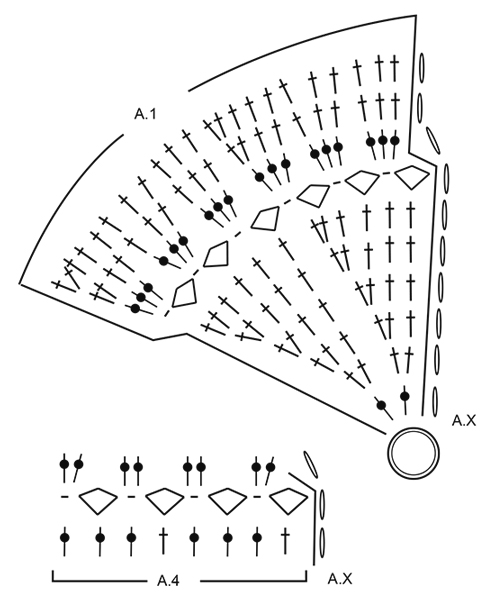
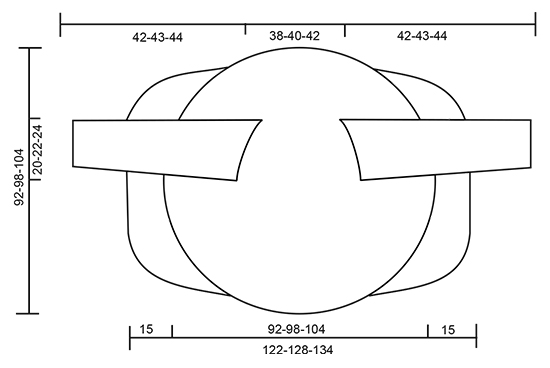
PATTERN: See diagrams A.1 to A.6. DECREASE TIP: Work 1 tr around next ch-space but wait with last pull through, work next tr around next ch-space (do not work 3 ch between tr), on last pull through, pull yarn through all 3 loops on hook. CROCHET TIP (applies to sleeve): After last tr on the round, continue to next round with 1 tr in next ch-space (= first ch-space on next round). NOTE: Insert 1 marker at the beg of round between last ch and first tr on the next round, move the marker upwards. NOTE: MAKE SURE NOT TO DISPLACE THE MARKER. ---------------------------------------------------------- JACKET WORKED IN A CIRCLE: Worked in the round from the centre and outwards. Work 4 ch with Cotton Merino on hook size 4 mm and form a ring with 1 sl st. Then work pattern according to diagram A.1 (= 6 repetitions in width) NOTE: A.x shows how every round beg and end, and is in addition to pattern. REMEMBER THE CROCHET TENSION! When entire A.1 has been worked vertically (= 132 tr), continue as follows: Work * A.2 (= 11 tr), A.3 (= 11 tr) *, repeat from *-* 6 times in total. Work up to and with arrow in diagram - see arrow for your size, there are now 228-252-264 sts on round. Work next round as follows: Continue to work over the first 34-36-38 sts, work 36-40-44 ch, and skip the next 36-40-44 sts (= armhole), work until 70-76-82 sts remain, work 36-40-44 ch and skip the next 36-40-44 sts (= armhole), continue to work over the last 34-36-38 sts. On next round continue according to pattern, work pattern as in diagram around ch-spaces in each side. When A.2 and A.3 have been worked, there are 312 tr on round. Continue with A.4 (= 39 repetitions on round). First round in A.4 shows last round in A.2/A.3, do not work this round. Continue to work as follows: Work * A.5 (= 26 tr), A.6 (= 26 tr) *, repeat from *-* 6 times in total. When A.5/A.6 have been worked, there are 600 sts on round (150 tr with 3 ch between each). Finish size S/M here. Size M/L -XXL/XXXL: Work 2-4 more rounds as last round in A.5/A.6 = 162-174 tr with 3 ch between. ALL SIZES: Piece measures approx. 46-49-52 cm from centre (92-98-104 cm in total). FRONT PIECES: Work back and forth in the one side with short rows. Cut the yarn, skip the first 13-16-19 tr on round, then work over the next 49 tr + ch-spaces as follows (insert a marker here): Work 3 ch, skip 1 ch-space, 1 dc around next ch-space, 3 ch (these 2 ch-spaces are no longer worked), 1 tr around next ch-space, work pattern as before until 2 ch-spaces remain (i.e. ch-spaces between tr, do not work around these 2 ch-spaces anymore), turn piece. Continue the short rows like this, AT THE SAME TIME inc 1 tr + 3 sts in the middle ch-space on every row (work 1 tr + 3 ch + 1 tr in this space). Continue with inc and dec on every row until piece measures 15 cm from marker. Skip 26-32-38 tr, then work short rows over the next 49 tr (13-16-19 tr remain on round). Work the same way as in the other side. CROCHET EDGE: Work an edge around the entire circle as follows: 1 dc around first ch-space, * 3 ch, 1 dc around next ch-space *, repeat from *-* and finish with 1 sl st in first dc. Fasten off. SLEEVES: Worked in the round, top down. Beg mid under one armhole, work 1 dc around first ch-space, 6 ch (= 1 tr + 3 ch), skip first tr and work 1 tr around next ch-space, * 3 ch, 1 tr around next ch-space *, repeat from *-* the entire round (work 1 tr + 3 ch around tr in corners), finish round with 1 tr around first 6 ch, then continue to work in the round without finishing it – READ CROCHET TIP = 21-23-25 tr + 21-23-25 ch-spaces. Continue with 1 tr + 3 ch around every space. When piece measures 4 cm, dec 1 ch-space before marker - READ DECREASE TIP! Repeat dec every 4½ cm 7 more times, dec alternately before and after marker = 13-15-17 tr + 13-15-17 ch-spaces. Continue until piece measures 42-43-44 cm. CROCHET EDGE SLEEVES: Crochet an edge around the sleeves as follows: 1 dc around first ch-space, * 3 ch, 1 dc around next ch-space *, repeat from *-* and finish with 1 sl st in first dc. Fasten off. Work the other sleeve the same way. |
||||||||||||||||||||||||||||
Diagram explanations |
||||||||||||||||||||||||||||
|
||||||||||||||||||||||||||||
 |
||||||||||||||||||||||||||||
 |
||||||||||||||||||||||||||||
 |
||||||||||||||||||||||||||||
 |
||||||||||||||||||||||||||||
 |
||||||||||||||||||||||||||||
Have you finished this pattern?Tag your pictures with #dropspattern #endlesslovecardigan or submit them to the #dropsfan gallery. Do you need help with this pattern?You'll find 7 tutorial videos, a Comments/Questions area and more by visiting the pattern on garnstudio.com. © 1982-2026 DROPS Design A/S. We reserve all rights. This document, including all its sub-sections, has copyrights. Read more about what you can do with our patterns at the bottom of each pattern on our site. |
||||||||||||||||||||||||||||


With over 40 years in knitting and crochet design, DROPS Design offers one of the most extensive collections of free patterns on the internet - translated to 17 languages. As of today we count 324 catalogues and 12290 patterns translated into English (UK/cm). 12290
We work hard to bring you the best knitting and crochet have to offer, inspiration and advice as well as great quality yarns at incredible prices! Would you like to use our patterns for other than personal use? You can read what you are allowed to do in the Copyright text at the bottom of all our patterns. Happy crafting!
Post a comment to pattern DROPS 168-12
We would love to hear what you have to say about this pattern!
If you want to leave a question, please make sure you select the correct category in the form below, to speed up the answering process. Required fields are marked *.