
Popular categories
Looking for a yarn?


Comments / Questions (35)
![]() Lillian Enevoldsen wrote:
Lillian Enevoldsen wrote:
Hvordan omregner jeg denne opskrift til kun én slags garn, her er skrevet 2 slags garn?
23.07.2019 - 14:29DROPS Design answered:
Hej Lillian, brug vores omregner og skriv garnforbruget i Baby Alpaca Silk x 2 og 2 tråde, så får du masser af alternativer op i 1 tråd. God fornøjelse!
02.08.2019 - 12:20
![]() Bouquier wrote:
Bouquier wrote:
Bonjour pouvez vous le donner les dimensions de l échantillon car je trouve que en n° 6 le point est trop lache . Merci 😊
16.04.2019 - 08:36DROPS Design answered:
Bonjour Mme Bouquier, sur les aiguilles no 6, 15 m x 30 rangs au point mousse et 2 fils = 10 x 10 cm. La tension est une affaire très personnelle, certains tricotent plutôt lâche alors que d'autres vont serrer davantage. Ce sont les aiguilles qui vont vous permettre d'ajuster la tension, la taille indiquée l'est seulement à titre indicatif! Vous devrez éventuellement changer d'aiguilles (pour des plus grosses ou des plus fines) pour que VOTRE tension corresponde bien à celle indiquée dans les explications. Bon travail!
16.04.2019 - 15:51
![]() Jules Fairfax wrote:
Jules Fairfax wrote:
I love this pattern...(I've studied hundreds of your circle jackets). Because I have been living four years in a tropical climate--where we DO have chilly days and nights during winter--I wonder if you can suggest what weight cotton or linen or--anything lighter weight that might work for this beautiful pattern...thank you.
10.01.2019 - 04:07
![]() Jules Fairfax wrote:
Jules Fairfax wrote:
I love this pattern...(I've studied hundreds of your circle jackets). Because I have been living four years in a tropical climate--where we DO have chilly days and nights during winter--I wonder if you can suggest what weight cotton or linen or--anything lighter weight that might work for this beautiful pattern...thank you.
10.01.2019 - 04:05
![]() Claudia wrote:
Claudia wrote:
Hallo. Ich komme leider nicht mit dem verschieben des Anfangs klar Es steht nicht wie oft ich den in der 2. und anschließend wie oft in der vierten. Dann soll man ab der 21. Runde damit anfangen immer vor dem ersten Umschlag. Aber weder in Reihe 23 noch in Reihe 25 ist ein Umschlag??? Für Hilfe wäre ich sehr dankbar!
26.09.2017 - 20:23DROPS Design answered:
Liebe Claudia, es soll hier vom 27. Runde sein (Korrektion wird gemacht sein), dh vom 1. Umschlag am Anfang A.1, und damit Anfang in der Mitte A.1 dann erfolgt. Viel Spaß beim stricken!
27.09.2017 - 09:14
![]() Loredana wrote:
Loredana wrote:
Buongiorno! Quindi si creano nuove maglie, giusto?
12.07.2016 - 12:55DROPS Design answered:
Buongiorno Loredana. Sì dovrebbe essere così. Buon lavoro!
12.07.2016 - 15:37
![]() Loredana wrote:
Loredana wrote:
Buongiorno! Potete spiegare meglio cosa s'intende....riprendere e arrotolare il filo prima che la maglia sul fermamaglie a ogni lato sia trasferita sul ferro (cioè a m alterne per evitare buchi nei punti di passaggio). Grazie mille Loredana
12.07.2016 - 10:45DROPS Design answered:
Buongiorno Loredana. Deve sollevare il filo tra le maglie e metterlo ritorto sul ferro. Buon lavoro!
12.07.2016 - 11:37
![]() Loredana wrote:
Loredana wrote:
Vi chiedo ancora.....se lascio le maglie restanti sui ferri circolari posso trasferire direttamente su questi le ultime due maglie che non vanno lavorate ? Grazie!
11.07.2016 - 15:42DROPS Design answered:
Buongiorno Loredana. Sì, può organizzare le maglie come meglio preferisce. Buon lavoro!
11.07.2016 - 16:30
![]() Loredana wrote:
Loredana wrote:
Buon pomeriggio, sono arrivata al punto in cui bisogna dividere le maglie per lavorare i due davanti e precisamente quando dice tenere le maglie tra il 2° ed il 4° segnapunti (100 maglie) , queste maglie vanno da quella che determina il secondo segnapunti ed il terzo segnapunti , fino a quella prima del 4° segnaposti. Giusto? Grazie Loredana
11.07.2016 - 15:26DROPS Design answered:
Buongiorno Loredana. Sì è corretto, le m vanno dalla m con il secondo segnapunti alla m prima del quarto segnapunti. Buon lavoro!
11.07.2016 - 16:29
![]() Loredana wrote:
Loredana wrote:
Grazie! Ho risolto lavorando i primi giri con il Magic loop.... Adesso vi chiedo questo, dopoil 21 giro bisogna spostare l'inizio giro di una maglia verso sinistra...cosa s'intende? Spostare la prima maglia di ogni ferro sul ferro di destra? Grazie
21.06.2016 - 13:18DROPS Design answered:
Buongiorno Loredana, deve semplicemente spostare il segnapunti di inizio giro (se lo utilizza) di 1 m verso sinistra prima a giri alterni poi ogni 4 giri, in modo che il giro inizi sempre prima del 1° gettato nel diagramma. Buon lavoro!
21.06.2016 - 13:24
|
||||||||||||||||||||||
White Flower#whiteflowerjacket |
||||||||||||||||||||||
 |
 |
|||||||||||||||||||||
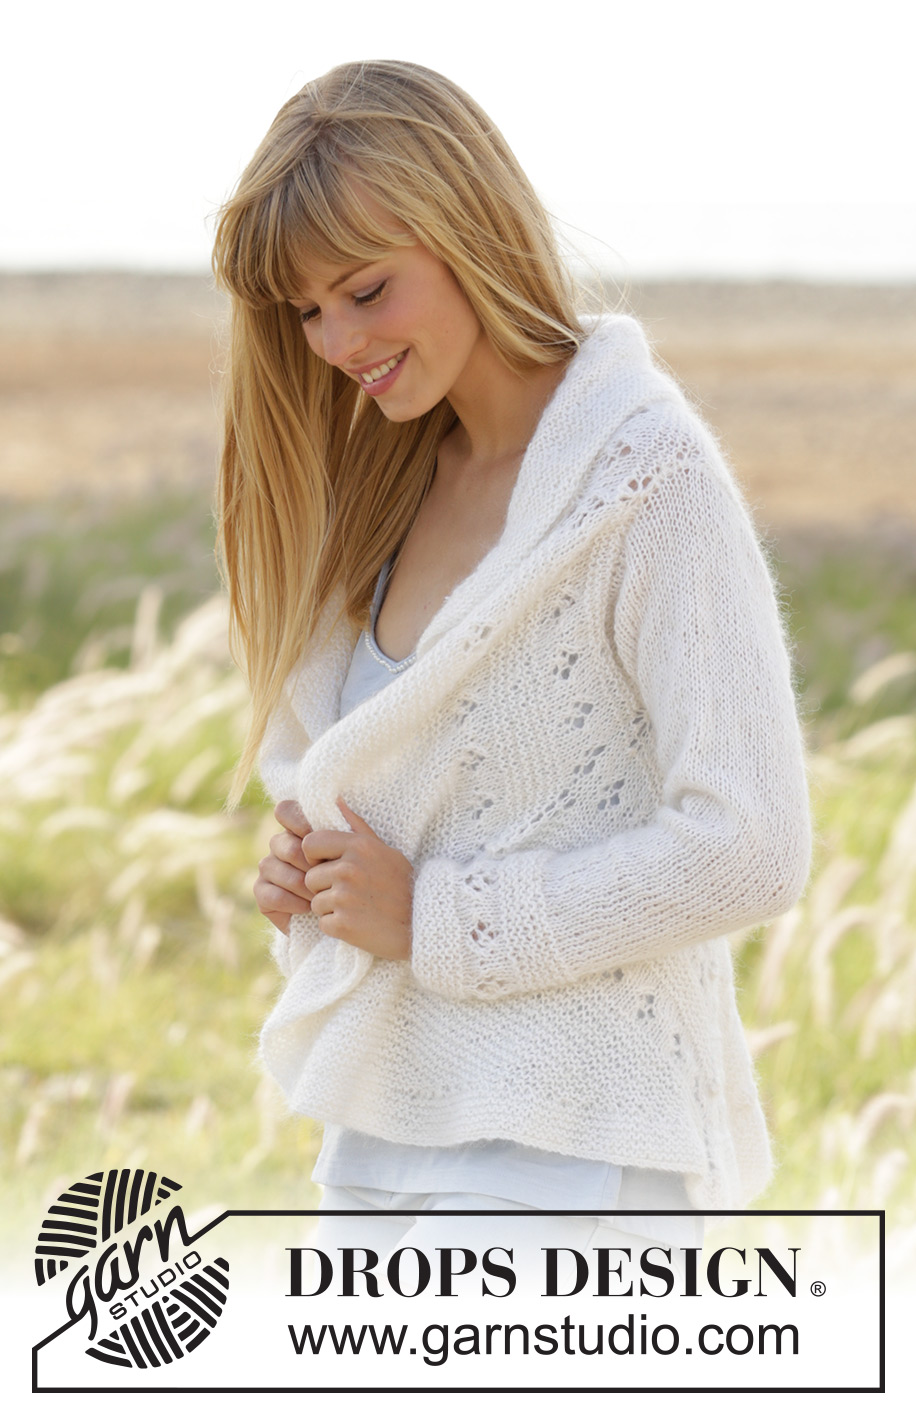
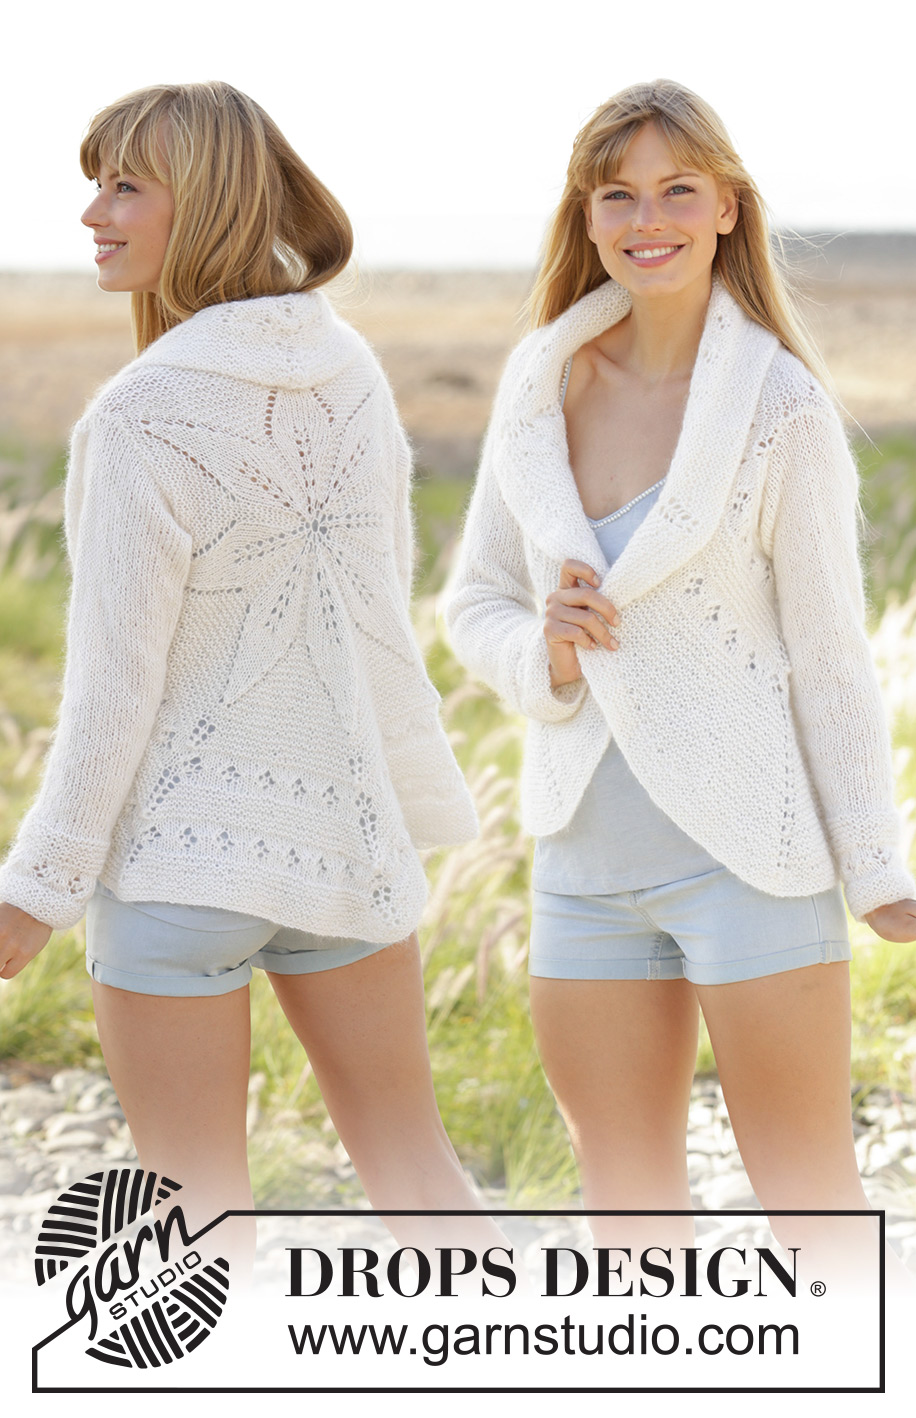
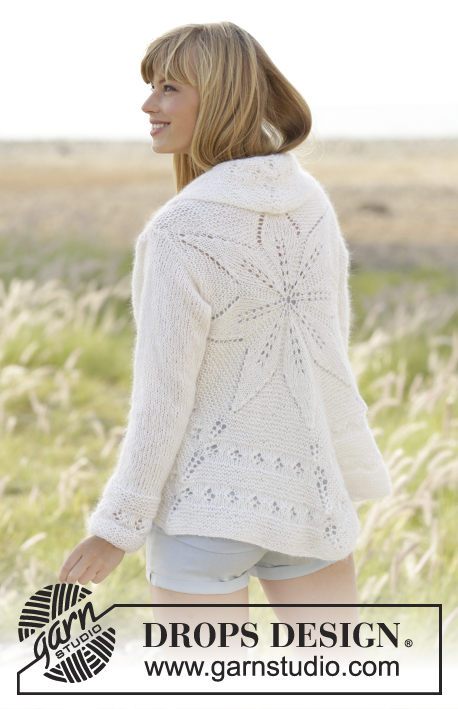
Knitted DROPS jacket worked in a circle with leaf pattern in "BabyAlpaca Silk" and "Kid-Silk". Size: S - XXXL.
DROPS 169-6 |
||||||||||||||||||||||
|
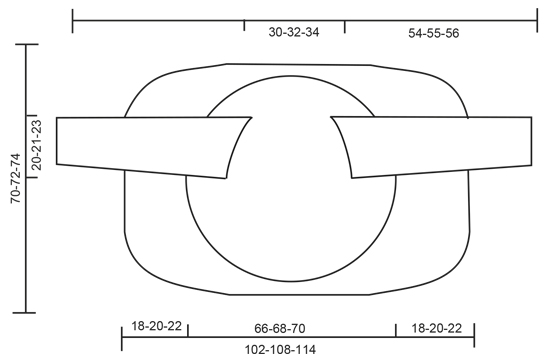
PATTERN: See diagrams A.1 to A.3. GARTER ST (worked in the round): 1 ridge = 2 rounds. * K 1 round and P 1 round *, repeat from *-*. GARTER ST (back and forth): K all rows. 1 ridge = 2 rows K. ---------------------------------------------------------- JACKET WORKED IN A CIRCLE: Worked in a circle from mid back in the round. BACK PIECE: Cast on 8 sts with 1 strand BabyAlpaca Silk and 1 strand Kid-Silk (= 2 strands) and divide them on 4 double pointed needles size 6 mm (= 2 sts on per needle). Work according to A.1 (= 8 repetitions of A.1 in width). When the first 27 rounds in A.1 have been worked, displace beg of round 1 st towards the left first on every other round, then every 4th round – i.e. beg of round is always before first YO in diagram so make it less visible. Beg of round at the end will be in the middle of first repetition of A.1. REMEMBER THE KNITTING TENSION Switch to circular needle when needed. When A.1 has been worked one time vertically, there are 208 sts on round, piece measures approx. 34 cm in diameter. Insert 8 markers in piece, insert 1st marker in 1st st on round, then insert 7 markers in sts with 25 sts apart, markers are directly over tip on each leaf. Work in GARTER ST - see explanation above, AT THE SAME TIME on first round inc 1 st on each side of markers. Inc with 1 YO on each side of sts with marker – on next round P YO to make holes = 16 inc sts per round. Repeat inc every other round 1-2-3 more times (= 32-48-64 inc sts in total) = 240-256-272 sts. On next round K, AT THE SAME TIME cast off all sts between 2nd and 3rd marker and 7th and 8th marker for armholes (= cast off 30-32-34 sts in each side). P next round, AT THE SAME TIME cast on 30-32-34 new sts over the cast off sts between 2nd and 3rd marker and 7th and 8th marker. When all sts are cast on again, there are 240-256-272 sts on needle. Then work as follows: Work A.2 over all sts, AT THE SAME TIME inc 1 st on each side of sts with marker on every round with star (= 16 sts per inc round) = 384-400-416 sts. Piece measures approx. 66-68-70 cm in diameter. LEFT FRONT PIECE: Then work as follows: Keep sts between 2nd and 4th marker on needle, slip the remaining sts on a stitch holder = 96-100-104 sts on needle. Work in GARTER ST - see explanation above - back and forth over these sts, AT THE SAME TIME at the end of every row slip the last 2 sts on stitch holder (do not work them, turn). NOTE: Continue with inc on each side of the 3rd marker every 4th row. Continue until 44 sts remain on needle. Slip the last 44 sts on stitch holder. RIGHT FRONT PIECE: Slip sts between 6th and 8th marker on circular needle size 6 mm, and work the same way in this side. Then K all sts from RS back onto circular needle size 6 mm - pick up and twist yarn between every time st on stitch holder in each side is slipped on needle (i.e. between every other st to avoid holes in transition) = approx. 512-540-568 sts. Work 4 ridges in garter st, cast off. SLEEVES: Worked in the round on double pointed needles. Cast on 32-32-40 sts on double pointed needles size 6 mm with 1 strand BabyAlpaca Silk and 1 strand Kid-Silk (= 2 strands). Work A.3 1 time vertically (= 4-4-5 repetitions in width), on last round inc 1 st = 33-33-41 sts. Insert 1 marker in first st at beg of round = mid under sleeve. Then work in stocking st but on every other round work as follows: Beg 2 sts before st with marker: K 2 tog, 1 YO, st with marker, 1 YO, slip 1 st as if to K, K 1 psso, work in stocking st over the remaining sts. On next round K YO to make hole, there should be an eyelet row upwards mid under sleeve, but no of sts remain the same. AT THE SAME TIME when piece measures 12 cm, beg inc mid under sleeve, work YOs and stocking st as before but do NOT dec on each side of YOs = 2 sts inc. Repeat inc this way every 3 cm 13-14-14 more times = 61-63-71 sts. Work until piece measures 54-55-56 cm, cast off. Knit another sleeve. ASSEMBLY: Sew in sleeves. |
||||||||||||||||||||||
Diagram explanations |
||||||||||||||||||||||
|
||||||||||||||||||||||
 |
||||||||||||||||||||||
 |
||||||||||||||||||||||
Have you finished this pattern?Tag your pictures with #dropspattern #whiteflowerjacket or submit them to the #dropsfan gallery. Do you need help with this pattern?You'll find 22 tutorial videos, a Comments/Questions area and more by visiting the pattern on garnstudio.com. © 1982-2026 DROPS Design A/S. We reserve all rights. This document, including all its sub-sections, has copyrights. Read more about what you can do with our patterns at the bottom of each pattern on our site. |
||||||||||||||||||||||


With over 40 years in knitting and crochet design, DROPS Design offers one of the most extensive collections of free patterns on the internet - translated to 17 languages. As of today we count 324 catalogues and 12239 patterns translated into English (UK/cm). 12239
We work hard to bring you the best knitting and crochet have to offer, inspiration and advice as well as great quality yarns at incredible prices! Would you like to use our patterns for other than personal use? You can read what you are allowed to do in the Copyright text at the bottom of all our patterns. Happy crafting!
Post a comment to pattern DROPS 169-6
We would love to hear what you have to say about this pattern!
If you want to leave a question, please make sure you select the correct category in the form below, to speed up the answering process. Required fields are marked *.