
Popular categories
Looking for a yarn?


Comments / Questions (65)
![]() Jannie Schmidt wrote:
Jannie Schmidt wrote:
Jeg har syet ruderne sammen vrang mod vrang (kun tre indtil videre). Er det korrekt. Syntes vrangsiden ser pænest ud. Venter på svar.
22.06.2017 - 09:34DROPS Design answered:
Hei Jannie. De skal ikke sys sammen vrangen mot vrangen, men legg kantene mot hverandre (rett opp) og sy i ytterste ledd av ytterste maske. Men du kan selvsagt sy vrangen mot vrangen, men som du sier, så synes du vrangsiden så penest ut. God Fornøyelse!
26.06.2017 - 11:47
![]() Nicoletta wrote:
Nicoletta wrote:
Non e' comprensibile il diagramma A4 e non c'e il diagramma A5 pertanto non riesco a proseguire il lavoro. Mi potete aiutarre ? GRAZIE
18.05.2017 - 19:43DROPS Design answered:
Buonasera Nicoletta. Nel diagramma A4 alterna un giro con 1 cat, 1 maglia alta (ripetuto su tutto il giro) con un giro lavorato tutte a maglie alte. Trova il diagramma A5 subito sopra allo schema con le misure; è la figura alla destra del diagramma A4. Buon lavoro!
18.05.2017 - 20:35
![]() Kim Hansen wrote:
Kim Hansen wrote:
Hoi, Zou je mij uitleg willen geven over A4 want volgens mij heb ik iets fout gedaan en ik zie niet wat? Gr Kim
19.03.2017 - 11:49DROPS Design answered:
Hoi Kim. Je haakt A.4 langs de rand tot aan de punten (hier haak je de meerderingen zoals beschreven). Het is 1 l, 1 stk in de ene toer en 1 stk om de l en 1 stk in het stk in de volgende toer.
20.03.2017 - 13:46Z-url.us wrote:
Hi, eu acho que eu vi que você visitou meu blogue Web site assim eu vim para "retribuir o favor" Estou. Tentando a encontrar coisas para melhorar melhorar o meu ! web site suponho que o seu ok para usar alguns dos suas ideias !!
23.11.2016 - 00:35DROPS Design answered:
Desde que refira SEMPRE a fonte de inspiração para suas ideias, fazendo referência à DROPS, pode usar nossas ideias.
23.11.2016 - 11:41Natalia wrote:
Tendrían un video explicativo sobre como continuar el poncho de los cuadros hacia abajo? Realmente al comenzar a leer la indicación no esta claro lo de 10-10-12-15 p.a. Podrían subir un patrón o un video de ser posible donde lo explique mas claramente? Gracias!
02.11.2016 - 22:00DROPS Design answered:
Hola Natalia. Estamos incluyendo vídeos según van surgiendo dudas de nuestras lectoras, pero es imposible acompañar todos los patrones con vídeos paso a paso. Este patrón tiene un vídeo para elaborar el cuadrado que es la parte más complicada del poncho. La parte inferior del poncho se trabaja según las explicaciones del patrón. Todos los pátrones de Drops están explicados para varias tallas, por eso cuando tienes varios números como en este caso 10-10-12-15 p.a. significa que para las tallas S/M se trabajan 10 p.a., para la talla L/XL - 10 p.a., para la talla XXL 12 p.a. y para la XXXL 15 p.a.
10.11.2016 - 09:04Martha Carrasquilla wrote:
Ustedes tiene el patron del cuatro pero no tiene para seguir ese poncho hasta el final tan lindo ayudemen por favor es muy bonito se lo agradeciera mucho
24.09.2016 - 03:29DROPS Design answered:
Hola Martha. El patrón está completo. Lee "DESDE LOS CUADRADOS HACIA ABAJO". Te recomiendo ver también los videos
03.10.2016 - 23:17
![]() Ingrid wrote:
Ingrid wrote:
Bij het patroon van de vierkantjes staat dat je de kleur naturel moet gebruiken als je de originele kleur aan houd, moet dit echter niet juist de lichtbeige zijn? Of ben ik nou gek? Groetjes ingrid
06.09.2016 - 20:15DROPS Design answered:
Hoi Ingrid. Ja, je hebt gelijk. Je haakt de vierkantjes met beige. Ik zal het aanpassen.
07.09.2016 - 13:24
![]() Mariuca wrote:
Mariuca wrote:
Be blessed! may God bless u so much for all the help and the beautiful things u do! thank u! u cannot imagine the joy i have seeing so many beautiful things someone can create helped by ur site! thank u!
22.07.2016 - 09:45Jana wrote:
Do you perhaps have a video tutorial on how to chrochet the A4 (round 2). Your video's are very helpfull.
19.06.2016 - 09:13DROPS Design answered:
Dear Jana, on round 2 in A.4 work 2 tr (UK-English) / 2 dc (US-English) in every ch-space. Happy crocheting!
20.06.2016 - 08:56
![]() Karen wrote:
Karen wrote:
Are there written instructions for the squares? I am new and don't fully understand how to follow a chart. I have already bought the yarn and want to get started.
17.06.2016 - 09:45DROPS Design answered:
Dear Karen, there are no written instructions for the squares, only diagram. Work following A.1 - each symbol represents 1 stitch/group of sts as explained under diagram text. Start round with a ring of chain and repeat each row in A.1 in the round - A.2 shows how to beg/end each round. Happy crocheting!
17.06.2016 - 10:22
|
|||||||||||||||||||||||||||||||||||||||||||
Sweet Martine#sweetmartineponcho |
|||||||||||||||||||||||||||||||||||||||||||
 |
 |
||||||||||||||||||||||||||||||||||||||||||
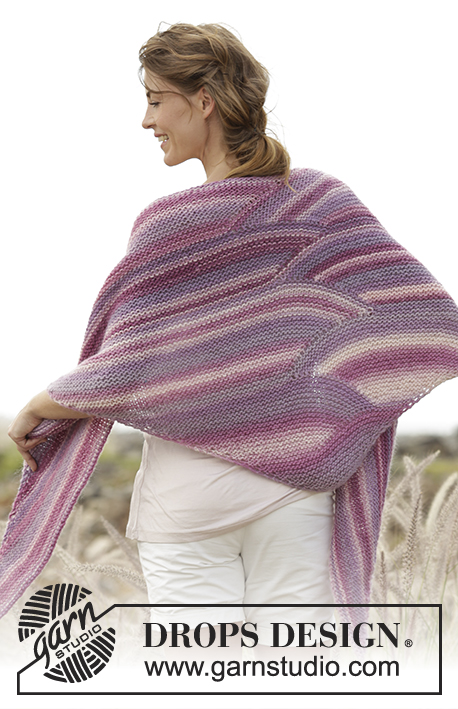
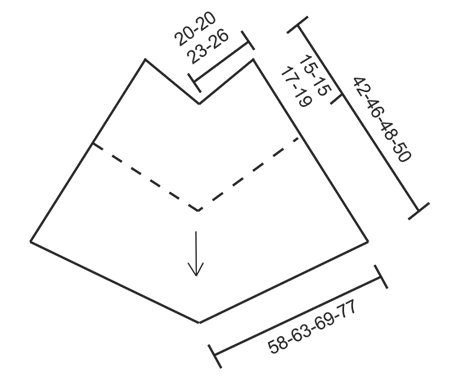
Crochet DROPS poncho with squares and lace pattern in ”Cotton Light”. The piece is worked top down. Size: S - XXXL.
DROPS 167-21 |
|||||||||||||||||||||||||||||||||||||||||||
|
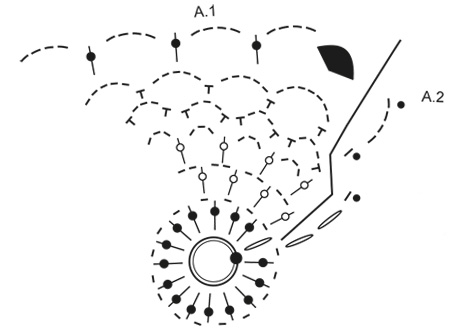
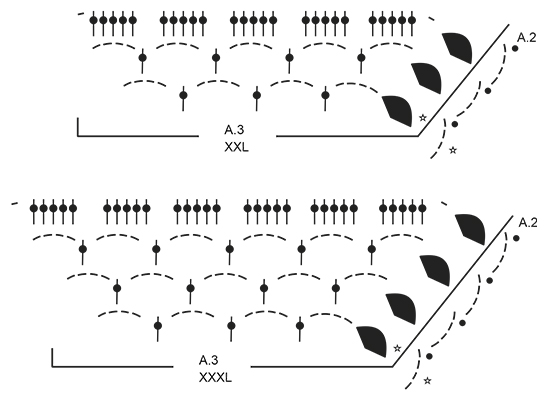
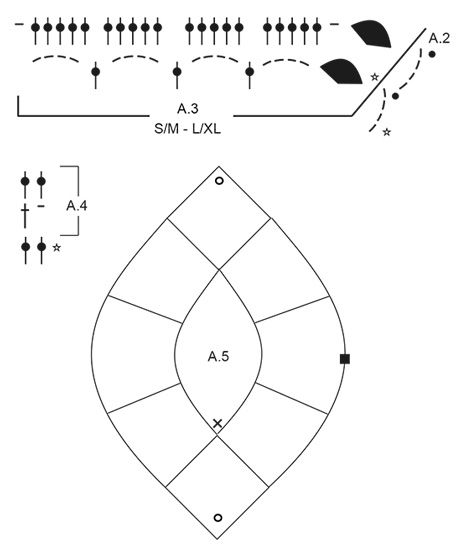
PATTERN: See diagrams A.1 to A.5. On diagram A.1 work first round in the entire round, then repeat A.1 and A.3 4 times in total on round. Diagram A.2 shows how every round beg and ends. A.5 shows how squares are assembled. CROCHET INFO: Beg every round with tr with 3 ch and finish with 1 sl st in 3rd ch. STRIPES: Work 0-4-4-4 rounds with light beige, then work * 2 rounds with off white, work 4 round with light beige *, repeat from *-* 3 times in total. INCREASE: On 1st round in A.4 (i.e. round with tr and ch) inc as follows: Work 1 ch, around ch-space at the tip work as follows: 2 tr around ch-space, 3 ch, 2 tr around same ch-space. On 2nd round in A.4 (i.e. round with tr) inc as follows: Work 1 tr around ch, around ch-space at the tip work as follows: 2 tr around ch-space, 3 ch, 2 tr around same ch-space. ---------------------------------------------------------- PONCHO: The piece is worked from the neck down. First work squares as follows: SQUARE: Work 4 ch on hook size 4 mm with light beige and form a ring with 1 sl st in first ch. Work A.1. Diagram A.2 shows how every round beg and ends. When first round of A.1 is worked, repeat A.1 4 times in total on round. When A.1 has been worked 1 time vertically, there are 16 ch-spaces and 4 corners. Work A.3 over A.1, i.e. repeat A.3 4 times in total on round (see diagram for correct size). NOTE: First round in A.3 is not worked, it only shows how next round is worked around sts. Diagram A.2 shows how every round beg and ends. When A.3 has been worked 1 time vertically, there are 80-80-100-120 tr and 4 corners. Fasten off. Square measures approx. 15-15-17-19 x 15-15-17-19 cm. REMEMBER THE CROCHET TENSION! Work 8 squares. ASSEMBLY: Sew squares tog edge to edge (see A.5) i.e. sew in outer loops of edge sts. These make up the upper part of poncho. Now work in the round from bottom edge of squares as follows: FROM SQUARES AND DOWN: ROUND 1: Beg in the side of square (see A.5), in the middle of the 1st square (i.e. 10-10-12-15 tr before corner). Work 3 ch – READ CROCHET INFO, work 1 tr in each of the first 10-10-12-15 tr, * over the 2 corners sewn tog work as follows: 1 tr in each of the next 2 tr, 2 tr around each of the next 2 corners, 1 tr in each of the next 2 tr *, then work 1 tr in every tr until next corner sewn tog (= over the next 20-20-25-30 tr), repeat from *-* over the next 2 corners sewn tog, 1 tr in each of the next 20-20-25-30 tr, over the next corner inc (see A.5) as follows: Work 1 tr around ch, around ch-space at the tip work as follows: 2 tr around ch-space, 3 ch, 2 tr around same ch-space, 1 tr around next ch. Work 1 tr in every tr and from *-* over the next 8 corners sewn tog and the next 100-100-125-150 tr (i.e. 20-20-25-30 tr between each of the 2 corners sewn tog). Around next corner inc as follows: Work 1 tr around ch, around ch-space at the tip work as follows: 2 tr around ch-space, 3 ch, 2 tr around same ch-space. Work 1 tr in every tr and from *-* the entire round, finish with 1 sl st in 3rd ch = 276-276-326-376 tr. ROUND 2: Work with off white - READ STRIPES. Work A.4 until 3 tr remain before ch-space in the tip, adjust to finish with 1 tr in last tr, work INCREASE – see explanation above. Repeat A.4 until next tip, work increase, work A.4 the rest of round. On every round inc 8 tr, i.e. inc 2 tr on each side of mid front/back. Repeat stripes and A.4 until finished measurements. When stripes have been worked, piece measures approx. 36-40-42-44 cm from the neck. EDGE AT THE BOTTOM: ROUND 1: Work with light beige. Work 1 ch, work 1 dc in first tr, work * 5 ch, skip 4 tr, 1 dc in next tr *, repeat from *-* until mid front/back, ** adjust so that last dc is worked around ch-space mid front/back, 5 ch, 1 dc around same ch-space **, repeat from *-* until mid front/back, repeat from **-** around ch-space mid front/back, repeat from *-* the rest of round, finish with 1 sl st in first ch at beg of round. ROUND 2: Work 3 ch, 1 sl st around first ch-space, 2 ch (= 1 htr), work * 4 ch, 1 htr around next ch-space *, repeat from *-* until ch-space mid front/back, ** 4 ch, around ch-space mid front/back work 1 htr + 4 ch + 1 htr **, repeat from *-* until mid front/back, repeat from **-** around ch-space mid front/back, repeat from *-* the rest of round, finish with 1 sl st in 2nd ch (= htr) at beg of round. ROUND 3: Work 3 ch (= 1 tr), work 5 tr around every ch-space, around ch-space mid front/back work: 1 ch, 2 tr around ch-space, 3 ch, 2 tr around same ch-space, 1 ch, finish round with 1 sl st in 3rd ch at beg of round. Fasten off. NECK EDGE: Beg mid front - see diagram and work with light beige on hook size 4 mm. Work as follows from RS: ROUND 1: Work 1 dc around ch-space in the middle (tip for the middle square), ** work 5 ch, skip corner (i.e. 3 ch + 2 tr), 1 dc around ch, * 5 ch, skip 5 tr, 1 dc between 2 tr *, repeat from *-* 2-2-3-4 more times, 5 ch, skip 5 tr, 1 dc around ch, 5 ch, 1 dc in seam between squares **, repeat from **-** around the entire neck, finish with 1 sl st in first dc. ROUND 2: Work 2 ch, 1 sl st around first ch-space, 2 ch (= 1 htr), * 4 ch, 1 htr around next ch-space *, repeat from *-* until 1 ch-space remains before mid back, work 1 htr around the next 2 ch-spaces, repeat from *-* until 1 ch-space remains, work 1 htr around last ch-space, finish with 1 sl st in 2nd ch (= 1 htr) at beg of round. ROUND 3: Work 3 ch (= 1 tr), work 2 tr around first ch-space, work 5 tr around every ch-space until 1 ch-space remains before mid back, work 3 tr around each of the next 2 ch-spaces, work 5 tr around every ch-space until 1 ch-space remains, work 3 tr around last ch-space, finish with 1 sl st in first tr. Fasten off. |
|||||||||||||||||||||||||||||||||||||||||||
Diagram explanations |
|||||||||||||||||||||||||||||||||||||||||||
|
|||||||||||||||||||||||||||||||||||||||||||
 |
|||||||||||||||||||||||||||||||||||||||||||
 |
|||||||||||||||||||||||||||||||||||||||||||
 |
|||||||||||||||||||||||||||||||||||||||||||
 |
|||||||||||||||||||||||||||||||||||||||||||
Have you finished this pattern?Tag your pictures with #dropspattern #sweetmartineponcho or submit them to the #dropsfan gallery. Do you need help with this pattern?You'll find 11 tutorial videos, a Comments/Questions area and more by visiting the pattern on garnstudio.com. © 1982-2026 DROPS Design A/S. We reserve all rights. This document, including all its sub-sections, has copyrights. Read more about what you can do with our patterns at the bottom of each pattern on our site. |
|||||||||||||||||||||||||||||||||||||||||||


With over 40 years in knitting and crochet design, DROPS Design offers one of the most extensive collections of free patterns on the internet - translated to 17 languages. As of today we count 324 catalogues and 12290 patterns translated into English (UK/cm). 12290
We work hard to bring you the best knitting and crochet have to offer, inspiration and advice as well as great quality yarns at incredible prices! Would you like to use our patterns for other than personal use? You can read what you are allowed to do in the Copyright text at the bottom of all our patterns. Happy crafting!
Post a comment to pattern DROPS 167-21
We would love to hear what you have to say about this pattern!
If you want to leave a question, please make sure you select the correct category in the form below, to speed up the answering process. Required fields are marked *.