
Popular categories
Looking for a yarn?


Comments / Questions (23)
![]() Anna Nygaard wrote:
Anna Nygaard wrote:
Jeg kan ikke tager 3 dbl stangmasker ud i mellem A1 og A1 på hver side. Lige nu har jeg kun 2 dbl stangmasker mellem mønsteret Hilsen Anna
26.06.2016 - 00:54DROPS Design answered:
Hej Anne. Ja, det passer ikke her. Jeg ville löse det med at haekle 3 dstk i één m imellem - for at tage ud det du skal. Vi afventer stadig en rettelse paa denne, men det er hvad vi forventer det skal vaere.
27.06.2016 - 16:34Mari Shish wrote:
It will be so wonderful if you will translate your website in Russian language.🙏✌️
13.06.2016 - 23:44
![]() Hellie wrote:
Hellie wrote:
Hallo wie kan mij uitleggen hoe ik dit precies moet haken.haak 1 dstk in elke van de eerste 11.v en meerder tegelijkertijd 3 dstk gelijkmatig. eigelijks snap ik er niks van :(
06.03.2016 - 15:13DROPS Design answered:
Hoi Hellie. Je haakt 1 dstk in elke van de eerste 11 v (dus 1 dstk in elke v) en tegelijkertijd meerder je 3 dstk gelijkmatig (= 11 dstk worden 14 dstk). Je doet dit met een gelijkmatige afstand zodat de meerdering niet in één plek komt en daarom ook mooier wordt. Je kunt dit bijvoorbeeld doen met 1 extra te haken aan het begin en eind en 1 in het midden: dus, 1 dstk extra maken in eerste, vierde en laatste v
08.03.2016 - 12:23
![]() CINZIA IRIDE wrote:
CINZIA IRIDE wrote:
Buongiorno, sono arrivata alla fine degli aumenti dello sprone e non riesco ad andare avanti. Avete uno schema da seguire? Le spiegazioni sono piuttosto complicate. Grazie Cinzia
15.02.2016 - 14:56DROPS Design answered:
Buongiorno Cinzia Quando trova l’indicazione di saltare A.1 + 22-24-26-28-30-32 m.a.d + A.1 (= manica), significa che non deve lavorare nelle m del diag. A.1 + le m.a.d indicate + le m del diag. A.1. Punta quindi l’uncinetto dopo tutte queste m. Le maglie saltate, verranno lavorate successivamente e sono le m della manica. Buon lavoro!
16.02.2016 - 13:11
![]() Merete wrote:
Merete wrote:
Oppskriften er grei nok å forstå helt til det skal økes på andre dblst rad. Her er det mye som ikke stemmer!!! I første forsøk var det slik oppskriften hinter om, men da mangler jeg 60masker!!!!
07.01.2016 - 21:21DROPS Design answered:
Hej Merete. Opskriften er rettet fornylig og burde nu vaere korrekt.
17.11.2016 - 16:05
![]() Sophie wrote:
Sophie wrote:
Skal der tages ud mellem A1 og A1? Der er jo blot 2 dbl-st. I så fald hvordan?
04.01.2016 - 11:19DROPS Design answered:
Hej Sophie. Opskriften var fejl, den er imidlertid rettet til. Undskyld den lange ventetid.
17.11.2016 - 16:04
![]() Andréa wrote:
Andréa wrote:
Bonjour, je n'en suis qu'à l'empiècement ....ce n'est pas très clair à partir de -crocheter en point fantaisie -1 au dessus des DB et A 1 au dessus de A1 : le point lfantaisie est composé si je comprends bien d'un rang de m.s Comment peut-on combiner des m.s et les DB de A1? N'est-ce pas plutot des m.s tout au long de ce rang ?? Un grand merci
27.12.2015 - 20:00DROPS Design answered:
Bonjour Andréa, le point fantaisie 1 = 1 rang de ms dans le brin avant des m, 1 rang de DB dans le brin arrière des m. Au rang 1 de A.1, crochetez le rang 2 du point fantaisie 1 et au rang 2 de A.1, crochetez le rang 1 du point fantaisie 1 (le 1er rang de ms dans A.1 est expliqué dans le modèle et correspond au rang 1 du point fantaisie 1. Bon crochet!
02.01.2016 - 14:14
![]() Annelies wrote:
Annelies wrote:
Ik snap niet hoe ik tussen de beide A1 patroontjes, (waar maar twee dubbele stokjes zitten na de eerste 'dstk' toer), maar liefst 6 dstk kan meerderen.
22.12.2015 - 22:21DROPS Design answered:
Hoi Annelies. Dit patroon was fout en is inmiddels aangepast. Excuses voor de wachttijd.
17.11.2016 - 16:03Camelia wrote:
Hi, what are the actual chest measurements? All i see are S, M, L, etc. Thanks Camelia
18.12.2015 - 23:26DROPS Design answered:
Dear Camelia, you will find a measurement chart with all measurements for each size at the end of the pattern, compare these measurements with a similar garment you have and like the shape to find out the matching size. Read more about sizing here. Happy crocheting!
21.12.2015 - 10:12
![]() Cathrine wrote:
Cathrine wrote:
Hei. Skal det økes 3 dblst mellom a1 og a1 på bærestykket? Det er jo bare 2 dblst mellom de.
11.12.2015 - 20:36DROPS Design answered:
Hej Cathrine. Mönstret var fejl og er imidlertid rettet. Undskyld den lange ventetid.
17.11.2016 - 16:00
|
|||||||||||||
Priscilla |
|||||||||||||
|
|
|||||||||||||
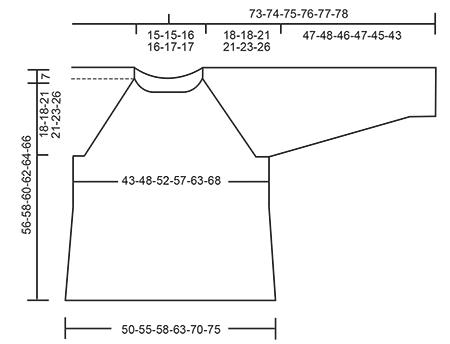
Crochet DROPS jumper with raglan and lace pattern in ”Air”. The piece is worked top down. Size: S - XXXL.
DROPS Extra 0-1183 |
|||||||||||||
|
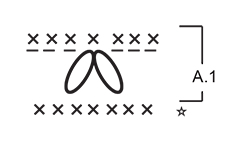
CROCHET INFO: At beg of every dc row, replace first dc with 1 ch, work row tog at the end by working 1 sl st in first ch. At beg of every dtr row, replace first dtr with 4 ch, work row tog at the end by working 1 sl st in 4th ch. At beg of every triple tr row, replace first triple tr with 5 ch, work row tog at the end by working 1 sl st in 5th ch. CROCHET TIP: If the crochet tension vertically is not high enough switch all dtr with triple tr. INCREASE TIP-2: Inc 1 dtr by working 2 dtr in same st. PATTERN-1: ROW 1 (= WS): Work 1 dc in front loop of every dtr. ROW 2 (= RS): Work 1 dtr in back loop of every dc. Repeat rows 1 to 2 until finished measurements. PATTERN-2: ROUND 1: Work 1 dtr in back loop of every dc. ROUND 2: Work 1 dc in back loop of every dtr. Repeat rounds 1 to 2 until finished measurements. INCREASE TIP-1: Inc 3 dtr before A.1 on BODY as follows: Work as before until 3 dc remain before A.1, work 2 dtr in each of the next 3 dc. Inc 3 dtr after A.1 on BODY as follows: Work 2 dtr in each of the next 3 dc after A.1. Inc 3 dtr before A.1 on SLEEVE as follows: Work 4 dtr in 1 dc before A.1. Inc 3 dtr after A.1 on SLEEVE as follows: Work 4 dtr in 1st dc after A.1 Inc 2 dtr before A.1 as follows: Work as before until 2 dc remain before A.1, work 2 dtr in each of the next 2 dc. Inc 2 dtr after A.1 as follows: Work 2 dtr in each of the next 2 dc after A.1. Inc 1 dtr before A.1 as follows: Work as before until 1 dc remain before A.1, work 2 dtr in dc. Inc 1 dtr after A.1 as follows: Work 2 dtr in first dc after A.1. DECREASE TIP: Work 1 dtr/dc but wait with last pull through (= 2 sts on hook), then work next dtr/dc but on last pull through, pull yarn through all sts on hook = 1 dc/dtr dec. PATTERN: See diagram A.1. Work A.1 as follows: ROW 1: Work 3 ch, skip 1 dc, * work 1 dtr in back loop of next dc but wait with last pull through (= 2 sts on hook), work 2 dtr in same st the same way *, skip 3 dc, repeat from *-* 1 time, pull yarn through all 7 sts on hook, 3 ch, skip 1 dc. ROW 2: Work 1 dc in each of the first 3 ch, 1 dc in next st, 1 dc in each of the next 3 ch. ---------------------------------------------------------- JUMPER: Worked top down, back and forth from mid back. YOKE: Work 76-76-80-80-84-84 ch on hook size 6 mm with Air and form 1 ring with 1 sl st in first ch. NOTE: Work every row tog at the end of row before turning piece. Work next row as follows: Work 1 dc in every ch - READ CROCHET INFO = 76-76-80-80-84-84 dc. Then work as follows from RS: Work all dtr in back loop of dc, and READ CROCHET TIP. Work 1 dtr in each of the first 11-11-12-12-13-13 dc AT THE SAME TIME inc 1-3-3-5-7-9 dtr evenly - READ INCREASE TIP-2 – (= half back piece), A.1 over the next 7 dc, 1 dtr in each of the next 2 dc, A.1 over the next 7 dc (= right sleeve), 1 dtr in each of the next 22-22-24-24-26-26 dc AT THE SAME TIME inc 2-6-6-10-14-18 dtr evenly (= front piece), A.1 over the next 7 dc (= left sleeve), 1 dtr in each of the next 2 dc, A.1 over the next 7 dc, (= right sleeve), 1 dtr in each of the next 11-11-12-12-13-13 dc AT THE SAME TIME inc 1-3-3-5-7-9 dtr evenly (= half back piece). Work PATTERN-1 over dtr and A.1 over A.1 as before. On first row in pattern-1 there are 80-88-92-100-112-120 dc (incl A.1). Repeat pattern-1 and A.1 vertically until finished measurements. REMEMBER THE CROCHET TENSION! On next row (= dtr row) inc for raglan on every row from RS (i.e. every row with dtr) on each side of A.1 – READ INCREASE TIP-1 – as follows: Inc 3 dtr on each side of A.1 1 time in total, then inc 2 dtr on each side of A.1 3-4-4-5-5-5 times in total, then 1 dtr on each side of A.1 1-0-1-0-1-2 times in total (= 160-176-188-204-224-240 sts in total). On next row (= from WS with dc) work as follows: Work all dc in front loop of every dtr. Work 1 dc in each of the first 22-25-27-30-34-37 dtr, work 8 ch, insert 1 marker in 4th ch, skip: A.1 + 22-24-26-28-30-32 dtr + A.1 (= sleeve), work 1 dc in each of the next 44-50-54-60-68-74 dtr, work 8 ch, insert 1 marker in 4th ch, skip: A.1 + 22-24-26-28-30-32 dtr + A.1 (= sleeve), 1 dc in each of the next 22-25-27-30-34-37 dtr = 88-100-108-120-136-148 dc (incl A.1) and 16 ch. Move the markers upwards when working. Insert 1 marker in piece, NOW MEASURE PIECE FROM HERE. BODY: Remember CROCHET INFO! Work next row (= from RS) as follows: Pattern-1 over all sts (i.e. 1 dtr in every ch under sleeve) = 104-116-124-136-152-164 dc on row. Work pattern-1 over body as before. When piece measures 6 cm, adjust so that next row is with dtr, inc 1 dtr on each side of each marker in the side (= 4 sts inc), repeat inc every 8 cm 3 more times. On next row with dc there are 120-132-140-152-168-180 dc on row. When piece measures 38-40-39-41-41-40 cm from marker, adjust so that last row is with dc, fasten off. SLEEVE: = A.1 + 22-24-26-28-30-32 dtr + A.1. Insert 1 marker in piece, NOW MEASURE PIECE FROM HERE. Sleeve is worked in the round, top down. Beg by working mid under sleeve as follows: Work 1 dc in the 5th ch of the 8 ch worked in armhole on body, work 1 dc in each of the next 3 ch, work last round of A.1 (= dc) over A.1, 1 dc in back loop of the next 22-24-26-28-30-32 dtr, last round of A.1 over A.1, before working 1 dc in each of the remaining 4 ch under sleeve = 44-46-48-50-52-54 dc. Insert 1 marker mid under sleeve, move the marker when working. Then work piece with PATTERN-2 - see explanation above. When sleeve measures 4 cm, dec 1 dc/tr on each side of marker - READ DECREASE TIP. Repeat dec every 5-4-4-4-4-3 cm 7-8-8-9-9-10 more times = 28-28-30-30-32-32 dc/dtr. Work until piece measures 46-47-45-46-44-42 cm – adjust so that last round is with dc. Work 2 round with 1 dc in back loop of every dc (= 3 round in total with dc at the bottom of sleeve). Fasten off. Work the other sleeve the same way. NECK EDGE: Beg mid back and work as follows from RS: 1 dc in back loop of every dc while AT THE SAME TIME dec 4-4-5-5-6-6 dc evenly = 72-72-75-75-78-78 dc. Turn piece and work from WS. 1 dc in front loop of every dc while AT THE SAME TIME dec 4-4-5-5-6-6 dc evenly = 68-68-70-70-72-72 dc. Fasten off. |
|||||||||||||
Diagram explanations |
|||||||||||||
|
|||||||||||||
 |
|||||||||||||
 |
|||||||||||||
Have you finished this pattern?Tag your pictures with #dropspattern or submit them to the #dropsfan gallery. Do you need help with this pattern?You'll find 14 tutorial videos, a Comments/Questions area and more by visiting the pattern on garnstudio.com. © 1982-2026 DROPS Design A/S. We reserve all rights. This document, including all its sub-sections, has copyrights. Read more about what you can do with our patterns at the bottom of each pattern on our site. |
|||||||||||||


With over 40 years in knitting and crochet design, DROPS Design offers one of the most extensive collections of free patterns on the internet - translated to 17 languages. As of today we count 324 catalogues and 12290 patterns translated into English (UK/cm). 12290
We work hard to bring you the best knitting and crochet have to offer, inspiration and advice as well as great quality yarns at incredible prices! Would you like to use our patterns for other than personal use? You can read what you are allowed to do in the Copyright text at the bottom of all our patterns. Happy crafting!
Post a comment to pattern DROPS Extra 0-1183
We would love to hear what you have to say about this pattern!
If you want to leave a question, please make sure you select the correct category in the form below, to speed up the answering process. Required fields are marked *.