
Popular categories
Looking for a yarn?


Comments / Questions (29)
![]() Monique wrote:
Monique wrote:
Bonjour, Je suis en train de finir le gilet. Par contre, je suis un peu déçue, car les diminutions au niveau de l'empiècement que j'ai réalisées en tricotant 2 mailles ensembles sont très visibles, et sont vues comme des défauts. Aurais-je dû employer une autre technique? Merci d'avance pour votre réponse.
26.10.2016 - 08:19DROPS Design answered:
Bonjour Monique, avez-vous bien conservé la même tension pour les 2 m tricotées ens et pour l'autre diminution? Un blocage suffit parfois à effacer d'éventuelles irrégularités - n'hésitez pas à montrer votre gilet à votre magasin DROPS (même en photo par mail), il pourra mieux vous conseiller. Bon tricot!
26.10.2016 - 09:41
![]() GONIDEC wrote:
GONIDEC wrote:
Bonjour, Merci pour vos conseils, je n'ai pas défait , en revanche, je me suis contentée de reprendre les mailles sur un crochet et j'ai exécuté une dizaine de rangs jersey qui roulottent et qui me plaisent énormément. je trouve le résultat au top
06.06.2016 - 12:03
![]() Mc wrote:
Mc wrote:
Bonjour, Je réalise actuellement le diagramme A4 et l'avant dernier rang du diagramme est orné d'une astérisque qui signifie la présence d'une augmentation. Je ne la vois pas dans l'explication ! Ai je manqué quelques lignes , Merci
05.03.2016 - 11:58DROPS Design answered:
Bonjour Mc, il s'agit d'une faute de frappe, il fallait lire "rang de diminutions", correction faite, merci! Bon tricot!
05.03.2016 - 18:16
![]() Vicky Williams wrote:
Vicky Williams wrote:
I am now doing the YOKE part in the pattern. The diagram for A3 shows the pattern being repeated 3 times altogether. After the 6 rows have been completed in A3 are only the RAGLAN Decreases then carried out between the sleeves edges OR do I continue doing the A3 pattern with the RAGLAN DECREASE every 4th row???? Very confused!!
03.03.2016 - 19:43DROPS Design answered:
Dear Mrs Williams, you are working A.3 a total of 4 times, ie at each transition between sleeve and body and dec for raglan on either side of each A.3 (see "RAGLAN"). After you have worked A.3 1 time in height, repeat diagram until all dec for raglan are done. Then work A.4, then A.5 then A.1. Happy knitting!
04.03.2016 - 10:32
![]() Mc wrote:
Mc wrote:
Bonjour, Actuellement je tricote A4, et il est stipulé la note suivante : "tricoter en jersey la dernière m avant la bordure devant (vu sur l’endroit)." Quelle différence avec le point jersey tricoté tout au long de l'ouvrage ? Merci
03.03.2016 - 11:14DROPS Design answered:
Bonjour Mc, il n'y a aucune différence, sur l'endroit, la dernière maille avant la bordure devant se tricote en jersey (et pas en A.4 = elle ne sera pas diminuée), c'est-à-dire que quand vous répétez A.4 en largeur, il reste 1 m avant celles de la bordure devant, c'est cette maille que vous tricotez en jersey. Bon tricot!
03.03.2016 - 13:49
![]() Marketta Yli-Tepsa wrote:
Marketta Yli-Tepsa wrote:
Haluaisin kutoa aivan samanvärisen villatakin kuin kuvassa. Voisinko saada tarkat värikoodit lankojen tilaamiseen? Terveisin Marketta
17.01.2016 - 12:59DROPS Design answered:
Hei! Lankojen värinumerot kerrotaan ohjeessa, eli DROPS Delight nro 05 ja DROPS Alpaca nro 506.
18.01.2016 - 17:14
![]() Corinne wrote:
Corinne wrote:
Hei! Jeg har startet på bærestykket. Skal A3 strikkes like langt som raglan-fellingen (24 p) eller kun 6 p som vist på diagram?
15.01.2016 - 22:15DROPS Design answered:
Hej Corinne, Ja du strikker A3 lige så langt som raglan-fellingen. God fornøjelse!
09.03.2016 - 16:25
![]() Gonidec wrote:
Gonidec wrote:
Bonjour, Petit problème : je suis en train de tricoter le corps de ce cardigan, et je m'aperçois que la bordure en point mousse (5mailles) a la fâcheuse tendance à se replier sur elle même, vers l'intérieur ! Comment y remédier ? J'ai vu que cette laine ne pouvait être repassée ! Il serait dommage de le porter "uniquement" boutonné ! Merci
13.01.2016 - 09:16DROPS Design answered:
Bonjour Mme Gonidec, vous pouvez bloquer le gilet quand il est fini, en maintenant bien les bordures avec des épingles. N'hésitez pas à demander conseil à votre magasin DROPS, il aura des astuces pour vous. Bon tricot!
13.01.2016 - 10:21
![]() Gonidec wrote:
Gonidec wrote:
Merci pour votre réactivité et de l'aide que vous nous apportez
03.01.2016 - 09:25
![]() Mc wrote:
Mc wrote:
Bonsoir, Je suis en pleine réalisation de ce modèle. Lorsque vous parlez des "marqueurs", avant les augmentations, à 22 cm de hauteur, s'agit-il des 4 marqueurs qui ont été posés avant les diminutions ? Ou faut-il poser de nouveaux marqueurs ? Je vous remercie
30.12.2015 - 19:20DROPS Design answered:
Bonjour Mme Mc, il s'agit bien des mêmes marqueurs. Bon tricot!
02.01.2016 - 15:42
|
|||||||||||||||||||
Frosty Morning Cardigan#frostymorningcardigan |
|||||||||||||||||||
|
|
|||||||||||||||||||
Knitted DROPS fitted jacket with stripes, lace pattern, raglan and round yoke in ”Delight” and ”Alpaca”. Size: S - XXXL.
DROPS 165-45 |
|||||||||||||||||||
|
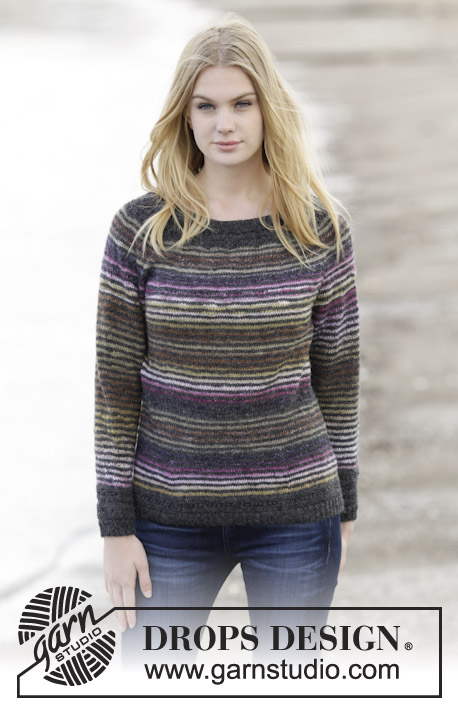
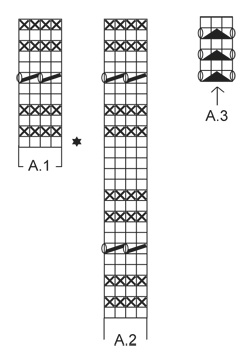
GARTER ST (back and forth on needle): K all rows. 1 ridge = 2 rows K. PATTERN: See diagrams A.1-A.5. The diagrams show all rows in pattern seen from RS. STRIPES: * Work 2 rows with Alpaca, work 2 rows with Delight *, repeat from *-*. WAIST: Dec for waist at the 4 markers. All dec are done from RS! Dec as follows when 2 sts remain before 1st and 3rd marker: Slip 1 st as if to K, K 1, psso. Dec as follows after 2nd and 4th marker: K 2 tog. INCREASE TIP 1: Inc at the 4 markers (= waist). All inc are done from RS. Inc as follows: Make 1 YO before 1st and 3rd marker and after 2nd and 4th marker. On next row P YO twisted to avoid holes. INCREASE TIP 2: Inc as follows under sleeves: Work until 1 st remains before marker, 1 YO, 2 sts in stocking st, 1 YO. On next round K YO twisted, i.e. work in the back loop of st instead of front to avoid holes. RAGLAN: Dec for raglan on each side of A.3 in every transition between sleeves and body. All dec are done from RS! Dec as follows after A.3: Slip 1 st as if to K, K 1, psso. Dec as follows 2 sts before A.3: K 2 tog. BUTTONHOLES: Dec for buttonholes on right band. 1 buttonhole = cast off third and fourth st from edge and cast on 2 new sts on next row over these sts. Dec for buttonholes when piece measures: SIZE S: 2, 9, 16, 23, 30, 37, 43, 49 and 55 cm. SIZE M: 2, 9, 16, 23, 30, 37, 44, 51 and 57 cm. SIZE L: 3, 10, 17, 24, 31, 38, 45, 52 and 59 cm. SIZE XL: 3, 11, 19, 26, 33, 40, 47, 54 and 61 cm. SIZE XXL: 3, 11, 19, 27, 35, 42, 49, 56 and 63 cm. SIZE XXXL: 3, 11, 19, 27, 35, 43, 51, 58 and 65 cm. ---------------------------------------------------------- BODY: Worked back and forth on circular needle from mid front. Cast on 223-241-262-286-310-337 sts (incl 5 band sts in garter st in each side) on circular needle size 2.5 mm with Alpaca. Work rib as follows: 5 band sts in GARTER ST – see explanation above -, P 1, * K 1, P 2 *, repeat from *-* until 7 sts remain, K 1, P 1, 5 band sts in garter st. Remember BUTTONHOLES - see explanation above. When rib measures 3 cm, work 2 rows in stocking st inside bands sts in each side. Now work pattern as follows: 5 band sts in garter st, A.1 until 5 sts remain, AT THE SAME TIME dec 12-10-11-11-11-10 sts evenly on 1st row in diagram, 5 band sts in garter st = 211-231-251-275-299-327 sts. NOTE: On 7th row in diagram K last st before band. When A.1 has been worked vertically, switch to circular needle size 3 mm and work in stocking st and STRIPES - see explanation above, inside 5 band sts in garter st in each side. REMEMBER THE KNITTING TENSION When piece measures 8-8-8-8-10-10 cm, insert 4 markers in piece as follows: Insert 1st marker after the first 31-32-34-35-35-36 sts, 2nd marker after the next 48-56-62-72-84-96 sts, 3rd marker after the next 53-55-59-61-61-63 sts and 4th marker after the next 48-56-62-72-84-96 sts (31-32-34-35-35-36 sts remain on needle after last marker). On next row from RS dec for WAIST – see explanation above (= 4 sts dec). Repeat dec every 4th row (i.e. every other row from RS) 6-6-6-6-5-5 more times = 183-203-223-247-275-303 sts. When piece measures 22 cm in all sizes, inc before 1st and 3rd marker and after 2nd and 4th marker – READ INCREASE TIP 1 (= 4 sts inc). Repeat inc every 4th-4th-6th-6th-8th-8th row 6-6-6-6-5-5 more times = 211-231-251-275-299-327 sts. Continue working until piece measures 38-39-39-40-41-43 cm (adjust so that next row is last row with Delight). Work next row as follows from WS: Work 50-55-60-65-71-78 sts (= left front piece), cast off 10-10-10-12-12-12 sts for armhole, work 91-101-111-121-133-147 sts in stocking st (= back piece), cast off 10-10-10-12-12-12 sts for armhole and work the last 50-55-60-65-71-78 sts (= right front piece). Put piece aside and knit the sleeves. SLEEVE: Worked in the round on double pointed needles. Cast on 57-57-60-60-63-66 sts on double pointed needles size 2.5 mm with Alpaca and work rib as follows: * K 1, P 2 *, repeat from *-* until rib measures 3 cm. Now work 2 rounds in stocking st AT THE SAME TIME on 1st round dec 1-1-2-0-1-2 sts evenly = 56-56-58-60-62-64 sts. Then continue pattern according to diagram A.2. When A.2 has been worked 1 time vertically, switch to double pointed needles size 3 mm. Insert 1 marker at beg of round (= mid under sleeve). Continue in stocking st and with stripes, AT THE SAME TIME on next round inc 1 st on each side of marker under sleeve - READ INCREASE TIP 2! Repeat inc every 9th-7th-7th-6th-6th-5th round 12-14-14-16-16-17 times in total = 80-84-86-92-94-98 sts. When piece measures 41-39-39-38-38-38 cm (NOTE: shorter measurements in the larger sizes because of wider shoulders) - adjust so that next round is last round with Delight. On next row cast off the middle 10-10-10-12-12-12 sts under (i.e. cast off 5-5-5-6-6-6 sts on each side of marker) = 70-74-76-80-82-86 sts. Put piece aside and knit another sleeve. YOKE: Slip sleeves on to same circular needle as body. Beg from RS and continue with stripes (i.e. work the first 2 rows with Alpaca), stocking st and band sts in garter st as before: Work sts from right front piece, then work sts from first sleeve and insert 1 marker in first and last st on sleeve, work sts from back piece, work sts from the other sleeve and insert 1 marker in first and last st on sleeve and work sts from left front piece = 331-359-383-411-439-475 sts on needle and 4 markers in piece. Now work A.3 in every transition between body and sleeves (arrow in diagram should fit against st with marker) and dec for RAGLAN - see explanation above, (= 8 sts dec). Repeat dec every 4th row (i.e. every other row from RS) 5-6-7-7-8-8 more times = 283-303-319-347-367-403 sts. After last dec, P 1 row from WS (continue bands in garter st) AT THE SAME TIME dec 20-26-28-32-36-40 sts evenly (do not dec over bands) = 263-277-291-315-331-363 sts on needle. Now work and dec according to A.4 inside 5 band sts in each side (choose diagram for correct size). NOTE: Work last st before band (seen from RS) in stocking st. On last row in diagram dec 4-6-8-28-30-44 st evenly = 187-195-203-211-221-231 sts. Now continue with Alpaca until finished measurements. Now work A.5 inside the 5 band sts in each side (NOTE: Choose diagram for correct size). (Work last st before band in stocking st). When A.5 has been worked vertically, switch to circular needle size 2.5 mm. Now work A.1 inside the 5 band sts in garter st. On 1st row in diagram dec 30-28-36-34-44-44 st evenly = 157-167-167-177-177-187 sts. When A.1 has been worked vertically, work an elevation in the back of neck in garter st as follows: Beg from RS and K until 20-20-22-22-24-26 sts remain on row. Turn, K back until 20-20-22-22-24-26 sts remain in the other side. Turn, K until 36-36-40-40-44-48 sts remain. Turn, K back until 36-36-40-40-44-48 sts remain in the other side. Turn piece and K the rest of the row. Work 2 rows in stocking st inside band sts AT THE SAME TIME adjust no of sts to 157-166-166-178-178-187. Now work rib as follows: 5 band sts in garter st, P 1, * K 1, P 2 *, repeat from *-* until 7 sts remain, K 1, P 1, 5 band sts in garter st. When rib measures 2 cm, cast off with K over K and P over P. Jacket measures approx. 56-59-60-62-64-66 cm from shoulder and down. ASSEMBLY: Sew the openings under the sleeves. Sew the buttons on to the left band. |
|||||||||||||||||||
Diagram explanations |
|||||||||||||||||||
|
|||||||||||||||||||
 |
|||||||||||||||||||
 |
|||||||||||||||||||
 |
|||||||||||||||||||
 |
|||||||||||||||||||
Have you finished this pattern?Tag your pictures with #dropspattern #frostymorningcardigan or submit them to the #dropsfan gallery. Do you need help with this pattern?You'll find 29 tutorial videos, a Comments/Questions area and more by visiting the pattern on garnstudio.com. © 1982-2026 DROPS Design A/S. We reserve all rights. This document, including all its sub-sections, has copyrights. Read more about what you can do with our patterns at the bottom of each pattern on our site. |
|||||||||||||||||||


With over 40 years in knitting and crochet design, DROPS Design offers one of the most extensive collections of free patterns on the internet - translated to 17 languages. As of today we count 324 catalogues and 12290 patterns translated into English (UK/cm). 12290
We work hard to bring you the best knitting and crochet have to offer, inspiration and advice as well as great quality yarns at incredible prices! Would you like to use our patterns for other than personal use? You can read what you are allowed to do in the Copyright text at the bottom of all our patterns. Happy crafting!
Post a comment to pattern DROPS 165-45
We would love to hear what you have to say about this pattern!
If you want to leave a question, please make sure you select the correct category in the form below, to speed up the answering process. Required fields are marked *.