
Popular categories
Looking for a yarn?


Comments / Questions (170)
![]() Astrid wrote:
Astrid wrote:
In der Zeichenerklärung (Diagramm) befindet sich in der deutschen Version ein Fehler. (Englisch ist korrekt) Bei dem Symbol für 3 zu kreuzende Maschen (die letzen beiden Symbole vor dem Zeichen für "ein Umschlag") werden die linken Maschen jeweils vor (!) der Arbeit gekreuzt. Das ist nicht korrekt, bzw. sähe sehr seltsam aus.
27.01.2019 - 17:59DROPS Design answered:
Liebe Astrid, herzlichen Dank für den Hinweis, die Korrektur erflogt bald. Viel Spaß beim stricken!
28.01.2019 - 12:32
![]() Puck wrote:
Puck wrote:
Der er vist en fejl i diagramtekst for symbol 9 !!! - = sæt 2 m på hj-p foran arb, 1 vr, 2 r fra hj-p. : den rigtige tekst skal være (som for model 156/19): = slå om mellem 2 m. På næste omg strikkes omslaget drejet .
13.12.2018 - 17:06DROPS Design answered:
Hei Puck. Det har du helt rett i, vi har nå endret dette. Takk for beskjed og god fornøyelse
14.12.2018 - 07:30Sharon B wrote:
Also, when doing the PATTERN [size small] [6sts in A.2, 8 P sts, 6sts in A.2, 8 Psts] on BODY in the series of 8 sections of inc. sts should the pattern not be reversed on the opposite sides of the body back and front? Example: if the above is the left front and back, the right front and back pattern should read [8 P sts, 6sts in A.2, 8 Psts, 6sts in A.2]. Otherwise the pattern is not symmetrical on both sides!
16.11.2018 - 05:02DROPS Design answered:
Dear Sharon, the increases are done in the pattern as explained, the new sts will be first worked in A.2, then P8, then A.2 then P8 (seen from the raglan line). Happy knitting!
16.11.2018 - 09:55Sharon B wrote:
Hello, I'm still trying to understand the PATTERN instructions for the BODY (size small): If I add up 6 inc. sts in A.2 + P next 8 inc sts + next 6 inc. sts in A.2, P next 8 inc. sts =28 (in each of the 8 increase sections). Then on front and back pieces the inc changes (one time) to just before and after the marker to the raglans? Also, you give A.3 instructions for the M-XXL size, but none for the S size. "When A.3 has been worked 1 time vertically, continue with A.2 over cable?
16.11.2018 - 04:49DROPS Design answered:
Dear Sharon B., this note about A.3 doesn't apply in size S - just work A.3 as explained for your size. The increases for raglan on body are done before A.1 at the end of left front piece + after A.1 at the beg and before A.1 at the end of back piece + after A.2 at the beg of right front piece = the increases for raglan will follow the pattern and have to be worked by and by into the pattern as explained. Happy knitting!
16.11.2018 - 09:48Sharon B wrote:
I'm on row 20 of the yoke in size small. Under 'PATTERN' should I be doing as follows: Work the first 6 sts inc in A.2, then P next 8 inc sts, work the next 6 inc sts in A.2, P the next 8 inc sts. THEN should I: S/M: inc inside A.1/A.2(i.e. between A.1 and A.2, towards marker for raglan-[?HELP!]) on front and back piece 1 more times. P the new sts. AND do I then ignore the NOTE: (Size M-L-XL-XXL): with A3 instructions? I'm struggling to interpret this pattern correct.
14.11.2018 - 19:19DROPS Design answered:
Dear Sharon B., since you are working size S, just ignore the instructions for the other sizes. After you have worked the increases as you told above (=6 sts in A.2, P8, 6 sts in A.2, P8) you will P (as for sleeves) the remaining increases (there will be 1 more increase on body inside A.1/A.2 (= as before). You have now increased a total of: 6 + 8 + 6 + 8 + 1 = 29 times in total. Happy knitting!
15.11.2018 - 08:49Sharon B wrote:
Thank you for providing this gorgeous pattern for free. I have read through the pattern yoke instructions many times and made myself detailed notes to track and follow, Still I keep ripping out my work and starting over!!! The photo of the model helps more than what is written! I can see A2 cables on the front and back of the body just off from the raglan and no instructions on how and where to insert! I also don’t understand PATTERN S/M ‘inc inside A1/A2...”1-4 more times”? Please help.
11.11.2018 - 05:56DROPS Design answered:
Dear Sharon B., the diagram A.2 is worked on the raglan lines as follows: A.1, marker, A.2 (seen from RS). You will then decrease for raglan before A.1/after A.2 - increase for raglan as explained ie the increases for raglan will have to be worked on body first in A.2, then P, then in A.2, then P and then P all remaining increased stitches on body. The new sts on sleeves will always be purled. Happy knitting!
12.11.2018 - 09:43
![]() Jenny wrote:
Jenny wrote:
On pattern A.5 there is cabling on row 40 (WS). Should this be on row 39?
29.07.2018 - 14:59DROPS Design answered:
Dear Jenny, Diagram will be checked - we'll come back to you as soon as possible. Thank you in advance for your patience. Happy knitting!
07.08.2018 - 18:04Sangeeta wrote:
Where i increase for raglan after front &before A2p2 or ..... Please help me
05.05.2018 - 14:11DROPS Design answered:
Dear Sangeeta, at each raglan line there is a pattern, consisiting of: (A.1/A.2, marker, A.2/A.1) and you should do every increase before and after these stitches. Happy Knitting!
06.05.2018 - 08:50
![]() Sangeeta wrote:
Sangeeta wrote:
I start this pattern but i'm confused picture of model &pattern are different please help me out
05.05.2018 - 13:52DROPS Design answered:
Dear Sangeeta, please let us know where do you find the pattern and the picture different. Also please take it into consideration that the modell is knitted from the top and downwards, therefor the charts might appear upside down, however that is the directions they should be reand and knitted. Happy Knitting!
06.05.2018 - 08:46
![]() Maryline wrote:
Maryline wrote:
Bonjour, j'ai un problème avec le raglan. Du coup est ce que cela fait : 5 m point mousse, 1 m env, 2 m end, 12m env, A.1 (1 augm), 1er marqueur, A.2 (1 augm) 2 m env, A.2, 2 m env, A.1(1 augm) 2ème marqueur, A.2 (1 augm), A.3, A.1,(1 augm) 3 ème marqueur, A.2,(1 augm) 2 m env, A.2 (1 augm), 2 m env, A.1 (1 augm, 4ème marqueur, A.2, 12m env, 2 m end, 1 m env, 5 m point mousse. A quoi servent les marqueurs ? a délimiter le raglan ? merci
04.04.2018 - 22:15DROPS Design answered:
Bonjour Maryline, les marqueurs sont situés à chaque raglan et on augmente de part et d'autre des mailles suivantes ainsi: (augm), A.1/A.2, marqueur, A.2/A.1. (augm). Bon tricot!
05.04.2018 - 08:43
|
||||||||||||||||||||||||||||
Alana Cardigan#alanacardigan |
||||||||||||||||||||||||||||
 |
 |
|||||||||||||||||||||||||||
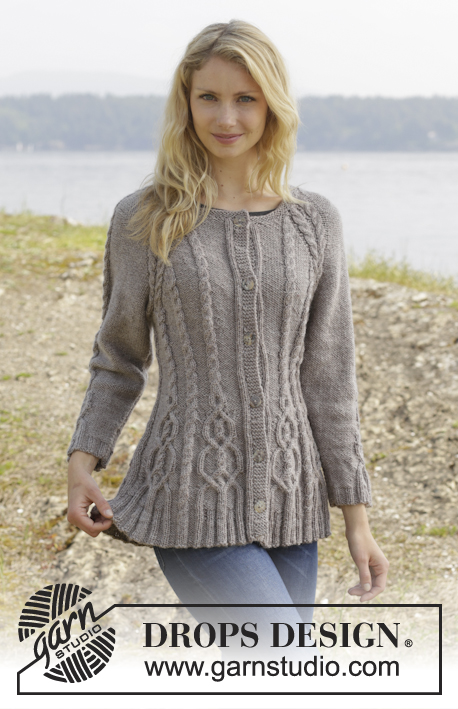
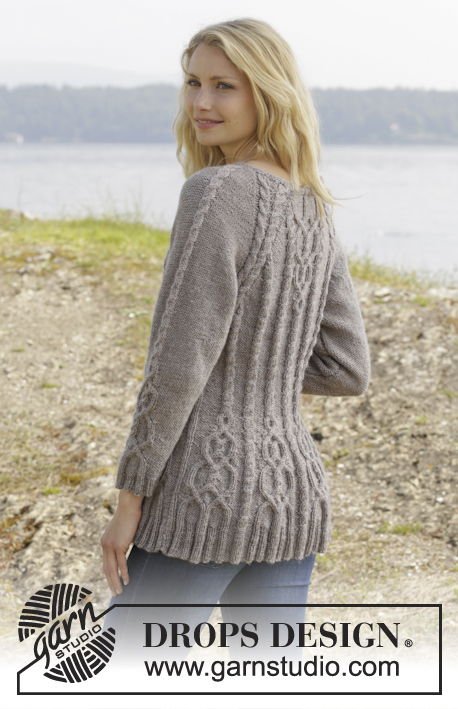
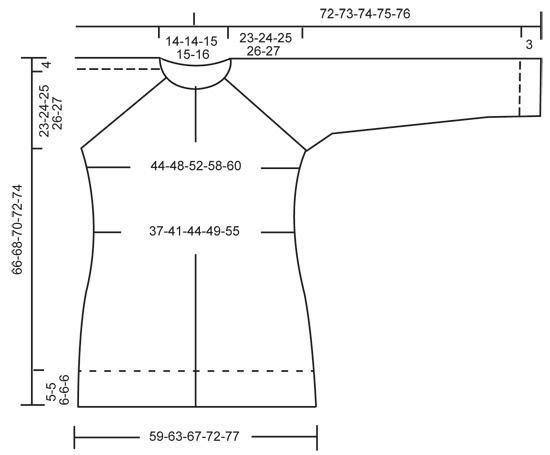
Knitted DROPS jacket with cables and raglan, worked top down in ”Karisma”. Size S-XXL
DROPS 156-4 |
||||||||||||||||||||||||||||
|
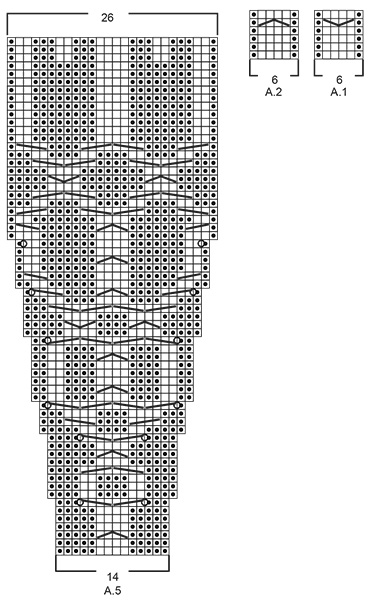
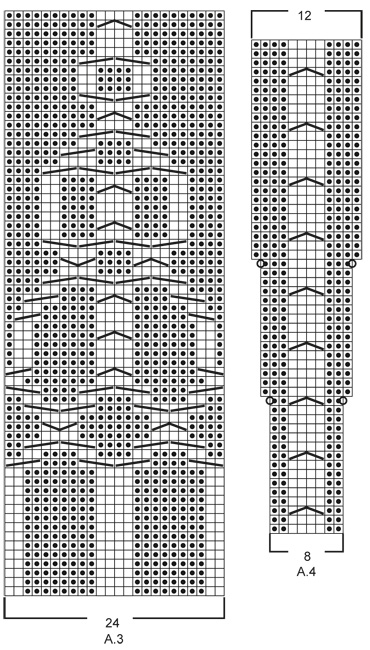
GARTER ST (back and forth on needle): K all rows. 1 ridge = 2 rows K. PATTERN: See diagrams A.1 - A.5. The diagrams show all rows in pattern seen from RS. RAGLAN: Inc on each side of raglan sts (A.1/A.2, marker, A.2/A.1) by making 1 YO = 8 inc on row. On next row work YOs twisted to avoid holes. Then work the new sts P on sleeves (seen from RS), and on front and back piece work the new sts in to pattern as explained below. DECREASE TIP (applies to sleeves): Dec on each side of marker as follows: Work until 3 sts remain before marker, P 2 tog, P 2, P 2 tog = 2 sts dec. INCREASE TIP: All inc are done from RS. Inc 1 st by making a YO. On next row K YOs twisted, i.e. work in the back loop of st instead of front to avoid holes. P the new sts (seen from RS). KNITTING TIP: For every 10th row work short rows over the 5 sts in garter st in bands as follows (beg from RS): K 5 band sts, turn piece, tighten yarn and K back, turn piece and work as before over all sts, turn piece, K 5 band sts in garter st, turn piece, tighten yarn and K back. That way the ridges in band will not contract as much. BUTTONHOLES: Dec for buttonholes on right band. 1 buttonhole = K tog third and fourth st from edge and make 1 YO. Dec for buttonholes when piece measures: SIZE S: 2, 12, 22, 32, 42 and 52 cm. SIZE M: 2, 12, 22, 32, 42 and 52 cm. SIZE L: 2, 11, 20, 29, 38, 47 and 56 cm SIZE XL: 2, 11, 20, 29, 38, 47 and 56 cm SIZE XXL: 2, 11, 20, 29, 38, 47, 56 and 65 cm ---------------------------------------------------------- JACKET: Worked back and forth, top down on circular needle to make room for all the sts. YOKE: Cast on 108-108-113-113-117 sts on circular needle size 4 mm with Karisma. Work 3 ridges in GARTER ST - see explanation above. K next row AT THE SAME TIME inc 24-24-23-23-27 sts evenly = 132-132-136-136-144 sts. Remember BUTTONHOLES - see explanation above. Now work as follows from RS: 5 sts in garter st, P 1, K 2 (= band), P 12-12-13-13-15, A.1, insert 1st marker, A.2, P 2, A.2, P 2, A.1, insert 2nd marker, A.2, P 0-0-1-1-3, A.3, P 0-0-1-1-3, A.1, insert 3rd marker, A.2, P 2, A.2, P 2, A.1, insert 4th marker, A.2, P 12-12-13-13-15, K 2, P 1, 5 sts in garter st (= band) – READ KNITTING TIP! READ ALL OF THE FOLLOWING SECTION BEFORE CONTINUING! REMEMBER THE KNITTING TENSION! On next row from RS beg inc for RAGLAN – see explanation above, AT THE SAME TIME work pattern as follows: RAGLAN: Repeat inc every row 0-2-10-20-20 times in total. Then inc on every other row (i.e. on every row from RS) 23-32-30-26-27 times and in every 3rd row 6-0-0-0-0 times= 364-404-456-504-520 sts. PATTERN: Work pattern on body as follows (P the inc sts on sleeves): Work the first 6 sts inc in A.2, then P next 8-9-7-8-8 inc sts, work the next 6 inc sts in A.2, P the next 8-9-7-8-8 inc sts. NOTE: (Size M-L-XL-XXL): When A.3 has been worked 1 time vertically, continue with A.2 over cable and P (seen from RS) the remaining sts from A.3 until start of body. S/M: Then inc as before on sleeve and inc inside A.1/A.2 (i.e. between A.1 and A.2, towards marker for raglan) on front and back piece 1-4 more times. P the new sts. L/XL/XXL: Continue with A.2 over the next 6 inc sts, P the next 7-8-8 inc sts, then inc as before on sleeve and inc inside A.1/A.2 (i.e. between A.1 and A.2, towards marker for raglan) on front and back piece 1-4-5 more times. P the last 1-4-5 inc sts. Piece now measures 27-28-29-30-31 cm from shoulder. Now work as follows from WS: Work 55-60-67-73-76 sts (= right front piece), slip the next 80-90-102-114-116 sts on a stitch holder for sleeve, cast on 12 new sts under sleeve, insert a blue marker in the middle of these new sts (= side), work the next 94-104-118-130-136 m (= back piece), slip the next 80-90-102-114-116 sts on a stitch holder for sleeve, cast on 12 new sts under sleeve, insert a blue marker in the middle of these new sts (= side), work the remaining 55-60-67-73-76 sts (= left front piece). There are now 228-248-276-300-312 sts on needle. NOW MEASURE THE PIECE FROM HERE. BODY: There are now 106-116-130-142-148 sts for back piece and 61-66-73-79-82 sts for each front piece. Then continue pattern as follows from RS: S/M: 5 sts in garter st, P 1, K 2 (= band), P 12-12, A.2, insert a marker, P 8-9, A.2, insert a marker, P 8-9, A.1, P 7-7, A.2 0-1 time in width, P 7-7, A.2, P 8-9, insert a marker, A.2, P 8-9, insert a marker, A.2, P 9-9, A.2, P 9-9, A.2, insert a marker, P 8-9, A.2, insert a marker, P 8-9, A.1, P 7-7, A.2 0-1 time in width, P 7-7, A.2, P 8-9, insert a marker, A.2, P 8-9, insert a marker, A.2, P 12-12, K 2, P 1, 5 sts in garter st. L/XL/XXL: 5 sts in garter st, P 1, K 2 (= band), P 13-14-15, A.2, insert a marker, P 7-8-8, A.2, insert a marker, P 7-8-8, A.2, insert a marker, P 7-8-8, A.1, P 4-6-5, A.2 1-1-2 times in width, P 4-6-5, A.2, P 7-8-8, insert a marker, A.2, P 7-8-8, insert a marker, A.2, P 7-8-8, insert a marker, A.2, P 10-11-12, A.2, P 10-11-12, A.2, insert a marker, P 7-8-8, A.2, insert a marker, P 7-8-8, A.2, insert a marker, P 7-8-8, A.1, P 4-6-5, A.2 1-1-2 times in width, P 4-6-5, A.2, P 7-8-8, insert a marker, A.2, P 7-8-8, insert a marker, A.2, P 7-8-8, insert a marker, A.2, P 13-14-15, K 2, P 1, 5 sts in garter st. READ THE NEXT 2 SECTIONS BEFORE CONTINUING! Now dec and inc at the same time as follows: DECREASE: Dec differently as follows: Dec 1 st by P 2 tog towards the bands mid front, repeat dec every 1½-1½-1½-2-2 cm 5-5-4-4-5 more times. AT THE SAME TIME dec 1 st on each side of the middle cable on back piece. Repeat dec every 2-2-1½-1½-1½ cm 3-3-4-4-6 more times. AT THE SAME TIME dec 1 st towards cable in every P section with marker in (= 8-8-12-12-12 markers). Repeat dec every 3-2½-5-4-4 cm 2-3-1-2-2 more times. INCREASE (towards the sides): When piece measures 3 cm, inc along the cable towards the sleeve (i.e. cable from raglan) in P section towards the sides – READ INCREASE TIP! Inc 4 sts on row. Repeat inc every 1½-1½-2½-1½-1 cm 3-4-2-4-10 more times. When all dec and inc are done, 200-216-244-264-294 sts remain. When piece measures 11-12-12-13-14 cm, work pattern as follows: 5 sts in garter st, P 1, K 2 (= band), P 2-2-4-4-5, A.5, A.4, A.5, A.4 0-0-1-1-1 time, P 7-8-6-11-15, A.2 0-1-1-1-2 times in width, P 7-8-6-11-15, A.4 0-0-1-1-1 time in width, * A.5, A.4 *, repeat from *-* 2-2-3-3-3 more times in width, A.5 1-1-0-0-0 times in width, P 7-8-6-11-15, A.2 0-1-1-1-2 times in width, P 7-8-6-11-15, A.4 0-0-1-1-1 time in width, A.5, A.4, A.5, P 2-2-4-4-5, K 2, P 1, 5 sts in garter st (= band). NOTE: Adjust the first cable in A.4 and A.5 to get a nice transition between diagrams. Continue with pattern and inc according to diagram. When A.4 and A.5 have been worked vertically and piece measures approx. 33-34-34-35-35 cm, there are 316-332-376-396-426 sts on needle. Insert a marker here. NOW MEASURE THE PIECE FROM HERE. Now work rib inside 8 band sts in each side of piece as follows: S/M: * Work K over K and P over P until 7-11 sts remain before the blue marker in the side, P 2, K 2, P 3-4 *, repeat from *-* 1 more time and continue with K over K and P over P until band sts. L/XL/XXL: * Work K over K and P over P until 8-14-21 sts remain before the blue marker in the side, K 2-2-2, P 3-4-3, K 0-2-2, P 0-3-3, K 0-0-2, P 0-0-3 *, repeat from *-* 1 more time and continue with K over K and P over P until band sts. When rib has been worked for 2 cm from marker, inc by making 1 YO before first P st in every P section. READ INCREASE TIP! When rib has been worked for 5-5-6-6-6 cm, cast off with K over K and P over P. SLEEVES: Slip the 80-90-102-114-116 sts from stitch holder back on circular needle. Work 1 row over all sts and cast on 12 new sts at the end of row = 92-102-114-126-128 sts. Insert a marker in the middle of the new sts (i.e. 6 sts on each side of marker). NOW MEASURE THE PIECE FROM HERE. Then work sleeve in the round on circular needle/double pointed needles. Continue the middle cable on sleeve as before but work P over cables in raglan. On 2nd round beg dec on each side of marker - READ DECREASE TIP. Repeat dec every other round 6 more times = 78-88-100-112-114 sts. Then dec 1 st on each side of marker every 2-1½-1-1-1 cm 13-17-22-27-27 times = 52-54-56-58-60 sts. AT THE SAME TIME when piece measures 15 cm, work A.5 over cable in the middle of sleeve - adjust the first cable in A.5 to get a nice transition between diagrams. NOTE: Do not inc in A.5 on sleeve, i.e. do not work YOs in diagram. When A.5 is finished and sleeve measures 37 cm, work rib as follows from marker at beg of round: P 0-0-1-2-3, K 1-2-2-2-2, P 3, K 2. P 3, K 2, P 2, continue rib as on last row in A.5 (= 26 sts), P 2, K 2, P 3, K 2, P 3, K 1-2-2-2-2, P 0-0-1-2-3. Continue like this for 3 cm, cast off with K over K and P over P. ASSEMBLY: Sew the holes under the sleeves. Sew the buttons on to left band. |
||||||||||||||||||||||||||||
Diagram explanations |
||||||||||||||||||||||||||||
|
||||||||||||||||||||||||||||
 |
||||||||||||||||||||||||||||
 |
||||||||||||||||||||||||||||
 |
||||||||||||||||||||||||||||
Have you finished this pattern?Tag your pictures with #dropspattern #alanacardigan or submit them to the #dropsfan gallery. Do you need help with this pattern?You'll find 26 tutorial videos, a Comments/Questions area and more by visiting the pattern on garnstudio.com. © 1982-2026 DROPS Design A/S. We reserve all rights. This document, including all its sub-sections, has copyrights. Read more about what you can do with our patterns at the bottom of each pattern on our site. |
||||||||||||||||||||||||||||


With over 40 years in knitting and crochet design, DROPS Design offers one of the most extensive collections of free patterns on the internet - translated to 17 languages. As of today we count 324 catalogues and 12239 patterns translated into English (UK/cm). 12239
We work hard to bring you the best knitting and crochet have to offer, inspiration and advice as well as great quality yarns at incredible prices! Would you like to use our patterns for other than personal use? You can read what you are allowed to do in the Copyright text at the bottom of all our patterns. Happy crafting!
Post a comment to pattern DROPS 156-4
We would love to hear what you have to say about this pattern!
If you want to leave a question, please make sure you select the correct category in the form below, to speed up the answering process. Required fields are marked *.