
Looking for a yarn?


Comments / Questions (167)
![]() Glenda Resnick wrote:
Glenda Resnick wrote:
Hello, I just asked a similar question yesterday, however I don't want to mess up so close to the end...this was a poorly done pattern but I like the sweater. I have been knitting almost 60 years. I am at the final increase in the rib before cast off. I am looking at 58 increases ...I am knitting an XL. I am pretty sure that I followed the pattern correctly. Is this too many?
30.09.2022 - 19:45DROPS Design answered:
Dear Mrs Resnick, as long as you increase in every purl section before casting off, it should work; the increasing in the purl sections will allow enough width without getting a too wider edge. Happy knitting!
03.10.2022 - 08:16
![]() Glenda Resnick wrote:
Glenda Resnick wrote:
I don't understand the last increase before casting off stitches....how many'purlsections' are there? how many stitches constitute a purl section? In other words...how many inctmreases should there be for the rib?
30.09.2022 - 06:00DROPS Design answered:
Dear Mrs Resnick, increase 1 stitch in every section worked with purled stitch whatever the number of sts there are and either purled stichtes from rib or from pattern. The number of stitches increased will depend on your size, simply increase 1 purl stitch every time you purl between knitted stitches. Happy knitting!
30.09.2022 - 08:24
![]() Katarina Pettersson wrote:
Katarina Pettersson wrote:
Kan man byta ut karisma mot lima? lika mycket garn i så fall?
15.09.2022 - 12:10DROPS Design answered:
Hej Katarina, ja det kan du, testa vår garn-konverterare; välj Karisma, välj antal g i din storlek och välj 1 tråd så ser du hur mycket du skall ha i DROPS Lima :)
15.09.2022 - 15:18
![]() Glenda Resnick wrote:
Glenda Resnick wrote:
What is the best way to increase on every row to get a smooth edge?
30.04.2022 - 21:40DROPS Design answered:
Dear Glenda, you can increase in an edge stitch (before or after it, depending on the side you are working on). If there is a big hole after a YO, you can pick up the horizontal thread between two stitches and work it twisted. Happy knitting!
30.04.2022 - 22:30
![]() Pauline E Thorson wrote:
Pauline E Thorson wrote:
I am looking at this pattern. Is it me or do the gauge and the completed inches for each size does not add up? For example, if I take the stitch count at the separation for the sleeves (assuming this is around the bust size) for the XXL size says I will have 312 stitches. Assuming I have the correct gauge of 21 stitches= 4 inches. that means that there are 5.25 stitches per inch. 312/ 5.25= 59.5 inches. What am I missing to get the 47.5 inches that the pattern says at the top?
28.04.2022 - 07:32DROPS Design answered:
Dear Mrs Thorson, the tension of 21 sts = 4" is measured when working stocking stitch, but you will need more stitches to work cables. Should your tension be right and if you keep this tension when working, then you will have the correct finished measurements. Happy knitting!
28.04.2022 - 11:56
![]() Glenda Resnick wrote:
Glenda Resnick wrote:
On the yoke it says inc every row 20 times (for raglan) then incr every other row 26 times...it also says that all Inc are done on the right side so are the incr's done on every RS row then every other RS row?
26.04.2022 - 06:25DROPS Design answered:
Hi Glenda, You increase to raglan first on every row (both right and wrong side) x 20, then every other row (each row from the right side ) for the remaining increases. Happy knitting!
26.04.2022 - 06:55
![]() Karen wrote:
Karen wrote:
Hej. Jeg forstår ikke instruktionen: S/M: Nu tages der ud som før på ærmet og der tages ud indenfor A.1/A.2 (dvs mellem A.1 og A.2, mod mærket til raglan) på for- og rygstk 1-4 gange til. De nye m strikkes vr. Skal jeg fortsætte med raglanudtagninger på samme måde som før (8 m. pr. pind)? Og hvor ofte?Udtagningerne kommer ikke til at passe med det samlede antal m. senere i opskriften (hvor de stadig går ud fra, at man har 404 m. i alt på en str. M)
25.04.2022 - 22:02DROPS Design answered:
Hej Karen, størrelsen er ikke S/M, strikker du Small tager du ud 1 gang til og strikker du Medium tager du ud 4 gange til. God fornøjelse!
27.04.2022 - 14:19
![]() Linda Langenhoven wrote:
Linda Langenhoven wrote:
Sorry, correction on my previous question. I have a problem with row 19 of A5 on the sleeve. The diagram for that row does not make sense. Please assist. Thank you for your kind assistance.
18.01.2022 - 15:54DROPS Design answered:
Dear Mrs Langenhoven, on row 19 work as follows starting when 2 purl remain before first K sts/cable and work: *slip 2 sts on cable needle behind piece (= 2 P), K 2, P 2 from cable needle, slip 2 sts on cable needle in front of piece, P 2, K 2 from cable needle*, repeat one more time from *-* (remember to omit the yarn overs that are not done in A.5 on sleeves). Happy knitting!
19.01.2022 - 08:11
![]() Linda Langenhoven wrote:
Linda Langenhoven wrote:
Good day. I am struggling with diagram A5 on the sleeve. Specifically with row 17. It seems that there is something not right. Could you please tell me if row 17 in the diagram is correct? Thank you for your kind assistance. Thank
18.01.2022 - 15:11DROPS Design answered:
See answer below.
19.01.2022 - 08:11
![]() Carol Pocknall wrote:
Carol Pocknall wrote:
"Dear Mrs Pocknall, the cables A.1 (there are 2 under body) are the one that continue from the raglan lines" I realise that but then you've got two cables on the body that are different to the others which seems odd. Thank you for answering all my questions by the way. I've never had trouble understanding a pattern like I have this one
25.11.2021 - 17:34
|
||||||||||||||||||||||||||||
Alana Cardigan#alanacardigan |
||||||||||||||||||||||||||||
 |
 |
|||||||||||||||||||||||||||
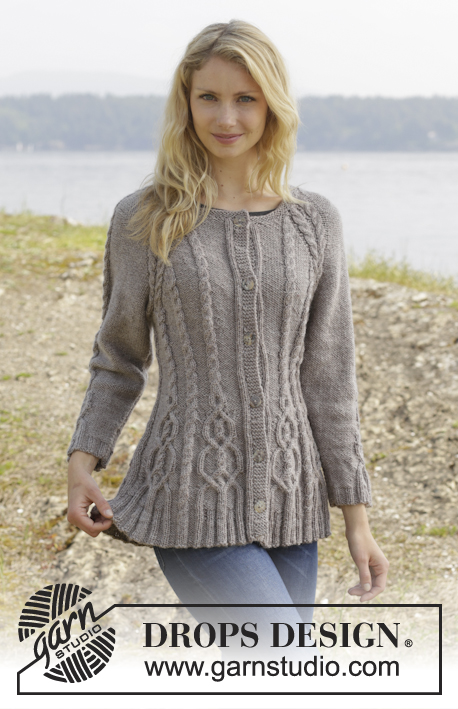
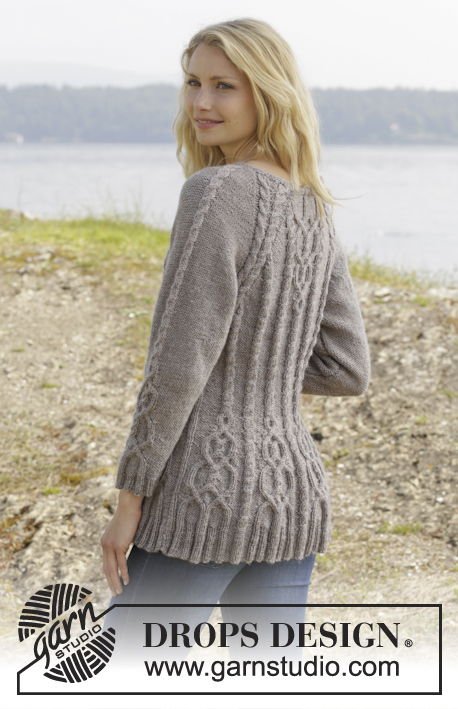
Knitted DROPS jacket with cables and raglan, worked top down in ”Karisma”. Size S-XXL
DROPS 156-4 |
||||||||||||||||||||||||||||
|
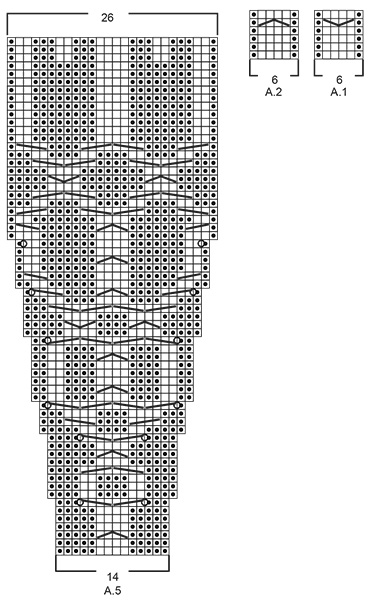
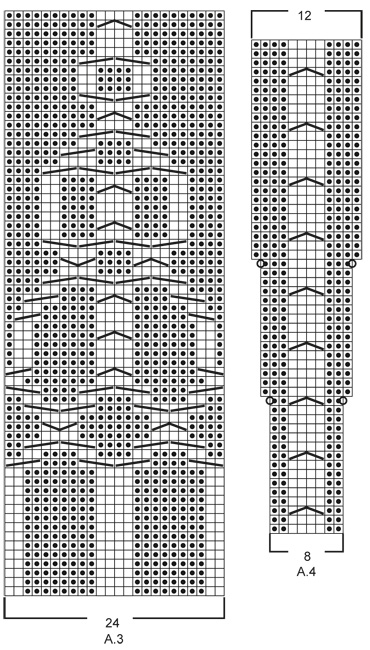
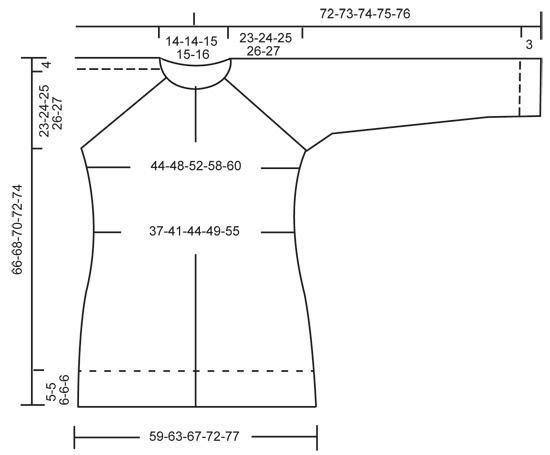
GARTER ST (back and forth on needle): K all rows. 1 ridge = 2 rows K. PATTERN: See diagrams A.1 - A.5. The diagrams show all rows in pattern seen from RS. RAGLAN: Inc on each side of raglan sts (A.1/A.2, marker, A.2/A.1) by making 1 YO = 8 inc on row. On next row work YOs twisted to avoid holes. Then work the new sts P on sleeves (seen from RS), and on front and back piece work the new sts in to pattern as explained below. DECREASE TIP (applies to sleeves): Dec on each side of marker as follows: Work until 3 sts remain before marker, P 2 tog, P 2, P 2 tog = 2 sts dec. INCREASE TIP: All inc are done from RS. Inc 1 st by making a YO. On next row K YOs twisted, i.e. work in the back loop of st instead of front to avoid holes. P the new sts (seen from RS). KNITTING TIP: For every 10th row work short rows over the 5 sts in garter st in bands as follows (beg from RS): K 5 band sts, turn piece, tighten yarn and K back, turn piece and work as before over all sts, turn piece, K 5 band sts in garter st, turn piece, tighten yarn and K back. That way the ridges in band will not contract as much. BUTTONHOLES: Dec for buttonholes on right band. 1 buttonhole = K tog third and fourth st from edge and make 1 YO. Dec for buttonholes when piece measures: SIZE S: 2, 12, 22, 32, 42 and 52 cm. SIZE M: 2, 12, 22, 32, 42 and 52 cm. SIZE L: 2, 11, 20, 29, 38, 47 and 56 cm SIZE XL: 2, 11, 20, 29, 38, 47 and 56 cm SIZE XXL: 2, 11, 20, 29, 38, 47, 56 and 65 cm ---------------------------------------------------------- JACKET: Worked back and forth, top down on circular needle to make room for all the sts. YOKE: Cast on 108-108-113-113-117 sts on circular needle size 4 mm with Karisma. Work 3 ridges in GARTER ST - see explanation above. K next row AT THE SAME TIME inc 24-24-23-23-27 sts evenly = 132-132-136-136-144 sts. Remember BUTTONHOLES - see explanation above. Now work as follows from RS: 5 sts in garter st, P 1, K 2 (= band), P 12-12-13-13-15, A.1, insert 1st marker, A.2, P 2, A.2, P 2, A.1, insert 2nd marker, A.2, P 0-0-1-1-3, A.3, P 0-0-1-1-3, A.1, insert 3rd marker, A.2, P 2, A.2, P 2, A.1, insert 4th marker, A.2, P 12-12-13-13-15, K 2, P 1, 5 sts in garter st (= band) – READ KNITTING TIP! READ ALL OF THE FOLLOWING SECTION BEFORE CONTINUING! REMEMBER THE KNITTING TENSION! On next row from RS beg inc for RAGLAN – see explanation above, AT THE SAME TIME work pattern as follows: RAGLAN: Repeat inc every row 0-2-10-20-20 times in total. Then inc on every other row (i.e. on every row from RS) 23-32-30-26-27 times and in every 3rd row 6-0-0-0-0 times= 364-404-456-504-520 sts. PATTERN: Work pattern on body as follows (P the inc sts on sleeves): Work the first 6 sts inc in A.2, then P next 8-9-7-8-8 inc sts, work the next 6 inc sts in A.2, P the next 8-9-7-8-8 inc sts. NOTE: (Size M-L-XL-XXL): When A.3 has been worked 1 time vertically, continue with A.2 over cable and P (seen from RS) the remaining sts from A.3 until start of body. S/M: Then inc as before on sleeve and inc inside A.1/A.2 (i.e. between A.1 and A.2, towards marker for raglan) on front and back piece 1-4 more times. P the new sts. L/XL/XXL: Continue with A.2 over the next 6 inc sts, P the next 7-8-8 inc sts, then inc as before on sleeve and inc inside A.1/A.2 (i.e. between A.1 and A.2, towards marker for raglan) on front and back piece 1-4-5 more times. P the last 1-4-5 inc sts. Piece now measures 27-28-29-30-31 cm from shoulder. Now work as follows from WS: Work 55-60-67-73-76 sts (= right front piece), slip the next 80-90-102-114-116 sts on a stitch holder for sleeve, cast on 12 new sts under sleeve, insert a blue marker in the middle of these new sts (= side), work the next 94-104-118-130-136 m (= back piece), slip the next 80-90-102-114-116 sts on a stitch holder for sleeve, cast on 12 new sts under sleeve, insert a blue marker in the middle of these new sts (= side), work the remaining 55-60-67-73-76 sts (= left front piece). There are now 228-248-276-300-312 sts on needle. NOW MEASURE THE PIECE FROM HERE. BODY: There are now 106-116-130-142-148 sts for back piece and 61-66-73-79-82 sts for each front piece. Then continue pattern as follows from RS: S/M: 5 sts in garter st, P 1, K 2 (= band), P 12-12, A.2, insert a marker, P 8-9, A.2, insert a marker, P 8-9, A.1, P 7-7, A.2 0-1 time in width, P 7-7, A.2, P 8-9, insert a marker, A.2, P 8-9, insert a marker, A.2, P 9-9, A.2, P 9-9, A.2, insert a marker, P 8-9, A.2, insert a marker, P 8-9, A.1, P 7-7, A.2 0-1 time in width, P 7-7, A.2, P 8-9, insert a marker, A.2, P 8-9, insert a marker, A.2, P 12-12, K 2, P 1, 5 sts in garter st. L/XL/XXL: 5 sts in garter st, P 1, K 2 (= band), P 13-14-15, A.2, insert a marker, P 7-8-8, A.2, insert a marker, P 7-8-8, A.2, insert a marker, P 7-8-8, A.1, P 4-6-5, A.2 1-1-2 times in width, P 4-6-5, A.2, P 7-8-8, insert a marker, A.2, P 7-8-8, insert a marker, A.2, P 7-8-8, insert a marker, A.2, P 10-11-12, A.2, P 10-11-12, A.2, insert a marker, P 7-8-8, A.2, insert a marker, P 7-8-8, A.2, insert a marker, P 7-8-8, A.1, P 4-6-5, A.2 1-1-2 times in width, P 4-6-5, A.2, P 7-8-8, insert a marker, A.2, P 7-8-8, insert a marker, A.2, P 7-8-8, insert a marker, A.2, P 13-14-15, K 2, P 1, 5 sts in garter st. READ THE NEXT 2 SECTIONS BEFORE CONTINUING! Now dec and inc at the same time as follows: DECREASE: Dec differently as follows: Dec 1 st by P 2 tog towards the bands mid front, repeat dec every 1½-1½-1½-2-2 cm 5-5-4-4-5 more times. AT THE SAME TIME dec 1 st on each side of the middle cable on back piece. Repeat dec every 2-2-1½-1½-1½ cm 3-3-4-4-6 more times. AT THE SAME TIME dec 1 st towards cable in every P section with marker in (= 8-8-12-12-12 markers). Repeat dec every 3-2½-5-4-4 cm 2-3-1-2-2 more times. INCREASE (towards the sides): When piece measures 3 cm, inc along the cable towards the sleeve (i.e. cable from raglan) in P section towards the sides – READ INCREASE TIP! Inc 4 sts on row. Repeat inc every 1½-1½-2½-1½-1 cm 3-4-2-4-10 more times. When all dec and inc are done, 200-216-244-264-294 sts remain. When piece measures 11-12-12-13-14 cm, work pattern as follows: 5 sts in garter st, P 1, K 2 (= band), P 2-2-4-4-5, A.5, A.4, A.5, A.4 0-0-1-1-1 time, P 7-8-6-11-15, A.2 0-1-1-1-2 times in width, P 7-8-6-11-15, A.4 0-0-1-1-1 time in width, * A.5, A.4 *, repeat from *-* 2-2-3-3-3 more times in width, A.5 1-1-0-0-0 times in width, P 7-8-6-11-15, A.2 0-1-1-1-2 times in width, P 7-8-6-11-15, A.4 0-0-1-1-1 time in width, A.5, A.4, A.5, P 2-2-4-4-5, K 2, P 1, 5 sts in garter st (= band). NOTE: Adjust the first cable in A.4 and A.5 to get a nice transition between diagrams. Continue with pattern and inc according to diagram. When A.4 and A.5 have been worked vertically and piece measures approx. 33-34-34-35-35 cm, there are 316-332-376-396-426 sts on needle. Insert a marker here. NOW MEASURE THE PIECE FROM HERE. Now work rib inside 8 band sts in each side of piece as follows: S/M: * Work K over K and P over P until 7-11 sts remain before the blue marker in the side, P 2, K 2, P 3-4 *, repeat from *-* 1 more time and continue with K over K and P over P until band sts. L/XL/XXL: * Work K over K and P over P until 8-14-21 sts remain before the blue marker in the side, K 2-2-2, P 3-4-3, K 0-2-2, P 0-3-3, K 0-0-2, P 0-0-3 *, repeat from *-* 1 more time and continue with K over K and P over P until band sts. When rib has been worked for 2 cm from marker, inc by making 1 YO before first P st in every P section. READ INCREASE TIP! When rib has been worked for 5-5-6-6-6 cm, cast off with K over K and P over P. SLEEVES: Slip the 80-90-102-114-116 sts from stitch holder back on circular needle. Work 1 row over all sts and cast on 12 new sts at the end of row = 92-102-114-126-128 sts. Insert a marker in the middle of the new sts (i.e. 6 sts on each side of marker). NOW MEASURE THE PIECE FROM HERE. Then work sleeve in the round on circular needle/double pointed needles. Continue the middle cable on sleeve as before but work P over cables in raglan. On 2nd round beg dec on each side of marker - READ DECREASE TIP. Repeat dec every other round 6 more times = 78-88-100-112-114 sts. Then dec 1 st on each side of marker every 2-1½-1-1-1 cm 13-17-22-27-27 times = 52-54-56-58-60 sts. AT THE SAME TIME when piece measures 15 cm, work A.5 over cable in the middle of sleeve - adjust the first cable in A.5 to get a nice transition between diagrams. NOTE: Do not inc in A.5 on sleeve, i.e. do not work YOs in diagram. When A.5 is finished and sleeve measures 37 cm, work rib as follows from marker at beg of round: P 0-0-1-2-3, K 1-2-2-2-2, P 3, K 2. P 3, K 2, P 2, continue rib as on last row in A.5 (= 26 sts), P 2, K 2, P 3, K 2, P 3, K 1-2-2-2-2, P 0-0-1-2-3. Continue like this for 3 cm, cast off with K over K and P over P. ASSEMBLY: Sew the holes under the sleeves. Sew the buttons on to left band. |
||||||||||||||||||||||||||||
Diagram explanations |
||||||||||||||||||||||||||||
|
||||||||||||||||||||||||||||
 |
||||||||||||||||||||||||||||
 |
||||||||||||||||||||||||||||
 |
||||||||||||||||||||||||||||
Have you finished this pattern?Tag your pictures with #dropspattern #alanacardigan or submit them to the #dropsfan gallery. Do you need help with this pattern?You'll find 26 tutorial videos, a Comments/Questions area and more by visiting the pattern on garnstudio.com. © 1982-2025 DROPS Design A/S. We reserve all rights. This document, including all its sub-sections, has copyrights. Read more about what you can do with our patterns at the bottom of each pattern on our site. |
||||||||||||||||||||||||||||


With over 40 years in knitting and crochet design, DROPS Design offers one of the most extensive collections of free patterns on the internet - translated to 17 languages. As of today we count 320 catalogues and 12091 patterns translated into English (UK/cm). 12091
We work hard to bring you the best knitting and crochet have to offer, inspiration and advice as well as great quality yarns at incredible prices! Would you like to use our patterns for other than personal use? You can read what you are allowed to do in the Copyright text at the bottom of all our patterns. Happy crafting!
Post a comment to pattern DROPS 156-4
We would love to hear what you have to say about this pattern!
If you want to leave a question, please make sure you select the correct category in the form below, to speed up the answering process. Required fields are marked *.