
Popular categories
Looking for a yarn?


Comments / Questions (170)
![]() Wendy wrote:
Wendy wrote:
I have made far more complex items before, but this needs tenacity to finish it. My tension is accurate throughout but the sizing similar to Jeanette’s; too large armholes and too wide at waist and hip. I advise going a size smaller and not giving up when you have to repeatedly unpick sections that are so very badly explained.
15.03.2026 - 00:33
![]() Iwona wrote:
Iwona wrote:
Dzień dobry. Kiedy pojawia się "drugi i trzeci warkoczyk" na przodach i tyle sweterka ? W którym momencie oczka dodane zaczynamy przerabiać jako schemat A2 ? Gdzie są te momenty opisane we wzorze? Próbuje robić rozmiar "M" Z góry dziękuję za pomoc Iwona W
17.02.2026 - 18:57DROPS Design answered:
Witaj Iwono, zobacz część ŚCIEG FANTAZYJNY: przerabiać motywy na przodach i tyle następująco (przerabiać na lewo dodawane oczka na rękawach): przerobić 6 pierwszych dodanych o. wg schematu A.2, dalej przerobić na lewo 9 nast. dodanych oczek, przerobić 6 nast. dodanych oczek wg schematu A.2, przerobić na lewo 9 dodanych oczek. Pozdrawiamy!
25.02.2026 - 08:27
![]() Wendy wrote:
Wendy wrote:
Raglan increases. I see that you said to this question (2016) 'contact your drops store. They do not know! You cannot YO each side of a marker. It is not clear where you increase for raglan as 'Inc on each side of raglan sts (A.1/A.2, marker, A.2/A.1) by making 1 YO = 8 inc on row.' that sequence is not in the pattern. I have knitted numerous all over cabled jumpers and never had a problem following the patterns before. I gave up on this once and would like to knit it
23.01.2026 - 01:54DROPS Design answered:
Hi Wendy, You increase on each side of A.1/A.2 + marker + A.2/A.1. So increase before working the first A.1/A.2 and after the second A.1/A.2 (with the marker between the 2 patterns). Regards, Drops Team.
23.01.2026 - 07:31
![]() Marie wrote:
Marie wrote:
Bonsoir, Encore une question : que veut dire tricoter A2 en largeur ? Quelle différence avec A2 ? Merci pour la rapidité de vos réponses. Ce modèle est très beau mais les explications vraiment confuses.
29.01.2025 - 19:01DROPS Design answered:
Bonjour Marie, tricoter 0 fois A.2 = on ne le tricote pas; tricoter 1 fois A.2 en largeur = on tricote les 6 mailles de A.2 une seule fois. Bon tricot!
30.01.2025 - 09:52
![]() Marie wrote:
Marie wrote:
Bonjour, Je suis arrivée à la fin des augmentations (404 mailles ) et en taille M, on me dit d’augmenter encore 4 fois mais je ne comprends pas de combien de mailles ni où les placer. Et surtout, pour le début du dos et du devant, le nombre de mailles ne correspond plus à ce qui est donné dans les explications. Merci de me donner des indications plus précises.
27.01.2025 - 12:10DROPS Design answered:
Bonjour Marie, lorsque vous avez vos 404 mailles, les augmentations sont terminées, les paragraphes suivants expliquent juste comment tricoter ces augmentations. Votre ouvrage doit mesurer environ 28 cm, vous tricotez le rang suivant comme indiqué pour diviser l'empiècement et ainsi tricoter le dos/les devants et les manches séparément. Bon tricot!
27.01.2025 - 17:34
![]() Therese Dahl Kristensen wrote:
Therese Dahl Kristensen wrote:
Det må presiseres innledningsvis hva som er raglanmasker. Det må rettes opp at A1 fortsetter nedover bolen når man strikker A5, og ikke A2. Det er rart hvis vridningene bytter retning, så A1 er riktig. Det må at at A4 fortsetter til A5 er ferdig. Det må stå at det ikke er vridninger under ermene, som på deres bilde.
15.01.2025 - 23:51
![]() Milena SARDELLA wrote:
Milena SARDELLA wrote:
Hi, these instructions are super complex and messy, is there anyway I can find someone who follows me step by step when making this cardigan? I would be willing to pay. English, French and Italian are ok for me.
04.01.2025 - 18:40DROPS Design answered:
Dear Milena, you can ask us any doubts that arise when working the pattern and we will explain it as best as possible. You can also join our DROPS Workshop group in Facebook here: https://www.facebook.com/groups/DROPSWorkshop/, where you can ask other knitters for tips or help. Happy knitting!
05.01.2025 - 17:10
![]() Therese Dahl Kristensen wrote:
Therese Dahl Kristensen wrote:
Hei. Spørsmål om raglan-økning. Det str øk på hver side av merket. Dette ender med at det blir et kast på hver side av merket, noe som fører til et stort hull. Skulle det vært fire masker ekstra i oppskriften, som er raglan-masker? Eller skal jeg lage last, føre merket over på høyre pinne, så strikke en maske etter merket før jeg øker?
02.01.2025 - 15:17DROPS Design answered:
Hei Therese, Kastene som er lagd hver gang du øker til raglan, er strikket vridd på neste pinnen, slik at det ikke blir hull. Godt nyttår!
03.01.2025 - 08:31
![]() Terese AM wrote:
Terese AM wrote:
Jag försöker förstå vad som menas i stycket ÖKNING (mot sidorna) där det står: ”Det ökas 4m på st” Vaddå st? Stickan? Stycket? Stolpen? För övrigt är det här utan tvekan det rörigaste och mest obegripliga mönster jag försökt följa - och jag har ändå stickat i snart 50 år!
27.10.2024 - 19:27DROPS Design answered:
Hej Terese. Det var fel i den svenska översättningen, det ska stå "varvet" istället för "st". Detta är nu rättat. Mvh DROPS Design
29.10.2024 - 08:27
![]() Erika Herren wrote:
Erika Herren wrote:
Ich habe bereits viele von ihren Designs nachgestrickt und alle sind super gelungen. Die Jacke 156-4 soll von oben nach unten gestrickt werden.Die Anleitung dazu ist mir jedoch viel zu kompliziert. Gibt es eine passende Anleitung welche man einfacher nachstricken kann.. Mit der jetzigen Anleitung schaffe ich es leider nicht. Für eine zeitnahe Rückmeldung bin ich Ihnen sehr dankbar
12.04.2024 - 01:48DROPS Design answered:
Liebe Frau Herren, hier finden Sie alle unsere Jacken, die von oben nach unten gestrickt sind; gerne können Sie auch diese Anleitungen filtern. Viel Spaß beim Stricken!
12.04.2024 - 08:31
|
||||||||||||||||||||||||||||
Alana Cardigan#alanacardigan |
||||||||||||||||||||||||||||
 |
 |
|||||||||||||||||||||||||||
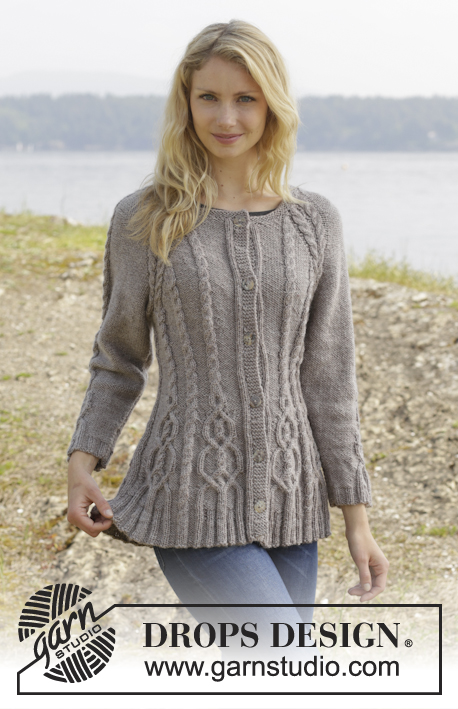
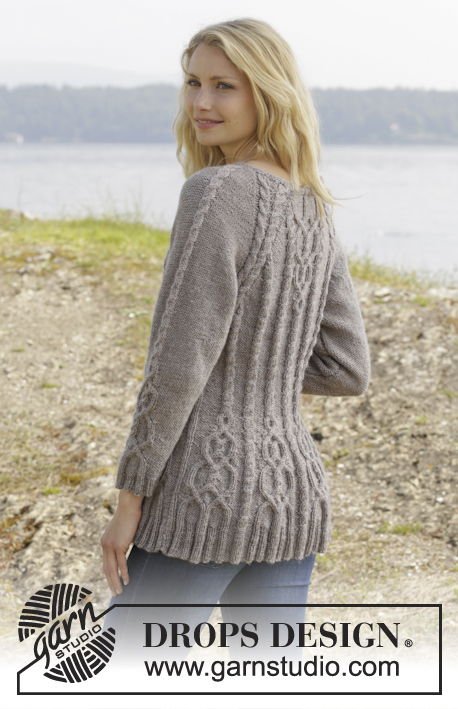
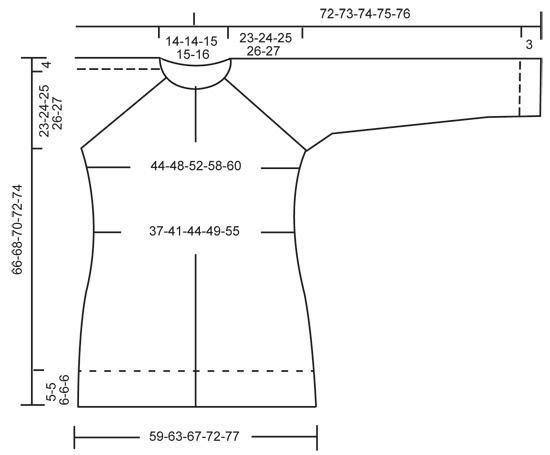
Knitted DROPS jacket with cables and raglan, worked top down in ”Karisma”. Size S-XXL
DROPS 156-4 |
||||||||||||||||||||||||||||
|
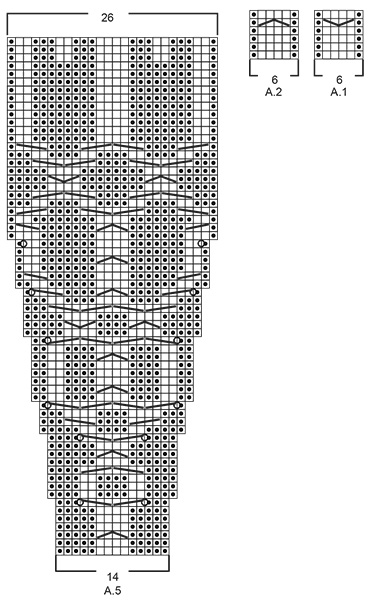
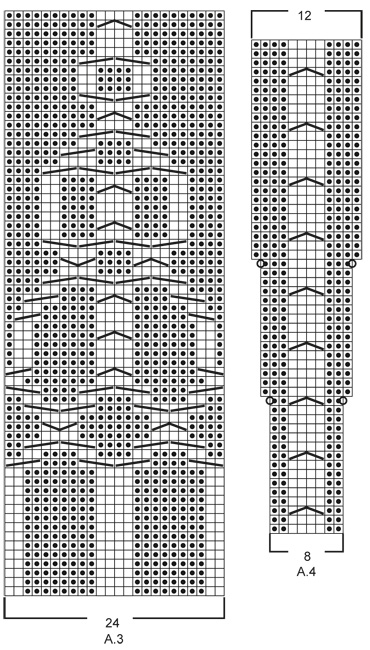
GARTER ST (back and forth on needle): K all rows. 1 ridge = 2 rows K. PATTERN: See diagrams A.1 - A.5. The diagrams show all rows in pattern seen from RS. RAGLAN: Inc on each side of raglan sts (A.1/A.2, marker, A.2/A.1) by making 1 YO = 8 inc on row. On next row work YOs twisted to avoid holes. Then work the new sts P on sleeves (seen from RS), and on front and back piece work the new sts in to pattern as explained below. DECREASE TIP (applies to sleeves): Dec on each side of marker as follows: Work until 3 sts remain before marker, P 2 tog, P 2, P 2 tog = 2 sts dec. INCREASE TIP: All inc are done from RS. Inc 1 st by making a YO. On next row K YOs twisted, i.e. work in the back loop of st instead of front to avoid holes. P the new sts (seen from RS). KNITTING TIP: For every 10th row work short rows over the 5 sts in garter st in bands as follows (beg from RS): K 5 band sts, turn piece, tighten yarn and K back, turn piece and work as before over all sts, turn piece, K 5 band sts in garter st, turn piece, tighten yarn and K back. That way the ridges in band will not contract as much. BUTTONHOLES: Dec for buttonholes on right band. 1 buttonhole = K tog third and fourth st from edge and make 1 YO. Dec for buttonholes when piece measures: SIZE S: 2, 12, 22, 32, 42 and 52 cm. SIZE M: 2, 12, 22, 32, 42 and 52 cm. SIZE L: 2, 11, 20, 29, 38, 47 and 56 cm SIZE XL: 2, 11, 20, 29, 38, 47 and 56 cm SIZE XXL: 2, 11, 20, 29, 38, 47, 56 and 65 cm ---------------------------------------------------------- JACKET: Worked back and forth, top down on circular needle to make room for all the sts. YOKE: Cast on 108-108-113-113-117 sts on circular needle size 4 mm with Karisma. Work 3 ridges in GARTER ST - see explanation above. K next row AT THE SAME TIME inc 24-24-23-23-27 sts evenly = 132-132-136-136-144 sts. Remember BUTTONHOLES - see explanation above. Now work as follows from RS: 5 sts in garter st, P 1, K 2 (= band), P 12-12-13-13-15, A.1, insert 1st marker, A.2, P 2, A.2, P 2, A.1, insert 2nd marker, A.2, P 0-0-1-1-3, A.3, P 0-0-1-1-3, A.1, insert 3rd marker, A.2, P 2, A.2, P 2, A.1, insert 4th marker, A.2, P 12-12-13-13-15, K 2, P 1, 5 sts in garter st (= band) – READ KNITTING TIP! READ ALL OF THE FOLLOWING SECTION BEFORE CONTINUING! REMEMBER THE KNITTING TENSION! On next row from RS beg inc for RAGLAN – see explanation above, AT THE SAME TIME work pattern as follows: RAGLAN: Repeat inc every row 0-2-10-20-20 times in total. Then inc on every other row (i.e. on every row from RS) 23-32-30-26-27 times and in every 3rd row 6-0-0-0-0 times= 364-404-456-504-520 sts. PATTERN: Work pattern on body as follows (P the inc sts on sleeves): Work the first 6 sts inc in A.2, then P next 8-9-7-8-8 inc sts, work the next 6 inc sts in A.2, P the next 8-9-7-8-8 inc sts. NOTE: (Size M-L-XL-XXL): When A.3 has been worked 1 time vertically, continue with A.2 over cable and P (seen from RS) the remaining sts from A.3 until start of body. S/M: Then inc as before on sleeve and inc inside A.1/A.2 (i.e. between A.1 and A.2, towards marker for raglan) on front and back piece 1-4 more times. P the new sts. L/XL/XXL: Continue with A.2 over the next 6 inc sts, P the next 7-8-8 inc sts, then inc as before on sleeve and inc inside A.1/A.2 (i.e. between A.1 and A.2, towards marker for raglan) on front and back piece 1-4-5 more times. P the last 1-4-5 inc sts. Piece now measures 27-28-29-30-31 cm from shoulder. Now work as follows from WS: Work 55-60-67-73-76 sts (= right front piece), slip the next 80-90-102-114-116 sts on a stitch holder for sleeve, cast on 12 new sts under sleeve, insert a blue marker in the middle of these new sts (= side), work the next 94-104-118-130-136 m (= back piece), slip the next 80-90-102-114-116 sts on a stitch holder for sleeve, cast on 12 new sts under sleeve, insert a blue marker in the middle of these new sts (= side), work the remaining 55-60-67-73-76 sts (= left front piece). There are now 228-248-276-300-312 sts on needle. NOW MEASURE THE PIECE FROM HERE. BODY: There are now 106-116-130-142-148 sts for back piece and 61-66-73-79-82 sts for each front piece. Then continue pattern as follows from RS: S/M: 5 sts in garter st, P 1, K 2 (= band), P 12-12, A.2, insert a marker, P 8-9, A.2, insert a marker, P 8-9, A.1, P 7-7, A.2 0-1 time in width, P 7-7, A.2, P 8-9, insert a marker, A.2, P 8-9, insert a marker, A.2, P 9-9, A.2, P 9-9, A.2, insert a marker, P 8-9, A.2, insert a marker, P 8-9, A.1, P 7-7, A.2 0-1 time in width, P 7-7, A.2, P 8-9, insert a marker, A.2, P 8-9, insert a marker, A.2, P 12-12, K 2, P 1, 5 sts in garter st. L/XL/XXL: 5 sts in garter st, P 1, K 2 (= band), P 13-14-15, A.2, insert a marker, P 7-8-8, A.2, insert a marker, P 7-8-8, A.2, insert a marker, P 7-8-8, A.1, P 4-6-5, A.2 1-1-2 times in width, P 4-6-5, A.2, P 7-8-8, insert a marker, A.2, P 7-8-8, insert a marker, A.2, P 7-8-8, insert a marker, A.2, P 10-11-12, A.2, P 10-11-12, A.2, insert a marker, P 7-8-8, A.2, insert a marker, P 7-8-8, A.2, insert a marker, P 7-8-8, A.1, P 4-6-5, A.2 1-1-2 times in width, P 4-6-5, A.2, P 7-8-8, insert a marker, A.2, P 7-8-8, insert a marker, A.2, P 7-8-8, insert a marker, A.2, P 13-14-15, K 2, P 1, 5 sts in garter st. READ THE NEXT 2 SECTIONS BEFORE CONTINUING! Now dec and inc at the same time as follows: DECREASE: Dec differently as follows: Dec 1 st by P 2 tog towards the bands mid front, repeat dec every 1½-1½-1½-2-2 cm 5-5-4-4-5 more times. AT THE SAME TIME dec 1 st on each side of the middle cable on back piece. Repeat dec every 2-2-1½-1½-1½ cm 3-3-4-4-6 more times. AT THE SAME TIME dec 1 st towards cable in every P section with marker in (= 8-8-12-12-12 markers). Repeat dec every 3-2½-5-4-4 cm 2-3-1-2-2 more times. INCREASE (towards the sides): When piece measures 3 cm, inc along the cable towards the sleeve (i.e. cable from raglan) in P section towards the sides – READ INCREASE TIP! Inc 4 sts on row. Repeat inc every 1½-1½-2½-1½-1 cm 3-4-2-4-10 more times. When all dec and inc are done, 200-216-244-264-294 sts remain. When piece measures 11-12-12-13-14 cm, work pattern as follows: 5 sts in garter st, P 1, K 2 (= band), P 2-2-4-4-5, A.5, A.4, A.5, A.4 0-0-1-1-1 time, P 7-8-6-11-15, A.2 0-1-1-1-2 times in width, P 7-8-6-11-15, A.4 0-0-1-1-1 time in width, * A.5, A.4 *, repeat from *-* 2-2-3-3-3 more times in width, A.5 1-1-0-0-0 times in width, P 7-8-6-11-15, A.2 0-1-1-1-2 times in width, P 7-8-6-11-15, A.4 0-0-1-1-1 time in width, A.5, A.4, A.5, P 2-2-4-4-5, K 2, P 1, 5 sts in garter st (= band). NOTE: Adjust the first cable in A.4 and A.5 to get a nice transition between diagrams. Continue with pattern and inc according to diagram. When A.4 and A.5 have been worked vertically and piece measures approx. 33-34-34-35-35 cm, there are 316-332-376-396-426 sts on needle. Insert a marker here. NOW MEASURE THE PIECE FROM HERE. Now work rib inside 8 band sts in each side of piece as follows: S/M: * Work K over K and P over P until 7-11 sts remain before the blue marker in the side, P 2, K 2, P 3-4 *, repeat from *-* 1 more time and continue with K over K and P over P until band sts. L/XL/XXL: * Work K over K and P over P until 8-14-21 sts remain before the blue marker in the side, K 2-2-2, P 3-4-3, K 0-2-2, P 0-3-3, K 0-0-2, P 0-0-3 *, repeat from *-* 1 more time and continue with K over K and P over P until band sts. When rib has been worked for 2 cm from marker, inc by making 1 YO before first P st in every P section. READ INCREASE TIP! When rib has been worked for 5-5-6-6-6 cm, cast off with K over K and P over P. SLEEVES: Slip the 80-90-102-114-116 sts from stitch holder back on circular needle. Work 1 row over all sts and cast on 12 new sts at the end of row = 92-102-114-126-128 sts. Insert a marker in the middle of the new sts (i.e. 6 sts on each side of marker). NOW MEASURE THE PIECE FROM HERE. Then work sleeve in the round on circular needle/double pointed needles. Continue the middle cable on sleeve as before but work P over cables in raglan. On 2nd round beg dec on each side of marker - READ DECREASE TIP. Repeat dec every other round 6 more times = 78-88-100-112-114 sts. Then dec 1 st on each side of marker every 2-1½-1-1-1 cm 13-17-22-27-27 times = 52-54-56-58-60 sts. AT THE SAME TIME when piece measures 15 cm, work A.5 over cable in the middle of sleeve - adjust the first cable in A.5 to get a nice transition between diagrams. NOTE: Do not inc in A.5 on sleeve, i.e. do not work YOs in diagram. When A.5 is finished and sleeve measures 37 cm, work rib as follows from marker at beg of round: P 0-0-1-2-3, K 1-2-2-2-2, P 3, K 2. P 3, K 2, P 2, continue rib as on last row in A.5 (= 26 sts), P 2, K 2, P 3, K 2, P 3, K 1-2-2-2-2, P 0-0-1-2-3. Continue like this for 3 cm, cast off with K over K and P over P. ASSEMBLY: Sew the holes under the sleeves. Sew the buttons on to left band. |
||||||||||||||||||||||||||||
Diagram explanations |
||||||||||||||||||||||||||||
|
||||||||||||||||||||||||||||
 |
||||||||||||||||||||||||||||
 |
||||||||||||||||||||||||||||
 |
||||||||||||||||||||||||||||
Have you finished this pattern?Tag your pictures with #dropspattern #alanacardigan or submit them to the #dropsfan gallery. Do you need help with this pattern?You'll find 27 tutorial videos, a Comments/Questions area and more by visiting the pattern on garnstudio.com. © 1982-2026 DROPS Design A/S. We reserve all rights. This document, including all its sub-sections, has copyrights. Read more about what you can do with our patterns at the bottom of each pattern on our site. |
||||||||||||||||||||||||||||


With over 40 years in knitting and crochet design, DROPS Design offers one of the most extensive collections of free patterns on the internet - translated to 17 languages. As of today we count 325 catalogues and 12298 patterns translated into English (UK/cm). 12298
We work hard to bring you the best knitting and crochet have to offer, inspiration and advice as well as great quality yarns at incredible prices! Would you like to use our patterns for other than personal use? You can read what you are allowed to do in the Copyright text at the bottom of all our patterns. Happy crafting!
Post a comment to pattern DROPS 156-4
We would love to hear what you have to say about this pattern!
If you want to leave a question, please make sure you select the correct category in the form below, to speed up the answering process. Required fields are marked *.