
Popular categories
Looking for a yarn?


Comments / Questions (27)
![]() Geertje Van De Kleut wrote:
Geertje Van De Kleut wrote:
Ik ben dit vestje aan het haken maar boven in loop het patroon niet door! Bij 7.8 jarig de derde rij van boven staat beginnen met een stokje en dan een hokje maar moet zijn met zeven stokjes
15.04.2014 - 10:20DROPS Design answered:
Hoi Geertje. Ben je begonnen bij het pijltje voor 7/8 jaar onderaan? Je hebt eerst 70 st, dus dan zou het patroon gelijk zijn aan beide kanten.
15.04.2014 - 11:34
![]() DROPS Design NL wrote:
DROPS Design NL wrote:
Dat klopt inderdaad. Het helpt mij altijd als ik het zie als een patroon op stof die steeds herhaald wordt. Als je een patroon uitknipt, leg je het zo neer dat een heel patroontje mooi in het midden komt. Dat het aan de zijkanten doorgeknipt wordt, is dan niet zo erg.
29.07.2013 - 07:44
![]() Alike wrote:
Alike wrote:
Bedankt voor jullie hulp. Het lukt me nu. Ik zat heel erg vast aan het feit dat ik het schema helemaal moet herhalen. Maar je haakt dus tot je steken op zijn en dat betkend dus dat ik halverwege mijn schema moet stoppen.. Heel erg bedankt ik kan nu lekker verder.
28.07.2013 - 12:52
![]() Alike wrote:
Alike wrote:
Ik heb inmiddels de strook extra uitgeprint en er voor geplakt. Dit leek de oplossing maar ik kom er nu absoluutniet uit met het aantal steken. Volgens mij miet het een herhaling zijn van 18 steken + 6. Ik heb er 69. Waarschijnlijk doe ik er het niet goed maar snap er helemaal niets meer van. Terwijl ik toch wel aardig wat haak ervaring heb. Ps bedankt voor de snelle reatie
25.07.2013 - 22:09DROPS Design answered:
U hebt 70 steken. Dan begint u bij de pijl en haakt u tot het einde (6 st), vervolgens herhaalt u nog 3 keer het hele patroon (3 x 18 = 54 st) en over de overgebleven 10 st haakt u de eerste 10 st van het patroon. Ik raad u van harte aan markeerders te plaatsen elke keer als u aan een nieuwe herhaling van het patroon begint, dat werkt overzichtelijk, dus na 6 st en dan na elke 18 st. Ook teruggaand weet u dan waar u bent op het telpatroon.
26.07.2013 - 10:04
![]() Alike wrote:
Alike wrote:
Sorry ik had en vraag maar als opmeking geplaatst
25.07.2013 - 21:04DROPS Design answered:
U haakt de teruggaande toer zo dat de steken in het telpatroon boven elkaar komen. Als u dat lastig vindt om te onthouden of te zien waar u bent, kunt u na elke patroonherhaling een markeerder of draadje plaatsen de eerste toeren tot u aan het patroon gewend bent.
25.07.2013 - 21:27
![]() Alike wrote:
Alike wrote:
Ik ben met dit patroon bezig in maat 7/8. Nu moet ik halverwege de toer beginnen maar dat betekent dus ook dat ik dat in de teruggaande toeren dus aan de andere kant 6 steken eerder (spiegelbeeld) moet beginnen. Of heb ik het mis. Dan is het patroon vrij ingewikkeld om te lezen. Pen is dan onmisbaar.
25.07.2013 - 20:52
![]() ALike wrote:
ALike wrote:
Dit vind ik ook zo'n schatje. En nu het katoen in de aanbieding is helemaal aantrekkelijk om te maken...
28.06.2013 - 13:22
|
|||||||||||||
Abby#abbybolero |
|||||||||||||
 |
 |
||||||||||||
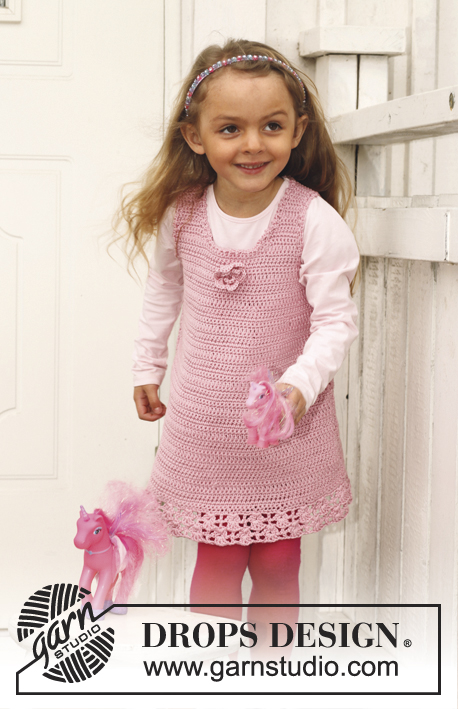
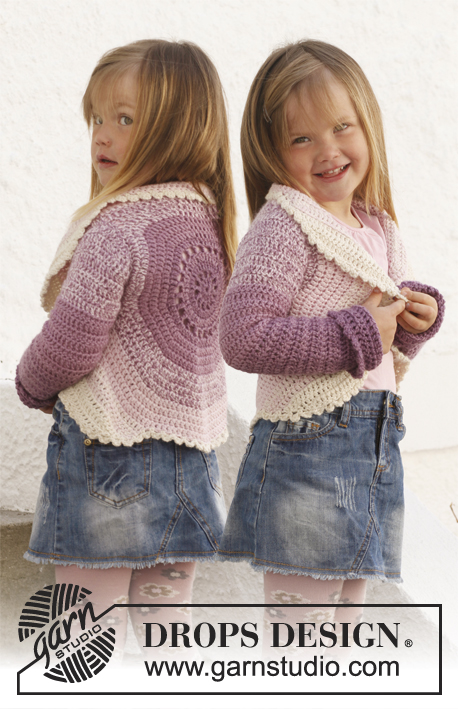
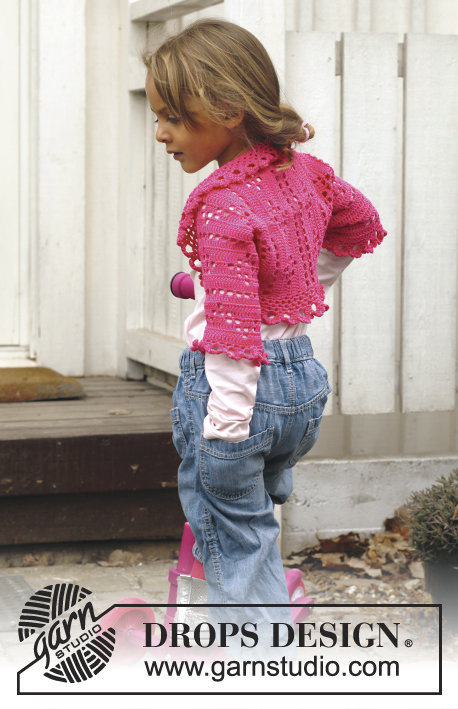
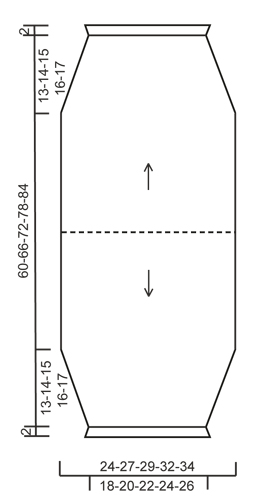
Crochet bolero with lace pattern in DROPS Safran. Size children 3 - 12 years.
DROPS Children 24-13 |
|||||||||||||
|
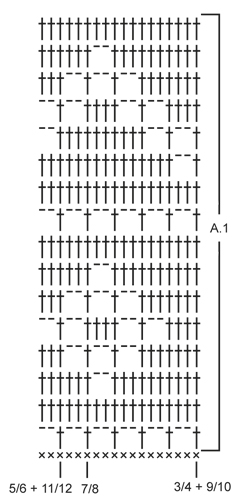
CROCHET INFO: Replace first tr on every row with 3 ch. PATTERN: See diagram A.1. NOTE: The first dc row in diagram is not a part of repetition and is not repeated when working. DECREASE TIP: Work 2 tr tog as follows: Work 1 tr in first st but wait with last pull through, work 1 tr in next st but on last pull through, pull thread through all 3 loops on hook. -------------------------------------------------------- BOLERO: Worked from mid back. Work first one side and down to beg of sleeve, then work the other side and down to beg of other sleeve. Then sew sleeve seams and work a flounce around the entire opening. FIRST SIDE: Work 69-77-84-91-98 ch with Safran on hook size 3 mm. Turn and work 1 dc in 2nd ch from hook, continue with 1 dc in each of the next 7-3-4-5-6 ch, * skip 1 ch, 1 dc in each of the next 5 ch *, repeat from *-* the entire row = 58-64-70-76-82 dc (first ch on row does NOT count as 1 dc). Continue with diagram A.1 - beg with 2nd row in diagram at the line for the size you are working so that the pattern is the same in both sides – READ CROCHET TIP! Repeat pattern until finished measurements. At the same time when piece measures 17-19-21-23-25 cm, insert 1 marker in the side (marks how far the sleeve seam is worked afterwards). On next row dec 1 tr in each side by working the second and third tr and the 2 next to last tr tog – SEE DECREASE TIP! Repeat dec every other row 6-7-8-8-9 more times = 44-48-52-58-62 sts remain - NOTE: When dec work only tr over the sts that do not fit the pattern. Work pattern until piece measures approx. 30-33-36-39-42 cm in total, finish after a row with only tr, fasten off. OTHER SIDE: Work 1 dc in each of the 58-64-70-76-82 dc worked on 1st row on first side (i.e. mid back). Then work pattern as on first side. Make sure to finish on same row in diagram at the bottom of sleeve in both sides. ASSEMBLY: Fold the bolero double alongside, and sew tog from bottom of each sleeve and up to where marker was is inserted in each side - sew edge to edge to avoid a chunky seam. FLOUNCE AROUND OPENING: Work around the entire opening as follows (start mid back): ROUND 1: 1 sl st in first st, * 3 ch, 1 dc in next tr *, repeat from *-* the entire round, finish with 3 ch and 1 sl st in first sl st at beg of round - NOTE: Adjust so that there are an even number of ch-spaces in total otherwise round 5 will not fit. ROUND 2: Work 1 sl st and 1 dc in first ch-space, * 3 ch, 1 dc in next ch-space *, repeat from *-* the entire round and finish with 1 sl st in first dc from beg of round. ROUND 3 and 4: Work as 2nd round. ROUND 5: Work 1 sl st and 1 dc in first ch-space, * 8 ch, 1 dc in next ch-space, 1 ch, 1 dc in next ch-space *, repeat from *-* the entire round and finish with 1 sl st in first dc from beg of round. ROUND 6: 1 ch, 1 dc in first large ch-space, [* 4 ch, 1 tr in first ch worked (= 1 picot), 1 dc in same ch-space *, repeat from *-* 2 more times (i.e. there are 3 picots in the large ch-space), 1 dc in the little ch-space (the one with only 1 ch which is between the large ch-spaces), 1 dc in next large ch-space], repeat from [-] the entire round, instead of last dc work 1 sl st in first dc on round. Fasten off. FLOUNCE AT THE BOTTOM OF SLEEVES: At the bottom around the sleeves work a somewhat shorter edge, here work only 1st, 5th, and 6th round of flounce worked around the opening - NOTE: On 1st round skip 1 tr between every ch-space. |
|||||||||||||
Diagram explanations |
|||||||||||||
|
|||||||||||||
 |
|||||||||||||
 |
|||||||||||||
Have you finished this pattern?Tag your pictures with #dropspattern #abbybolero or submit them to the #dropsfan gallery. Do you need help with this pattern?You'll find 7 tutorial videos, a Comments/Questions area and more by visiting the pattern on garnstudio.com. © 1982-2026 DROPS Design A/S. We reserve all rights. This document, including all its sub-sections, has copyrights. Read more about what you can do with our patterns at the bottom of each pattern on our site. |
|||||||||||||


With over 40 years in knitting and crochet design, DROPS Design offers one of the most extensive collections of free patterns on the internet - translated to 17 languages. As of today we count 325 catalogues and 12298 patterns translated into English (UK/cm). 12298
We work hard to bring you the best knitting and crochet have to offer, inspiration and advice as well as great quality yarns at incredible prices! Would you like to use our patterns for other than personal use? You can read what you are allowed to do in the Copyright text at the bottom of all our patterns. Happy crafting!
Post a comment to pattern DROPS Children 24-13
We would love to hear what you have to say about this pattern!
If you want to leave a question, please make sure you select the correct category in the form below, to speed up the answering process. Required fields are marked *.